Modern by the Yard #12
Find modern quilting inspiration in this new issue of Modern by the Yard!
Find modern quilting inspiration in this new issue of Modern by the Yard!

Create successful ePaper yourself
Turn your PDF publications into a flip-book with our unique Google optimized e-Paper software.
MODERN<br />
BY<br />
THE<br />
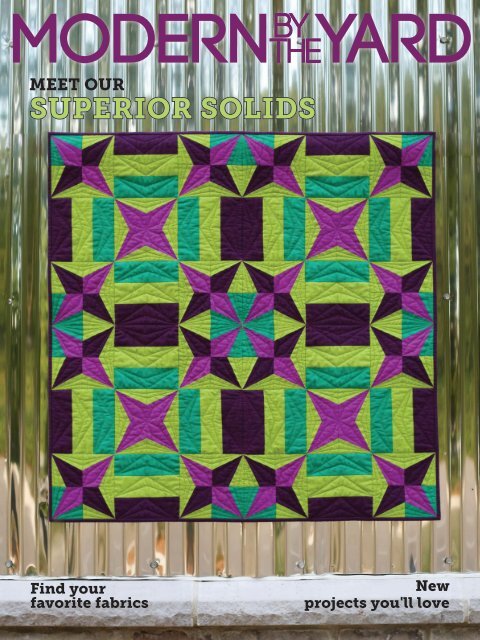
MEET OUR<br />
SUPERIOR SOLIDS<br />
YARD<br />
Find your<br />
favorite fabrics<br />
New<br />
projects you'll love
from <strong>the</strong><br />
editor<br />
Starburst<br />
close-up<br />
Solidly in Love<br />
132 West 36th Street<br />
4th Floor<br />
New York, NY 10018<br />
T: 212.840.3250<br />
F: 212.921.8204<br />
E: info@benartex.com<br />
I: www.benartex.com<br />
As you may have guessed from our cover quilt, we’re<br />
ecstatic about our new Superior Solids! We know modern quilters<br />
love to work with solid fabrics, and we can’t say enough about our<br />
50 new colors. This new line of high-quality solids have a soft hand<br />
and rich, saturated appearance. You’ll see <strong>the</strong> Superior Solids a few<br />
times in this issue—Tara Miller used <strong>the</strong>m in our cover quilt, Starburst<br />
(see p. 8), we officially introduce <strong>the</strong>m in a Fabric Spotlight on p. 4,<br />
and <strong>the</strong>y also play a central role in this issue’s <strong>Modern</strong> with a Twist<br />
feature (see p. 6). Ask for <strong>the</strong>m at your local quilt shop—we know<br />
you’ll fall in love too!<br />
Publisher: Benartex, LLC<br />
Editorial Director: Susan Neill<br />
Editor: Lisa Swenson Ruble<br />
Art Director: Julie Lambert<br />
Photographer: Paula Kennedy Photography<br />
& Erin Su<strong>the</strong>rland Photography<br />
Tech Editor: Lucy Fazely<br />
Volume 3, Issue 4<br />
Of course, our e-zine isn’t solely focused on solids. The<br />
bright and bold Color Pop quilt on p. 12 features Christa Watson’s<br />
Geo Pop collection and Sarah Lauzon explores a gradating design<br />
with Pearl Reflections prints in her Disappearing Plaid wall quilt on<br />
p. 16. Check out Lemon Linens on p. 20 for ideas to freshen up your<br />
kitchen with our modern Lemon Fresh fabrics.<br />
Beyond projects, you’ll also find free quilt patterns, our<br />
fabric gallery, and product and social media spotlights. We hope you<br />
enjoy this issue of <strong>Modern</strong> <strong>by</strong> <strong>the</strong> <strong>Yard</strong>!<br />
Happy Sewing!<br />
Susan<br />
Susan Neill<br />
www.benartex.com<br />
Have you checked out our website?<br />
You’ll find all our latest fabrics (as well<br />
as old favorites) organized <strong>by</strong> our three<br />
studios: Benartex, Kanvas and Contempo.<br />
We also have a wide variety of free quilt<br />
patterns to download featuring our fabrics.<br />
Follow us on social media:<br />
Have a question about a project in this<br />
issue? Interested in submitting a project<br />
or article idea for our next issue?<br />
Email modern<strong>by</strong><strong>the</strong>yard@gmail.com<br />
2
New<br />
projects you'll love<br />
contents<br />
MODERN BY THE YARD<br />
12.<br />
24.<br />
Fabric gallery<br />
NEW COLLECTIONS<br />
TO ASK FOR AT YOUR<br />
LOCAL QUILT SHOP<br />
Projects<br />
8. STARBURST<br />
Simple solids make this<br />
sleek design pop off <strong>the</strong> wall<br />
12. COLOR POP<br />
One block done two ways<br />
makes an ultra modern lap<br />
quilt<br />
4. FABRIC SPOTLIGHT<br />
Our new Superior Solids<br />
can’t wait for an invitation<br />
into your sewing room<br />
6. MODERN WITH A TWIST<br />
Bold solids at work in some<br />
classic favorite blocks<br />
16. DISAPPEARING PLAID<br />
Go from light to dark<br />
using a cool palette of<br />
pearlescent prints<br />
15. STOCK YOUR STUDIO<br />
New year, new supplies;<br />
check out <strong>the</strong>se<br />
must-haves!<br />
20. LEMON LINENS<br />
Add a little citrus flair to<br />
your kitchen decor<br />
Features<br />
2. EDITOR’S NOTE<br />
19. SEWCIAL MEDIA<br />
Add some sparkle to<br />
your feed with <strong>the</strong>se<br />
recommendations<br />
24. PROJECT GALLERY<br />
New free quilt patterns for<br />
your 2020 to-do list<br />
32. LOOKING FOR MORE?<br />
Keep in touch and<br />
don’t miss an issue of<br />
<strong>Modern</strong> <strong>by</strong> <strong>the</strong> <strong>Yard</strong><br />
MODERN<br />
BY<br />
THE<br />
MEET OUR<br />
SUPERIOR SOLIDS<br />
YARD<br />
Find your<br />
favorite fabrics<br />
On <strong>the</strong> cover STARBURST BY TARA MILLER<br />
FEATURING SUPERIOR SOLIDS<br />
3
fabric<br />
spotlight<br />
We’re excited to introduce you to our new Superior Solids<br />
collection! These high quality solids have a soft hand and cut and<br />
sew beautifully. You’ll love <strong>the</strong>m!<br />
Superior Solids are available in fifty<br />
luscious shades, from soft Bubble<br />
Gum Pink to cheery Sunshine Yellow<br />
and fresh Citron Green, and dreamy<br />
Caribbean Blue to rich Eggplant. The<br />
line even includes a wide range of<br />
grays—must-haves for most modern<br />
quilters! See all fifty colors on <strong>the</strong><br />
opposite page and click here for color<br />
names and skus.<br />
Try <strong>the</strong>m out today; ask for <strong>the</strong>m at<br />
your local quilt shop.<br />
4
OUR FABULOUS FIFTY<br />
These solids open <strong>the</strong> door wide to a whole new world of color. Fifty different hues<br />
(with more to come!) provide plenty of options for a solids-only quilt, or as coordinates<br />
to your favorite prints. You’ll love both <strong>the</strong> feel of <strong>the</strong>se fabrics and <strong>the</strong> pop of color <strong>the</strong>y<br />
bring to your next project.<br />
See a project made with Superior Solids on pg 8.<br />
5
MODERN<br />
with a twist<br />
Transforming traditional blocks<br />
We’re continuing our celebration of our new Superior Solids collection here and showing some of our most<br />
popular <strong>Modern</strong> with a Twist favorites reinvented in bold new palettes. Block design and fabric choices come<br />
toge<strong>the</strong>r to create surprising new patterns that we think you’ll love! We’ll be sharing directions for making<br />
<strong>the</strong>se blocks on social media—make sure you follow us to find <strong>the</strong>m!<br />
Big & Bold Monkey Wrench<br />
Big & Bold Monkey Wrench<br />
1<br />
Big & Bold Monkey Wrench<br />
Working exclusively in solids offers<br />
so many opportunities to play with<br />
color palettes: Subdued or bright,<br />
monochromatic or all <strong>the</strong> colors of<br />
<strong>the</strong> rainbow. One easy way to make<br />
a classic block modern is to choose<br />
a boldly bright unexpected color<br />
combination. The contrast <strong>the</strong>se colors<br />
create allow <strong>the</strong> crisp lines of <strong>the</strong> design<br />
to shine—minimalism at its best.<br />
Imagine this Monkey Wrench block<br />
enlarged so that just one block makes<br />
<strong>the</strong> entire quilt. Bold and beautiful!<br />
Solid Lineup:<br />
Tangerine (3000B-31)<br />
Ciron (3000B-48)<br />
Purple (3000B-68)<br />
Follow <strong>the</strong> Leader Flying<br />
Follow The Leader Flying<br />
Geese<br />
Follow <strong>the</strong> Leader Flying<br />
What can’t you do with Flying Geese? This<br />
is one of <strong>the</strong> most versatile patchwork units<br />
ever. Stack <strong>the</strong>m, combine <strong>the</strong>m, use <strong>the</strong>m<br />
for star points…<strong>the</strong>y’re simple to make and<br />
fun to design with. This block uses four<br />
stacked units that “follow” each o<strong>the</strong>r and a<br />
controlled color palette. Shades of gray are<br />
a popular modern background choice, and<br />
pairing those grays with a monochromatic<br />
palette of trendy teal creates a design with<br />
maximum graphic impact.<br />
Solid Lineup:<br />
Gray (3000B-08)<br />
Medium Gray (3000B-11)<br />
Turquoise (3000B-84)<br />
Teal (3000B-86)<br />
2<br />
6
Improv Log Cabin<br />
3Improv Log Cabin<br />
Use a neutral palette of varying shades from<br />
Improv Log Cabin<br />
white to black to create a dramatic Log Cabin<br />
design. Instead of choosing a more traditional<br />
lights versus darks layout, this block mixes up<br />
<strong>the</strong> values as logs are added for a boxy modern<br />
patchwork feel. Play around with narrow improv<br />
piecing insets on some of <strong>the</strong> logs to add<br />
splashes of bold color that pop off <strong>the</strong> neutral<br />
background.<br />
Rainbow Drunkard’s Path<br />
Solid Lineup:<br />
Dove (3000B-01)<br />
Gray (3000B-08)<br />
White (3000B-09)<br />
Medium Gray<br />
(3000B-11)<br />
Black (3000B-12)<br />
Charcoal (3000B-13)<br />
Squash (3000B-30)<br />
Sunshine (3000B-32)<br />
Lime (3000B-42)<br />
Purple (3000B-68)<br />
Turquoise (3000B-84)<br />
Rainbow Drunkard's Path<br />
Sometimes in quilting it’s all about size, and solids<br />
offer you huge flexibility—no need to worry about<br />
<strong>the</strong> scale of a print working in your design! This<br />
Drunkard’s Path uses sixteen small quarter-circle units<br />
and a full spectrum of colors in an inspired modern<br />
interpretation. A simple layout emphasizes <strong>the</strong> rainbow<br />
effect, and each color stands out from <strong>the</strong> neutral<br />
background. We chose Dove—a hue that makes you<br />
wonder…is it gray? is it taupe? Ei<strong>the</strong>r way, it works well<br />
with so many colors!<br />
4<br />
Rainbow Drunkard’s Path<br />
Solid Lineup:<br />
Dove (3000B-01)<br />
Light Yellow (3000B-03)<br />
Scarlet (3000B-20)<br />
Bubble Gum (3000B-25)<br />
Berry (3000B-28)<br />
Squash (3000B-30)<br />
Tangerine (3000B-31)<br />
Sunshine (3000B-32)<br />
Lime (3000B-42)<br />
Citron (3000B-48)<br />
Olive (3000B-49)<br />
Dark Blue (3000B-54)<br />
Grape (3000B-62)<br />
Purple (3000B-68)<br />
Lilac (3000B-60)<br />
Turquoise (3000B-84)<br />
Teal (3000B-86)<br />
7
8<br />
STARBURST
intermediate<br />
A bold palette and clean lines make this twoblock<br />
design shine!<br />
Designed <strong>by</strong>: Tara Miller; quilt district<br />
From <strong>the</strong> Citron:<br />
(16) 2-½” x 6-½” pieces<br />
(5) 3-⅝” x WOF strips; subcut into (64) each of<br />
Template B and Template Br<br />
From <strong>the</strong> Purple:<br />
(4) 3-⅝” x WOF strips; subcut into (48) of Template A<br />
Finished Size: 36” square<br />
Block Count & Size: (4) 18” square<br />
Fabric: Superior Solids collection<br />
Diagram 2<br />
Materials<br />
• 1/2 yard Superior Solids Green (#3000B-45)<br />
• 7/8 yard Superior Solids Citron (#3000B-48)<br />
• 5/8 yard Superior Solids Purple (#3000B-68)<br />
• 1-1/8 yards Superior Solids Eggplant, includes<br />
binding (#3000B-64)<br />
• 1-1/4 yards backing fabric<br />
• 44” square of batting<br />
Note: Keep <strong>the</strong> edges adjoining <strong>the</strong> 90-degree corner<br />
of <strong>the</strong> template along <strong>the</strong> straight of <strong>the</strong> grain as<br />
shown.<br />
From <strong>the</strong> Eggplant:<br />
(3) 3-⅝” x WOF strips; subcut into (32) of Template A<br />
(16) 2-½” x 6-½” pieces<br />
(4) 2-¼” x WOF strips for binding<br />
Download <strong>the</strong> templates here<br />
Cutting/Preparation<br />
From <strong>the</strong> Green:<br />
(16) 2-½” x 6-½” pieces<br />
(2) 3-⅝” x WOF strips; subcut into (16) each of<br />
Template B and Template Br<br />
Make <strong>the</strong> Blocks<br />
1. Sew a Citron B piece to a Purple A piece. Sew a<br />
Citron Br piece to <strong>the</strong> opposite side of <strong>the</strong> A piece.<br />
Trim to measure 3-½” square. Make 32 Citron/Purple<br />
units.<br />
Diagram 1<br />
Diagram 3<br />
Note: Keep <strong>the</strong> edges adjoining <strong>the</strong> 90-degree corner<br />
of <strong>the</strong> template along <strong>the</strong> straight of <strong>the</strong> grain as<br />
shown.<br />
9
2. In <strong>the</strong> same way, make 16 Green/Purple units and<br />
32 Citron/Eggplant units.<br />
Diagram 4<br />
5. Sew (1) each 2-½” x 6-½” Eggplant, Citron and<br />
Green pieces toge<strong>the</strong>r lengthwise to make a strip unit.<br />
Make a total of (16) strip units.<br />
Diagram 4<br />
3. Lay out (1) Citron/Purple, (1) Green/Purple, and (2)<br />
Citron/Eggplant units into (2) rows of (2) units each.<br />
Sew into rows and join <strong>the</strong> rows to make (1) star unit.<br />
Make a total of (16) Eggplant/Purple star units.<br />
Diagram 5<br />
Diagram 7<br />
6. Lay out (4) Eggplant/Purple star units, (1) Purple<br />
star unit, and (4) strip units into (3) rows of (3) units<br />
each. Sew <strong>the</strong> units into rows and join <strong>the</strong> rows to<br />
make an 18-½” square block. Make a total of (4)<br />
blocks.<br />
Diagram 5<br />
4. In <strong>the</strong> same way, join (4) Citron/Purple units to<br />
make a Purple Star unit. Make (4) Purple star units.<br />
Diagram 8<br />
Diagram 6<br />
10
Assemble <strong>the</strong> Quilt<br />
1. Lay out <strong>the</strong> (4) blocks into (2) rows of (2) block each. Sew <strong>the</strong> blocks into rows and join <strong>the</strong> rows to complete <strong>the</strong><br />
quilt top.<br />
2. Layer <strong>the</strong> backing right side down, batting and quilt top right side up. Baste to secure and quilt as desired. Trim<br />
backing and batting even with <strong>the</strong> quilt top.<br />
3. Use <strong>the</strong> (4) 2-¼” x WOF Eggplant binding strips to bind <strong>the</strong> quilt.<br />
Quilt Layout Diagram<br />
11
COLOR POP<br />
Graphic geometric prints stand out in<br />
this one-block fun modern quilt.
easy<br />
Designed <strong>by</strong>: Sherry Shish; powered <strong>by</strong> quilting<br />
Finished Size: 60" square<br />
Finished Block Count & Size:<br />
(16) 15" square<br />
Fabric: Geo Pop <strong>by</strong> Christa Watson for Contempo<br />
Studio and Superior Solids<br />
Materials<br />
Block A fabrics:<br />
• 3/8 yard each of:<br />
Op Squares Red (#3428-10)<br />
Op Squares Raspberry (#3428-22)<br />
Op Squares Yellow (#3428-33)<br />
Op Squares Orange (#3428-38)<br />
Op Squares Kelly (#3428-44)<br />
Op Squares Turquoise (#3428-84)<br />
Tiny Hex Sky Blue (#3429-05)<br />
Tiny Hex Magenta (#3429-63)<br />
From each Block B color:<br />
(28) 3” squares<br />
(4) 3” x 5-½” pieces<br />
From <strong>the</strong> Mosaic Dots Black/Grey:<br />
(7) 2-¼” x WOF strips for binding<br />
From <strong>the</strong> White Solid:<br />
(40) 5-1/2” squares<br />
(64) 3” x 5-1/2” pieces<br />
(288) 3” squares<br />
Make <strong>the</strong> Blocks<br />
A Block<br />
1. Draw a diagonal line on <strong>the</strong> wrong side of (4) 3”<br />
White squares. Position a marked square right<br />
sides toge<strong>the</strong>r on opposite corners of (1) 5-½” Op<br />
Squares Yellow square. Sew on <strong>the</strong> drawn line, trim<br />
seam allowance to ¼”, and press open. Repeat on<br />
<strong>the</strong> remaining (2) corners<br />
Figure<br />
to make<br />
1<br />
(1) square-in-asquare<br />
unit. Make a total of (5) units.<br />
Block B fabrics:<br />
• 3/8 yard each of:<br />
Diamond Pop Red (#3425-19)<br />
Diamond Pop Grey/Yellow (#3425-33)<br />
Diamond Pop Green/blue (#3425-54)<br />
Diamond Pop Magenta (#3425-63)<br />
Mosaic Dots Fuchsia (#3426-26)<br />
Mosaic Dots Grey/Yellow (#3426-33)<br />
Mosaic Dots Blue/Green (#3426-55)<br />
Tiny Hex Red/Orange (#3429-19)<br />
• 5/8 yard Mosaic Dots Black/Grey for binding<br />
(#3426-12)<br />
• 3-3/4 yards Superior Solids White (#3000B-09)<br />
• 4 yards backing fabric<br />
• 68” square of batting<br />
Cutting/Preparation<br />
NOTE: Divide <strong>the</strong> 16 colors into blocks A and B.<br />
From each Block A color:<br />
(5) 5-1/2” squares<br />
(4) 3” x 5-1/2” pieces<br />
(8) 3” squares<br />
Diagram 1<br />
2. Draw a diagonal line on <strong>the</strong> wrong side of (2)<br />
3” White squares and (2) 3” Op Squares Yellow<br />
squares. Position a marked white square right sides<br />
toge<strong>the</strong>r on (1) end of (1) 3” x 5-½” Op Squares<br />
Yellow piece. Sew on <strong>the</strong> drawn line, trim seam<br />
allowance to ¼” and press open. Repeat on <strong>the</strong><br />
opposite side to<br />
Figure<br />
make a White/Yellow<br />
2<br />
flying geese<br />
unit. Make (4).<br />
Diagram 2<br />
Figure 3<br />
3. In <strong>the</strong> same way, use (1) 3” x 5-½” White piece and<br />
(2) 3” marked Op Squares Yellow squares to make a<br />
Yellow/White flying geese unit. Make (4).<br />
Diagram 3<br />
13
4. Sew (1) flying geese unit each from Steps 2 and 3<br />
to make a double flying geese unit. Make (4).<br />
4. Sew (1) flying geese unit each from Steps 2 and 3<br />
to make a double flying geese unit. Make (4).<br />
Diagram 4<br />
5. Lay out (5) square-in-a-square units and (4) double<br />
flying geese units into (3) rows of (3) units each,<br />
noting orientation of <strong>the</strong> units. Sew <strong>the</strong> units into<br />
rows and join <strong>the</strong> rows to make <strong>the</strong> 15-½” square<br />
block. Make a total of (8) different A blocks.<br />
Diagram 9<br />
5. Sew toge<strong>the</strong>r units from steps 1 and 4 to make<br />
<strong>the</strong> 15-1/2” square B block. Make a total of (8)<br />
different B blocks.<br />
Diagram 5<br />
B Block<br />
1. Using 3” Mosaic Dots Grey/Yellow Squares and<br />
5-1/2” White squares, follow <strong>the</strong> instructions in step<br />
1 of <strong>the</strong> A block to make (5) square-in-a square<br />
units.<br />
Diagram 6<br />
Diagram 10<br />
Assemble <strong>the</strong> Quilt<br />
1. Lay out <strong>the</strong> A blocks alternating with <strong>the</strong> B blocks<br />
into (4) rows of (4) blocks each. Sew <strong>the</strong> blocks into<br />
rows and join <strong>the</strong> rows to make <strong>the</strong> quilt top.<br />
2. Layer <strong>the</strong> backing right side down, batting and<br />
quilt top right side up. Baste to secure and quilt<br />
as desired. Trim backing and batting even with <strong>the</strong><br />
quilt top.<br />
3. Use <strong>the</strong> (7) 2-¼” x WOF Mosaic Dots Black/Grey<br />
binding strips to bind <strong>the</strong> quilt.<br />
2. Using 3” Mosaic Dots Grey/Yellow squares and 3”<br />
White squares, follow <strong>the</strong> instructions in step 2 of<br />
<strong>the</strong> A block to make (4) White/Mosaic Dots flying<br />
geese units.<br />
Diagram 7<br />
3. In <strong>the</strong> same way, use (1) 3” x 5-½” White piece and<br />
(2) 3” Mosaic Dots Grey/Yellow squares to make a<br />
Mosaic Dots/White flying geese unit. Make (4).<br />
Diagram 8<br />
14<br />
Quilt Layout Diagram
stock YOUR studio<br />
1<br />
MUST-HAVE PRODUCTS, BOOKS AND MORE<br />
FOR THE MODERN QUILTER<br />
4<br />
2<br />
3<br />
1.Hello, Laser!<br />
Say good<strong>by</strong>e to your fabric marking<br />
pen, and hello to <strong>the</strong> ViviLux Laser.<br />
Adding this cool tool to your sewing<br />
machine helps sew straight lines when<br />
making half-square triangles (HSTs)<br />
or stitch and flip corners. How does<br />
it save time? You won’t have to draw<br />
lines from corner to corner before<br />
stitching; instead, simply follow <strong>the</strong><br />
laser line as you stitch. Think how fast<br />
you’ll be able to create HSTs! The<br />
laser is made especially for quilters<br />
and attaches to your sewing machine<br />
<strong>by</strong> Velcro or magnet. Red and green<br />
lasers available. O<strong>the</strong>r features: it has<br />
an adjustable “neck,” features three<br />
different tips to change laser shape,<br />
and is rechargeable.<br />
Harbor-sales.com<br />
2. A Cut Above<br />
It’s 11 pm, you’ve just started cutting<br />
fabric for a new quilting project, and<br />
you realize that your rotary cutter blade<br />
is dull. A quick check in your drawer—<br />
nope, no new blades—so frustrating!<br />
Minimize that problem with Olfa’s<br />
Endurance Rotary Blade. This blade,<br />
made from high quality tungsten tool<br />
steel, retains its edge for two times<br />
longer than <strong>the</strong> standard blade. This<br />
means fewer blade changes, fewer<br />
blade purchases, and more hours of<br />
frustration-free cutting.<br />
Olfa.com<br />
5<br />
3. Up to Date<br />
2020 may have started, but <strong>the</strong>re’s<br />
still time to enjoy a beautiful quilting<br />
calendar! Keep track of quilt classes,<br />
guild meetings, and daily events<br />
with <strong>the</strong> Art of <strong>the</strong> Quilt 2020 Wall<br />
Calendar from <strong>Modern</strong> Quilt Studio.<br />
This large format calendar features<br />
gorgeous photos of favorite quilts<br />
made <strong>by</strong> Weeks Ringle and Bill Kerr<br />
that can add color to your wall all year<br />
long. Each calendar grid includes room<br />
for noting appointments, birthdays<br />
and more. Even better, a back pocket<br />
includes <strong>the</strong> patterns for <strong>the</strong> featured<br />
quilts so you can make <strong>the</strong>m yourself.<br />
Willowcreekpress.com<br />
4. Design Goes <strong>Modern</strong><br />
Co-authors Hea<strong>the</strong>r Black and Daisy<br />
Aschehoug have released <strong>the</strong>ir book<br />
Quilt <strong>Modern</strong> Curves & Bold Stripes<br />
and it’s packed with inspiration for<br />
making complex-looking quilts! Inside<br />
you’ll find fifteen designs created<br />
with strong lines, quilted curves, and<br />
movement for graphic impact. Quilt<br />
patterns include both block based<br />
designs and improvisational piecing,<br />
and options for making your own strip<br />
sets or strategically using striped prints.<br />
With a heavy focus on circles, you’ll<br />
also find tips to help you master curved<br />
piecing techniques.<br />
Ctpub.com<br />
5. Inspired Sketching<br />
<strong>by</strong> Sue Spargo<br />
Do you sketch out future designs or<br />
quilting ideas? Surround yourself with<br />
textile beauty that will inspire you to<br />
write, sketch, and draw whenever <strong>the</strong><br />
mood hits. Sue Spargo’s Creative<br />
Sketchbook and Journal is packed<br />
with more than 150 close-up photos<br />
of her work, sprinkled amongst lined,<br />
graphed and blank pages ready for<br />
your doodles, thoughts, and more. The<br />
journal is compact: 5-1/4” x 8-3/8”, so<br />
it’s perfect to pop in your purse or tote<br />
for when inspiration strikes while you’re<br />
on <strong>the</strong> go. This is a wonderful gift to<br />
give, so buy two – one for yourself, and<br />
one for a friend.<br />
Shopmartingale.com<br />
15
easy<br />
Disappearing<br />
plaid<br />
This wall hanging depends on value<br />
changes to create a gradating<br />
design framed in white.<br />
Designed <strong>by</strong>:<br />
Sarah J. Lauzon; @cera.bee<br />
Finished Size: 40-1/2" x 45"<br />
Fabric: Pearl Reflections and Superior Solids<br />
From Fabric B*:<br />
(1) 3-½” x WOF strip; subcut (16) 2” x 3-½” pieces<br />
(2) 2” x WOF strips; subcut (2) 2” x 8” pieces and (6) 2”<br />
x 6-½” pieces<br />
From Fabric C:<br />
(8) 2” x 3-½” pieces<br />
(1) 2” x 8” piece<br />
(3) 2” x 6-½” pieces<br />
From Fabric D:<br />
(32) 2” x 3-½” pieces<br />
From Fabric E*:<br />
(1) 3-½” x WOF strip; subcut (16) 2” x 3-½” pieces<br />
From Fabric F:<br />
(16) 2” x 3-½” pieces<br />
Materials<br />
• 1/4 yard each of:<br />
• A - Pearl Drop Dark Teal (#8813P-84)<br />
• C - Shadow Dandelion Aqua/Teal (#8461P-84)<br />
• D - Beaded Circle Light Peacock (#8464P-52)<br />
• 1/3 yard of B - Floating Dandelion Teal<br />
(#8462P-84)<br />
• 1/8 yard each of:<br />
• E - Pearl Drop Dark Peacock (#8813P-54)<br />
• F - Floating Dandelion Sky Blue (#8462P-05)<br />
• G - Pearl Drop Iris (#8813P-62)<br />
• H -Beaded Circle Light Purple (#8464P-06)<br />
• I - Floating Dandelion White/Purple<br />
(#8462P-06)<br />
• 1-5/8 yards Superior Solids White; includes<br />
binding (#3000B-09)<br />
• 2-1/4 yards backing fabric<br />
• 49” x 54” piece of batting<br />
Cutting/Preparation<br />
Note cutting instructions for directional prints*.<br />
From Fabric A*:<br />
(1) 3-½” x WOF strip; subcut (8) 2” x 3-½” pieces<br />
(1) 2” x WOF strip; subcut (1) 2” x 8” piece and (3) 2” x<br />
6-½” pieces<br />
From Fabric G*:<br />
(1) 3-½” x WOF strip; subcut (10) 2” x 3-½” pieces<br />
From Fabric H:<br />
(20) 2” x 3-½” pieces<br />
From Fabric I:<br />
(10) 2” x 3-½” pieces<br />
From White Solid:<br />
(4) 8” x WOF strips for border<br />
(5) 2-¼” x WOF strips for binding<br />
Make <strong>the</strong> Blocks<br />
Block #1<br />
1. Lay out (2) 2” x 3-½” I, (2) 2” x 3-½” F, and (1) 2” x<br />
3-½” C pieces as shown. Sew toge<strong>the</strong>r lengthwise.<br />
Make (2). Sew to opposite sides of (1) 2” x 8” C<br />
Diagram 1<br />
piece to make (1) light #1 block.<br />
I<br />
F<br />
C<br />
C<br />
F<br />
I<br />
Diagram 1<br />
H D<br />
Diagram 3<br />
17
2. In <strong>the</strong> same way, make (2) medium #1 blocks and<br />
(1) dark #1 block.<br />
Diagram 2<br />
H<br />
I<br />
D<br />
Diagram 1 Diagram 2<br />
B D H G E A E G<br />
FB<br />
C<br />
C<br />
F<br />
I<br />
Diagram 2<br />
Block #2<br />
1. Lay out (2) 2” x 3-½” F, (1) 2” x 3-½” C and (1) 2” x<br />
A<br />
2. In <strong>the</strong> same way, Make (2) medium rows and (1)<br />
dark row.<br />
3. Referring to <strong>the</strong> Quilt Layout Diagram, lay out <strong>the</strong><br />
light row, (2) medium rows, and dark row. Sew <strong>the</strong><br />
Drows B Dtoge<strong>the</strong>r H to G make E A<strong>the</strong> E quilt G center.<br />
4. Measure <strong>the</strong> length of <strong>the</strong> quilt across <strong>the</strong> center.<br />
Trim (2) 8” x WOF White strips to that length and<br />
sew to opposite sides of <strong>the</strong> quilt center.<br />
5. Measure <strong>the</strong> width of <strong>the</strong> quilt, including <strong>the</strong><br />
borders just added. Trim (2) 8” x WOF White strips<br />
to that length and sew to <strong>the</strong> top and bottom of <strong>the</strong><br />
quilt center.<br />
3-½” I pieces as shown. Sew toge<strong>the</strong>r lengthwise.<br />
Diagram<br />
Make (2). Sew to opposite Diagram 4<br />
sides 2of (1) 2” x 6-½” C<br />
piece to make (1) Diagram light #2 block. 3 Repeat to make a<br />
Diagram 4<br />
total of (3) HD<br />
Dlight B BD<br />
#2 DH<br />
blocks. H E GA<br />
EE<br />
AG<br />
E G<br />
6. Layer <strong>the</strong> backing right side down, batting and<br />
Diagram 1 Diagram quilt 2 top right side up. Baste to secure and quilt<br />
F C<br />
B F I A A<br />
D as B desired. D H Trim E backing A E Gand batting even with <strong>the</strong><br />
H D B D H Gquilt E Atop.<br />
E G<br />
I F C F I<br />
B<br />
A<br />
C<br />
B<br />
A<br />
C<br />
7. Use <strong>the</strong> (5) 2-¼” x WOF White binding strips to bind<br />
<strong>the</strong> quilt.<br />
H<br />
B<br />
A<br />
Diagram 3<br />
2. In <strong>the</strong> same way, make (6) medium #2 blocks and<br />
Diagram 4<br />
(3) dark #2 blocks. Diagram 3<br />
Diagram 4<br />
F<br />
D<br />
C<br />
C<br />
B<br />
F<br />
B<br />
D<br />
I<br />
H Diagram E A 5E<br />
A<br />
G<br />
D<br />
B<br />
B<br />
D<br />
H<br />
E<br />
A<br />
A<br />
E<br />
G<br />
Diagram 4<br />
Assemble <strong>the</strong> Quilt<br />
1. Lay out (1) light #1 block and (3) light #2 blocks in<br />
a horizonal row. Sew <strong>the</strong> blocks toge<strong>the</strong>r to make<br />
Diagram 5<br />
(1) light row.<br />
Quilt Layout Diagram<br />
Diagram 5<br />
18
Sewcial Media<br />
Who do you follow? Between blogs, Instagram, Pinterest, Facebook, and more,<br />
<strong>the</strong>re’s so much inspiration at our fingertips! We’ll introduce you to a few of our favorites.<br />
><br />
IG: #Improv Piecing<br />
If you’re new to it, improv<br />
piecing can seem intimidating—<br />
where are <strong>the</strong> measurements<br />
and cutting directions? Scrolling<br />
through this inspiring hashtag<br />
can offer up some starting<br />
ideas and help minimize <strong>the</strong><br />
fear. Find your favorites (and<br />
maybe some new IG-ers to<br />
follow!) and start playing around<br />
with your own stash to broaden<br />
<strong>the</strong> modern quilting possibilities.<br />
FB:Benartex<br />
Hopefully you already follow<br />
us, but if you don’t, here’s a<br />
heads up—make sure you do<br />
for a chance to win free fabric!<br />
That’s right—we host Win-It<br />
Wednesday contests on both<br />
Facebook and Instagram, as well<br />
as introduce new fabric lines,<br />
offer links to free patterns on<br />
Fridays, and share background<br />
stories from designers on<br />
Showcase Saturdays.<br />
Pinterest: Hexagons<br />
What can you make with a fabric<br />
hexagon? The question should<br />
really be, “what can’t you make?”<br />
Check out <strong>the</strong>se Pinterest-ing<br />
ideas—many of <strong>the</strong> pins include<br />
tutorials or patterns you can<br />
follow—for incorporating this<br />
fun shape into a future project.<br />
And just wait until you fall down<br />
<strong>the</strong> rabbit hole of fussy cutting<br />
your fabrics for hexagons! The<br />
possibilities are endless.<br />
<strong>Modern</strong> Quilt Studio<br />
Follow <strong>the</strong> creative path of Weeks<br />
Ringle and Bill Kerr on <strong>the</strong>ir<br />
<strong>Modern</strong> Quilt Studio website.<br />
You’ll see <strong>the</strong>ir latest Benartex<br />
fabric collections (Dreamy!),<br />
professionally styled photos of<br />
quilts <strong>the</strong>y’ve made, and have <strong>the</strong><br />
opportunity to shop for fabrics,<br />
standalone patterns and kits,<br />
and <strong>the</strong>ir gorgeously modern<br />
print publication, <strong>Modern</strong> Quilts<br />
Illustrated.<br />
IG: #Selvedge Quilt<br />
Do you keep your fabric<br />
selvedges? If you don’t, we<br />
predict you will start after seeing<br />
some of <strong>the</strong> amazing quilts made<br />
with <strong>the</strong>m on Instagram. You’ll find<br />
so many different ideas to try!<br />
Selvedges are strippy, scrappy,<br />
and sew much fun, and you’ll run<br />
to your stash, inspired to cut off<br />
and save <strong>the</strong>se informative little<br />
edges. Good thing almost every<br />
fabric has <strong>the</strong>m!<br />
FB: Paula Nadelstern<br />
Make sure that you’re<br />
finding kaleidoscopic quilting<br />
inspiration in your feed <strong>by</strong><br />
following Paula Nadelstern. On<br />
her page, you’ll be treated to<br />
a heads up about her popular<br />
online pop-up shop, see new<br />
creations made with her fabric<br />
and take a peek into her artistic<br />
life. If you love Paula’s fabrics,<br />
here’s ano<strong>the</strong>r opportunity to<br />
see more!<br />
19
easy<br />
Designed <strong>by</strong>: Laura Piland, Slice of Pi quilts<br />
Finished Double Oven Mitt: 7” x 32”<br />
Finished Kitchen Towel: 16” x 18-1/2”<br />
Finished Flour Sack Towel: 27” x 28”<br />
Fabric: Lemon Fresh collection<br />
Materials<br />
Double Oven Mitt<br />
• 1/2 yard Bouquet Black (#7833-12)<br />
• 1/3 yard Bouquet White (#7833-09)<br />
• 1/3 yard Citrus Slices for binding (#7839-30)<br />
• 14” x 34” piece of Insul-Bright<br />
• 14” x 36” piece of 100% cotton batting<br />
20
Lemon Linens<br />
Add a splash of citrus to your kitchen decor<br />
Kitchen Towels*<br />
(Makes 2)<br />
• 5/8 yard Lemon Stripe Black (#7842-12)<br />
• (2) 16” x 19” Bar Mop Towels<br />
Flour Sack Towels*<br />
(Makes 2)<br />
• 5/8 yard Lemon Toss (#7834-03)<br />
• (2) 28” x 29” Flour Sack Towels<br />
*Washing and drying towels and fabrics sewn to <strong>the</strong>m<br />
before sewing is recommended to manage shrinkage.<br />
Cutting/Preparation<br />
Double Oven Mitt<br />
From Bouquet Black:<br />
(1) 7” x 34” piece<br />
(4) 7” x 9-1/2” pieces<br />
21
Diagram 1<br />
From Bouquet White:<br />
(1) 7” x 34” piece<br />
From Citrus Slices:<br />
(3) 2-1/2”-wide bias strips (at least 100” total)<br />
From both Insul-Bright and Cotton Batting:<br />
(1) 7” x 34” piece<br />
(2) 7” x 9-1/2” pieces<br />
Kitchen Towels<br />
From Lemon Stripe Black:<br />
Fussy cut (2) 3” x 18” stripe pieces<br />
Fussy cut (2) 6” x 18” lemon pieces<br />
Flour Sack Towels<br />
From Lemon Slices:<br />
(6) 2” x WOF strips<br />
4. Layer <strong>the</strong> 7” x 34” quilted rectangle Black Bouquet<br />
side down. Position <strong>the</strong> 7” x 9-1/2” quilted pieces on<br />
both ends as shown. Using a plate or bowl as a guide,<br />
trace a curve onto each end. Use scissors to cut along<br />
<strong>the</strong> line through all layers.<br />
Diagram 2<br />
Diagram 2<br />
5. Join <strong>the</strong> (3) 2-1/2”-wide bias strips into a long strip<br />
and press in half lengthwise. Cut (2) 8" strips and bind<br />
<strong>the</strong> flat edge of each 7" x 9-1/2" quilted piece. Attach<br />
remaining binding around <strong>the</strong> outer raw edges of <strong>the</strong><br />
double oven mitt using your preferred method. Note:<br />
Using a walking foot is recommended.<br />
Make <strong>the</strong> Double Oven Mitt<br />
1. Lay <strong>the</strong> 7” x 34” Bouquet Black piece right side<br />
down. Layer 7” x 34” Insul-Bright piece shiny side<br />
down, and 7” x 34” cotton batting piece on top.<br />
Position <strong>the</strong> 7” x 34” Bouquet White piece on top right<br />
side up. Pin or spray baste layers toge<strong>the</strong>r.<br />
Diagram 1<br />
Making <strong>the</strong> Kitchen Towels<br />
1. Sew (1) 3” x 18” stripe piece to (1) 6” x 18” lemon<br />
piece and press.<br />
Diagram 1<br />
2. Sandwich (1) each 7” x Diagram 9-1/2” 2 cotton batting<br />
and Insul-Bright piece between (2) 7” x 9-1/2” Black<br />
Bouquet pieces.<br />
3. Quilt all three basted sandwiches as desired.<br />
Diagram 3<br />
22
2. Press <strong>the</strong> top raw edge of <strong>the</strong> lemon section under<br />
¼”. Press <strong>the</strong> bottom raw edge of <strong>the</strong> stripe section<br />
under 1½”.<br />
3. Trim approximately ½” off <strong>the</strong> bottom of <strong>the</strong> towel<br />
to remove <strong>the</strong> factory sewn edge.<br />
4. Using a washable marker, mark a horizontal line 1”<br />
from <strong>the</strong> bottom on <strong>the</strong> back side of <strong>the</strong> towel.<br />
5. With <strong>the</strong> right side of <strong>the</strong> pieced section from Step<br />
1 face down, align <strong>the</strong> raw edges of <strong>the</strong> striped section<br />
with <strong>the</strong> drawn line on <strong>the</strong> back of <strong>the</strong> towel. Be sure<br />
<strong>the</strong> fabric is centered on <strong>the</strong> towel. 1” of <strong>the</strong> towel<br />
should be showing below <strong>the</strong> fabric.<br />
8. To finish towel sides, fold fabric raw edges even<br />
with towel edge and press. Fold around to towel back<br />
and topstitch in place to secure. Repeat on opposite<br />
towel edge.<br />
9. Repeat steps 1-8 to make a second towel.<br />
Diagram 4<br />
6. Sew <strong>the</strong> pieced section to <strong>the</strong> towel, using a ¼”<br />
seam and <strong>the</strong> drawn line as a guide. Press <strong>the</strong> pieced<br />
section toward <strong>the</strong> bottom of <strong>the</strong> towel.<br />
7. Fold <strong>the</strong> fabric around <strong>the</strong> bottom of <strong>the</strong> towel to<br />
<strong>the</strong> front and pin in place. Topstitch along top edge,<br />
ensuring <strong>the</strong> raw edge of <strong>the</strong> lemon section is folded<br />
under ¼”.<br />
Making <strong>the</strong> Flour Sack Towels<br />
1. Sew <strong>the</strong> (6) 2” x WOF Lemon Toss strips short ends<br />
toge<strong>the</strong>r into a long strip. Press in half lengthwise with<br />
wrong sides toge<strong>the</strong>r to create a double fold binding.<br />
2. Trim approximately ½” off each side of <strong>the</strong> flour<br />
sack towel to remove factory sewn edges.<br />
3. Sew <strong>the</strong> binding strip onto <strong>the</strong> towels like you sew a<br />
binding onto a quilt. Note: Machine sewing both sides<br />
of <strong>the</strong> binding is recommended to increase <strong>the</strong> towel’s<br />
longevity.<br />
4. Repeat steps 2-3 to make <strong>the</strong> second flour sack<br />
towel.<br />
Diagram 5<br />
To order <strong>the</strong> Lemon Slice quilt pattern, click here<br />
23
Project<br />
Gallery<br />
Bubbles<br />
Fabric:<br />
Nightingale<br />
Designer: Amanda Murphy<br />
Click here to download<br />
Inspiration from<br />
your screen to<br />
your sewing room!<br />
You can never have too many<br />
quilts on your to-do list!<br />
In The Loop<br />
Fabric:<br />
Stone Quarry III<br />
Designer:<br />
Stitched Toge<strong>the</strong>r Studios<br />
Click here to download<br />
Browse through <strong>the</strong>se free<br />
quilt patterns, all available<br />
on our website. Print your<br />
favorites, do a little fabric<br />
shopping, and start sewing!<br />
Butterfly<br />
Blossoms<br />
Fabric:<br />
Choose To Shine<br />
Designer: Cherry Guidry<br />
Click here to download<br />
Luminance<br />
Fabric:<br />
Celestial Lights<br />
Designer: Amanda Murphy<br />
Click here to download<br />
24
fabric<br />
gallery<br />
MEET YOUR NEW<br />
FAVORITE FABRICS<br />
We have packed so much color into <strong>the</strong>se pages! Find your new favorite collection to use in your next project.<br />
Lemon Fresh helps keep that summer day feeling all year long, and Geo Pop is bold and modern, and you<br />
guessed it—geometric! We’re also introducing new lines enhanced with a pearl finish—a little extra sparkle<br />
and shine that you’ll find on Pearl Reflections, Colorweave Pearl, and New Hue Pearl. We think you’ll love it!<br />
Turn <strong>the</strong> page to check out our favorite new print collections on <strong>the</strong>se gallery pages. Each<br />
page shows <strong>the</strong> full line of fabrics offered; use <strong>the</strong> provided links to visit our website and<br />
put a name and SKU to your favorites!<br />
LEMON<br />
FRESH<br />
PEARL<br />
REFLECTIONS<br />
COLORWEAVE<br />
PEARL<br />
GEO POP<br />
CELESTIAL LIGHTS<br />
NEW HUE PEARL<br />
25
LEMON FRESH<br />
Show your kitchen some love with this refreshing line! Based on a citrus favorite,<br />
<strong>the</strong>se prints are both sweet and tart—delicate blossoms, bold lemon wedges,<br />
lemonade pitchers, and a charming pin dot. Adding black and white to this yellowbased<br />
palette ups <strong>the</strong> mod kitchen feel.<br />
26<br />
See a project featuring Lemon Fresh on p. 20.
PEARL REFLECTIONS<br />
Nature goes modern with <strong>the</strong>se cool dandelion-inspired prints. These “weeds” have<br />
never looked better—detailed fea<strong>the</strong>ry tips in a palette of blue, aqua, teal and purple.<br />
The fabrics range from light to dark for fun gradation possibilities. And of course, as<br />
<strong>the</strong> name suggests, <strong>the</strong>se prints are enhanced with pearlescent for a unique finish.<br />
See a project featuring Pearl Reflections on p. 16.<br />
27
COLORWEAVE<br />
PEARL<br />
The textured woven-look prints you love with a twist! We’ve chosen many of our<br />
favorite Color Weave hues and enhanced <strong>the</strong>m with a pearlescent finish. This<br />
subtle addition adds glowing depth to your next project. Use <strong>the</strong>se tonals alone or<br />
combine <strong>the</strong>m with your favorite print collection.<br />
28
GEO POP<br />
<strong>by</strong> Christa Watson<br />
Christa has done it again! Her collection of various geometric designs, including<br />
diamonds, mosaic dots, and squares, is so much fun to use. The palette spans <strong>the</strong><br />
entire rainbow—from magenta and red to blue and purple—with pops of gray, black<br />
and white to add contrast within <strong>the</strong> prints.<br />
See a project featuring Geo Pop on p. 12.<br />
29
CELESTIAL LIGHTS<br />
<strong>by</strong> Amanda Murphy<br />
Up your machine quilting game with this starry collection from Amanda Murphy.<br />
Designed with machine quilters in mind, <strong>the</strong> fabrics include ruler panels, orange<br />
peel and scroll designs, and star medallions that can serve as a guide for your<br />
stitches. Patriotic red, white and blue make beautiful home décor all year long.<br />
Panels measure<br />
approx 24" x 43"<br />
30
NEW HUE PEARL<br />
The popular New Hue blender group got a makeover to become New Hue Pearl!<br />
This mouth-watering palette of jewel-tones includes magentas, purples and teals,<br />
mixed with blacks and grays. The mottled New Hue and speckled look received a<br />
pearlescent touch for a little extra sparkle and glow.<br />
31
Flashback Favorites!<br />
Have you saved each issue of <strong>Modern</strong> <strong>by</strong> <strong>the</strong> <strong>Yard</strong>?<br />
Here’s a look back at some of our most popular projects.<br />
FIND ALL<br />
THE ISSUES<br />
HERE.<br />
Icicles<br />
<strong>by</strong> Chris Dodsley<br />
Issue #7<br />
Keep In Touch<br />
You just finished reading <strong>the</strong> twelfth<br />
issue of <strong>Modern</strong> <strong>by</strong> <strong>the</strong> <strong>Yard</strong>. We hope<br />
you enjoyed our e-zine and found plenty<br />
of inspiration for an upcoming project!<br />
You can bookmark <strong>the</strong> magazine to go<br />
back and view it online, or save it to<br />
your desktop to pull it up any time you<br />
like.<br />
If you want to receive an email each<br />
time we produce a new issue, email us<br />
at modern<strong>by</strong><strong>the</strong>yard@gmail.com so<br />
we can add you to our mailing list. Let<br />
your friends know as well! Also, make<br />
sure you’re following us on our social<br />
media platforms so that you’re among<br />
<strong>the</strong> first to hear about our new fabric<br />
collections, projects, and giveaways.<br />
(Watch for Win-It Wednesdays on<br />
IG and Facebook!)<br />
Mod Triangles<br />
<strong>by</strong> Amy Friend<br />
Issue #6<br />
Goodfellow<br />
<strong>by</strong> <strong>Modern</strong> Quilt Studio<br />
Issue #8<br />
Follow us on:<br />
Submissions... Do you have an idea for an original modern quilt or small project design using Benartex fabric to be featured<br />
in <strong>Modern</strong> <strong>by</strong> <strong>the</strong> <strong>Yard</strong>? We’d love to hear about it! Contact us at modern<strong>by</strong><strong>the</strong>yard@gmail.com