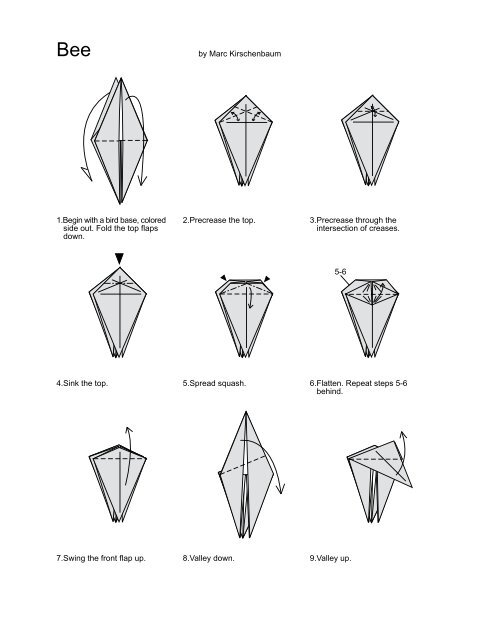
by Marc Kirschenbaum 1.Begin with a bird base, colored ... - Origami
by Marc Kirschenbaum 1.Begin with a bird base, colored ... - Origami
by Marc Kirschenbaum 1.Begin with a bird base, colored ... - Origami

Create successful ePaper yourself
Turn your PDF publications into a flip-book with our unique Google optimized e-Paper software.
Bee <strong>by</strong> <strong>Marc</strong> <strong>Kirschenbaum</strong><br />
<strong>1.Begin</strong> <strong>with</strong> a <strong>bird</strong> <strong>base</strong>, <strong>colored</strong><br />
side out. Fold the top flaps<br />
down.<br />
2.Precrease the top. 3.Precrease through the<br />
intersection of creases.<br />
4.Sink the top. 5.Spread squash. 6.Flatten. Repeat steps 5-6<br />
behind.<br />
7.Swing the front flap up.<br />
8.Valley down.<br />
5-6<br />
9.Valley up.
8-10<br />
10.Unfold. 11.Repeat steps 8-10 in mirror<br />
image.<br />
13.Rabbit ear. 14.Squash. 15.Valley over.<br />
16.Swing up.<br />
17.Spread squash.<br />
12.Swing down while spreading<br />
out the top layers.<br />
18.Swing over.
18-19<br />
19.Pull the flap through. 20.Repeat steps 18-19 in mirror<br />
image.<br />
22.Swing down.<br />
25.Carefully fold flap up,<br />
releasing the trapped layer.<br />
23.Tuck flap into pocket.<br />
8-16<br />
26.Repeat steps 8-16 on this<br />
flap.<br />
21.Bring the <strong>colored</strong> layers to<br />
the surface.<br />
24.Swing the large flap over.<br />
27.Swing over.
24-27<br />
28.Repeat steps 24-27 in mirror<br />
image.<br />
29.Turn over. 30.Wrap a single layer around<br />
each side.<br />
31.Valley up. 32.Unsink.<br />
33.Valley up.<br />
34.Turn over.<br />
35.Swing everything over.<br />
36.Swing down two flaps.<br />
37.Closed sink. 38.Swing one flap up. 39.Swing the large flaps back.
35-39<br />
40.Repeat steps 35-39 in mirror<br />
image.<br />
43.Swing up again.<br />
46.Rearrange the flaps as<br />
indicated.<br />
49.Swing down two flaps.<br />
41.Swing one flap over. 42.Swing one flap up (a portion<br />
of the fold is hidden under<br />
the <strong>colored</strong> region).<br />
44.Swing the flap through.<br />
47.Swing up while incorporating<br />
a reverse fold.<br />
50.Swing over one flap.<br />
45.Reverse fold.<br />
48.Swing over bottom flap.<br />
Stretch top flap outwards.<br />
51.Valley corner down.
41-51<br />
52.Repeat steps 41-51 in mirror<br />
image.<br />
53.Swing down. 54.Valley up.<br />
55.Swing down. 56.Precrease in opposite<br />
direction.<br />
57.Valley to horizontal crease.<br />
58.Valley to center. 59.Unfold. 60.Swing up while swiveling in<br />
sides.<br />
61.Precrease. 62.Valley the top single layers<br />
outwards while folding the<br />
tail upwards. The tail will not<br />
lie flat.<br />
63.Valley the tail up.
64.Pleat the tail. The valley fold<br />
lies along an existing crease.<br />
The mountain fold is midway<br />
from the valley fold to the<br />
white portion.<br />
67.Squash the tip.<br />
65.Fold the sides back to the<br />
center. A swivel will form<br />
underneath the pleat.<br />
68.Swing the top back to reveal<br />
the <strong>colored</strong> triangle.<br />
Mountain back the excess<br />
paper at the <strong>base</strong> ofthe tail.<br />
66.Precrease. The resulting<br />
width should be about as<br />
wide as the <strong>colored</strong> section<br />
below.<br />
69.Valley upwards; do not<br />
crease sharply.<br />
70.Swing the top flaps up. 71.Reverse fold. 72.Swing over.
73.Valley up. 74.Swing over. 75.Sink.<br />
76.Swing back.<br />
82.Swing over.<br />
77.Swivel over.<br />
72-82<br />
83.Repeat steps 72-82 in mirror<br />
image.<br />
78.Pull out single layer.<br />
79.Swing over. 80.Rabbit ear. 81.Swing over.<br />
84.Lightly fold the model in half.
94.Valley fold.<br />
1/4<br />
85.Squash flap, being sure to<br />
distribute the inner layers as<br />
evenly as possible. The tiny<br />
hidden flap should go<br />
towards the head. Rotate.<br />
85-88<br />
88.Squash fold. Repeat steps<br />
85-88 behind.<br />
86.Reverse fold one half into<br />
angle quadsectors. Reverse<br />
the other half along the angle<br />
bisector.<br />
89.Reverse fold.<br />
91.Valley fold. 92.Swing over two flaps. Repeat<br />
steps 89-92 behind.<br />
95.Pull out back leg while<br />
swiveling at top.<br />
87.Swing over.<br />
90.Swivel up. Make the valley<br />
fold as light as possible.<br />
89-92 Edge A<br />
93.Ccrimp the head into the<br />
body so that edge A lies<br />
straight. Alow the antennae<br />
to swing up.<br />
96.Valley down.
94-97<br />
97.Tuck the tip of the win into<br />
the pocket. Shape the wing.<br />
Repeat steps 94-97 behind.<br />
100.Pull the antennae back and<br />
outside reverse fold the<br />
head around them.<br />
103.Completed Bee<br />
©1994 <strong>Marc</strong> <strong>Kirschenbaum</strong><br />
98.Rabbit ear the front legs. Due<br />
to the thickness, they will<br />
stick out slightly.<br />
101. Curl the antennae around<br />
the head. Double rabbit ear<br />
the head. Pull tail upwards.<br />
99.Crimp the middle legs in half.<br />
102.Crimp the legs. Curl the<br />
antennae and the tip of the<br />
head.Round out the<br />
abdomen, and curl the<br />
wings around it.