SPIRIT Harness container system.
SPIRIT Harness container system.
SPIRIT Harness container system.

Create successful ePaper yourself
Turn your PDF publications into a flip-book with our unique Google optimized e-Paper software.
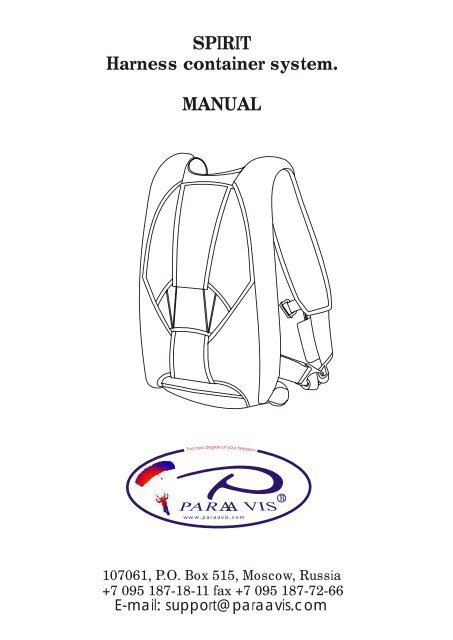
<strong>SPIRIT</strong><br />
<strong>Harness</strong> <strong>container</strong> <strong>system</strong>.<br />
MANUAL<br />
AA<br />
ww w.paraavis.com<br />
107061, P.O. Box 515, Moscow, Russia<br />
+7 095 187-18-11 fax +7 095 187-72-66<br />
E-mail: support@paraavis.com<br />
R
AA<br />
q<br />
<strong>SPIRIT</strong> <strong>Harness</strong> <strong>container</strong> <strong>system</strong>.<br />
Dear customer!<br />
Read and follow all operating instructions and all manufacturer specifications,<br />
advice and requirements for use of the equipment.<br />
Use only manufacturer recommended compatible components.<br />
Examine and replace ANY defective, worn or deteriorated component part.<br />
Examine all gear and equipment, including all fittings, buckles, snaps or other<br />
fasteners before each use of any parachute product.<br />
Use only products for parachute use.<br />
Do not exceed recommended or stated forces, speeds, or other factors<br />
regarding safe use of the equipment.<br />
Read and follow all warning labels, timers or other similar equipment<br />
before each jump or use.<br />
Be extremely careful and cautious.<br />
Review emergency procedures before each use.<br />
Do not be too selfconfident.<br />
Never use eguipment packed, prepared, assembled or fitted by others.<br />
Examine your equipment before each use.<br />
Failure to activate the main or reserve parachute (or execute correct<br />
emergency procedures)<br />
at a safe altitude, and/or eguipment failure can result in serious injury or death.<br />
FAILURE TO FOLLOW ALL WARNINGS, INSTRUCTIONS AND<br />
REQUIRED PROCEDURES MAY RESULT IN SERIOUS INJURY OR DEATH.<br />
Read and follow all WARNINGS, WARRANTY and INSTRUCTIONS for products.<br />
Read page 2 of this manual.<br />
ww w.paraavis.com<br />
2
AA<br />
q<br />
Features<br />
<strong>SPIRIT</strong> <strong>Harness</strong> <strong>container</strong> <strong>system</strong>.<br />
Warranty and instructions<br />
Disclaimer<br />
Cypres assembly<br />
Reserve toggles assembly<br />
Reserve freebag set up<br />
Packing reserve canopy to the freebag<br />
Closing the reserve <strong>container</strong><br />
RSL installation guide<br />
Main canopy control line brake settings Page 17<br />
Main parachute closing loop set up<br />
Main parachute D-bag packing<br />
Throw away pilot chute<br />
Sizes chart<br />
Rigger notes<br />
Content<br />
Read and follow all WARNINGS, WARRANTY and INSTRUCTIONS for products.<br />
Read page 2 of this manual.<br />
ww w.paraavis.com<br />
3<br />
Page 2<br />
Page 4<br />
Page 5<br />
Page 6<br />
Page 7<br />
Page 9<br />
Page 10<br />
Page 11<br />
Page 13<br />
Reserve pin protection flap close Page 15<br />
3-ring release <strong>system</strong> assembly Page 16<br />
Page 18<br />
Page 19<br />
Page 21<br />
Page 22<br />
Page 23
AA<br />
q<br />
<strong>SPIRIT</strong> <strong>Harness</strong> <strong>container</strong> <strong>system</strong>.<br />
WARNING<br />
PARACHUTING IS A HAZARDOUS ACTIVITY<br />
THAT CAN RESULT IN INJURY OR DEATH<br />
Even though the parachutes described in this manual are<br />
intended to be life saving devices, there is no guarantee<br />
that they will work if needed.<br />
There are so many factors, both human and natural,<br />
beyond our control that we want you to clearly<br />
understand that by using or intending to use our<br />
parachutes, you are assuming a considerable risk of<br />
personal injury or death.<br />
DISCLAIMER<br />
There are NO WARRANTIES which extend beyond the<br />
description of the parachutes in this manual, and neither<br />
the seller nor any agent of the seller has made any<br />
affirmation of fact or promise with respect to the<br />
parachutes except those that appear therein.<br />
The liability of the seller is limited to the duty to replace<br />
defective parts found upon examination by the<br />
manufacturer to be defective in material or workmanship<br />
within 7 days after purchase and found not to have been<br />
caused by any accident, improper use, alteration,<br />
tampering, abuse or lack of care on the part of the<br />
purchaser.<br />
Read and follow all WARNINGS, WARRANTY and INSTRUCTIONS for products.<br />
Read page 2 of this manual.<br />
ww w.paraavis.com<br />
4
AA<br />
q<br />
<strong>SPIRIT</strong> <strong>Harness</strong> <strong>container</strong> <strong>system</strong>.<br />
Features<br />
1. <strong>Harness</strong>/<strong>container</strong> <strong>system</strong><br />
2. Reserve freebag with bridle<br />
3. Main deployment bag with bridle<br />
4. Reserve spring pilot chute<br />
5. Main pilot chute<br />
6. Cutaway handle<br />
7. Ripcord handle<br />
8. Closing loop main<br />
9. Closing loop reserve<br />
10. Main risers with no velcro toggles<br />
11. Reserve hook toggles<br />
12. Passport<br />
13. Manual<br />
14. Pull up<br />
15. Rubber bands<br />
Read and follow all WARNINGS, WARRANTY and INSTRUCTIONS for products.<br />
Read page 2 of this manual.<br />
ww w.paraavis.com<br />
5
AA<br />
q<br />
Put the Cypres main device<br />
in the special pocket in the<br />
bottom of the <strong>container</strong>.<br />
Set the controlling device in<br />
the special pocket situated on the<br />
back of the <strong>container</strong>.<br />
Stretch the wire with a cutter<br />
through the black channel<br />
situated on the inside of bottom<br />
reserve flap* of the <strong>container</strong>.<br />
<strong>SPIRIT</strong> <strong>Harness</strong> <strong>container</strong> <strong>system</strong>.<br />
Cypress assembly<br />
Stretch wires through the channels<br />
up to the top of the <strong>container</strong>.<br />
Push accurate the rest<br />
of the cable inside.<br />
Read and follow all WARNINGS, WARRANTY and INSTRUCTIONS for products.<br />
Read page 2 of this manual.<br />
ww w.paraavis.com<br />
Now carefully place the rest<br />
of the cables under the velcro.<br />
Cypres is now installed.<br />
* Cypres cutter is situated on the bottom reserve flap for the <strong>SPIRIT</strong> <strong>container</strong> of size 2 and 3.<br />
For <strong>SPIRIT</strong> <strong>container</strong> of sizes #1, #0, #00, #000 cypres cutter is placed on the right reserve flap.<br />
6<br />
aa<br />
.
AA<br />
q<br />
Locking loops:<br />
Type of closing loop can be used with CONTAINER.<br />
Standard loop made of 2,3 mm diameter line.<br />
Use the picture below to identify the correct type of loop.<br />
The following points must be strictly respected:<br />
The fixing of the loop must be made with the metallic washer<br />
Provided with your harness <strong>container</strong>.<br />
A) Mark the right lenght for the canopy to be packed, then make the knot and tight it on the<br />
mark.<br />
B) Make a second knot and tight it on the first one.<br />
C) Attach a thread on the loop, then route it through the second and third hole as it is<br />
shown.<br />
Reserve closing loop length.<br />
000 -60 mm<br />
00 -60 mm<br />
0 -70 mm<br />
1 -75 mm<br />
1/2 -80 mm<br />
2 -80 mm<br />
3 -90 mm<br />
4 -90 mm<br />
<strong>SPIRIT</strong> <strong>Harness</strong> <strong>container</strong> <strong>system</strong>.<br />
2,3mm Standard washer<br />
Read and follow all WARNINGS, WARRANTY and INSTRUCTIONS for products.<br />
Read page 2 of this manual.<br />
ww w.paraavis.com<br />
6a
AA<br />
q<br />
<strong>SPIRIT</strong> <strong>Harness</strong> <strong>container</strong> <strong>system</strong>.<br />
After checking reserve canopy lines, check connectors and risers.<br />
Control lines must set in to the reefing rings on a back<br />
reserve canopy risers.<br />
Reserve toggles assembly<br />
Route the control line through the grommets on a toggle and<br />
put loop trough toggle. Tight the loop across grommet.<br />
Read and follow all WARNINGS, WARRANTY and INSTRUCTIONS for products.<br />
Read page 2 of this manual.<br />
ww w.paraavis.com<br />
7
AA<br />
q<br />
<strong>SPIRIT</strong> <strong>Harness</strong> <strong>container</strong> <strong>system</strong>.<br />
Reserve canopy control lines<br />
Stow line slack then secure it with the velcro fastener.<br />
Reaching this stage of operations the reserve canopy is ready to<br />
be packed into the deployment bag according to the specific manual.<br />
Read and follow all WARNINGS, WARRANTY and INSTRUCTIONS for products.<br />
Read page 2 of this manual.<br />
ww w.paraavis.com<br />
8
AA<br />
q<br />
<strong>SPIRIT</strong> <strong>Harness</strong> <strong>container</strong> <strong>system</strong>.<br />
Reserve freebag set up<br />
Route the elastic endings through the grommets.<br />
Read and follow all WARNINGS, WARRANTY and INSTRUCTIONS for products.<br />
Read page 2 of this manual.<br />
ww w.paraavis.com<br />
9
AA<br />
q<br />
<strong>SPIRIT</strong> <strong>Harness</strong> <strong>container</strong> <strong>system</strong>.<br />
Packing reserve to the reserve freebag.<br />
Prepare the canopy following the drawings below(refer to the reserve canopy packing manual)<br />
After placing canopy on the bag work one side at a time into the freebag.<br />
Fill the top of the bag as full as possible. Close the freebag mouth lock using the safety stow.<br />
Roll over the bag without making twists and stow the lines into the velcro line pocket.<br />
Close the protection flap and roll over the deployment bag (do not twist).<br />
Read and follow all WARNINGS, WARRANTY and INSTRUCTIONS for products.<br />
Read page 2 of this manual.<br />
ww w.paraavis.com<br />
10
AA<br />
q<br />
<strong>SPIRIT</strong> <strong>Harness</strong> <strong>container</strong> <strong>system</strong>.<br />
Closing the reserve <strong>container</strong><br />
Before you put freebag into the <strong>container</strong>, compress it to push out air.<br />
Arrange risers flat in the reserve <strong>container</strong> bottom, then place the freebag.<br />
Distribute accurately the reserve canopy over the <strong>container</strong>, especially in its corners.<br />
Close the inside up flap, then clear the bridle.<br />
Fold the bridle in a triangle to distribute its thickness.<br />
Route the packing cord through the pilot chute grommets.<br />
Placethe base of the pilot chute or the exit loop grommet then compress the spring coil<br />
after coil and lock with the pin. Clear fabric and mesh from the coils.<br />
Close down flap and route pilotschute for 2-3 .<br />
Fold and arrange the fabric as shown to avoid any clamping under the flaps.<br />
Read and follow all WARNINGS, WARRANTY and INSTRUCTIONS for products.<br />
Read page 2 of this manual.<br />
ww w.paraavis.com<br />
11
AA<br />
q<br />
Close left and right side flaps. Arrange pilot chute fabric under each side fplap.<br />
!<br />
<strong>SPIRIT</strong> <strong>Harness</strong> <strong>container</strong> <strong>system</strong>.<br />
!<br />
Check ripcord housing<br />
?!<br />
Read and follow all WARNINGS, WARRANTY and INSTRUCTIONS for products.<br />
Read page 2 of this manual.<br />
ww w.paraavis.com<br />
!<br />
After closing all flaps check closing loop condition.<br />
If the loop have any damages, change the loop.<br />
Check temporary closing pin.<br />
12<br />
!
AA<br />
q<br />
<strong>SPIRIT</strong> <strong>Harness</strong> <strong>container</strong> <strong>system</strong>.<br />
RSL installation guide<br />
The Reserve Static Line System (RSL) is optional equipment on the <strong>SPIRIT</strong> harness/<strong>container</strong>!<br />
If it is not installed on your <strong>SPIRIT</strong> you do not need to read this section!<br />
If you would like to have the RSL installed on your <strong>SPIRIT</strong> you may contact the authorised<br />
rigger or Paraavis company at the address in the beginning of this manual!<br />
To properly use a <strong>system</strong> equipped with an RSL" you must be familiar with its assembly"<br />
operation and function! You must also receive training from competent instructors prior<br />
to using such a <strong>system</strong>!<br />
The RSL <strong>system</strong> consists of a lanyard between the left main riser and the reserve ripcord! It is designed<br />
to use the mechanical force of the released main risers after a cutaway to pull the reserve ripcord pin!<br />
It is not guaranteed to function properly and should not be relied on to activate your reserve!<br />
To install RSL mate about 17-20 cm<br />
of hook Velcro on the RSL lanyard to<br />
the 2,5 cm pile Velcro on ! the back<br />
of the left rear reserve riser (see Pict.1)<br />
Pict.2<br />
Check ripcord housing<br />
Insert excess RSL lanyard fold into<br />
the space behind 3-ring cover below<br />
the left main harness ring (see Pict.3)<br />
?!<br />
Read and follow all WARNINGS, WARRANTY and INSTRUCTIONS for products.<br />
Read page 2 of this manual.<br />
ww w.paraavis.com<br />
13<br />
!<br />
Mate 1cmX3cm hook and pile Velcro<br />
forming a fold.(Pict.2)<br />
Pict. 1<br />
Pict.3
AA<br />
q<br />
Attach the snap shackle to the main<br />
riser RSL ring and inspect routing.<br />
The RSL shackle must not interfere<br />
with the operation of the 3-Ring System.<br />
(See Pict.4)<br />
<strong>SPIRIT</strong> <strong>Harness</strong> <strong>container</strong> <strong>system</strong>.<br />
!<br />
Check ripcord housing<br />
Pict.5<br />
?!<br />
Proper configuration of the reserve<br />
ripcord through the RSL rings is<br />
critical to the proper function of the RSL<br />
<strong>system</strong>(See Pict.6).<br />
Read and follow all WARNINGS, WARRANTY and INSTRUCTIONS for products.<br />
Read page 2 of this manual.<br />
ww w.paraavis.com<br />
14<br />
!<br />
Pict.4<br />
Prior to the upper reserve closing flap,<br />
thread reserve ripcord through the RSL<br />
rings with the ring on the RSL lanyard<br />
between the housing keeper and<br />
the RSL retainer ring.(See Pict.5)<br />
Pict.6<br />
After closing the reserve protective flap neatly tuck the excess lanyard under the reserve riser.<br />
RSL is now installed!
AA<br />
q<br />
<strong>SPIRIT</strong> <strong>Harness</strong> <strong>container</strong> <strong>system</strong>.<br />
Reserve <strong>container</strong> protection flap close.<br />
Close the protection flap by slipping tongues under the upper flap.<br />
Read and follow all WARNINGS, WARRANTY and INSTRUCTIONS for products.<br />
Read page 2 of this manual.<br />
ww w.paraavis.com<br />
15
AA<br />
q<br />
<strong>SPIRIT</strong> <strong>Harness</strong> <strong>container</strong> <strong>system</strong>.<br />
Standard 3-ring release <strong>system</strong>.<br />
Assembly of 3-ring release <strong>system</strong>.<br />
Before assembling the 3-Ring release make sure the risers aren’t twisted or reversed.<br />
Thread each cable into its housing and mate the handle to the harness.<br />
The handle should be positioned as close to the ends<br />
of the housings as possible so that little or no cable is exposed.<br />
Assembly:<br />
Before assembly, check fhat all components are new or in perfect condition.<br />
The cables and housings should not show any damage. Keep the equipment away from the sun.<br />
Ultraviolet light weakens nylon components without any visual sign.<br />
Caution:<br />
For improved safety check 3-ring release <strong>system</strong> before each jump<br />
and reconnect after1 months of usage or every 50 jumps.<br />
Read and follow all WARNINGS, WARRANTY and INSTRUCTIONS for products.<br />
Read page 2 of this manual.<br />
ww w.paraavis.com<br />
16
AA<br />
q<br />
<strong>SPIRIT</strong> <strong>Harness</strong> <strong>container</strong> <strong>system</strong>.<br />
Main canopy toggles assembly<br />
Read and follow all WARNINGS, WARRANTY and INSTRUCTIONS for products.<br />
Read page 2 of this manual.<br />
ww w.paraavis.com<br />
17
AA<br />
q<br />
<strong>SPIRIT</strong> <strong>Harness</strong> <strong>container</strong> <strong>system</strong>.<br />
Main parachute closing loop set up.<br />
a<br />
Closing loop length.<br />
Main<br />
a<br />
000 -150 mm<br />
00 -160 mm<br />
0 -160 mm<br />
1 -170 mm<br />
1/2 -175 mm<br />
2 -180 mm<br />
a<br />
3 -190 mm<br />
4 -200 mm<br />
Read and follow all WARNINGS, WARRANTY and INSTRUCTIONS for products.<br />
Read page 2 of this manual.<br />
ww w.paraavis.com<br />
18<br />
a
AA<br />
q<br />
a<br />
<strong>SPIRIT</strong> <strong>Harness</strong> <strong>container</strong> <strong>system</strong>.<br />
Main parachute D-bag packing.<br />
a<br />
Read and follow all WARNINGS, WARRANTY and INSTRUCTIONS for products.<br />
Read page 2 of this manual.<br />
ww w.paraavis.com<br />
19
AA<br />
q<br />
a<br />
<strong>SPIRIT</strong> <strong>Harness</strong> <strong>container</strong> <strong>system</strong>.<br />
The force to withdraw the curved pin must be measured between 5 and 8 dan.<br />
Read and follow all WARNINGS, WARRANTY and INSTRUCTIONS for products.<br />
Read page 2 of this manual.<br />
ww w.paraavis.com<br />
20
AA<br />
q<br />
<strong>SPIRIT</strong> <strong>Harness</strong> <strong>container</strong> <strong>system</strong>.<br />
Throw away pilot chute.<br />
Read and follow all WARNINGS, WARRANTY and INSTRUCTIONS for products.<br />
Read page 2 of this manual.<br />
ww w.paraavis.com<br />
21<br />
a
AA<br />
q<br />
<strong>SPIRIT</strong> <strong>Harness</strong> <strong>container</strong> <strong>system</strong>.<br />
Sizes chart<br />
Read and follow all WARNINGS, WARRANTY and INSTRUCTIONS for products.<br />
Read page 2 of this manual.<br />
ww w.paraavis.com<br />
22<br />
a
AA<br />
q<br />
<strong>SPIRIT</strong> <strong>Harness</strong> <strong>container</strong> <strong>system</strong>.<br />
Rigger notes<br />
Read and follow all WARNINGS, WARRANTY and INSTRUCTIONS for products.<br />
Read page 2 of this manual.<br />
ww w.paraavis.com<br />
23<br />
a