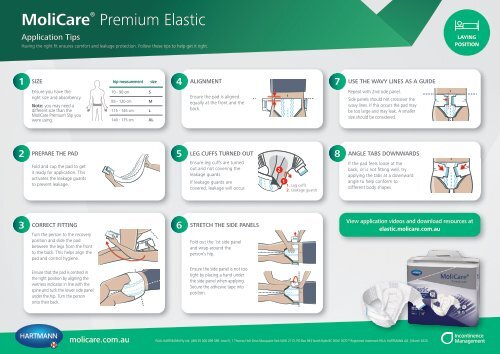
MoliCare Premium Elastic Application Tips
Learn the top tips and tricks for Molicare Premium Elastic Application.
Learn the top tips and tricks for Molicare Premium Elastic Application.
- No tags were found...

Create successful ePaper yourself
Turn your PDF publications into a flip-book with our unique Google optimized e-Paper software.
<strong>MoliCare</strong> ® <strong>Premium</strong> <strong>Elastic</strong><br />
<strong>Application</strong> <strong>Tips</strong><br />
Having the right fit ensures comfort and leakage protection. Follow these tips to help get it right.<br />
LAYING<br />
POSITION<br />
1<br />
SIZE<br />
hip measurement<br />
size<br />
4<br />
ALIGNMENT<br />
7<br />
USE THE WAVY LINES AS A GUIDE<br />
Ensure you have the<br />
right size and absorbency.<br />
Note: you may need a<br />
different size than the<br />
<strong>MoliCare</strong> <strong>Premium</strong> Slip you<br />
were using.<br />
70 - 90 cm S<br />
85 - 120 cm M<br />
115 - 145 cm L<br />
140 - 175 cm XL<br />
Ensure the pad is aligned<br />
equally at the front and the<br />
back.<br />
Repeat with 2nd side panel.<br />
Side panels should not crossover the<br />
wavy lines. If this occurs the pad may<br />
be too large and may leak. A smaller<br />
size should be considered.<br />
2<br />
PREPARE THE PAD<br />
5<br />
LEG CUFFS TURNED OUT<br />
8<br />
ANGLE TABS DOWNWARDS<br />
Fold and cup the pad to get<br />
it ready for application. This<br />
activates the leakage guards<br />
to prevent leakage.<br />
Ensure leg cuffs are turned<br />
out and not covering the<br />
leakage guards.<br />
If leakage guards are<br />
covered, leakage will occur.<br />
2<br />
1<br />
1. Leg cuffs<br />
2. Leakage guards<br />
If the pad feels loose at the<br />
back, or is not fitting well, try<br />
applying the tabs at a downward<br />
angle to help conform to<br />
different body shapes.<br />
3<br />
CORRECT FITTING<br />
Turn the person to the recovery<br />
position and slide the pad<br />
between the legs from the front<br />
to the back. This helps align the<br />
pad and control hygiene.<br />
6<br />
STRETCH THE SIDE PANELS<br />
Fold out the 1st side panel<br />
and wrap around the<br />
person’s hip.<br />
View application videos and download resources at<br />
elastic.molicare.com.au<br />
Ensure that the pad is centred in<br />
the right position by aligning the<br />
wetness indicator in line with the<br />
spine and tuck the lower side panel<br />
under the hip. Turn the person<br />
onto their back.<br />
Ensure the side panel is not too<br />
tight by placing a hand under<br />
the side panel when applying.<br />
Secure the adhesive tape into<br />
position.<br />
molicare.com.au<br />
PAUL HARTMANN Pty Ltd. ABN 35 000 099 589. Level 5, 1 Thomas Holt Drive Macquarie Park NSW 2113. PO Box 943 North Ryde BC NSW 1670 ® Registered trademark PAUL HARTMANN AG. | March 2020<br />
Incontinence<br />
Management
<strong>MoliCare</strong> ® <strong>Premium</strong> <strong>Elastic</strong><br />
<strong>Application</strong> <strong>Tips</strong><br />
Having the right fit ensures comfort and leakage protection. Follow these tips to help get it right.<br />
STANDING<br />
POSITION<br />
1<br />
SIZE<br />
hip measurement<br />
size<br />
4<br />
ALIGNMENT<br />
7<br />
USE THE WAVY LINES AS A GUIDE<br />
Ensure you have the<br />
right size and absorbency.<br />
Note: you may need a different<br />
size than the <strong>MoliCare</strong> <strong>Premium</strong><br />
Slip you were using.<br />
70 - 90 cm S<br />
85 - 120 cm M<br />
115 - 145 cm L<br />
140 - 175 cm XL<br />
Ensure the pad is aligned equally<br />
at the front and the back.<br />
Repeat with 2nd side panel.<br />
Side panels should not crossover the<br />
wavy lines. If this occurs the pad may<br />
be too large and may leak. A smaller<br />
size should be considered.<br />
2<br />
PREPARE THE PAD<br />
Fold and cup the pad to get<br />
it ready for application. This<br />
activates the leakage guards<br />
to prevent leakage.<br />
5<br />
LEG CUFFS TURNED OUT<br />
Ensure leg cuffs are turned<br />
out and not covering the<br />
leakage guards.<br />
If leakage guards are<br />
covered, leakage will occur.<br />
2<br />
1<br />
1. Leg cuffs<br />
2. Leakage guards<br />
8<br />
ANGLE TABS DOWNWARDS<br />
If the pad feels loose at the back,<br />
or is not fitting well, try applying<br />
the tabs at a downward angle to<br />
help conform to different body<br />
shapes.<br />
3<br />
CORRECT FITTING<br />
Stand beside the person.<br />
Slide the pad between the legs<br />
from the front to the back.<br />
6<br />
STRETCH THE SIDE PANELS<br />
Fold out the 1st side panel<br />
and wrap around the<br />
person’s hip.<br />
View application videos and download resources at<br />
elastic.molicare.com.au<br />
Ensure that the pad is centred<br />
in the right position by aligning<br />
the wetness indicator in line<br />
with the spine.<br />
Ensure the side panel is not too<br />
tight by placing a hand under<br />
the side panel when applying.<br />
Secure the adhesive tape into<br />
position.<br />
molicare.com.au<br />
PAUL HARTMANN Pty Ltd. ABN 35 000 099 589. Level 5, 1 Thomas Holt Drive Macquarie Park NSW 2113. PO Box 943 North Ryde BC NSW 1670 ® Registered trademark PAUL HARTMANN AG. | March 2020<br />
Incontinence<br />
Management