

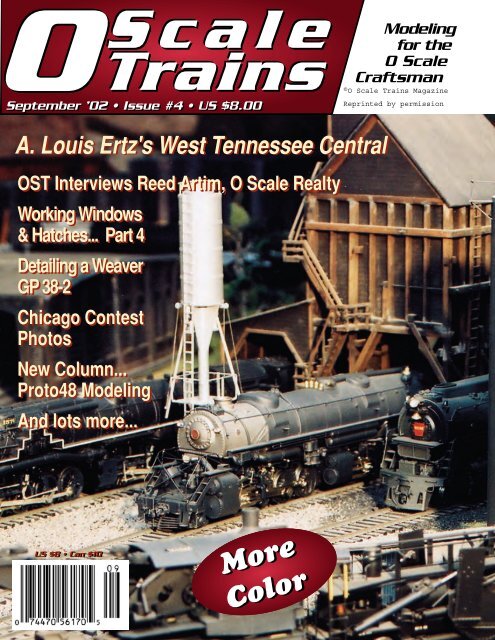
A. Louis Ertz's West Tennessee Central OST Interviews Reed Artim ...
A. Louis Ertz's West Tennessee Central OST Interviews Reed Artim ...
A. Louis Ertz's West Tennessee Central OST Interviews Reed Artim ...

Create successful ePaper yourself
Turn your PDF publications into a flip-book with our unique Google optimized e-Paper software.
Scale<br />
Scale<br />
Trains Trains<br />
Modeling<br />
for the<br />
O Scale<br />
Craftsman<br />
September ’02 • Issue #4 • US $8.00<br />
A. <strong>Louis</strong> <strong>Ertz's</strong> <strong>West</strong> <strong>Tennessee</strong> <strong>Central</strong><br />
<strong>OST</strong> <strong>Interviews</strong> <strong>Reed</strong> <strong>Artim</strong>, O Scale Realty<br />
Working Windows<br />
& Hatches... Part 4<br />
Detailing a Weaver<br />
GP 38-2<br />
Chicago Contest<br />
Photos<br />
New Column...<br />
Proto48 Modeling<br />
And lots more...<br />
US $8 • Can $10<br />
More More<br />
Color Color
<strong>Louis</strong> <strong>Ertz's</strong><br />
<strong>West</strong><br />
<strong>Tennessee</strong><br />
<strong>Central</strong><br />
Railroad<br />
A. LOUIS ERTZ, JR.<br />
History of the <strong>West</strong> <strong>Tennessee</strong> <strong>Central</strong><br />
Railroad, An O Scale Model Railroad<br />
The addition to the house (24' x 57')<br />
was built in 1980 after many track plans<br />
were drawn. The idea was to have a layout<br />
that I could be inside the railroad<br />
with a walkway along the main and<br />
have no “duck-unders.”<br />
One main line is a “folded dog bone”<br />
and the second main is a simple loop.<br />
The two “mains” can be interchanged at<br />
the Dead Wood grade up from the<br />
lower loop main to the longer folded<br />
dog bone loop. There are several lift out<br />
panels for service to the layout area<br />
where it is impossible to reach from the<br />
outside of the bench work.<br />
The bench work is L-girder construction<br />
with 2"x4" joists, screwed up<br />
from the L portion of the box grid, into<br />
the 2"x4". Risers then were screwed<br />
and glued to the 2"x4"s up to the proper<br />
level of the subroadbed and fastened to<br />
the plywood (3/4" birch) subroadbed<br />
4 • O Scale Trains<br />
with screws, using a 1 1 ⁄2" x 1 1 ⁄2" x 3"<br />
long aluminum angle at each joint. The<br />
roadbed I used was a milled spruce<br />
piece with beveled edges 6' long. To<br />
make all the curved roadbed, I sawed<br />
slots in the road bed and screwed and<br />
glued this to the subroadbed.<br />
Next, all the ties were hand laid by<br />
spreading thinned Elmer’s Yellow Glue<br />
over a 10'-15' long section of roadbed<br />
and then placing the ties. I used wax<br />
paper over the ties and a piece of ply-<br />
wood cut to match the curve and placed<br />
a weight on the top of the plywood at<br />
several locations. This was done to<br />
insure that the ties were seated in the<br />
glue and the top of the ties would be<br />
ready to receive the rail. All the rail is<br />
hand spiked, using 4 spikes per tie.<br />
Nickel silver code 148 rail was used<br />
with steel rail on the grades.<br />
Turnouts were then located (most<br />
were built by Earl R. Eshleman) and<br />
lined up with the track and then spiked
down on roadbed cut to match the<br />
turnout. Turnout switch point links were<br />
then installed. I used KTM, twin coil<br />
switch machines (82) and to this date,<br />
after 22 years, have had no failures.<br />
Scenery<br />
The scenery was the most enjoyable<br />
part of building the layout. As an architect,<br />
it was easy for me to envision the<br />
topography, the mountains, rivers,<br />
ponds, roads, building locations,<br />
bridges, and tunnels. So I set to work. I<br />
used 1"x2" wood for strength on the<br />
cardboard vertical contours of the hills<br />
and cuts. These cardboard contours<br />
were spaced about a foot apart, forming<br />
an outline of what the mountain, cut or<br />
hill would look like. Then pieces of<br />
cardboard cut into 1 1 ⁄2" wide strips were<br />
glued to the cardboard contours, using<br />
staples to hold the joints until the glue<br />
dried. Over this a cardboard strip was<br />
placed 90° to the horizontal strips, forming<br />
an apple pie crust design. The cardboard<br />
strips are placed about 4" apart.<br />
Over the horizontal and vertical cardboard<br />
strips brown craft paper was<br />
glued to the maze of strips. Most pieces<br />
of craft paper were cut to fit one or two<br />
openings, then glued into place. (Note:<br />
Butcher’s brown paper, not the wax<br />
coated type, makes the best material)<br />
After the craft paper was glued in<br />
place, I then gave it a coat of varnish.<br />
After the varnish dried, I then applied a<br />
coat of Elmer’s White Glue (thinned).<br />
The hydrocal plaster will stick to the<br />
glue finish, but not the varnish which<br />
was used to waterproof the paper.<br />
Now for the fun part... plaster work! I<br />
used hydrocal plaster giving you a 6 or<br />
7 minute work time before it starts to<br />
harden. White hydrocal gypsum cement<br />
provides exceptional strength for producing<br />
ornamentation with durable fine<br />
detail. It is recommended for thin castings<br />
and those made from intricate latex<br />
molds. The rock face was made by<br />
making a latex rubber mold from a large<br />
piece of coal about 2' long x 1' high<br />
thereby giving a natural structure to the<br />
rock face. The molds were curved or<br />
bent to give a different shape to the rock<br />
face as needed. Then the coal face was<br />
broken off and another mold made to<br />
develop a new rock face and so on. Care<br />
was given in joining castings so as not<br />
to look like pieces of plaster molds were<br />
just stuck together. Plaster fill was<br />
inserted as needed when rock moldings<br />
were set and strata lines were carved<br />
into the joint plaster and into the two<br />
adjoining castings. Rock castings were<br />
placed by pressing the rubber mold<br />
(with wet plaster inside) into place and<br />
holding until you could feel the warm<br />
set-up reaction. All plaster was dry<br />
mixed with color in the plaster (you can<br />
get many choices of colors at the local<br />
O Scale Trains • 5
ick yard - black, brown,<br />
red, etc.). Buff gives a<br />
good clay look on cuts<br />
and hills where bushes,<br />
trees, and grass was<br />
applied. Lichen gathered<br />
from the hills of <strong>Tennessee</strong><br />
in large pieces (<br />
about one foot square)<br />
was cleaned and soaked in<br />
a mixture of glycerine and<br />
water with some color<br />
(acrylic artist paint in tube<br />
“Hunter Green”) was<br />
added. This was spread<br />
out on newspaper and allowed to dry. The lichen today, after 20 years, is still soft to the touch. Trees were built from sage brush<br />
and foliage was added using Woodland Scenic material. Grass was sprinkled over a brushing of Elmer’s White Glue using<br />
Woodland Scenic Grass. Over the years I have added<br />
trees from both local plants and shrubs to give some<br />
variance to the type of trees. Only God can make a<br />
tree. A good tree on your layout is not easy to make.<br />
Structures<br />
As an architect, drawing plans to 1 ⁄4" scale was a<br />
help so I drew up buildings, made copies and built the<br />
building on the plans. The coal tipple at Dead Wood<br />
was the last structure built. The deep shaft mine on the<br />
hillside and the conveyor bridge with operating mine<br />
cart over to the 2 track tipple was built right off copies<br />
of the blueprint. Many buildings were purchased at<br />
train meets and some were built by other model railroaders.<br />
Ken Anz and Joe Anz have built several<br />
buildings with interiors. Johnnie Reid built the station from C & O plans of the prototype with all interiors, people, and lights.<br />
The location and site planning of all structures has been an important element on the layout. Foundation elevations vary as the<br />
topography varies, that is<br />
some buildings are located<br />
at different levels even<br />
if on the same street. The<br />
streetcar runs around the<br />
town of LaGrange and<br />
the tracks are set in brick<br />
and the street is asphalt<br />
with concrete curbs and<br />
sidewalks. The Ritz Picture<br />
Show (theater) is on<br />
the first floor of a four<br />
story building. The marquee<br />
was built from brass<br />
6 • O Scale Trains
sheet and 280 fiber optic<br />
strands light up the marquee.<br />
The light source is a projection<br />
bulb at the other end of<br />
the bundle of fiber optic<br />
strands with a color wheel<br />
and a black striped wheel<br />
overlapping the color wheel.<br />
This gives the on-off of the<br />
lights and the color of the<br />
lights change—white, green,<br />
yellow, and red. In order to<br />
give the “V” chase pattern on<br />
the marquee, the fibers were<br />
individually checked for<br />
light and then mounted in the marquee. Two reduction motors are mounted in the projection box under the layout for the color<br />
wheel and the on-off chase pattern.<br />
The turntable was kit built (i.e., you do all the<br />
work). Mylark O Scale turntables were available in<br />
1980 and have since gone out of business. The electrical<br />
portion was pre-wired (not connected to anything)<br />
and indexed. The pit and turntable was built on a table<br />
in the layout room. The turntable is powered by a<br />
Pittman can motor and reduction gear and is indexed<br />
to stop on the center line of each track that you program.<br />
Incoming tracks are powered and controlled<br />
from the panel. The tracks to the roundhouse and other<br />
service tracks are controlled by the position of the<br />
turntable and no locomotive can be backed out of the<br />
roundhouse unless the bridge is lined up with that<br />
track. The turn table bridge has no wires to it. Power is<br />
transmitted to the track from a large brass disc 18" in diameter and approximately 1 ⁄4" thick with wipers. The bridge is held in<br />
position on the center line of the track with pre-drilled holes in the brass disc and a solenoid, which engages the hole, as selected<br />
on the control panel. The roundhouse<br />
is Kober built in 1983.<br />
Wiring<br />
In 1980, when the layout was started,<br />
the state of the art control systems<br />
was Dynatrol. I installed it with 13<br />
separate locomotive control units and<br />
8 hand held control cabs, which had to<br />
be plugged in at various locations on<br />
the fascia of the railroad. It was great!<br />
Locomotives could go anywhere on<br />
the layout, no reverse loop problems,<br />
and the headlight was constantly bright<br />
O Scale Trains • 7
at full speed and standing. Problems developed when passenger<br />
cars were added. About 30 passenger cars with interior<br />
lighting used up the AC/DC power assigned to the locomotives<br />
and they just sat on the track with a low hum. A block<br />
system was necessary to kill the passenger car lights when<br />
they were sitting at the station and then a few other blocks<br />
were added for other cars with lights, such as cabooses, work<br />
trains, and others. I then decided to use the old standard<br />
power supply. A Variac Power Supply System was installed at<br />
each control panel and PFM sound was installed. I could then<br />
switch from Dynatrol to the Variac or to PFM sound on either<br />
loop with DPDT switches. Wiring to me was the most work<br />
and without the help from a fellow model railroader, James<br />
Cain, it would never have been installed as professionally as it<br />
was. With all the blocks, power options, and signal interface<br />
with the panels, I have over 70,000 feet of wire under the railroad,<br />
all color coded and tagged. Turnouts are controlled with<br />
push buttons mounted in the panel on a schematic track plan,<br />
with indicator LEDs. Signals along the right of way are also<br />
duplicated with LEDs on the control panel. There are seven<br />
control panels, with one master panel, that has control of the<br />
entire railroad and can give the other sub-panels control over<br />
their portion of the railroad.<br />
Background & Ballast Work<br />
The wall background was a sky blue color rolled on. Then<br />
the clouds were painted on with acrylic artist paint using a<br />
broad brush. White with a touch of blue was used, twisting<br />
the brush as you go. If you make a mistake simply roll over<br />
8 • O Scale Trains<br />
with the sky blue background paint.<br />
White was air brushed on last to make a<br />
distant haze in the background at the<br />
horizon line. The foreground was<br />
applied using sponges dipped in acrylic<br />
artist paint, using a pie pan as a palate, to<br />
simulate trees, foliage, and bushes.<br />
Using Hunter Green with a touch of yellow,<br />
I tried to match the foreground<br />
lichen with the background. The ballast<br />
work was done before the scenery was<br />
done around the track. First, an application<br />
of Elmer’s White Glue was applied<br />
on either side of the sloping roadbed and<br />
then sprinkle the ballast on this area and<br />
let dry. Then the remaining ballast was poured on the ties and<br />
spread out with an artist’s brush. When the ballast was in the<br />
proper place, water spray was applied with a small amount,of<br />
detergent added. While wet, I used a large toy plastic syringe<br />
to apply thinned Elmer’s White Glue. Use plenty of glue and<br />
let it get on all the ties and rail, After this portion of the ballast<br />
is in place, carefully wipe off the glue from the rails and the<br />
inside face of the rails. The white glue on the ties will dry and<br />
will not show, as it will be clear and have a flat finish.<br />
Every Saturday morning the local “O” Scale model railroaders<br />
have an operating session running the equipment on<br />
the <strong>West</strong> <strong>Tennessee</strong> <strong>Central</strong> and their prize pieces of equipment.<br />
After the morning get-together, it’s off to the local barbecue<br />
shop where more railroad shop talk continues. Then it’s<br />
back to the railroad for some final switching.<br />
There is always some new project to start and I look forward<br />
to finishing the ones that I have already begun. ◆
53"<br />
24"<br />
<strong>West</strong> <strong>Tennessee</strong> <strong>Central</strong> R.R.<br />
Layout Details<br />
Name: <strong>West</strong> <strong>Tennessee</strong><br />
<strong>Central</strong><br />
Roads Modeled: Freelance<br />
Room Size: 24 x 57<br />
Style: Folded Dogbone<br />
Layout Height: 42 inches<br />
Benchwork: 2 x 4 “L” girder<br />
Mainline run: approx. 155<br />
feet<br />
Roadbed: 3/4” birch plywood<br />
sub-roadbed, milled<br />
spruce w/beveled edges as<br />
roadbed.<br />
Track: Code 148 Nickel<br />
Silver and steel<br />
Turnouts: Earl Eshleman,<br />
#8s in yard, #12s on the<br />
main.<br />
Min radius: 72 inches<br />
Controls: Dynatrol and traditional<br />
Variac w/PFM sound<br />
O Scale Trains • 9