Roasting Survival Guide
Troubled by tenderloin? Stressed over seasoning? Stewing about roasting? Rest easy, roast master. We've got you.
Troubled by tenderloin? Stressed over seasoning? Stewing about roasting? Rest easy, roast master. We've got you.

You also want an ePaper? Increase the reach of your titles
YUMPU automatically turns print PDFs into web optimized ePapers that Google loves.
READY TO ROAST?<br />
Follow these simple steps:<br />
1. Preheat oven to 450°F<br />
2. Season roast<br />
3. Place in a roasting pan fitted with a rack, fat side up<br />
4. Cook 15 minutes<br />
5. Reduce oven to 325°F and continue roasting (time will vary<br />
depending on cut, size and desired doneness)<br />
6. Remove from oven when 5-10° lower than target temperature<br />
7. Rest before serving<br />
Note: these instructions are tested and proven for a variety of roasts but<br />
are a general guide. If your recipe has specific instructions, follow them.<br />
ESSENTIAL TOOLS<br />
• <strong>Roasting</strong> pan with a rack<br />
• Salt and pepper mills<br />
• Instant-read thermometer<br />
• Chef’s knife<br />
• Cutting board<br />
• Roast Perfect app<br />
Looking for more guidance?<br />
The Roast Perfect app<br />
includes an interactive timer<br />
that you can customize for<br />
your specific roast cut, size<br />
and doneness to ensure<br />
perfect, no-stress results.<br />
REST, CARVE & SERVE<br />
Give your roast a rest. Letting it relax a few<br />
minutes before serving will allow all of the<br />
flavorful juices to redistribute throughout the<br />
roast. You can tent it loosely with foil if you like,<br />
but larger roasts will stay plenty warm while<br />
resting.<br />
• 10 minutes for roasts less than 4 lbs.<br />
• 15 minutes for 4-10 lb. roasts<br />
• 20 minutes for roasts larger than 10 lbs.<br />
Now, it’s time to carve. You’ll need a large cutting<br />
board and a long, sharp, non-serrated knife.<br />
1. If you tied your roast before cooking, snip away<br />
the butcher’s twine and carefully remove it.<br />
2. Identify which direction the grain is—the<br />
direction of the meat’s natural texture. In some<br />
cuts, this grain is very pronounced, and in<br />
others, it’s more subtle.<br />
3. Plan your cuts to go against the grain to<br />
maximize the tenderness in every bite.<br />
4. Using long, smooth strokes, slice the roast into<br />
thin or thick slices according to your preference.<br />
Avoid making short back-and-forth sawing<br />
motions.<br />
PRO<br />
TIP<br />
Ask your guests if they’d prefer thick or thin<br />
slices, and how much they’d like to be served.<br />
They’ll appreciate the personal touch.<br />
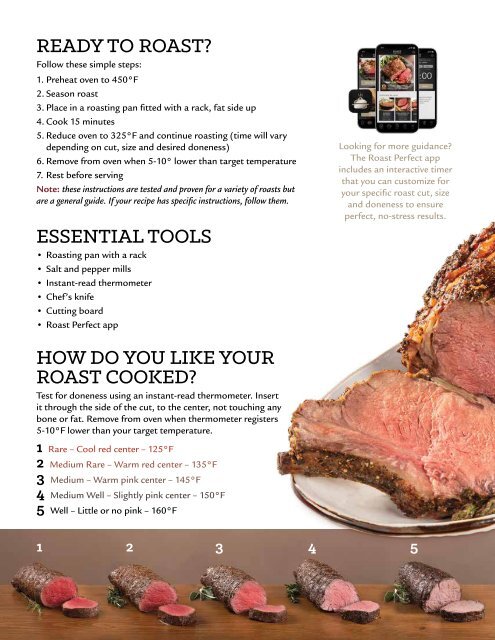
HOW DO YOU LIKE YOUR<br />
ROAST COOKED?<br />
Test for doneness using an instant-read thermometer. Insert<br />
it through the side of the cut, to the center, not touching any<br />
bone or fat. Remove from oven when thermometer registers<br />
5-10°F lower than your target temperature.<br />
1 Rare – Cool red center – 125°F<br />
2 Medium Rare – Warm red center – 135°F<br />
3 Medium – Warm pink center – 145°F<br />
4 Medium Well – Slightly pink center – 150°F<br />
5 Well – Little or no pink – 160°F<br />
CARVE A PRIME RIB<br />
Carving a bone-in roast, like a Prime Rib, doesn’t<br />
need to be intimidating.<br />
1. Start by holding the bones perpendicular to the<br />
cutting board.<br />
2. Hold your knife parallel to the bones, and carefully<br />
slice down to the board. When you’re done with<br />
this cut, you’ll have separated the bones from the<br />
main roast.<br />
3. Set the bone-in portion aside and carve the roast<br />
as described above. If your guests request it, you<br />
can slice in between the bones and distribute those<br />
at the table as well.<br />
1 2 3 4<br />
5<br />
PRO<br />
TIP<br />
Separate the bones from the Prime Rib before cooking. Make the same cut<br />
described above before you season the roast, then use butcher’s twine to tie the<br />
bones back in place before cooking. After the roast has rested, snip away the<br />
twines and the bones will fall away, allowing for easy carving tableside.