NZPhotographer Issue 43, May 2021
As of December 2022, NZPhotographer magazine is only available when you purchase an annual or monthly subscription via the NZP website. Find out more: www.nzphotographer.nz
As of December 2022, NZPhotographer magazine is only available when you purchase an annual or monthly subscription via the NZP website. Find out more: www.nzphotographer.nz

Create successful ePaper yourself
Turn your PDF publications into a flip-book with our unique Google optimized e-Paper software.
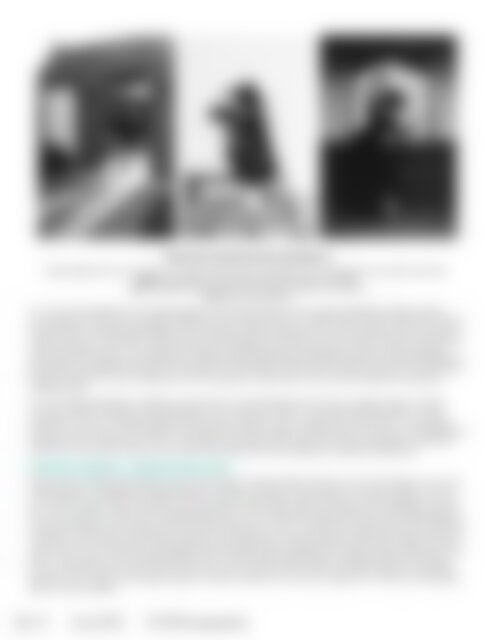
HARD LIGHT AND BACKLIGHT SHADOWPLAY<br />
Left: Backlighting from the sun creates a rim of light around the subject, separating her from the background and casting a long shadow.<br />
Middle: Strong sunlight on the white wall has a similar effect to a backlight.<br />
Right: Backlighting using a window with natural light bouncing in to fill shadows.<br />
Model: Anita van der Mespel.<br />
You can even experiment with creating flare and sunburst effects when using backlighting. Simply position<br />
your subject so that the sun is slightly peeking out from behind them. A higher f-stop in this situation will create a<br />
sunburst effect (variable depending on the number of aperture blades in your lens) whereas a lower f-stop will<br />
create more of a hazy effect. Modern lenses are fastidiously manufactured and coated in order to specifically<br />
avoid lens flare but you can increase the chances of getting one by removing your lens hood and playing<br />
around with the angle you’re shooting at. There are also tools like the OMNI filter system by Lensbaby designed<br />
specifically to generate lens effects or the Black Pro-Mist filters by Tiffen which create a hazy look. Another way<br />
to get lens flare is to use a vintage lens with an adapter as these don’t have the anti-reflective coatings of<br />
modern lenses.<br />
You can also photograph a subject backlit indoors by positioning them in front of a bright window. Instead<br />
of using a reflector to light your backlit subject, you could use a flash. I’ll be talking all things flash in a later<br />
article but, for now, try experimenting with the pop-up flash on your camera if you have one. If it’s not bright<br />
enough, move closer to your subject. If the light is too hard or bright, try diffusing it with a piece of baking paper<br />
attached with a rubber band. You can also get some subtle colour effects by using colour gels on your flash<br />
(and now you have an excuse to buy those chocolates that are wrapped in coloured cellophane).<br />
CREATIVE LIGHTING – MANIPULATING LIGHT<br />
Strong, direct sunlight (hard light) can be used to great creative effect and you can try this indoors or out. You<br />
will have seen how bright sun shining directly in through a window casts patterns on the room inside. Any item<br />
with a pattern, provided that pattern is thick enough to block light, can be used for creative lighting. You can<br />
buy what is called a ‘gobo’ (short for go-between) for some studio lights and projectors to make light patterns,<br />
but I encourage you to have fun experimenting with your own finds or creations. For example, horizontal blinds<br />
create that classic film-noir look but, if you don’t have these, you can create it by taping up strips of cardboard<br />
or similar to your window. The sharpest results are achieved by moving your gobo close to the subject (or vice<br />
versa) which is why those film-noir images have the subject right up against the window blinds, peering through<br />
them. I have had success creating patterns with a tennis racket, fishnet tights, cardboard strips and cutouts…<br />
but my favorite is lace. Have a look to see what you have around the house that might create an interesting<br />
pattern. Hint: it needs to be large enough to create a pattern to cover your subject as it’s best to avoid being<br />
able to see the edges.<br />
26 <strong>May</strong> <strong>2021</strong> <strong>NZPhotographer</strong>