Manual Controller cabinet RSL98 - psg-online.de
Manual Controller cabinet RSL98 - psg-online.de
Manual Controller cabinet RSL98 - psg-online.de

Create successful ePaper yourself
Turn your PDF publications into a flip-book with our unique Google optimized e-Paper software.
PSG PLASTIC SERVICE GMBH<br />
Pirnaerstr. 14 - 16<br />
68309 Mannheim<br />
Tel.: 0621 / 7162 - 0<br />
Fax.: 0621 / 7162 - 162<br />
<strong>Manual</strong><br />
<strong>Controller</strong> <strong>cabinet</strong><br />
<strong>RSL98</strong><br />
Version 1.0
<strong>Manual</strong> <strong>RSL98</strong> V1.0 see<br />
GENERAL INSTRUCTION .............................................................................................3<br />
Right reserved to make modification ................................................................................................3<br />
Despatch / <strong>de</strong>livery ..............................................................................................................................3<br />
STARTING-UP INSTRUCTIONS .....................................................................................4<br />
DISPLAYS AND OPERATING UNIT...............................................................................4<br />
DISPLAY INFORMATIONS ...........................................................................................4<br />
INSTRUCTIONS FOR USE .............................................................................................6<br />
To change from main level to control/user level.............................................................................7<br />
To change from main level to parameter level...............................................................................7<br />
Remove input barrier............................................................................................................................8<br />
Changing values...................................................................................................................................8<br />
Changing values step by step............................................................................................................................8<br />
Changing values continously .............................................................................................................................9<br />
Changing values continuously in steps of 10 <strong>de</strong>grees...................................................................................9<br />
Entry each zone...................................................................................................................................10<br />
Selecting a loop for an entry ............................................................................................................................10<br />
Block entry............................................................................................................................................11<br />
Saving changed values to file ..........................................................................................................12<br />
Leaving control/user- resp. parameter level ..................................................................................12<br />
OPERATING EXAMPLES ............................................................................................13<br />
Operation example control level.....................................................................................................13<br />
Operating example parameter level ..............................................................................................15<br />
STATE .........................................................................................................................16<br />
Control the state of the zones ..........................................................................................................16<br />
SPECIAL FUNCTIONS ................................................................................................17<br />
1
<strong>Manual</strong> <strong>RSL98</strong> V1.0 see<br />
Special function current transfer ......................................................................................................17<br />
ALARM/DIAGNOSE/CAUSE/RELIEF .........................................................................18<br />
MESSAGES IN CASE OF DEFECTS.............................................................................19<br />
PARAMETERLIST.........................................................................................................19<br />
Parameters of the control level ........................................................................................................19<br />
Target value .........................................................................................................................................................19<br />
Gradient angle....................................................................................................................................................19<br />
Current tolerance ...............................................................................................................................................19<br />
Target current ......................................................................................................................................................20<br />
Parameters of the parameter level .................................................................................................20<br />
Actuator mo<strong>de</strong> ...................................................................................................................................................20<br />
Lower limit.............................................................................................................................................................20<br />
Upper limit ............................................................................................................................................................20<br />
Target value 2/Lowering value.........................................................................................................................20<br />
Temperature increase........................................................................................................................................20<br />
Approach hold....................................................................................................................................................21<br />
Approach time....................................................................................................................................................21<br />
Passive / active zone .........................................................................................................................................21<br />
Unit of temperature ............................................................................................................................................21<br />
2
<strong>Manual</strong> <strong>RSL98</strong> V1.0 see<br />
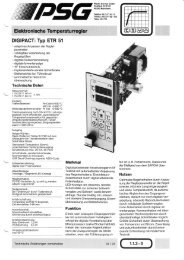
General instruction<br />
The controller <strong>cabinet</strong> RSL 98 contents the temperature controller ETR98.<br />
The ETR98 is a multiple temperature control unit for 8 temperature control<br />
zones. It is operated by means of a key-pad on its front panel, and is protected<br />
against the unintentional input of data.<br />
Right reserved to make modification<br />
These operating instructions have been drawn up with the aim of being up<br />
to date and correct. Nevertheless, technological improvements can make<br />
it necessary to make modifications to this control unit or to the way it is operated<br />
which <strong>de</strong>viate from these instructions. For this reason we can bear<br />
no legal liability un<strong>de</strong>r such circumstances for any malfunction or interruptions<br />
in operation or for any consequent loss or damage.<br />
Despatch / <strong>de</strong>livery<br />
The packaging of this controller <strong>cabinet</strong> normally unit is shatterproof and<br />
will normally ensure a<strong>de</strong>quate protection during <strong>de</strong>spatch. However, if external<br />
damage is visible even before the box has been opened, the unit<br />
should be examined carefully for any sign of internal damage. Please contact<br />
the sen<strong>de</strong>r or the firm of PSG PLASTIC SERVICE GMBH so that an assessment<br />
can be ma<strong>de</strong> of any damage. CAUTION: the unit must not be<br />
taken into operation if there is any suspicion that it has been damaged.<br />
3
<strong>Manual</strong> <strong>RSL98</strong> V1.0 see<br />
Starting-up instructions<br />
Before the first use you have to you connect the controller <strong>cabinet</strong> as<br />
shown in the electric plan ad<strong>de</strong>d to this manual instruction.<br />
Displays and operating unit<br />
A Net-switch G state key<br />
B switch - 2nd targetvalue H select key<br />
C netfuse I handkey<br />
D fuses heating J ‘arrow right’-key<br />
E display heating K ‘arrow down’-key<br />
F information display L ‘arrow up’-key<br />
Display informations<br />
4<br />
M loop display<br />
In the main level the actual values are shown in the 8 loopdisplays. The<br />
loopdisplays are numbered on the frontfoil.<br />
In the diplay below the name of the parameters in the loopdisplay is<br />
shown (information display). In the main level you see °C for the actual<br />
value.<br />
The LED in the alarm key flashes if an alarm is <strong>de</strong>tected.<br />
If the LED in the parameter key is shining you see the diplayed parameter<br />
in the information display (e.g. target value).
<strong>Manual</strong> <strong>RSL98</strong> V1.0 see<br />
If the LED in the hand key is shining at least one loop is in actuator mo<strong>de</strong>.<br />
In the loop displays is shown which zone is in actuator mo<strong>de</strong>. You have an<br />
alternating display of the actual value and Stb in the loop diplay.<br />
If the left LED in the hand key is shining you are in the ‘2nd target value/lowering<br />
mo<strong>de</strong>’.<br />
To indicate that the zones are in the standby mo<strong>de</strong> 2So cyclially flashes up<br />
in the loop displays.<br />
If no thermocouple is <strong>de</strong>tected 999 is displayed in the loop displays.<br />
If it is a sensor break Fb cyclially flashes up in the loop display.<br />
If a wrong sensor polarity is recognised, the information FP will appear in<br />
the loop display.<br />
5
<strong>Manual</strong> <strong>RSL98</strong> V1.0 see<br />
Instructions for use<br />
The controller is operated by means of a keypad on its frontpanel.<br />
The functions are clearly divi<strong>de</strong>d in 3 levels :<br />
1. After switching on the controller you are in the main level, in which all<br />
actual temperature values ar shown in the loop display. If you once<br />
press the manual key (‘Hand key’) the actual gradient angle is diplayed,<br />
after a second press the actual current is shown.<br />
You can choose the parameters in <strong>de</strong>pen<strong>de</strong>nce on use in two levels. To<br />
change in the control level or in the parameter level you maust be in<br />
main level.<br />
2. All functions can be foun<strong>de</strong>d at the control level that are nee<strong>de</strong>d for<br />
the normal daily operation of the controller. You reach the control level<br />
(user level) with a keyhit.<br />
3. The parameter level, which you reach with a key combination, contains<br />
all the functions which as a rule only have to be used once, when<br />
the unit is being started up or you have a greater change in your configuration.<br />
You find a list of the controllertypes available from stock in chapter 4. Not<br />
used parameters are not seen for the user.<br />
Following the steps if you work with the controller:<br />
1. Change from main level to control level and choose the wanted parameter.<br />
The values of all zones are shown in the loopdisplay.<br />
2. To change a parameter you have to release the input barrier and select<br />
the zone. Top change the parameter for all loops you have to activate<br />
the block entry.<br />
3. Change the values and acknowledge the entry. If there is no acknowledge<br />
30 seconds after a change the values that have been entered will<br />
not be saved to file and the old values will remain in effect.<br />
6<br />
main level<br />
control/user level<br />
parameterlevel<br />
How to serve the<br />
controller
<strong>Manual</strong> <strong>RSL98</strong> V1.0 see<br />
To change from main level to control/user level<br />
1<br />
2<br />
To change from main level to parameter level<br />
3<br />
4<br />
1<br />
2<br />
3<br />
4<br />
7<br />
select control level<br />
.....<br />
1 8<br />
press key<br />
push additionally<br />
5 .....<br />
1 8
<strong>Manual</strong> <strong>RSL98</strong> V1.0 see<br />
Remove input barrier<br />
Changing values<br />
After releasing the input barrier you change the values with the ‘Less key’<br />
an the ‘More key’. Values can be changed step by step, continiously or<br />
continiously in big steps.<br />
Changing values step by step<br />
Increasing values<br />
Decreasing values<br />
max. 3 sec<br />
8<br />
remove input barrier<br />
press key until <strong>de</strong>sired<br />
value is shown<br />
in display<br />
press key until <strong>de</strong>sired<br />
value is shown<br />
in display
<strong>Manual</strong> <strong>RSL98</strong> V1.0 see<br />
Changing values continously<br />
Increasing values<br />
Decreasing values<br />
Changing values continuously in steps of 10 <strong>de</strong>grees<br />
Increasing values<br />
Decreasing values<br />
1<br />
2<br />
1<br />
2<br />
9<br />
hold key<br />
hold key<br />
press key<br />
and push additionally<br />
press key<br />
and push additionally
<strong>Manual</strong> <strong>RSL98</strong> V1.0 see<br />
Entry each zone<br />
Release input barrier<br />
Selecting a loop for an entry<br />
You only can select a zone if the input barrier is released.<br />
The way to select a zone with the key is shown in the following picture.<br />
(e.g. select zone 5)<br />
1<br />
2<br />
3<br />
4<br />
5<br />
1<br />
2<br />
3<br />
max. 3 sec<br />
max. 3 sec<br />
10<br />
remove input barrier<br />
.....<br />
1 8<br />
remove input barrier<br />
.....<br />
1 8<br />
1 8 press key until <strong>de</strong>sired loop display<br />
flashes<br />
.....<br />
1 5<br />
.....<br />
8
<strong>Manual</strong> <strong>RSL98</strong> V1.0 see<br />
Block entry<br />
Using block mo<strong>de</strong> you can change the values of all 8 loops at one time.<br />
The way to reach the block entry is shown in the following picture.<br />
You have to notice that all values are changed at the same time to the<br />
same value.<br />
1<br />
2<br />
3<br />
4<br />
5<br />
6<br />
max. 3 sec<br />
To show that you are in block entry, all 8 zone displays start flashing at once.<br />
11<br />
remove input barrier<br />
.....<br />
1 8<br />
1 8 press key<br />
and push additionally<br />
.....<br />
1 8
<strong>Manual</strong> <strong>RSL98</strong> V1.0 see<br />
Saving changed values to file<br />
Before you leave control or parameter level entry has to be acknowledged.<br />
If during 30 seconds after the last keypress no acknowledge has<br />
been given the values that have been entered will not be saved to file<br />
and the old values will remain in effect.<br />
You save changed values in control or parameter level if you press the<br />
Loop/Enterkey.<br />
Leaving control/user- resp. parameter level<br />
The main level can be reached using the state/escape key. Previously<br />
changed values have to be acknowledged.<br />
12
<strong>Manual</strong> <strong>RSL98</strong> V1.0 see<br />
Operating examples<br />
Operation example control level<br />
The following two examples show a change of one zone and on block<br />
entry in the control level.<br />
Example 1: Change the lower limit value of zone 5 from 5°C to 3°C.<br />
1<br />
2<br />
3<br />
4<br />
5<br />
6<br />
7<br />
8<br />
9<br />
10<br />
11<br />
12<br />
13<br />
14<br />
15<br />
16<br />
max. 3 sec<br />
13<br />
1 8<br />
.....<br />
1 8<br />
select control level<br />
.....<br />
1 8<br />
.....<br />
1 8<br />
press key repeatedly until<br />
info display shows ...<br />
.....<br />
1 8<br />
remove input barrier<br />
.....<br />
1 8<br />
press key until <strong>de</strong>sired<br />
loop display flashes<br />
..... .....<br />
1 5 8<br />
press key until disired value<br />
is shown in<br />
loop display<br />
..... .....<br />
1 5 8<br />
1 8 acknowledge entry<br />
A<br />
.....<br />
5 6<br />
leave control level<br />
.....<br />
1 8<br />
.....<br />
8
<strong>Manual</strong> <strong>RSL98</strong> V1.0 see<br />
Example 2: Changing the upper limit value in block entry from 3°C to<br />
5°C .<br />
1<br />
2<br />
3<br />
4<br />
5<br />
6<br />
7<br />
8<br />
9<br />
10<br />
11<br />
12<br />
13<br />
14<br />
15<br />
16<br />
17<br />
max. 3 sec<br />
1 8<br />
A<br />
14<br />
.....<br />
1 8<br />
select control level<br />
.....<br />
1 8<br />
.....<br />
1 8<br />
press key repeatedly until info display<br />
shows ...<br />
.....<br />
1 8<br />
remove input barrier<br />
.....<br />
1 8<br />
1 8 press key<br />
and push additionally<br />
.....<br />
1 8<br />
press key until <strong>de</strong>sired<br />
value is shown in<br />
display<br />
.....<br />
1 8<br />
acknowledge entry<br />
.....<br />
1 2<br />
leave control level<br />
.....<br />
1 8<br />
.....<br />
8
<strong>Manual</strong> <strong>RSL98</strong> V1.0 see<br />
Operating example parameter level<br />
All released parameters for units available from stock are listed in appendix<br />
4. In appendix 6 you fing a free list for your own notices (e.g custom<br />
specific parameters.<br />
Example: Changing the maximum required value of zone 5 from 500°C<br />
to 250°C.<br />
1<br />
2<br />
3<br />
4<br />
5<br />
6<br />
7<br />
8<br />
9<br />
10<br />
11<br />
12<br />
13<br />
14<br />
15<br />
16<br />
max. 3 sec<br />
15<br />
.....<br />
1 8<br />
press key<br />
and push additionally<br />
.....<br />
1 8<br />
remove input barrier<br />
.....<br />
1 8<br />
.....<br />
1 8<br />
press key until <strong>de</strong>sired parameter<br />
is shown in info display<br />
.....<br />
1 8<br />
press key until <strong>de</strong>sired zone<br />
flashes in<br />
loop display<br />
..... .....<br />
1 5<br />
press key until <strong>de</strong>sired<br />
value is shown in<br />
loop display<br />
1 8 acknowledge entry<br />
A<br />
.....<br />
1 5<br />
leave parameter level<br />
.....<br />
1 8<br />
.....<br />
8<br />
8
<strong>Manual</strong> <strong>RSL98</strong> V1.0 see<br />
State<br />
Control the state of the zones<br />
In the following picture is shown how to change from main level to the state<br />
diplay level, in which you are able to in<strong>de</strong>ntificate the states of each zone.<br />
1<br />
2<br />
3<br />
If an alarm is shown in the state key you can locate the alarm if you press<br />
the State / Escape key. The state of every zone is displayed in the loop diplays.<br />
Alarm LED<br />
flashes when alarm is<br />
imminent<br />
temperature limit value<br />
minus<br />
temperature limit value<br />
minus<br />
16<br />
A<br />
A<br />
output heating<br />
temperature limit value<br />
plus<br />
.....<br />
1 8<br />
activate state display<br />
A<br />
output heating<br />
temperature limit value<br />
plus<br />
0 = off<br />
1 = on<br />
output cooling<br />
current alarm<br />
output cooling<br />
current alarm
<strong>Manual</strong> <strong>RSL98</strong> V1.0 see<br />
Special functions<br />
Special function current transfer<br />
With the current transfer the current target values are set as the actual current<br />
values for every zone. How to use the current transfer is shown in the<br />
following 10 operating steps.<br />
1<br />
2<br />
3<br />
4<br />
5<br />
6<br />
7<br />
8<br />
9<br />
10<br />
max. 3 sec<br />
automatic change<br />
17<br />
A<br />
.....<br />
1 8<br />
Keep pressing repeatedly until<br />
the info display shows ...<br />
.....<br />
1 8<br />
remove input barrier<br />
.....<br />
1 8<br />
or<br />
.....<br />
1 8<br />
.....<br />
1 8<br />
leave control level<br />
.....<br />
1 8
<strong>Manual</strong> <strong>RSL98</strong> V1.0 see<br />
Alarm/Diagnose/Cause/Relief<br />
Press the ‘State key’ in the main level gives you a <strong>de</strong>tailed status information.<br />
The loop display show the status of every loop.<br />
Alarm Diagnose Cause Relief<br />
sensor break<br />
Upper limit<br />
wrong sensor polarity<br />
Lower limit<br />
heating on<br />
Lower limit<br />
Lower limit<br />
actual value =<br />
target value<br />
Upper limit<br />
Upper limit<br />
actual value =<br />
target value<br />
18<br />
- sensor break<br />
- sensor not connected<br />
- sensor cable wrong<br />
connected<br />
- heating element <strong>de</strong>fect<br />
- heating power too<br />
small<br />
- lower limit value too<br />
small<br />
- higher temperature<br />
of the neighbourzones<br />
influences<br />
temperature of the<br />
zone<br />
- upper limit value too<br />
small<br />
- check sensor<br />
(if necessary replace sensor)<br />
- exchanged the sensor<br />
cables<br />
- check heating element<br />
(if neccessary replace<br />
element)<br />
- check heating<br />
power(optimize if necessary)<br />
- check lower limit value<br />
(change if necessary)<br />
(if necessary check<br />
neighbourzones)<br />
- check upper limit value<br />
(change if necessary)
<strong>Manual</strong> <strong>RSL98</strong> V1.0 see<br />
Messages in case of <strong>de</strong>fects<br />
In occurence of a hardware<strong>de</strong>fect one of the following four messages are<br />
displayed in the loop display. In this case the controller must be sent immediatly<br />
to PSG.<br />
fault<br />
checksum<br />
EPROM<br />
Parameterlist<br />
fault<br />
temperature<br />
balance<br />
19<br />
fault<br />
RAM<br />
EEPROM<br />
hardwarefault<br />
In the following chapter all available parameters of the controller ETR98<br />
are listed. On the right margin you find the con<strong>de</strong>nsation of every parameter<br />
and the standardvalue stored if <strong>de</strong>livered from manufactury. In<br />
case of other configurations the settings are recor<strong>de</strong>d in seperate parameter<br />
lists. You find the parameterlists for units from the stock in appendix 4. Following<br />
all temperaturevalues are listed in °C. With parameter CEL you are<br />
able to change the display to °F.<br />
Parameters of the control level<br />
Target value<br />
zonespezific parameter range: 000...999<br />
If target value is set to 0 the loop is switched off but the monitoring of the<br />
current is still activated.<br />
Gradient angle<br />
zonespecific parameter range: -99...99<br />
This parameter indicates the current regulation ratio in % during normal<br />
regulation mo<strong>de</strong>. The value correspon<strong>de</strong>nts to the heating or cooling<br />
output of a connected heating or cooling unit.<br />
If the zone is in actuator mo<strong>de</strong> the regulation ratio for actuator mo<strong>de</strong> is entered.<br />
The regulation ratio manual can be set to other values.<br />
Current tolerance<br />
zonenspezific parameter range: 000...99.9<br />
You can enter the number of A by which the current actual value may<br />
<strong>de</strong>viate from the current target value without incurring an alarm signal.<br />
The value must be about 10% of the set current targetvalue.
<strong>Manual</strong> <strong>RSL98</strong> V1.0 see<br />
Target current<br />
zonenspezific parameter range: 0...99.9or 0...999<br />
To monitor the current you need the peripherical cards STI88 and VSW41.<br />
If the power consumption of the heating is known, this can be entered direct<br />
at this point. If the power consumption is not known, it is possible to<br />
measure the current with a current transfer.<br />
The current monitoring is <strong>de</strong>activated if you set the target current to 0 A.<br />
Parameters of the parameter level<br />
Actuator mo<strong>de</strong><br />
zonespezific parameter range: on/off<br />
If this parameter is set to on, the closed-loop control is disactivated and<br />
the controller operates in actuator mo<strong>de</strong>.<br />
In the loop displays Stb is shown cyclially. The green LED with the % in the<br />
Hand key is on.<br />
Lower limit<br />
zonespecific parameter range: 000...999<br />
The users enters the number of °C by which the actual value <strong>de</strong>viate from<br />
the target value without incurring an alarm signal. In relation to the parameter<br />
AS2 it can be an absolute or relative value.<br />
Upper limit<br />
zonenspezific parameter range: 000...999<br />
The users enters the number of °C by which the actual value <strong>de</strong>viate from<br />
the target value without incurring an alarm signal. In relation to the parameter<br />
AS1 it can be an absolute or relative value.<br />
Target value 2/Lowering value<br />
zonespecific parameter range: 000...999<br />
This parameter serves the 2nd target.<br />
2So is shown cyclically in the loop display.<br />
Temperature increase<br />
zonespezific parameter range: 000...999<br />
This specifies how quickly the entered target value should change. Normally,<br />
the entered target value is accepted directly by the controller. This<br />
parameter enables the target value to be increased, not sud<strong>de</strong>nly, but via<br />
a ramp. The entered value then terminates the number of <strong>de</strong>grees by<br />
which the target value may change in a minute. 000 means that the tem-<br />
20
<strong>Manual</strong> <strong>RSL98</strong> V1.0 see<br />
perature increase is disactivated.<br />
Approach hold<br />
zonespezific parameter range: on / off<br />
The approach hold function regulates the connected temperature zones<br />
to 100°C and holds this temperature for the length of time set as the approach<br />
time, at the end of which it then changes over to the normal regulation<br />
program or to the pre-set required time. Precondition is that, after a<br />
reset, an actual value smaller than 60 °C and a target value greater than<br />
100°C are <strong>de</strong>tected. Afb is shown cyclially in the loop display.<br />
After the start up time normal regulation mo<strong>de</strong> is activated.<br />
Approach time<br />
zonespezific parameter range: 000...099<br />
Time during the approach hold is activated. The remaining approch time<br />
is shown in the loop display.<br />
Passive / active zone<br />
zonespezific parameter range: on / off<br />
Individual zones can be switched off by setting the parameter to on. Alarm<br />
functions are not activated in this case.<br />
Unit of temperature<br />
parameter for all zones range: on / off<br />
Definition of the temperatureunit: Celsius (CEL=on) or Fahrenheit<br />
(CEL=off).<br />
21