Studio Force V 12 User Manual - Chroma-Q
Studio Force V 12 User Manual - Chroma-Q
Studio Force V 12 User Manual - Chroma-Q

Create successful ePaper yourself
Turn your PDF publications into a flip-book with our unique Google optimized e-Paper software.
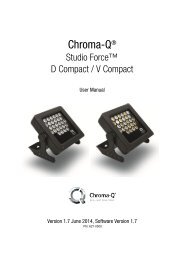
<strong>Chroma</strong>-Q<br />
<strong>Studio</strong> <strong>Force</strong> D<strong>12</strong> / V<strong>12</strong><br />
<strong>User</strong> <strong>Manual</strong><br />
Software Version 2.0 September 20<strong>12</strong><br />
PN: 621-0502
Warranty Statement<br />
<strong>Chroma</strong>-Q warrants to the original purchaser, with proof of purchase, that its delivered products shall be free from defects in<br />
material and workmanship under normal use for a period of <strong>12</strong> months from date of shipment.<br />
<strong>Chroma</strong>-Q will repair, or at its option, provide an equivalent item or replace, the defective product during the stated warranty<br />
period. This warranty applies only to the repair or replacement of the product and only when the product is properly handled,<br />
installed and maintained according to <strong>Chroma</strong>-Q instructions. This warranty excludes defects resulting from improper<br />
handling, storage, installation, acts of God, fire, vandalism or civil disturbances. Purchaser must notify <strong>Chroma</strong>-Q in writing<br />
within 14 days of noticing the defect. This warranty excludes field labour or service charges related to the repair or<br />
replacement of the product.<br />
The warranty contained herein shall not extend to any finished goods or spare parts from which any serial number has been<br />
removed or which have been damaged or rendered defective (a) as a result of normal wear and tear, willful or accidental<br />
damage, negligence, misuse or abuse; (b) due to water or moisture, lightning, windstorm, abnormal voltage, harmonic<br />
distortion, dust, dirt, corrosion or other external causes; (c) by operation outside the specifications contained in the user<br />
documentation; (d) by the use of spare parts not manufactured or sold by <strong>Chroma</strong>-Q or by the connection or integration of<br />
other equipment or software not approved by <strong>Chroma</strong>-Q unless the Customer provides acceptable proof to <strong>Chroma</strong>-Q that<br />
the defect or damage was not caused by the above; (e) by modification, repair or service by anyone other than <strong>Chroma</strong>-Q,<br />
who has not applied for and been approved by <strong>Chroma</strong>-Q to do such modification, repair or service unless the Customer<br />
provides acceptable proof to <strong>Chroma</strong>-Q that the defect or damage was not caused by the above; (f) due to procedures,<br />
deviating from procedures specified by <strong>Chroma</strong>-Q or (g) due to failure to store, install, test, commission, maintain, operate or<br />
use finished goods and spare parts in a safe and reasonable manner and in accordance with <strong>Chroma</strong>-Q’s instructions (h) by<br />
repair or replacement of engines without factory training.<br />
The warranty contained herein shall not apply to finished goods or spare parts which are sold “as is”, as “second-hand”, as<br />
used”, as “demo” or under similar qualifications or to Consumables (“Consumables” is defined as any part(s) of goods or<br />
part(s) for use with goods, which part(s) of goods or part(s) for use with goods are consumed during the operation of the<br />
goods and which part(s) of goods or part(s) for use with goods require replacement from time to time by a user such as, but<br />
not limited to, light bulbs).<br />
The warranty contained herein shall not apply, unless the total purchase price for the defective finished goods or spare parts<br />
has been paid by the due date for payment.<br />
The warranty contained herein applies only to the original purchaser and are not assignable or transferable to any<br />
subsequent purchaser or end-user.<br />
This warranty is subject to the shipment of the goods, within the warranty period, to the <strong>Chroma</strong>-Q warranty returns<br />
department, by the purchaser, at the purchasers expense. If no fault is found, <strong>Chroma</strong>-Q will charge the purchaser for the<br />
subsequent return of the goods.<br />
<strong>Chroma</strong>-Q reserves the right to change the warranty period without prior notice and without incurring obligation and<br />
expressly disclaims all warranties not stated in this limited warranty.<br />
www.chroma-q.com<br />
<strong>Studio</strong> <strong>Force</strong> D <strong>12</strong> / V <strong>12</strong> <strong>User</strong> <strong>Manual</strong> 1 V2.0 September 20<strong>12</strong>
Disclaimer<br />
The information contained herein is offered in good faith and is believed to be accurate. However, because conditions and<br />
methods of use of our products are beyond our control, this information should not be used in substitution for customer's<br />
tests to ensure that <strong>Chroma</strong>-Q products are safe, effective, and fully satisfactory for the intended end use. Suggestions of<br />
use shall not be taken as inducements to infringe any patent. <strong>Chroma</strong>-Q sole warranty is that the product will meet the sales<br />
specifications in effect at the time of shipment. Your exclusive remedy for breach of such warranty is limited to refund of<br />
purchase price or replacement of any product shown to be other than as warranted.<br />
<strong>Chroma</strong>-Q reserves the right to change or make alteration to devices and their functionality without notice due to our on<br />
going research and development.<br />
The <strong>Chroma</strong>-Q <strong>Studio</strong> <strong>Force</strong> D <strong>12</strong> / V <strong>12</strong> range has been designed specifically for the lighting industry. Regular maintenance<br />
should be performed to ensure that the products perform well in the entertainment environment.<br />
If you experience any difficulties with any <strong>Chroma</strong>-Q products please contact your selling dealer. If your selling dealer is<br />
unable to help please contact support@chroma-q.com. If the selling dealer is unable to satisfy your servicing needs, please<br />
contact the following, for full factory service:<br />
Outside North America: North America:<br />
Tel: +44 (0)1494 446000 Tel: 416-255-9494<br />
Fax: +44 (0)1494 461024 Fax: 416-255-3514<br />
support@chroma-q.com support@chroma-q.com<br />
For further information please visit the <strong>Chroma</strong>-Q website at www.chroma-q.com.<br />
<strong>Chroma</strong>-Q and <strong>Studio</strong> <strong>Force</strong> are trademarks, for more information on this visit<br />
www.chroma-q.com/trademarks.<br />
The rights and ownership of all trademarks are recognised.<br />
Important Notice:<br />
As per the requirements in the Occupational Safety and Health Administration standards for product approval, please refer to<br />
the OSHA web pages http://www.osha.gov/dts/otpca/nrtl/ for information on the list of Nationally Recognized Testing<br />
Laboratories (NRTLs) and the scope of recognition.<br />
www.chroma-q.com<br />
<strong>Studio</strong> <strong>Force</strong> D <strong>12</strong> / V <strong>12</strong> <strong>User</strong> <strong>Manual</strong> 2 V2.0 September 20<strong>12</strong>
Table of Contents<br />
1. Product Overview ……………...…………………………………………………….………... 4<br />
2. Operation ……………...…………………………………………………….………... 5<br />
2.1 Unpacking the units ………………….………………………………………. 5<br />
2.2 Cabling ……………………………………………….…………. 5<br />
2.3 Mounting …………………………………………………….……. 5<br />
2.4 Optical Accessories …………………………………………………….……. 6<br />
2.5 Chevrons ...…..……….……………………………………………. 6<br />
2.6 Control ...………..….……………………………………………. 6<br />
2.7 DMX Protocol – <strong>Studio</strong> <strong>Force</strong> D <strong>12</strong> ...……..….…………………………………………….10<br />
2.8 DMX Protocol – <strong>Studio</strong> <strong>Force</strong> V <strong>12</strong> ...……….……………………………………………. 11<br />
2.9 Thermal Performance ...………..….……………………………………………. 13<br />
3. Troubleshooting ……………...…………………………………………………….………... 14<br />
4. Specification ……………...…………………………………………………….………... 14<br />
4.1 Technical Specifications ...………..….……………………………………………. 14<br />
4.2 Drawings ...………..….……………………………………………. 16<br />
4.3 Accessories ...………..….……………………………………………. 16<br />
3. Maintenance ……………...…………………………………………………….………... 16<br />
www.chroma-q.com<br />
<strong>Studio</strong> <strong>Force</strong> D <strong>12</strong> / V <strong>12</strong> <strong>User</strong> <strong>Manual</strong> 3 V2.0 September 20<strong>12</strong>
1. Product overview<br />
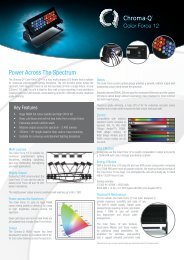
The <strong>Chroma</strong>-Q <strong>Studio</strong> <strong>Force</strong> <strong>12</strong> LED fixtures range features a choice of 6,100K CCT, daylight white (<strong>Studio</strong> <strong>Force</strong> D <strong>12</strong>)<br />
and 3,000K – 6,100K CCT, variable white (<strong>Studio</strong> <strong>Force</strong> V <strong>12</strong>) models – the latter featuring 3200°K and 5600°K laboratory<br />
calibrated presets.<br />
Utilising the same core technologies as the innovative <strong>Chroma</strong>-Q Color <strong>Force</strong> range, both models offer at least twice the<br />
light output of their RGBA colour variants.<br />
The units provide an extreme output of 6,000 lumens (<strong>Studio</strong> <strong>Force</strong> D <strong>12</strong>) / 5,300 lumens (<strong>Studio</strong> <strong>Force</strong> V <strong>12</strong>) for evenly<br />
washing large areas, complemented by smooth, theatrical grade dimming.<br />
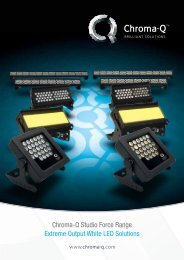
The <strong>Studio</strong> <strong>Force</strong> range is specifically designed for TV, film, touring, exhibitions, corporate events and theatre lighting<br />
applications.<br />
At only 300mm / 1ft long, the fixtures are ideal for floor, wall or truss mounting. The units can also be used to extend <strong>Studio</strong><br />
<strong>Force</strong> LED batten installations.<br />
Optional accessories include cyc and border light lens, lightbank kit + , egg crate louver, top hat, half top hat, barn door, spigot<br />
adaptor and diffuser box attachment accessories.<br />
Both models utilise two light engines featuring 24 high powered LEDs per engine / a total of 48 LEDs per fixture. The <strong>Studio</strong><br />
<strong>Force</strong> D <strong>12</strong> features 24 cold white LEDs per engine, whereas the <strong>Studio</strong> <strong>Force</strong> V <strong>12</strong> features <strong>12</strong> cold white and <strong>12</strong> warm<br />
white LEDs per engine.<br />
The models are equipped with a built-in power supply and can operate as a standalone unit or be remotely controlled<br />
through ANSI E1.11 USITT DMX 5<strong>12</strong>-A protocol. The control options incorporate a choice of multiple channel intensity<br />
control, effects and a dynamic Variable Effects Engine integrated in the software, which gives the user full control of the<br />
effects combination.<br />
The product's robust anodised aluminum extruded construction houses a discreet cable management system. Additional<br />
protection is built around the lenses for a truly road proof fixture.<br />
+ The Lightbank Kit consists of the Lightbank Adaptor (Speedring) and Lightbank. Both items can also be purchased separately. Fixture not included.<br />
www.chroma-q.com<br />
<strong>Studio</strong> <strong>Force</strong> D <strong>12</strong> / V <strong>12</strong> <strong>User</strong> <strong>Manual</strong> 4 V2.0 September 20<strong>12</strong>
Note: HANDHELD COLOUR METERS<br />
Handheld Colour Meters provide a very limited measuring range for LED fixtures, which results in inconsistent and unreliable<br />
data.<br />
All photometric values listed in this document are based on testing and measurements conducted by certified independent<br />
laboratories with reference to the IES standards.<br />
2. Operation<br />
2.1 Unpacking the Units<br />
The <strong>Studio</strong> <strong>Force</strong> D <strong>12</strong> / V <strong>12</strong> package includes 1 unit <strong>Studio</strong> <strong>Force</strong> <strong>12</strong> fixture, power connector (EU)/power cord (US) and a<br />
Quick Start Guide. We recommend that you keep the original packaging in case the item needs to be returned.<br />
2.2 Cabling<br />
The <strong>Studio</strong> <strong>Force</strong> D <strong>12</strong> / V <strong>12</strong> utilises PowerCon connectors for power input and through. The DMX control data input and<br />
through connections from an external control console are via two XLR 5-pin connectors. The chassis are ground bonded.<br />
Note: The maximum number of <strong>Studio</strong> <strong>Force</strong> D <strong>12</strong> / V <strong>12</strong> fixtures running off a single power input cable is 10 at <strong>12</strong>0V AC or<br />
20 at 240V AC. Please refer to ANSI and AWG standards for the maximum data and power cable lengths.<br />
XLR 5-pin Cable:<br />
Pin# Function<br />
1 Ground (Screen)<br />
2 Data Minus<br />
3 Data Plus<br />
4 Spare Data Minus<br />
5 Spare Data Plus<br />
Power Cable:<br />
International<br />
Colour Code<br />
North American<br />
Colour Code<br />
Connections<br />
Green and Yellow Green Earth (E) Ground (Green)<br />
Blue White Neutral (N) Neutral (Silver)<br />
Brown Black Live (L) Hot (Gold)<br />
Important Notice: The use of an opto-splitter for DMX signal distribution is highly recommended when several fixture units<br />
are not plugged into the same power source.<br />
2.3 Mounting<br />
The <strong>Studio</strong> <strong>Force</strong> D <strong>12</strong> / V <strong>12</strong> fixtures are equipped with a built-in mounting yoke for floor, wall and truss mounting<br />
applications. The yoke assembly features a hidden quick release fixing for fast and easy tilt adjustment.<br />
www.chroma-q.com<br />
<strong>Studio</strong> <strong>Force</strong> D <strong>12</strong> / V <strong>12</strong> <strong>User</strong> <strong>Manual</strong> 5 V2.0 September 20<strong>12</strong>
Note: Secure the fixture with a safety bond. A provision for a fixing hold is built into the yoke.<br />
2.4 Optical Accessories<br />
Slide-in optical accessories are available to adjust the beam angle of the <strong>Studio</strong> <strong>Force</strong> D <strong>12</strong> /<br />
V <strong>12</strong> fixtures to suit a wide range of applications. Two accessory slots and a swivel plate are included at the front and side<br />
of the fixture to hold and lock these slide-in accessories: cyc and border light lens, lightbank kit, egg crate louver, top hat,<br />
half top hat, barn door, spigot adaptor and diffuser box attachment accessories.<br />
2.5 Chevrons<br />
The <strong>Studio</strong> <strong>Force</strong> D <strong>12</strong> / V <strong>12</strong> fixtures have the ‘chevron’ markings stamped on both ends and printed at the rear enclosure<br />
to indicate the side of the fixture that should be adjacent to the wall or cyclorama.<br />
2.6 Control<br />
<strong>Studio</strong> <strong>Force</strong> D <strong>12</strong> / V <strong>12</strong> fixtures can operate as a standalone unit or be controlled remotely via ANSI E1.11 USITT DMX5<strong>12</strong>-<br />
A protocol. The control functions can be accessed through the LCD display at the rear of the fixture with 4 push buttons.<br />
Push button operation:<br />
Control Function<br />
Exit Back to previous menu<br />
Up Arrow Increases (+) the mode level or value<br />
Down Arrow Decreases (-) the mode level or value<br />
Back Arrow (Enter) Stores the menu choice<br />
Power-Up Display:<br />
On power-up and home position, the display shows the model name ‘<strong>Studio</strong> F<strong>12</strong>D’, software version ‘v2.0’, the DMX<br />
address ‘d001’, current assigned mode ‘Dim2x’, and the number of channels the <strong>Studio</strong> <strong>Force</strong> <strong>12</strong> is in ‘2ch’.<br />
Display Mode:<br />
The LCD is backlit when you access the menus. This will turn off when left undisturbed for 5 seconds.<br />
www.chroma-q.com<br />
<strong>Studio</strong> <strong>Force</strong> D <strong>12</strong> / V <strong>12</strong> <strong>User</strong> <strong>Manual</strong> 6 V2.0 September 20<strong>12</strong>
Control Modes:<br />
Grouping - The <strong>Studio</strong> <strong>Force</strong> D <strong>12</strong> / V <strong>12</strong> consist of 2 LED engines with 24 white LEDs each. The two engines can be<br />
controlled as a one group “All” or as two separate groups “Duo”.<br />
<strong>Studio</strong> <strong>Force</strong> D <strong>12</strong><br />
8 channels (Dim8x) – 1 control channel directly affecting the intensity of 6 LEDs per engine.<br />
2 channels (FxDim) – 1 control channel directly affecting the intensity of all the LEDs and 1 control channel for intensity<br />
effects.<br />
2 channels (Dim2x) – 1 control channel directly affecting the intensity of 24 LEDs per engine.<br />
1 channel – (Dim1x) – 1 control channel directly affecting the intensity of all the LEDs.<br />
1 channel (Look Select) – 1 control channel directly selecting scenes from the look store.<br />
<strong>Studio</strong> <strong>Force</strong> V <strong>12</strong><br />
8 channels (WWWW) – 1 control channel directly affecting the intensity of 6 LEDs per engine.<br />
3 channels (sWWCW) – 1 control channel for intensity effects, the 2 nd control channel directly affecting the intensity of all<br />
warm white LEDs and the 3 rd channel directly affecting the intensity of all cold white LEDs.<br />
2 channels (WW/CW) – 1 control channel directly affecting the intensity of all warm white LEDs and the 2 nd control channel<br />
directly affecting the intensity of all cold white LEDs.<br />
2 channels (CTI) – 1 control channel for Colour Temperature adjustment and the 2 nd control channel for Intensity level.<br />
1 channel (Look Select) – 1 control channel directly selecting scenes from the look store.<br />
Other Control Modes (Both Models):<br />
Internal FX engine: integrated in the software is an internal Fx engine with variable parameters to create an unlimited<br />
amount of unique lighting effects.<br />
Master Standalone – assigns the unit to be the Master unit where standalone control options are set.<br />
Slave Standalone – assigns the unit to be the Slave unit and follows the control options assigned to the Master unit.<br />
<strong>Manual</strong> – gives manual control for the Intensity level (<strong>Studio</strong> <strong>Force</strong> D <strong>12</strong>), and Intensity and Colour Temperature (<strong>Studio</strong><br />
<strong>Force</strong> V <strong>12</strong>)<br />
Control Menu<br />
Use the push buttons (up/down arrows) to scroll through the control menu positions:<br />
Home / DMX Address<br />
To set the DMX start address, press Enter, press Up/Down buttons to adjust DMX start address, press Enter for<br />
2 seconds to save settings, the display goes back to Home.<br />
Control Mode<br />
The <strong>Studio</strong> <strong>Force</strong> D <strong>12</strong> and the <strong>Studio</strong> <strong>Force</strong> V <strong>12</strong> can be set to operate in 5 DMX controlled modes and 3<br />
www.chroma-q.com<br />
<strong>Studio</strong> <strong>Force</strong> D <strong>12</strong> / V <strong>12</strong> <strong>User</strong> <strong>Manual</strong> 7 V2.0 September 20<strong>12</strong>
standalone modes. 2 grouping options are available (cell-grouped (“Duo), all-grouped (“All”). Refer to the list<br />
below for details.<br />
Press the Up/Down buttons to access the “Control Mode”, press Up/Down to select the mode and press Enter<br />
for 2 seconds to save the settings.<br />
<strong>Studio</strong> <strong>Force</strong> D <strong>12</strong><br />
Control Mode - Software Version 2.0<br />
Mode Name Group Ch Description<br />
1 Dim8x Duo 8 WWWW + WWWW<br />
2 FxDim All 2 1 intensity Fx + All<br />
3 Dim2x Duo 2 2 x W<br />
4 Dim1x All 1 All<br />
11 Look Sel 1 Look Select<br />
<strong>12</strong> Mastr StndAlon Standalone Master<br />
13 Slave StndAlon Standalone Master<br />
<strong>Manual</strong>:<br />
<strong>Manual</strong> <strong>Manual</strong><br />
In this mode, the intensity level “Intensity” can be set and adjusted in standalone operation. From the main<br />
menu, press Up/Down to access “Control Mode”, press Up/Down to select “<strong>Manual</strong>”, and then press Enter for 2<br />
seconds to save the setting. Press Exit and the display will show “<strong>Manual</strong> Control” and the intensity level “00%<br />
Intensity”. To adjust the levels press Enter once “00%” level will flash. Use the Up/Down buttons to adjust the<br />
value and press Enter for 2 seconds to save the settings.<br />
<strong>Studio</strong> <strong>Force</strong> V <strong>12</strong><br />
Control Mode - Software Version 2.0<br />
Mode Name Group Ch Description<br />
1 WWWW Duo 8 WWWW + WWWW<br />
2 sWWCW All 3 1 Intensity Fx + WW + CW<br />
3 WW/CW All 2 WW + CW<br />
4 CTI All 2 1 Colour Temperature + Intensity<br />
11 Look Sel 1 Look Select<br />
<strong>12</strong> Mastr StndAlon Standalone Master<br />
13 Slave StndAlon Standalone Master<br />
<strong>Manual</strong>:<br />
<strong>Manual</strong> <strong>Manual</strong><br />
In this mode, the intensity level “Int” and colour temperature “CT” can be set and adjusted in standalone<br />
operation. From the main menu, press Up/Down to access “Control Mode”, press Up/Down to select “<strong>Manual</strong>”,<br />
and then press Enter for 2 seconds to save the setting. Press Exit and the display will show “<strong>Manual</strong> Control” –<br />
the level of colour temperature “CT 00%” and the intensity level “Int 00%”. To adjust the levels press Enter<br />
once and the CT level will flash. Use the Up/Down buttons to adjust the value and press Enter again once and<br />
the “Int” level will flash. Use the Up/Down buttons to adjust the value and press Enter for 2 seconds to save the<br />
settings.<br />
When DMX is Lost<br />
If DMX is not detected various output options can be selected:<br />
Press Up/Down to access “When DMX is Lost”, press Enter, press Up/Down buttons to select the options , press<br />
www.chroma-q.com<br />
<strong>Studio</strong> <strong>Force</strong> D <strong>12</strong> / V <strong>12</strong> <strong>User</strong> <strong>Manual</strong> 8 V2.0 September 20<strong>12</strong>
Enter for 2 seconds to save.<br />
‘Off’ - will snap to off<br />
‘Hold’ - will hold the last valid DMX state<br />
‘Look 1-31’ will snap to the Look of your choice<br />
Look Store<br />
The <strong>Studio</strong> <strong>Force</strong> D <strong>12</strong> / V <strong>12</strong> has 31 internal preset FX Looks for standalone operation, 1-23 are preprogrammed.<br />
To replay a Look in standalone operation, press Up/Down buttons to access “Look Store”, press<br />
Enter, press Up/Down buttons to select the desired Look and press Enter for 2 seconds to save settings.<br />
To replay a Look with a DMX console, press Up/Down buttons to access Control Mode 11 and press Enter for 2<br />
seconds. Use the DMX console with the assigned channel to playback the various looks stored. (1-31 looks in 1<br />
single channel)<br />
Note: DMX has priority over internal Looks<br />
Looks can be recorded to the internal flash memory by users and will be preserved on power down. However,<br />
looks will be returned to default setting if Reset is performed. There are two ways to record a look:<br />
Simple, with DMX console<br />
Set the <strong>Studio</strong> <strong>Force</strong> D <strong>12</strong> / V <strong>12</strong> to the desired Control Mode. Use a DMX console to adjust channel levels and<br />
create the desired look or effect. Press Up/Down buttons to the “Look Store” and press Enter, press Up/Down<br />
buttons to the desired Look number and press Enter. Press Enter again for 2 seconds to save Look.<br />
Advanced, standalone (DMX is unplugged)<br />
Press Up/Down buttons to access “Look Store”, and press Enter, press Up/Down button to the desired Look and<br />
press Enter to access the memory data. The data is presented as two numbers separated by a letter “c”. The<br />
number to the left of the “c” is the channel number and to the right is the channel level. Pressing Up/Down up<br />
to the far end will show the Mode at which the selected Look was programmed.<br />
To edit the Mode of a selected Look:<br />
Press Up/Down buttons to access “Look Store” and press Enter, press Up/Down to the desired Look and press<br />
Enter to access the memory data. Press Up/Down buttons up to the far end until Mode number is shown and<br />
press Enter. Press Up/Down buttons to adjust the Mode number. Press Enter to toggle back to the channel<br />
numbers.<br />
To edit the channel numbers and levels of a selected Look:<br />
Press Up/Down buttons to access “Look Store” and press Enter, press Up/Down to the desired Look and press<br />
Enter to access the memory data. Press Up/Down buttons and select the channel number. To edit the channel<br />
level, press Enter and use the Up/Down buttons to adjust the level (shown as 0-255). Press Enter to toggle back<br />
to the channel number. When the desired effect is created press Enter for 2 seconds to save the edited Look.<br />
Technical<br />
In this mode, frequency settings of the unit can be changed; and pre-programmed engines can be uploaded.<br />
Press Up/Down to access “Technical”, press Up/Down to select either “Frequency” or “Upload Engines”.<br />
Frequency:<br />
The <strong>Studio</strong> <strong>Force</strong> <strong>12</strong> has four frequency settings available - 600, <strong>12</strong>00, 2400, 4800. This allows for the LED<br />
scan rate to be synchronised with the video camera and avoid a flickering effect. Press the Up/Down buttons to<br />
select the desired frequency, press Enter for 2 seconds to save settings.<br />
www.chroma-q.com<br />
<strong>Studio</strong> <strong>Force</strong> D <strong>12</strong> / V <strong>12</strong> <strong>User</strong> <strong>Manual</strong> 9 V2.0 September 20<strong>12</strong>
Upload Engines:<br />
Pre-programmed engines can be uploaded to the <strong>Studio</strong> <strong>Force</strong> D <strong>12</strong> / V <strong>12</strong> from the <strong>Chroma</strong>-Q Uploader:<br />
1. Press Enter, Up/Down buttons to select “Upload Engines” then press Enter, and the display will show<br />
“Ready”:<br />
2. Connect an XLR 5-pin cable from the Uploader to the unit.<br />
3. Power-up the Uploader - display will show the file name, and “Ready”.<br />
4. Press the “GO” button once to execute the uploading - red indicator light on the “GO” button will<br />
blink.<br />
5. The Uploader display will show a simulated arrow moving from left to right indicating the uploading<br />
process.<br />
6. All the white LEDs of the unit will light up (low intensity) to indicate completion of a successful<br />
Upload and the Uploader display will show “DONE”.<br />
7. Power-cycle the unit.<br />
(See Quick Start Guide of the <strong>Chroma</strong>-Q Uploader)<br />
Output Setting<br />
The light output of the <strong>Studio</strong> <strong>Force</strong> D <strong>12</strong> / V <strong>12</strong> can be adjusted to two levels. “Standard” is the maximum light<br />
output and “Matching CF48/72” is the light output level that matches the levels of the Color <strong>Force</strong> 72 and 48<br />
fixtures.<br />
Press Up/Down to access “Output Setting”, then press Enter and Up/Down to select between “Standard” or<br />
Matching CF48/72”.<br />
Fan Speed:<br />
The <strong>Studio</strong> <strong>Force</strong> D <strong>12</strong> / V <strong>12</strong> are built with an internal fan with four speed options to regulate noise levels and<br />
the cooling process. The internal fan is off in the “Quiet” mode. The “<strong>Studio</strong>” mode is the equivalent to low<br />
velocity for most studio application and cooler locations. “Live” mode is the equivalent to high velocity for<br />
louder/less critical applications and warmer locations. “Live with Light” mode is equivalent to the “Live” mode<br />
activating when the light is on.<br />
Press Enter, Up/Down buttons to select “Fan Speed”, then press Enter to select from either “Quiet”, “<strong>Studio</strong>”,<br />
“Live” or “Live with Light”, and then press Enter for 2 seconds to save the settings.<br />
Reset to Default<br />
Press Up/Down to access “Reset to Default”, press Enter, display will show “reset?”, press Enter for 2 seconds,<br />
display will show “resetting” and “done” when complete, and all menu items are reset to factory defaults:<br />
DMX address = 001, Control Mode = 2 , When DMX is Lost = Hold, Looks = 00,<br />
Frequency = 600, Fan Speed = Quiet, Output Setting = Standard.<br />
2.7 DMX Protocol – <strong>Studio</strong> <strong>Force</strong> D <strong>12</strong><br />
<strong>Studio</strong> <strong>Force</strong> D <strong>12</strong> - DMX Personality Mode 1-2:<br />
<strong>Studio</strong> <strong>Force</strong> D <strong>12</strong><br />
v2.0<br />
Control Mode 1<br />
[8ch] Dim8x<br />
Group : Duo<br />
Control Mode 2<br />
[2ch] FxDim<br />
Group : All<br />
Channel 1 Cold White for group 1 Intensity Effects<br />
0 Static<br />
1-63 Fade on, fade off. Variable, 63 fastest<br />
www.chroma-q.com<br />
<strong>Studio</strong> <strong>Force</strong> D <strong>12</strong> / V <strong>12</strong> <strong>User</strong> <strong>Manual</strong> 10 V2.0 September 20<strong>12</strong>
Channel 2 Cold White for group 1 Cold White for group 1<br />
Channel 3 Cold White for group 1<br />
Channel 4 Cold White for group 1<br />
Channel 5 Cold White for group 2<br />
Channel 6 Cold White for group 2<br />
Channel 7 Cold White for group 2<br />
Channel 8 Cold White for group 2<br />
Total 8 DMX channels 2 DMX channels<br />
<strong>Studio</strong> <strong>Force</strong> D <strong>12</strong> - DMX Personality Mode 3-4:<br />
<strong>Studio</strong> <strong>Force</strong> D <strong>12</strong><br />
v2.0<br />
Control Mode 3<br />
[2ch] Dim2x<br />
Group: Duo<br />
64-<strong>12</strong>7 Fade on, snap off. Variable, <strong>12</strong>7 fastest<br />
<strong>12</strong>8-191 Snap on, fade off. Variable, 191 fastest<br />
192-255 Snap on, snap off (strobe). Variable, 255 fastest.<br />
www.chroma-q.com<br />
Control Mode 4<br />
[1ch] Dim1x<br />
Group : All<br />
Channel 1 Cold White for group 1 Cold White for group 1<br />
Channel 2 Cold White for group 2<br />
Total 2 DMX channels 1 DMX channel<br />
2.8 DMX Protocol – <strong>Studio</strong> <strong>Force</strong> V <strong>12</strong><br />
<strong>Studio</strong> <strong>Force</strong> V <strong>12</strong> - DMX Personality Mode 1-2:<br />
<strong>Studio</strong> <strong>Force</strong> V <strong>12</strong><br />
v2.0<br />
Control Mode 1<br />
[8ch] WWWW<br />
Group : Duo<br />
Control Mode 2<br />
[3ch] sWWCW<br />
Group : All<br />
Channel 1 Cold White for group 1 Intensity Effects<br />
0 Static<br />
1-63 Fade on, fade off. Variable, 63 fastest<br />
64-<strong>12</strong>7 Fade on, snap off. Variable, <strong>12</strong>7 fastest<br />
Channel 2 Warm White for group 1 Warm White for group 1<br />
Channel 3 Warm White for group 1 Cold White for group 2<br />
Channel 4 Cold White for group 1<br />
Channel 5 Cold White for group 2<br />
Channel 6 Warm White for group 2<br />
Channel 7 Warm White for group 2<br />
Channel 8 Cold White for group 2<br />
Total 8 DMX channels 3 DMX channels<br />
<strong>12</strong>8-191 Snap on, fade off. Variable, 191 fastest<br />
192-255 Snap on, snap off (strobe). Variable, 255 fastest.<br />
<strong>Studio</strong> <strong>Force</strong> D <strong>12</strong> / V <strong>12</strong> <strong>User</strong> <strong>Manual</strong> 11 V2.0 September 20<strong>12</strong>
<strong>Studio</strong> <strong>Force</strong> V <strong>12</strong> - DMX Personality Mode 3-4:<br />
<strong>Studio</strong> <strong>Force</strong> V <strong>12</strong><br />
v2.0<br />
Control Mode 3<br />
[2ch] WW/CW<br />
Group: All<br />
www.chroma-q.com<br />
Control Mode 4<br />
[2ch] CTI<br />
Group : All<br />
Channel 1 Warm White for group 1 Colour Temperature for group 1<br />
Channel 2 Cold White for group 1 Intensity level for group 1<br />
Total 2 DMX channels 2 DMX channels<br />
<strong>Studio</strong> <strong>Force</strong> V <strong>12</strong> - DMX Personality Mode 11:<br />
<strong>Studio</strong> <strong>Force</strong> V <strong>12</strong> v2.0 Mode 11 [1ch] Look Select<br />
<strong>Studio</strong> <strong>Force</strong> D <strong>12</strong> / V <strong>12</strong> <strong>User</strong> <strong>Manual</strong> <strong>12</strong> V2.0 September 20<strong>12</strong>
Channel 1 Channel levels and the corresponding Look numbers:<br />
Channel Level (%) Look Description<br />
0 OFF<br />
1–2 1 Full Scroll (5 sec)<br />
3–5 2 Full Scroll (10 sec)<br />
6–9 3 Full Scroll (30 sec)<br />
10–11 4 Warm Colour Scroll (5 sec)<br />
<strong>12</strong>–15 5 Warm Colour Scroll (10 sec)<br />
16–19 6 Warm Colour Scroll (30 sec)<br />
20–22 7 Cold Colour Scroll (5 sec)<br />
23-25 8 Cold Colour Scroll (10 sec)<br />
26–27 9 Cold Colour Scroll (30 sec)<br />
29-32 10<br />
33–35 11<br />
36-38 <strong>12</strong><br />
39-42 13<br />
43-45 14<br />
46-48 15<br />
49-51 16<br />
52-54 17<br />
56-58 18<br />
59-61 19<br />
62-64 20<br />
65-68 21<br />
69-71 22 3200 White<br />
72-74 23 5600 White<br />
75-78 24<br />
79-81 25<br />
83-85 26<br />
86-88 27<br />
89-91 28<br />
92-94 29<br />
95-97 30<br />
98-100 31<br />
2.9 Thermal Performance<br />
The <strong>Studio</strong> <strong>Force</strong> D <strong>12</strong> / V <strong>12</strong> fixture is equipped with an internal fan to drive the internal cooling system. If the internal<br />
temperature of the <strong>Studio</strong> <strong>Force</strong> <strong>12</strong> exceeds 75ºC the output of the fixture is reduced for automatic protection. This happens<br />
on rare and extreme conditions when ambient temperature is over 35ºC or the internal fans are blocked or damaged.<br />
The airflow to and from the fan must not be constricted to maintain the maximum operating capacity of the <strong>Studio</strong> <strong>Force</strong> D<br />
<strong>12</strong> / V <strong>12</strong>.<br />
www.chroma-q.com<br />
<strong>Studio</strong> <strong>Force</strong> D <strong>12</strong> / V <strong>12</strong> <strong>User</strong> <strong>Manual</strong> 13 V2.0 September 20<strong>12</strong>
3. Troubleshooting<br />
Troubleshooting is a process of elimination. First, rule out the other field factors (i.e. bad connections, faulty cables and<br />
power supplies). For technical support and/or parts, please contact your selling dealer or the offices listed in this manual.<br />
Symptom Possible Cause Solution<br />
Fixture does not respond to<br />
DMX control.<br />
Set to wrong or different DMX address.<br />
Bad cable connecting DMX control and fixture.<br />
Bad in/through connection between adjacent<br />
fixtures.<br />
Noise from fixture unit. Fan malfunction. Check fan.<br />
Low LED output. Internal temperature is over the limit.<br />
Fan is not working.<br />
4. Specification<br />
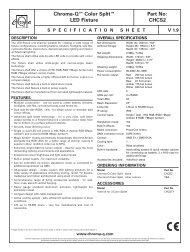
4.1 Technical Specifications<br />
www.chroma-q.com<br />
Check DMX address and Mode<br />
settings.<br />
Check/replace DMX run from the<br />
console.<br />
Check “Fan Control” mode.<br />
Check fan.<br />
<strong>Studio</strong> <strong>Force</strong> D <strong>12</strong> <strong>Studio</strong> <strong>Force</strong> V <strong>12</strong><br />
Product Code CHSFD<strong>12</strong>NF CHSFV<strong>12</strong>NF<br />
Net Dimensions** 335mm x 190mm x 218mm / 13.2” x 7.5” x 8.6”<br />
Net Weight 4kgs / 9lbs<br />
Power Supply Built-in<br />
Power Input Rating 100-240V AC, 50-60 Hz, 160VA<br />
Power Factor 0.997<br />
Power Consumption 150W<br />
Check for airflow - to and from the<br />
internal fan.<br />
Check area ventilation.<br />
Typical Power & Current Measurements done with all LEDs at max. intensity. Measurements made at nominal<br />
voltage. Allow for a deviation of +/- 10%.<br />
Power Connector In/Out PowerCon<br />
Data Connectors In/Out XLR 5-pin<br />
Control Protocol ANSI E1.11 USITT DMX 5<strong>12</strong>-A<br />
Cooling System <strong>Force</strong>d – 1 x fan<br />
Construction Black anodised aluminium extrusion<br />
Colour Black<br />
Built-In Hardware Quick release lever for tilt adjustment<br />
IP Rating IP20<br />
Approvals CISPR 22 :2006/EN55022 :2006 & CISPR 24 :1997/EN55024 :1998, ICES-003 :2004<br />
& FCC Part 15 Subpart B: 2007, CSA C22. No. 166-M1983:R2008 UL 1573:2003; UL<br />
8750<br />
LED Engines 2<br />
LEDs Per Engine 24 Cold White <strong>12</strong> Cold White / <strong>12</strong> Warm White<br />
<strong>Studio</strong> <strong>Force</strong> D <strong>12</strong> / V <strong>12</strong> <strong>User</strong> <strong>Manual</strong> 14 V2.0 September 20<strong>12</strong>
Total LEDs 48<br />
Control Modes 8 channels Dim8x<br />
2 channels FxDim<br />
2 channels Dim2x<br />
1 channel Dim1x<br />
1 channel Look Select<br />
Master Standalone<br />
Slave Standalone<br />
<strong>Manual</strong><br />
Dimming Curve Theatrical<br />
Variable Effects Engines Yes<br />
Effects Parameters Intensity Effects<br />
www.chroma-q.com<br />
8 channels WWWW<br />
3 channels WWCW<br />
2 channels WW/CW<br />
2 channel CTI<br />
1 channel Look Select<br />
Master Standalone<br />
Slave Standalone<br />
<strong>Manual</strong><br />
Hot Lumen Output White 6,000 hot lumens White 5,300 hot lumens @ 4,200K<br />
Optics Specialised close focus lens<br />
Beam angle ~23º<br />
Beam Angle With Optional Cyc<br />
Optic<br />
Beam Angle With Optional<br />
Border Optic<br />
80 x 30° (approx.)<br />
60° (approx.)<br />
Beam distribution Asymmetrical direct illumination<br />
CCT 6,100K (+/- 200K) 3,000K – 6,100K<br />
Colour Gamut Performance enhanced<br />
CRI ≥70 ≥80<br />
Lamp Life L70 at 50,000 hours<br />
Operating temperature 0ºC to 40ºC<br />
**For exact measurements please refer to the line drawings below<br />
<strong>Studio</strong> <strong>Force</strong> D <strong>12</strong> / V <strong>12</strong> <strong>User</strong> <strong>Manual</strong> 15 V2.0 September 20<strong>12</strong>
4.2 Drawings - Dimensions<br />
4.3 Accessories<br />
CHCFCL<strong>12</strong> – Cyc Lens For <strong>Force</strong> <strong>12</strong> CHCFBD<strong>12</strong> – Barn Door For <strong>Force</strong> <strong>12</strong><br />
CHCFBL<strong>12</strong> – Border Light Lens For <strong>Force</strong> <strong>12</strong> CHCFDBX – Diffuser Box For <strong>Force</strong> <strong>12</strong><br />
CHCFSA<strong>12</strong> – Spigot Adaptor For <strong>Force</strong> <strong>12</strong> CHCFLBA<strong>12</strong> – Lightbank Adaptor (Speedring) For <strong>Force</strong> <strong>12</strong><br />
CHCFECL<strong>12</strong> – Egg Crate Louver For <strong>Force</strong> <strong>12</strong> CHCFLB<strong>12</strong> – Lightbank For <strong>Force</strong> <strong>12</strong><br />
CHCFTH<strong>12</strong> – Top Hat For <strong>Force</strong> <strong>12</strong><br />
CHCFHTH<strong>12</strong> – Half Top Hat For <strong>Force</strong> <strong>12</strong><br />
CHCFLBK-K – Lightbank Kit + For <strong>Force</strong> <strong>12</strong> (consists of Lightbank<br />
Adaptor (Speedring) & Lightbank)<br />
+ The Lightbank Kit consists of the Lightbank Adaptor (Speedring) and Lightbank. Both items can also be purchased separately. Fixture not included<br />
5. Maintenance<br />
With care, the <strong>Studio</strong> <strong>Force</strong> D <strong>12</strong> / V <strong>12</strong> will require little maintenance. However, as the unit is likely to be used in a stage<br />
environment we recommend periodical internal inspection and cleaning of any resulting dust and cracked oil residue.<br />
Do not spray liquids on the front or rear panel. If the front enclosure requires cleaning, wipe with a mild detergent on a damp<br />
cloth.<br />
www.chroma-q.com<br />
<strong>Studio</strong> <strong>Force</strong> D <strong>12</strong> / V <strong>12</strong> <strong>User</strong> <strong>Manual</strong> 16 V2.0 September 20<strong>12</strong>