Audi A3 Quick reference guide - Audi 'S-cars' Club
Audi A3 Quick reference guide - Audi 'S-cars' Club
Audi A3 Quick reference guide - Audi 'S-cars' Club

You also want an ePaper? Increase the reach of your titles
YUMPU automatically turns print PDFs into web optimized ePapers that Google loves.
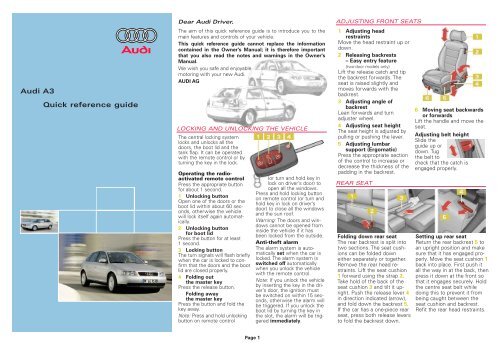
<strong>Audi</strong> <strong>A3</strong><br />
<strong>Quick</strong> <strong>reference</strong> <strong>guide</strong><br />
Dear <strong>Audi</strong> Driver,<br />
The aim of this quick <strong>reference</strong> <strong>guide</strong> is to introduce you to the<br />
main features and controls of your vehicle.<br />
This quick <strong>reference</strong> <strong>guide</strong> cannot replace the information<br />
contained in the Owner's Manual; it is therefore important<br />
that you also read the notes and warnings in the Owner's<br />
Manual.<br />
We wish you safe and enjoyable<br />
motoring with your new <strong>Audi</strong>.<br />
AUDI AG<br />
LOCKING AND UNLOCKING THE VEHICLE<br />
The central locking system<br />
locks and unlocks all the<br />
doors, the boot lid and the<br />
tank flap. It can be operated<br />
with the remote control or by<br />
turning the key in the lock.<br />
Operating the radioactivated<br />
remote control<br />
Press the appropriate button<br />
for about 1 second.<br />
1 Unlocking button<br />
Open one of the doors or the<br />
boot lid within about 60 seconds,<br />
otherwise the vehicle<br />
will lock itself again automatically.<br />
2 Unlocking button<br />
for boot lid<br />
Press the button for at least<br />
1 second.<br />
3 Locking button<br />
The turn signals will flash briefly<br />
when the car is locked to confirm<br />
that the doors and the boot<br />
lid are closed properly.<br />
4 Folding out<br />
the master key<br />
Press the release button.<br />
Folding away<br />
the master key<br />
Press the button and fold the<br />
key away.<br />
Note: Press and hold unlocking<br />
button on remote control<br />
Page 1<br />
(or turn and hold key in<br />
lock on driver’s door) to<br />
open all the windows.<br />
Press and hold locking button<br />
on remote control (or turn and<br />
hold key in lock on driver’s<br />
door) to close all the windows<br />
and the sun roof.<br />
Warning: The doors and windows<br />
cannot be opened from<br />
inside the vehicle if it has<br />
been locked from the outside.<br />
Anti-theft alarm<br />
The alarm system is automatically<br />
set when the car is<br />
locked. The alarm system is<br />
switched off automatically<br />
when you unlock the vehicle<br />
with the remote control.<br />
Note: If you unlock the vehicle<br />
by inserting the key in the driver’s<br />
door, the ignition must<br />
be switched on within 15 seconds,<br />
otherwise the alarm will<br />
be triggered. If you unlock the<br />
boot lid by turning the key in<br />
the slot, the alarm will be triggered<br />
immediately.<br />
ADJUSTING FRONT SEATS<br />
1 Adjusting head<br />
restraints<br />
Move the head restraint up or<br />
down.<br />
2 Releasing backrests<br />
– Easy entry feature<br />
(two-door models only)<br />
Lift the release catch and tip<br />
the backrest forwards. The<br />
seat is raised slightly and<br />
moves forwards with the<br />
backrest.<br />
3 Adjusting angle of<br />
backrest<br />
Lean forwards and turn<br />
adjuster wheel.<br />
4 Adjusting seat height<br />
The seat height is adjusted by<br />
pulling or pushing the lever.<br />
5 Adjusting lumbar<br />
support (Ergomatic)<br />
Press the appropriate section<br />
of the control to increase or<br />
decrease the thickness of the<br />
padding in the backrest.<br />
REAR SEAT<br />
Folding down rear seat<br />
The rear backrest is split into<br />
two sections. The seat cushions<br />
can be folded down<br />
either separately or together.<br />
Remove the rear head restraints.<br />
Lift the seat cushion<br />
1 forward using the strap 2.<br />
Take hold of the back of the<br />
seat cushion 3 and tilt it upright.<br />
Push the release lever 4<br />
in direction indicated (arrow),<br />
and fold down the backrest 5.<br />
If the car has a one-piece rear<br />
seat, press both release levers<br />
to fold the backrest down.<br />
6 Moving seat backwards<br />
or forwards<br />
Lift the handle and move the<br />
seat.<br />
Adjusting belt height<br />
Slide the<br />
<strong>guide</strong> up or<br />
down. Tug<br />
the belt to<br />
check that the catch is<br />
engaged properly.<br />
Setting up rear seat<br />
Return the rear backrest 5 to<br />
an upright position and make<br />
sure that it has engaged properly.<br />
Move the seat cushion 1<br />
back into place. First push it<br />
all the way in at the back, then<br />
press it down at the front so<br />
that it engages securely. Hold<br />
the centre seat belt while<br />
doing this to prevent it from<br />
being caught between the<br />
seat cushion and backrest.<br />
Refit the rear head restraints.
SAFETY<br />
Seat belts must be worn on<br />
every journey, even on short<br />
trips in town. This applies to<br />
the front and rear seats. To<br />
ensure that the seat belts, belt<br />
tensioners and airbags are fully<br />
effective, note the following<br />
points:<br />
Adjust seat and sit in<br />
correct position<br />
The front seats should not be<br />
positioned too close to the<br />
steering wheel or dashboard.<br />
Maintain a distance of at<br />
least 25 cm from the steering<br />
wheel. It is important to sit in<br />
a normal, upright position and<br />
set the backrest so it is fully<br />
against your back. The top of<br />
the head restraint should be<br />
at eye level (or higher). Put<br />
Safety of children in the vehicle<br />
Category 0<br />
Children under 12 should travel<br />
on the rear seat. They<br />
must be protected by a child<br />
restraint system which complies<br />
with the European standard<br />
ECE R 44 and is suitable<br />
for the child’s weight and<br />
height. The safest place for<br />
the child restraint system is<br />
behind the front passenger’s<br />
seat. Make sure that the<br />
system is properly secured.<br />
The retractor mechanism of<br />
the seat belts can be locked<br />
to secure a child safety seat.<br />
Please observe the notes in<br />
the <strong>Audi</strong> Owner's Manual and<br />
refer to the manufacturer's<br />
instructions for the child seat.<br />
your feet in a comfortable<br />
position in the footwell.<br />
Wear the seat belt<br />
correctly<br />
Make sure that the shoulder<br />
section of the belt is positioned<br />
over the centre of the<br />
shoulder, and move the lap<br />
section as far down over the<br />
hips as possible. The belts<br />
should always be worn so<br />
that they fit tightly (see illustration).<br />
Category 1 Category 2<br />
Category 0 or 0+: For babies<br />
up to about 9 months/ 10 kg<br />
and infants up to about<br />
18 months/ 13 kg.<br />
Category 1: For small<br />
children up to about<br />
4 years of age/ 18 kg.<br />
Category 2: For children up<br />
to about 7 years/ 25 kg.<br />
Category 3: Children over<br />
7 years of age but less than<br />
1.5 metres tall are best protected<br />
by a booster cushion<br />
in conjunction with the threepoint<br />
seat belt.<br />
INSTRUMENTS AND WARNING/INDICATOR LAMPS<br />
1 Rev counter<br />
2 Warning and<br />
indicator lamps<br />
EPC<br />
AIR<br />
BAG<br />
ABS<br />
P<br />
Engine management 1) or<br />
Glow plugs<br />
(on diesel models) 1)<br />
Trailer turn signals<br />
Side lights/ headlights<br />
Electronic stability<br />
program (ESP)/ traction<br />
control system (ASR)<br />
Electronic immobilizer<br />
Main beam headlights<br />
Turn signals,<br />
hazard warning lights<br />
Fault in engine<br />
management system 1)<br />
Airbag system 1)<br />
Anti-lock brake system 1)<br />
Handbrake engaged<br />
Alternator 1)<br />
Seat belt reminder<br />
3 Coolant temperature<br />
gauge<br />
4 Fuel gauge<br />
5 Speedometer<br />
6 Digital clock and date<br />
7 Control button:<br />
• To check distance to<br />
next service<br />
Press the button briefly with<br />
the ignition on and the vehicle<br />
stationary.<br />
Page 2<br />
• To check the auto-check<br />
control display<br />
Press the button twice with<br />
the ignition on and the<br />
vehicle stationary.<br />
• To call up<br />
driver information<br />
Press the button if one of<br />
the red symbols flashes.<br />
• To activate mileage<br />
recorder display and<br />
digital clock<br />
Press the button when the<br />
ignition is off.<br />
• To set speed warning 1<br />
Press the button briefly when<br />
the desired speed is indicated<br />
on the speedometer. To clear<br />
the speed limit, press the<br />
button for at least 1 second.<br />
• To set the digital clock/<br />
date<br />
Keep pulling the button<br />
briefly until the desired display<br />
appears. Turn the button<br />
to alter the time/ date.<br />
8 Display:<br />
• Warning symbols or<br />
auto-check control<br />
No faults detected<br />
Fault in brake system<br />
Fault in cooling system<br />
Engine oil pressure<br />
too low<br />
Fuel level low<br />
Brake pads worn1) OK<br />
MIN<br />
BREMS-<br />
LICHT<br />
Check engine oil level<br />
Engine oil sensor<br />
faulty 1)<br />
Door or tailgate not shut<br />
Battery voltage<br />
too high or too low 1)<br />
SENSOR<br />
/ Brake light faulty 1)<br />
Bulb failure: dipped<br />
headlights or rear lights 1)<br />
Washer fluid level low<br />
Speed warning 1 or 2<br />
(km/h or mph)<br />
Dynamic headlight range<br />
control faulty 1)<br />
• Radio/ telephone<br />
information<br />
• Outside temperature<br />
• On-board computer<br />
l/100 km Instantaneous fuel<br />
consumption<br />
ø<br />
L<br />
100 km<br />
økm/h<br />
Fuel range<br />
Driving time<br />
Average fuel consumption<br />
Average speed<br />
• Service indicator<br />
Shortly before a service is<br />
due, the display will briefly<br />
show the word Service, together<br />
with the number of<br />
miles/km until the service is<br />
due.<br />
• Navigation/ telematics<br />
information<br />
• Selector lever position<br />
(on vehicles with automatic<br />
gearbox)<br />
9 Reset button for<br />
trip recorder<br />
10 Mileage recorder<br />
Top display: trip recorder<br />
Bottom display: total mileage<br />
If one of the red symbols lights up while you are driving, stop the car,<br />
switch off the engine and refer to the Owner’s Manual.<br />
1) If one of these warning symbols lights up while you are driving, please<br />
take the vehicle to an <strong>Audi</strong> workshop straightaway.<br />
SUN ROOF<br />
FILLING THE TANK<br />
Kurzanleitung <strong>Audi</strong> <strong>A3</strong> englisch 7.01 221.562.621.20<br />
km<br />
h<br />
Turn the control to the appropriate<br />
position to open and<br />
close the sun roof:<br />
1 To slide roof open<br />
0 To close roof<br />
To tilt roof up at the rear:<br />
Turn the control to position 0<br />
and press the control.<br />
To move it down again:<br />
Pull the control briefly.<br />
Opening the tank flap<br />
Open the tank flap as illustrated.<br />
Unscrew the filler cap<br />
and hook it onto the tank flap.<br />
Stickers for:<br />
1 Fuel grade<br />
2 Tyre pressures
OVERVIEW OF CONTROLS AND EQUIPMENT<br />
Page 3<br />
1 Electric windows<br />
Press the switch briefly to<br />
move window all the way<br />
down. Lift the switch briefly<br />
to move the window all the<br />
way up. The window can be<br />
stopped in any position by<br />
briefly pressing the switch<br />
again.<br />
On 4-door models, the rear<br />
windows can be deactivated<br />
by pressing the safety<br />
switch.<br />
2<br />
Electric adjustment<br />
for exterior mirrors<br />
Selector knob:<br />
I Off<br />
/ L Left exterior<br />
mirror<br />
/ R Right exterior<br />
mirror<br />
Retract both<br />
exterior mirrors<br />
On 2-door models, press the<br />
adjuster to move the mirror<br />
surface in the desired direction.<br />
On 4-door models, turn<br />
the knob. The mirrors are<br />
heated when the ignition<br />
is on.<br />
3 Door handle<br />
4 Central locking switch<br />
Press the lower half of the<br />
switch to lock the vehicle<br />
centrally from the inside.<br />
Press the top half of the<br />
switch to unlock the vehicle.
5<br />
Thumbwheel for<br />
instrument lighting<br />
6<br />
Thumbwheel for headlight<br />
range control<br />
7 Light switch<br />
Lights off<br />
Side lights<br />
Main or dipped beam<br />
headlights<br />
Turn switch to dipped beam<br />
position. Then pull out to<br />
- 1st stop:<br />
Front fog lights<br />
- 2nd stop:<br />
Front fog lights<br />
and<br />
Rear fog light<br />
8 Light<br />
switch; turn signal<br />
and headlight dip lever<br />
1 Right turn signals<br />
(With ignition off:<br />
right parking light on)<br />
2 Left turn signals<br />
(With ignition off:<br />
left parking light on)<br />
3 Main beam headlights<br />
4 Headlight flasher<br />
Cruise control system<br />
To activate the system: slide<br />
control A to ON/ EIN position.<br />
Press button B to store the<br />
current speed and maintain<br />
this speed constantly.<br />
To switch off cruise control<br />
temporarily: press either the<br />
brake pedal or clutch pedal, or<br />
slide control A to OFF/ AUS.<br />
To resume the programmed<br />
cruising speed, slide switch<br />
A to RES/ AUFN.<br />
To switch off cruise control<br />
completely: slide control A<br />
all the way over to OFF/ AUS<br />
until the click stop engages.<br />
9 Horn<br />
Air outlets with<br />
10 thumbwheels<br />
Instruments and<br />
11 warning/indicator<br />
lamps<br />
See also overleaf.<br />
Switch for 12 ASR (traction control<br />
system)<br />
or<br />
ESP (electronic<br />
stability program)<br />
Switch for hazard<br />
13 warning lights<br />
14 Cup holder<br />
Press the catch to open<br />
the lid.<br />
15 Radio<br />
16 Lockable glove box<br />
Thumbwheel for<br />
17 seat heating<br />
(front left seat)<br />
Switch for rear<br />
18 window heater<br />
Air conditioner<br />
19 controls:<br />
AUTO<br />
Temperature setting<br />
Automatic mode<br />
Blower speed<br />
Defrost windows<br />
Standard setting for<br />
all seasons:<br />
Select a temperature of<br />
22 °C and switch the<br />
automatic mode on.<br />
Thumbwheel for<br />
20 seat heating<br />
(front right seat)<br />
Page 4<br />
Ashtray, cigarette<br />
21 lighter and electrical<br />
socket<br />
Gear lever/<br />
22 selector lever<br />
Selector lever positions on<br />
vehicles with automatic<br />
gearbox<br />
P - Parking lock<br />
R - Reverse gear<br />
N - Neutral<br />
D - Drive<br />
To move the selector lever<br />
out of position P or N, press<br />
the interlock button on the<br />
selector lever handle and<br />
the brake pedal simultaneously.<br />
Note: Use the foot brake<br />
to hold the vehicle when<br />
stationary with the engine<br />
running (in all selector lever<br />
positions other than P and<br />
N).<br />
Warning: Do not move the<br />
selector lever to positions<br />
P or R when the vehicle is<br />
moving.<br />
Manual gearshift program<br />
(Tiptronic)<br />
The Tiptronic program<br />
enables you to change gear<br />
manually.<br />
To do this, move the selector<br />
lever out of position D into<br />
the Tiptronic gate on the<br />
right. Press the selector<br />
lever forwards briefly to shift<br />
up a gear, or push the lever<br />
back to shift down a gear.<br />
Storage compart-<br />
23 ment or switches for<br />
navigation system<br />
and telematics<br />
24 Handbrake<br />
Windscreen wiper<br />
25 and washer lever<br />
Windscreen:<br />
0 Off<br />
1 Brief wipe<br />
2 Intermittent wipe<br />
The wiper intervals can be<br />
varied in stages by turning<br />
control A.<br />
3 Slow wiper speed<br />
4 Fast wiper speed<br />
5 Automatic wash<br />
and wipe<br />
Pull lever towards you<br />
and hold.<br />
Rear window:<br />
6 Intermittent wipe<br />
Press lever towards<br />
dashboard.<br />
7 Automatic wash<br />
and wipe<br />
Press lever as far as it will go<br />
towards dashboard and hold.<br />
Function selector switch<br />
for on-board computer<br />
Press the top or bottom of<br />
rocker switch B to show the<br />
various displays in turn. Press<br />
and hold button C to reset<br />
display to zero.<br />
Selector button for<br />
display modes<br />
Press button C repeatedly to<br />
select the following displays:<br />
on-board computer (single<br />
journey memory and total<br />
journey memory), navigation<br />
system and telematics, or to<br />
switch the display off.<br />
26 Ignition lock<br />
Compartment for<br />
27 Service Wallet<br />
Lever for adjustable<br />
28 steering column<br />
Pull lever down and adjust<br />
the position of the steering<br />
column as required. Then<br />
push the lever back up as far<br />
as it will go.<br />
29 Bonnet release lever<br />
Please refer to Owner's<br />
Manual.<br />
Switch in door pillar<br />
30 (driver’s side)<br />
This switch deactivates<br />
the interior<br />
monitor for the antitheft<br />
alarm system.<br />
© 2001 AUDI AG<br />
AUDI AG reserves the right to alter any part of the vehicle, its equipment and technical<br />
specifications. No legal commitment can be implied by the information, illustrations or<br />
descriptions in this publication. No part of this publication may be reprinted, reproduced or<br />
translated without the written permission of AUDI AG. All rights under the laws of copyright are<br />
expressly reserved by AUDI AG. Subject to change. Printed in Germany. Concept and layout:<br />
Pfriemer Kataloge GmbH.