SKIN GRAFTS - Practical Plastic Surgery
SKIN GRAFTS - Practical Plastic Surgery
SKIN GRAFTS - Practical Plastic Surgery

Create successful ePaper yourself
Turn your PDF publications into a flip-book with our unique Google optimized e-Paper software.
Chapter 12<br />
<strong>SKIN</strong> <strong>GRAFTS</strong><br />
KEY FIGURES:<br />
Skin anatomy with Mesher<br />
graft thickness Skin graft<br />
Humby knife Tying the dressing<br />
Using the dermatome in place<br />
Using the Humby knife Defatting the FTSG<br />
A skin graft involves taking a piece of skin from an uninjured area of<br />
the body (called the donor site) and using it to provide coverage for an<br />
open wound. When primary closure is impossible because of soft<br />
tissue loss and closure by secondary intention is contraindicated, a skin<br />
graft is the next rung on the reconstructive ladder. It is not a technically<br />
difficult procedure but does require some surgical skills. For a successful<br />
result, you need a thorough understanding of how skin grafts heal<br />
and how to perform the procedure.<br />
BBaacckkggrroouunndd iinnffoorrmmaattiioonn<br />
Anatomy of Skin<br />
The thickness of human skin is quite variable. The eyelids have the<br />
thinnest skin (0.5 mm), and the thickest skin is found on the soles of<br />
the feet (> 5.0 mm).<br />
Epidermis<br />
The epidermis is the top portion of the skin. The outer layers of the epidermis<br />
are formed by essentially dead, nonreplicating cells. The innermost<br />
layer contains the cells capable of replication, which are responsible<br />
for wound healing and skin pigmentation.<br />
Dermis<br />
Immediately below the epidermis is the dermis. It is made primarily of collagen<br />
and is much thicker than the epidermal layer. The dermal-epidermal<br />
97
98 <strong>Practical</strong> <strong>Plastic</strong> <strong>Surgery</strong> for Nonsurgeons<br />
junction is irregular and has the appearance of ridges. This anatomic<br />
arrangement accounts for the skin’s strength and prevents injury from<br />
normal shear forces. Nerve endings, hair follicles, and sweat glands are<br />
located in the dermis. All skin grafts must include at least a portion of the<br />
dermal layer for survival.<br />
Subcutaneous Tissue<br />
The subcutaneous fatty tissue below the dermis provides padding for<br />
the skin. The base of many hair follicles and sweat glands, as well as<br />
many important nerves for pressure sensation, reside in the subcutaneous<br />
tissue. Because of these important skin components, I include<br />
the subcutaneous tissue as a layer of the skin. However, it is not included<br />
in a skin graft. Fat attached to the graft interferes with transport<br />
of nutrients to the important upper skin layers. Therefore, no fat<br />
should be included in the skin graft.<br />
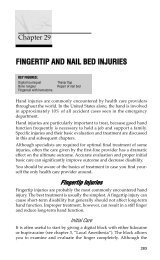
Cross-section of human skin showing the epidermis and dermis (derived from<br />
two different germ layers). The relative thickness of skin grafts is shown. The<br />
thicker the graft, the more characteristics of normal skin it will provide. (From<br />
Cohen M (ed): Mastery of <strong>Plastic</strong> and Reconstructive <strong>Surgery</strong>. Boston, Little,<br />
Brown, 1994, with permission.)<br />
How a Skin Graft Survives<br />
When the skin graft is harvested from the donor site, it is completely<br />
separated from its blood supply. In its new position covering the open<br />
wound, the graft initially survives by diffusion of nutrients from the<br />
wound bed into the graft. Diffusion of nutrients keeps the skin graft
Skin Grafts 99<br />
alive for, at most, 3–5 days. During this period, blood vessels begin to<br />
grow from the wound bed into the graft. By the time the graft is no<br />
longer able to survive by diffusion of nutrients alone, this vascular network<br />
has formed and becomes the primary mechanism for providing<br />
nutrients to the graft.<br />
In the first several weeks after the procedure, the skin graft looks quite<br />
red and irregular compared with normal surrounding skin. Reassure<br />
the patient that the appearance will improve dramatically over the next<br />
several months, but the skin-grafted area will never look completely<br />
normal. It can take at least 1 year to see the final appearance of the<br />
graft. See chapter 15, “Scar Formation,” for more details<br />
When is a Wound Ready for Grafting?<br />
A wound will accept a skin graft when there is no overlying dead<br />
tissue and the wound is clean, beefy red (from granulation tissue), and<br />
without surrounding infection. Skin grafts heal well over muscle.<br />
Therefore, if muscle is exposed in the wound, skin can be grafted at<br />
any time, as long as the wound is otherwise clean.<br />
Table 1. Compensating for Factors that Interfere with Graft Survival<br />
Factor Compensation<br />
Dirty wound (e.g., Debride the wound and treat it with wet-to-dry dressings<br />
surrounding in- until the wound looks clean. Use antibiotics to clear<br />
fection, necrotic signs of surrounding infection. The skin graft can be<br />
tissue over wound) done once the wound has improved in appearance and<br />
there are no signs of surrounding infection.<br />
Fat in base of wound Fat has a poor blood supply and may not be able to support<br />
the graft. Treat the wound with wet-to-dry dressings<br />
until granulation tissue* begins to appear. Then do the<br />
skin graft.<br />
Shear forces between Movement of the graft over the wound interferes with vasgraft<br />
and base of cular ingrowth. The graft must be kept well secured to<br />
wound the wound by the dressing. If the graft is on an extremity,<br />
consider using a splint for immobilization of the limb.<br />
Blood or serum Fluid collection under the graft prevents the ingrowth of<br />
collection under blood vessels necessary for graft survival. Fluid collection<br />
graft can be prevented by cutting holes in the graft and keeping<br />
the graft well secured to the wound. If the graft is on<br />
the leg, the patient should be kept on bedrest, with the<br />
leg elevated at all times for at least the first 4–5 days.<br />
* Granulation tissue is the beefy red tissue that develops as a wound heals. It has an excellent blood<br />
supply but also contains bacteria in its crevices.<br />
Contraindications to Wound Closure with a Skin Graft<br />
A wound that has exposed tendon or bone can be successfully covered<br />
with a skin graft only if the thin layer of tissue connecting the tendon or
100 <strong>Practical</strong> <strong>Plastic</strong> <strong>Surgery</strong> for Nonsurgeons<br />
bone (paratenon or periosteum, respectively) is intact. These connective<br />
tissues contain the vascular structures necessary for skin graft survival. If<br />
the paratenon or periosteum is absent, the graft will not survive. Under<br />
these circumstances, some type of flap is needed for wound closure.<br />
SSpplliitt--tthhiicckknneessss SSkkiinn GGrraafftt<br />
A split-thickness skin graft (STSG) is composed of the top layers of skin<br />
(the epidermis and part of the dermis). The graft is placed over an open<br />
wound to provide coverage and promote healing. The STSG donor site<br />
is essentially a second-degree burn because only part of the dermis is<br />
included in the graft. The donor site will heal on its own because some<br />
dermal elements remain.<br />
Indications<br />
An STSG is indicated in most wounds that cannot be closed primarily<br />
and when closure by secondary intention is contraindicated. It is also<br />
indicated for a relatively large wound (> 5–6 cm in diameter) that<br />
would take many weeks to heal secondarily. A skin graft provides<br />
more stable coverage for large wounds than the scar that results from<br />
secondary closure. A large wound also heals more quickly with a skin<br />
graft than with dressing changes alone. The wound must be clean. All<br />
necrotic tissue must be removed before skin grafting, and there should<br />
be no signs of infection in the surrounding tissues.<br />
Anesthesia of the Donor Site<br />
Because of the relatively large size of the graft to be taken, the patient<br />
usually requires either general or spinal anesthesia for adequate pain<br />
control. However, if the required graft is no more than several centimeters<br />
in diameter, the donor site can be anesthetized by local infiltration<br />
of tissues with lidocaine or bupivacaine.<br />
Preparation of the Donor Site<br />
The most common donor site is the anterior or lateral aspect of the<br />
thigh. If the wound to be covered is on the back, try to take the graft<br />
from the lateral thigh, but the posterior thigh is also acceptable. Use of<br />
the posterior thigh as a donor site is a bit more painful and difficult for<br />
the patient to care for postoperatively.<br />
Any betadine or other antibacterial solution used to prepare the donor<br />
site should be washed off with saline. Then the donor site should be<br />
dried. Apply a sterile lubricant (e.g., mineral oil, K-Y jelly) to the donor<br />
site and to the instrument you will be using to harvest the graft.
Procedure for Taking the Graft<br />
Skin Grafts 101<br />
A thin layer of skin (epidermis with some underlying dermis) is<br />
taken with a dermatome or a Humby knife (sometimes called a<br />
Watson knife). A dermatome is powered by air or electricity, but it is<br />
not available in all hospitals, especially in rural settings. Remember:<br />
you are not taking full-thickness skin; some dermis must be left at the<br />
donor site.<br />
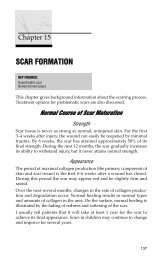
Skin-graft (Humby) knife. (From Padgett Instruments, Inc., with permission.)<br />
Both the Humby knife and dermatome have settings that can be adjusted<br />
to set the thickness of the graft. Place the settings at 0.011–0.015<br />
inch (0.25–0.4 mm). Unfortunately, these settings are often unreliable.<br />
Another technique to ensure proper thickness of the graft is to adjust<br />
the opening of the blade so that you can snuggly fit the beveled edge of<br />
a no. 10 blade into the opening.<br />
Caution: Always check the knife settings just before you take the graft.<br />
This safety check prevents the accidental taking of too thick or too thin<br />
a graft.<br />
An assistant should help to spread and flatten out the donor site by<br />
placing tension on the skin with gauze or tongue depressors.<br />
If you have a dermatome:<br />
1. Turn on the power while the dermatome is in the air before it comes<br />
into contact with the skin.<br />
2. Hold the dermatome at a 45° angle with the skin and hold it firmly<br />
against the skin.<br />
3. Slowly move down the donor site until you have taken the properly<br />
sized graft.<br />
4. At this point do not turn off the power. Remove the dermatome<br />
from the skin with the power on so that the graft is completely freed<br />
from the donor site.<br />
5. The entire movement is evocative of landing an airplane and taking<br />
off again right away.
102 <strong>Practical</strong> <strong>Plastic</strong> <strong>Surgery</strong> for Nonsurgeons<br />
Harvesting a split-thickness skin graft with a power-driven dermatome. (From<br />
Cohen M (ed): Mastery of <strong>Plastic</strong> and Reconstructive <strong>Surgery</strong>. Boston, Little,<br />
Brown, 1994, with permission.)<br />
If you have a Humby knife:<br />
1. Hold it with the sharp edge at about a 45° angle with the skin.<br />
2. With a back-and-forth motion run the knife over the tight skin.<br />
3. When you have taken a large enough graft, continue the back-andforth<br />
motion, and twist your wrist into supination to remove the<br />
knife from the skin. Another option is to stop the knife movement<br />
and then use a scalpel to cut the skin graft from the donor site at the<br />
Harvesting a split-thickness graft with the Humby knife. (From McCarthy JG<br />
(ed): <strong>Plastic</strong> <strong>Surgery</strong>. Philadelphia, W.B. Saunders, 1990, with permission.)
Skin Grafts 103<br />
blade edge. You may need to open the knife fully to remove the skin<br />
from the instrument.<br />
Preparation of the Skin Graft<br />
It is best to cut multiple slices in the graft to prevent blood and serum<br />
from accumulating under the graft. The cuts also help to expand the<br />
graft, allowing you to take a graft that is slightly smaller than the open<br />
wound. Use the tip of a knife or a small scissors to create the cuts in the<br />
graft. Some operating rooms have special equipment, called meshers,<br />
for this purpose. The mesher is a hand-cranked instrument that creates<br />
pie-cuts in the skin.<br />
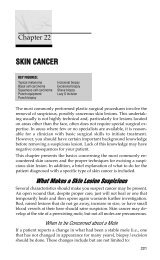
A, The mesher, a device used to<br />
make fine cuts in skin grafts. B, The<br />
skin graft is placed on the rough side<br />
of the carrier and passed through the<br />
mesher. C, The meshed graft can<br />
now be spread over a larger area.<br />
(From Chase CA: Altas of Hand <strong>Surgery</strong>.<br />
Philadelphia, W.B. Saunders,<br />
1973, with permission.)
104 <strong>Practical</strong> <strong>Plastic</strong> <strong>Surgery</strong> for Nonsurgeons<br />
How to Use the Mesher<br />
1. Place the skin on a plastic carrier. Carriers are available in different<br />
sizes, but the best size to use is 1.5:1 (i.e., the graft is expanded 1.5<br />
times).<br />
2. Spread out the skin graft on the rough side of the carrier. If you put<br />
it on the smooth side, you will get spaghetti when you place the<br />
graft through the mesher. It does not matter which side of the<br />
skin faces upward on the carrier, but the dermis side is the more<br />
shiny side.<br />
3. Pass the carrier with the skin graft through the mesher, taking care<br />
that the graft stays on the carrier and is not pulled into the blades of<br />
the mesher.<br />
Placement of the Graft onto the Recipient Site<br />
1. Be sure that the wound is clean. Remove any small areas that appear<br />
unhealthy.<br />
2. To decrease the amount of contamination in the top layers of the<br />
healing wound, scrape the wound with the edge of a knife. Do not<br />
push the knife edge into the wound; instead, scrape it over the<br />
wound. Rinse the wound with saline.<br />
Wound covered with a split-thickness skin graft. The graft has been meshed<br />
1.5:1.
Skin Grafts 105<br />
3. Scraping the wound will make it bleed, but the bleeding is easily<br />
controlled by placing gauze over the wound and applying gentle<br />
pressure for a few minutes. Remember: hemostasis is important.<br />
4. Place the skin graft over the wound with the dermis side (the<br />
shinier side) down, next to the raw surface of the wound.<br />
5. Suture the graft in place with absorbable sutures. Leave a long tail<br />
on a few of these sutures so that they can be used to hold the dressing<br />
in place (see below).<br />
6. Alternatively, the skin graft can be stapled in place, but the staples<br />
must be removed. Removal can be painful.<br />
Application of Wound Dressing<br />
1. A layer of nonstick material, such as antibiotic-impregnated gauze,<br />
should be placed directly over the graft. If you do not have this type<br />
of gauze, apply a layer of antibiotic ointment over the graft.<br />
2. Moisten a sterile gauze with mineral oil (if available) or saline.<br />
3. Fluff the gauze and place it over the nonstick layer; then cover the<br />
area with dry gauze.<br />
4. Try to keep the dressing as secure as possible, either by wrapping<br />
with gauze or by tying the dressing in place.<br />
Tying the dressing in place. In suturing the skin graft to the wound edges, leave<br />
the ends of each suture long (A). Then use the long ends to secure the dressing<br />
in place (B). This technique immobilizes the dressing and underlying graft.<br />
(From Edgerton M: The Art of Surgical Technique. Baltimore, Williams &<br />
Wilkins, 1988, with permission.)
106 <strong>Practical</strong> <strong>Plastic</strong> <strong>Surgery</strong> for Nonsurgeons<br />
Removal of Wound Dressing<br />
• The dressing should be kept in place for 3–5 days. Check the dressing<br />
each day. If it develops an odor or has a lot of drainage, remove<br />
the dressing sooner.<br />
• Be careful not to lift the graft from the wound with the dressing<br />
change. Wet the dressing with saline (mixed with a little hydrogen<br />
peroxide, if available) to prevent the dressing from sticking.<br />
Aftercare<br />
• Gently apply antibiotic ointment, or use a wet-to-wet saline dressing<br />
once or twice a day for the next few days. The area can be cleansed<br />
very gently with saline at each dressing change.<br />
• After 10–14 days, once the wound looks like it is healing (i.e., the<br />
graft is pink and well-adherent to the wound), the dressings can be<br />
left off. A gentle moisturizer should be applied daily.<br />
• The skin graft site should be kept out of the sun as much as possible.<br />
Sunscreens can be used once the graft has fully healed.<br />
• Vigorously counsel the patient not to smoke during the healing<br />
period. Smoking probably will cause the skin graft to die.<br />
Care of the Donor Site<br />
• At the time of surgery, the donor site should be covered with a layer<br />
of antibiotic gauze. A thick layer of gauze should be placed on top.<br />
• After 24 hours, remove the outer gauze dressing—not the antibiotic<br />
layer—and leave the entire area open to air. The layer of antibiotic<br />
gauze will dry out over the next 24–48 hours and gradually peel off<br />
as the underlying wound heals.<br />
• An alternative treatment is to treat the donor site like a burn: apply<br />
antibiotic ointment twice a day until the wound has healed.<br />
• Apply moisturizer regularly to the donor site once it has healed.<br />
• The donor site also should be kept out of the sun. Sunscreens can be<br />
used once the wound has fully healed.<br />
FFuullll--tthhiicckknneessss SSkkiinn GGrraafftt<br />
A full thickness skin graft (FTSG) includes the epidermis and entire<br />
dermis but no subcutaneous fat. Because the entire thickness of skin is<br />
taken, the graft donor site must be closed primarily.
Indications<br />
Skin Grafts 107<br />
FTSGs are rarely done, because the wound must be very clean for the<br />
graft to survive. Most often they are used for a small wound, usually<br />
one created surgically (such as a wound on the face created by excision<br />
of a malignant skin lesion).<br />
The other common use is for open wounds on the palmar surface of<br />
the hands and fingers. These areas may scar too tightly if the thinner<br />
STSG is used.<br />
Preparation of the Donor Site<br />
The best donor site is usually just above the inguinal crease on the<br />
lower abdomen. If the graft is needed to cover a facial wound, extra<br />
skin of a reasonable color match often can be taken from the supraclavicular<br />
area in the neck or from behind the ear.<br />
An ellipse is drawn at the donor site. Make sure that it is large enough<br />
to cover the defect but not too large to close the donor site.<br />
You can tell how large a graft you can take by seeing how much skin<br />
you can pinch or pull up at the donor site. At the inguinal area, you can<br />
flex the patient’s hip to decrease tension on the closure. After a few<br />
days the patient will be able to extend the hip fully. This approach<br />
causes no long-term problems.<br />
Anesthesia of the Donor Site<br />
Because you are taking a relatively small graft, the FTSG can be harvested<br />
with a local anesthetic. Lidocaine and marcaine work equally well.<br />
Procedure for Taking the Graft<br />
1. The ellipse of skin is excised with the full layer of dermis. To facilitate<br />
the procedure, take the graft with some underlying fat attached.<br />
2. You must remove the attached fat, which will interfere with graft<br />
survival.<br />
How to Defat the Graft<br />
1. The skin graft should be placed under tension. Place clamps on the<br />
ends of the graft, lay the graft over your hand, and let the clamps<br />
hang freely.<br />
2. Use scissors to remove the fat on the dermis. Place the scissors flush<br />
with the skin, and cut away the fat. Do not worry if you take a little<br />
dermis or cut into small areas of the epidermis.
108 <strong>Practical</strong> <strong>Plastic</strong> <strong>Surgery</strong> for Nonsurgeons<br />
Defatting the undersurface of a full-thickness skin graft with a pair of scissors.<br />
(From McCarthy JG (ed): <strong>Plastic</strong> <strong>Surgery</strong>. Philadelphia, W.B. Saunders, 1990,<br />
with permission.)<br />
Placement of the Graft onto the Recipient Site<br />
1. The recipient site must be very clean.<br />
2. If you are using the FTSG for a wound on the palmar surface of the<br />
hand, decrease the amount of contamination in the top layers of the<br />
healing wound by scraping the wound with the edge of a knife. Do<br />
not push the knife edge into the wound; simply scrape it over the<br />
wound and then rinse with saline.<br />
3. Scraping makes the wound bleed, but the bleeding is easily controlled<br />
by placing gauze over the wound and applying gentle pressure<br />
for a few minutes. Remember: hemostasis is important.<br />
4. A few small slits can be cut in the graft to prevent fluid from accumulating<br />
under the graft. In general, the graft is placed as an intact<br />
sheet. Do not mesh a FTSG.<br />
5. The graft is placed over the wound, dermis side down, and sutured<br />
in place with absorbable sutures. Leave a long tail on a few of these<br />
sutures so that they can be used to hold the dressing in place.<br />
Application of Wound Dressing<br />
1. A layer of nonstick, antibiotic-impregnated gauze should be placed<br />
directly over the graft. Alternatively, place a thin layer of antibiotic<br />
ointment over the graft.<br />
2. Moisten sterile gauze with mineral oil (if available) or saline.<br />
3. Fluff the gauze and place it over the nonstick layer and cover with<br />
dry gauze.
Skin Grafts 109<br />
4. Keep the dressing as secure as possible, either by wrapping with<br />
gauze or by tying the dressing in place.<br />
Removal of Wound Dressing<br />
The dressing should be kept in place for 3–5 days. Check the dressing<br />
each day. If the wound develops an odor or has a lot of drainage,<br />
remove the dressing sooner.<br />
Be careful not to lift the graft off of the wound with dressing changes.<br />
If necessary, wet the dressing with saline (mixed with a little hydrogen<br />
peroxide if available) to prevent it from sticking.<br />
Aftercare<br />
Apply antibiotic ointment, or use a wet-to-wet saline dressing once or<br />
twice a day for the next few days.<br />
Cleanse the area gently with saline at each dressing change.<br />
The epidermis (very top layer) may become black and peel off. Do not<br />
be overly concerned. As long as the underlying dermis is attached and<br />
vascularized, the graft should heal.<br />
After 7–10 days, once the graft looks like it is healing (i.e., it is pink and<br />
well-adherent), the dressings can be left off. A gentle moisturizer<br />
should be applied.<br />
The skin graft site should be kept out of the sun as much as possible. A<br />
gentle sunscreen should be used.<br />
Vigorously counsel the patient not to smoke during the healing period.<br />
Smoking probably will cause the skin graft to die.<br />
Care of the Donor Site<br />
The donor site should be closed primarily and covered with antibiotic<br />
ointment and dry gauze. The dressing can be removed after 24 hours.<br />
Apply a small amount of antibiotic ointment and dry gauze for 2–3<br />
days. Then the area can be left open.<br />
Clean daily with gentle soap and water.<br />
Remove the sutures after 7–10 days.<br />
BBiibblliiooggrraapphhyy<br />
Reus WF, Mathes SJ: Wound closure. In Jurkeiwicz MJ, Krizek TJ, Mathes SJ, Ariyan S<br />
(eds): <strong>Plastic</strong> <strong>Surgery</strong>: Principles and Practice. St. Louis, Mosby, 1990, pp 20–22.