

QUICK START GUIDE Pyramid TimeTrax EZ ETHERNET MODEL
QUICK START GUIDE Pyramid TimeTrax EZ ETHERNET MODEL
QUICK START GUIDE Pyramid TimeTrax EZ ETHERNET MODEL

You also want an ePaper? Increase the reach of your titles
YUMPU automatically turns print PDFs into web optimized ePapers that Google loves.
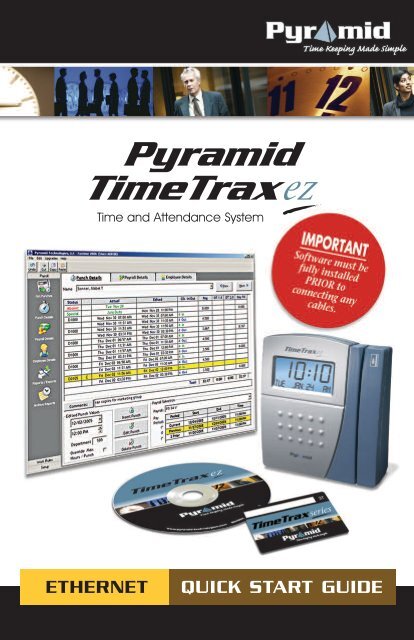
Time and Attendance System<br />
<strong>ETHERNET</strong> <strong>QUICK</strong> <strong>START</strong> <strong>GUIDE</strong>
PYRAMID TIMETRAX <strong>EZ</strong> <strong>ETHERNET</strong> <strong>QUICK</strong> <strong>START</strong> <strong>GUIDE</strong><br />
<strong>QUICK</strong> <strong>START</strong> <strong>GUIDE</strong><br />
<strong>Pyramid</strong> <strong>TimeTrax</strong> <strong>EZ</strong><br />
WHAT’S IN THE BOX?<br />
• <strong>Pyramid</strong> <strong>TimeTrax</strong> time recorder<br />
• AC Power supply<br />
• <strong>TimeTrax</strong> Software CD<br />
• Quick Start Guide<br />
• Ethernet Cable<br />
• Employee Swipe Cards<br />
• Mounting bracket, screws<br />
and release key<br />
©2009 <strong>Pyramid</strong> Technologies, LLC. All rights reserved.<br />
<strong>ETHERNET</strong> <strong>MODEL</strong><br />
SOFTWARE MUST BE FULLY INSTALLED PRIOR<br />
TO CONNECTING ANY TERMINAL CABLES<br />
MINIMUM SYSTEM<br />
REQUIREMENTS<br />
• DHCP Server on the Network<br />
• Ethernet Network Jack<br />
• PC with a Pentium ® class or<br />
faster processor<br />
• 128 megabytes of RAM<br />
• 1 gigabyte of free space on the<br />
system’s hard drive<br />
• Windows ® XP, 2000, NT or Vista<br />
• Printer (if hard copy reports<br />
are desired)<br />
CUSTOMER SERVICE PHONE NUMBER<br />
(888) 479-7264<br />
NEED TO PLACE AN ORDER?<br />
For cable extensions and other supplies,<br />
call <strong>Pyramid</strong> Technologies, LLC at:<br />
(888) 479-7264
PYRAMID TIMETRAX <strong>EZ</strong> <strong>ETHERNET</strong> <strong>QUICK</strong> <strong>START</strong> <strong>GUIDE</strong><br />
INSTALLING THE SOFTWARE<br />
NOTE: Prior to installing the software, it is recommended that you disable<br />
all anti-virus and firewall software so it does not interfere with the<br />
installation. It can be turned back on immediately after the installation.<br />
1<br />
Place the <strong>Pyramid</strong> <strong>TimeTrax</strong> Software<br />
CD into your PC. The software will<br />
AUTORUN. You will then see the below<br />
setup screens. Follow the onscreen<br />
instructions.<br />
Click NEXT to continue<br />
Accept licensing<br />
agreement and click<br />
NEXT to continue<br />
Click NEXT to continue<br />
Enter a User Name and<br />
Organization (optional)<br />
and click NEXT to<br />
continue<br />
Click INSTALL to begin<br />
installation
PYRAMID TIMETRAX <strong>EZ</strong> <strong>ETHERNET</strong> <strong>QUICK</strong> <strong>START</strong> <strong>GUIDE</strong><br />
CABLE INSTALLATION<br />
PARTS REFERENCE<br />
A PC<br />
E<br />
B Cat5 Ethernet Cable (included)* F<br />
C Ethernet Hub (not included)** G<br />
D Cat5 Ethernet Cable (not included)*<br />
When installation is<br />
complete, click FINISH<br />
and Restart your<br />
computer.<br />
You are now finished installing the <strong>Pyramid</strong> <strong>TimeTrax</strong> software onto your<br />
PC. We highly recommend restarting your computer before you proceed.<br />
NOTE: Do not continue using the software until the terminal(s) is<br />
completely connected with all cables and power supply.<br />
A<br />
B<br />
D<br />
OPTION 1<br />
OPTION 2<br />
TWO OPTIONS ARE AVAILABLE FOR CONNECTING THE<br />
PYRAMID TIMETRAX <strong>ETHERNET</strong> TERMINAL TO YOUR PC.<br />
OPTION 1: PC HAS an available open Ethernet port.<br />
Connect the AC power supply (Fig. F) to a standard wall power outlet<br />
(Fig. G) and to the <strong>TimeTrax</strong> terminal (Fig. E). Connect the Cat5 Ethernet<br />
cable (Fig. B) to the back of your PC (Fig. A) and to the back of the<br />
<strong>TimeTrax</strong> terminal (Fig. A).<br />
2<br />
HUB<br />
C<br />
B<br />
F<br />
E<br />
<strong>TimeTrax</strong> Terminal (included)<br />
AC Power Supply (included)<br />
Wall Power Outlet<br />
G
PYRAMID TIMETRAX <strong>EZ</strong> <strong>ETHERNET</strong> <strong>QUICK</strong> <strong>START</strong> <strong>GUIDE</strong><br />
OPTION 2: PC DOES NOT HAVE an available open Ethernet<br />
port -or- other <strong>TimeTrax</strong> terminal is being directly<br />
connected to your network. Connect the AC power supply (Fig. F)<br />
to a standard wall power outlet (Fig. G) and to the <strong>TimeTrax</strong> terminal (Fig.<br />
E).Connect the Cat5 Ethernet cable (Fig. B) to the <strong>TimeTrax</strong> terminal (Fig. E).<br />
Connect the opposite end of the Cat5 cable to an Ethernet Hub (Fig. C).<br />
Then connect one end of the Cat5 Ethernet Cable (Fig. D) to the Ethernet<br />
Hub (Fig. C) and the opposite end to the back of your PC (Fig. A).<br />
*(1) 50’ Cat5 cable is included. Any additional Cat5 cables necessary for installation are not included<br />
and must be purchased separately from any office supply reseller or computer store.<br />
**Ethernet Hub (Fig. C) is not included with <strong>TimeTrax</strong> kit.<br />
Please restart/reboot your PC before continuing<br />
with the instructions.<br />
TERMINAL MOUNTING<br />
The <strong>TimeTrax</strong> time recorder can be mounted on a wall using the mounting<br />
bracket or set on a desk. The communication and power cables may be<br />
routed through the hole in the bottom of the time recorder or through<br />
the cutout in the mounting bracket and through the wall. The mounting<br />
bracket features a locking tab that prevents the time recorder from being<br />
removed once it is attached. A wall bracket release key is provided to disengage<br />
the lock tab for removing the unit. Do not misplace the release key.<br />
INSTALLING THE MOUNTING BRACKET<br />
Hold the mounting bracket flush against the wall with the cable access<br />
cut out to the left. The locking tab should be to the right and extended<br />
downward. The four mounting tabs on the corners should be extended<br />
upward. Level the bracket. Use a pencil to mark the four screw holes close<br />
to the corner tabs. Drill holes as marked for the four mounting screws and<br />
insert the included anchors. Drill a hole centered in the rectangular opening<br />
of the bracket so the cable can pass through. The hole should be large<br />
enough to allow you to conveniently route the cables through the wall.<br />
Screw the mounting bracket to the wall with the included screws.<br />
ATTACHING THE TERMINAL<br />
TO THE MOUNTING BRACKET<br />
1. Push the time recorder onto the previously installed mounting<br />
bracket so that the four tabs on the bracket fit into the<br />
four matching slots on the back of the time recorder.<br />
2. Slide the time recorder downward until the locking tab<br />
"clicks" into place. When properly mounted, the time<br />
recorder cannot be slid up and off the bracket without<br />
using the included wall bracket release key to disengage<br />
the locking tab.<br />
3
PYRAMID TIMETRAX <strong>EZ</strong> <strong>ETHERNET</strong> <strong>QUICK</strong> <strong>START</strong> <strong>GUIDE</strong><br />
DETACHING THE TIME RECORDER<br />
FROM THE MOUNTING BRACKET<br />
1. Hold the included wall bracket release key with the pointed<br />
end up and the diagonally cut side away from you.<br />
2. Insert the key into the narrow slot on the bottom of the time<br />
recorder to the right of the cable access cutout.<br />
3. Push the key all the way up into the slot. The key will slide<br />
easily until the last ½ inch when some resistance from the<br />
locking tab will be felt.<br />
4. With key fully pushed into the slot, slide the time recorder<br />
up and off of the mounting bracket.<br />
LOGGING INTO THE SOFTWARE FOR THE FIRST TIME<br />
Double click the<br />
<strong>Pyramid</strong> <strong>TimeTrax</strong><br />
ICON placed on your<br />
desktop to begin<br />
If the recorder is connected correctly,<br />
the Initial Communication Form will<br />
appear with the message “Recorder<br />
Found”. If not, check your cable<br />
connections as per the installation<br />
diagram and click the ReConnect<br />
button.<br />
At this point, the Reference Guide and online software wizards will walk<br />
you through steps to get you up and running. They will also teach you how<br />
to set the time and date on the terminal, create your employee database,<br />
print reports and manage your time and attendance.<br />
4<br />
When the program is launched, you are<br />
presented with the LOGIN screen shown.<br />
The temporary User Name is “Admin”<br />
The temporary Password is “PTI”.<br />
PTI is case sensitive and must be<br />
entered as directed.<br />
Enter this information and click the<br />
LOGIN button in the center of the screen.
PYRAMID TIMETRAX <strong>EZ</strong> <strong>ETHERNET</strong> <strong>QUICK</strong> <strong>START</strong> <strong>GUIDE</strong><br />
USING THE SOFTWARE AND REFERENCE <strong>GUIDE</strong><br />
The “Reference Guide” can be accessed and printed from the Log In<br />
screen as well as the software toolbar by selecting the ICON below.<br />
You may also locate the Reference Guide from the software by selecting<br />
Help and Reference Guide or by accessing our website<br />
http://pyramidtechnologies.com/ProductManuals/default.asp.<br />
Click the “Reference Guide” ICON to open the electronic PDF file of<br />
the Software Users Guide. You will see complete steps and full directions<br />
on how to use the <strong>Pyramid</strong> <strong>TimeTrax</strong> Software. The guide is always available<br />
on the software screen toolbar. In addition, you can print this file out or<br />
save it to your PCs hard drive. Note: Adobe PDF Reader is required to view<br />
the reference guide and can be downloaded from http://www.adobe.com.<br />
USING THE TIME RECORDER<br />
Once the time recorder is installed, the employee records that are generated<br />
from swipe card punches are stored within the recorder even if those records<br />
are uploaded to the <strong>TimeTrax</strong> database. If power should fail or the terminal<br />
power supply is interrupted, the swipe card punch information and log will<br />
be stored in the terminals internal memory. The terminal is equipped with<br />
an internal battery backup for memory storing ONLY<br />
The <strong>TimeTrax</strong> recorder automatically stores the last 4,000 punches.<br />
Depending on usage, the punches can be retrieved on a more or less frequent<br />
basis. However, it is recommended that punches should be retrieved<br />
on a regular basis for two reasons:<br />
1. The larger the number of new punches retrieved, the longer it takes for<br />
downloading to the <strong>TimeTrax</strong> database.<br />
2. In case of catastrophic equipment failure of the time recorder, such as<br />
lightning or violent impact, the punch record is stored in a second<br />
place (the PC).<br />
USING EMPLOYEE SWIPE CARDS<br />
1. Insert the employee swipe card at the top of the slot on the right side of<br />
the time recorder. The swipe card must be held with the magnetic stripe<br />
to the right and the card firmly in the slot.<br />
2. With a steady motion, pull the swipe card down through the slot. If the<br />
employee number is successfully read, the time recorder will beep and<br />
the card number will be displayed briefly on the time recorder screen.<br />
5
45 Gracey Ave., Meriden, CT 06451<br />
www.ptitime.com I2207