
You also want an ePaper? Increase the reach of your titles
YUMPU automatically turns print PDFs into web optimized ePapers that Google loves.
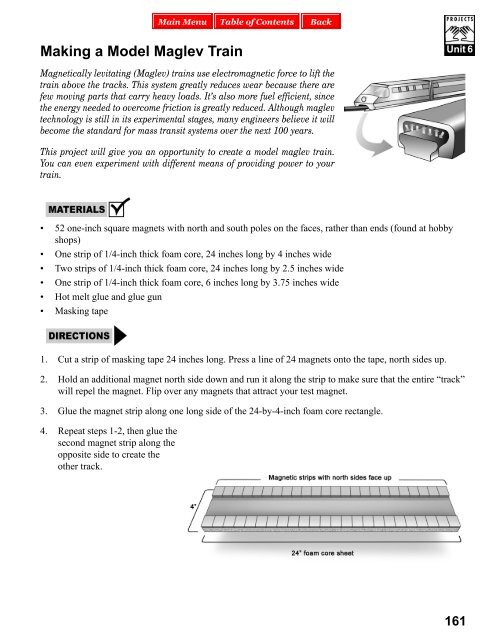
<strong>Making</strong> a <strong>Model</strong> <strong>Maglev</strong> <strong>Train</strong><br />
Magnetically levitating (<strong>Maglev</strong>) trains use electromagnetic force to lift the<br />
train above the tracks. This system greatly reduces wear because there are<br />
few moving parts that carry heavy loads. It’s also more fuel efficient, since<br />
the energy needed to overcome friction is greatly reduced. Although maglev<br />
technology is still in its experimental stages, many engineers believe it will<br />
become the standard for mass transit systems over the next 100 years.<br />
This project will give you an opportunity to create a model maglev train.<br />
You can even experiment with different means of providing power to your<br />
train.<br />
• 52 one-inch square magnets with north and south poles on the faces, rather than ends (found at hobby<br />
shops)<br />
• One strip of 1/4-inch thick foam core, 24 inches long by 4 inches wide<br />
• Two strips of 1/4-inch thick foam core, 24 inches long by 2.5 inches wide<br />
• One strip of 1/4-inch thick foam core, 6 inches long by 3.75 inches wide<br />
• Hot melt glue and glue gun<br />
• Masking tape<br />
1. Cut a strip of masking tape 24 inches long. Press a line of 24 magnets onto the tape, north sides up.<br />
2. Hold an additional magnet north side down and run it along the strip to make sure that the entire “track”<br />
will repel the magnet. Flip over any magnets that attract your test magnet.<br />
3. Glue the magnet strip along one long side of the 24-by-4-inch foam core rectangle.<br />
4. Repeat steps 1-2, then glue the<br />
second magnet strip along the<br />
opposite side to create the<br />
other track.<br />
Unit 6<br />
161
5. Place a bead of hot glue along the cut edge and attach one 24-by-2.5 inch foam core rectangle to<br />
form a short wall.<br />
6. Repeat step 5 to form the opposite wall. This keeps the train from sliding sideways off the track.<br />
7. To create your train, glue the south side of a magnet to each corner of the small foam core rectangle.<br />
8. Turn the train over so that the north side of its magnets face the tracks. Place your train above the track<br />
and watch what happens!<br />
162<br />
Unit 6
1. Experiment with various means to propel your train along the tracks. Consider using balloons, rubber<br />
bands and toy propellers, small motors (available at hobby stores) or even jet propulsion using vinegar<br />
and baking soda as fuel.<br />
2. Build a longer, more permanent track using plywood shelving. Use Plexiglas for the front wall so that<br />
you can see the train floating above the track.<br />
3. Find out how much weight your train can carry. Are some propulsion systems able to carry more weight<br />
than others? Why?<br />
4. Have a design contest to see who can build the fastest train, or the train that can carry the most weight<br />
from one end of the track to the other.<br />
Unit 6<br />
163