BEAT 175 Owners Manual - Connects2
BEAT 175 Owners Manual - Connects2
BEAT 175 Owners Manual - Connects2

Create successful ePaper yourself
Turn your PDF publications into a flip-book with our unique Google optimized e-Paper software.
INSTALLATION<br />
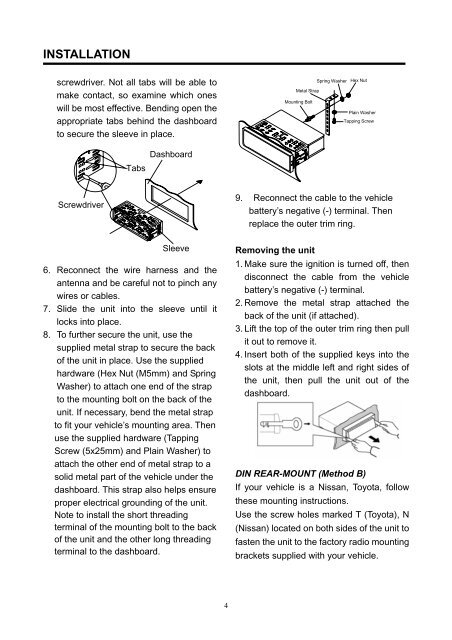
screwdriver. Not all tabs will be able to<br />
make contact, so examine which ones<br />
will be most effective. Bending open the<br />
appropriate tabs behind the dashboard<br />
to secure the sleeve in place.<br />
Screwdriver<br />
Tabs<br />
Dashboard<br />
Sleeve<br />
6. Reconnect the wire harness and the<br />
antenna and be careful not to pinch any<br />
wires or cables.<br />
7. Slide the unit into the sleeve until it<br />
locks into place.<br />
8. To further secure the unit, use the<br />
supplied metal strap to secure the back<br />
of the unit in place. Use the supplied<br />
hardware (Hex Nut (M5mm) and Spring<br />
Washer) to attach one end of the strap<br />
to the mounting bolt on the back of the<br />
unit. If necessary, bend the metal strap<br />
to fit your vehicle’s mounting area. Then<br />
use the supplied hardware (Tapping<br />
Screw (5x25mm) and Plain Washer) to<br />
attach the other end of metal strap to a<br />
solid metal part of the vehicle under the<br />
dashboard. This strap also helps ensure<br />
proper electrical grounding of the unit.<br />
Note to install the short threading<br />
terminal of the mounting bolt to the back<br />
of the unit and the other long threading<br />
terminal to the dashboard.<br />
4<br />
Metal Strap<br />
Mounting Bolt<br />
Spring Washer Hex Nut<br />
Plain Washer<br />
Tapping Screw<br />
9. Reconnect the cable to the vehicle<br />
battery’s negative (-) terminal. Then<br />
replace the outer trim ring.<br />
Removing the unit<br />
1. Make sure the ignition is turned off, then<br />
disconnect the cable from the vehicle<br />
battery’s negative (-) terminal.<br />
2. Remove the metal strap attached the<br />
back of the unit (if attached).<br />
3. Lift the top of the outer trim ring then pull<br />
it out to remove it.<br />
4. Insert both of the supplied keys into the<br />
slots at the middle left and right sides of<br />
the unit, then pull the unit out of the<br />
dashboard.<br />
DIN REAR-MOUNT (Method B)<br />
If your vehicle is a Nissan, Toyota, follow<br />
these mounting instructions.<br />
Use the screw holes marked T (Toyota), N<br />
(Nissan) located on both sides of the unit to<br />
fasten the unit to the factory radio mounting<br />
brackets supplied with your vehicle.