D GB F NL S DK N FIN I E P PL H CZ SK GR ... - Vseinstrumenti.ru
D GB F NL S DK N FIN I E P PL H CZ SK GR ... - Vseinstrumenti.ru
D GB F NL S DK N FIN I E P PL H CZ SK GR ... - Vseinstrumenti.ru

You also want an ePaper? Increase the reach of your titles
YUMPU automatically turns print PDFs into web optimized ePapers that Google loves.
D Betriebsanleitung<br />
Elektro-Rasenmäher<br />
<strong>GB</strong> Operating Inst<strong>ru</strong>ctions<br />
Electric Lawnmower<br />
F Mode dʼemploi<br />
Tondeuse électrique<br />
<strong>NL</strong> Inst<strong>ru</strong>cties voor geb<strong>ru</strong>ik<br />
Elektrische grasmaaier<br />
S B<strong>ru</strong>ksanvisning<br />
Elektrisk Gräsklippare<br />
<strong>DK</strong> B<strong>ru</strong>gsanvisning<br />
Elektrisk Plæneklipper<br />
N B<strong>ru</strong>ksanvisning<br />
Elektrisk Gressklipper<br />
<strong>FIN</strong> Käyttöohje<br />
Tehokas sähköleikkuri<br />
I Ist<strong>ru</strong>zioni per lʼuso<br />
Rasaerba elettrico<br />
E Manual de inst<strong>ru</strong>cciones<br />
Cortacésped eléctrico<br />
P Inst<strong>ru</strong>ções de utilização<br />
Máquina de cortar relva eléctrica<br />
<strong>PL</strong> Inst<strong>ru</strong>kcja obsіugi<br />
Elektryczna kosiarka<br />
H Vevőtájékoztató<br />
Elektromos fűnyíró<br />
PowerMax 36 E<br />
Art. 4037<br />
PowerMax 42 E<br />
Art. 4043<br />
<strong>CZ</strong> Návod k obsluze<br />
Elektrická sekačka<br />
<strong>SK</strong> Návod na používanie<br />
Elektrická kosačka<br />
<strong>GR</strong> Oδηγíες χρήσεως<br />
Ηλεκτρική χλooκoπτική μηχανή<br />
RUS Инструкция по эксплуатации<br />
Электрические газонокосилки<br />
SLO Navodila za uporabo<br />
Električna kosilnica<br />
HR Uputstva za upotrebu<br />
Električna kosilica<br />
UA Інструкція з експлуатації<br />
Eлектрична газонокосарка<br />
RO Inst<strong>ru</strong>cţiuni de utilizare<br />
Masina electrica de tuns gazonul<br />
TR Kullanma Talimatı<br />
Elektrikli Çim Biçme Makinesi<br />
BG Инструкция за експлоатация<br />
Eлектрокосачка<br />
EST Kasutusjuhend<br />
Elektriline mu<strong>ru</strong>niiduk<br />
LT Eksploatavimo inst<strong>ru</strong>kcija<br />
Elektrinė vejapjovė<br />
LV Lietošanas inst<strong>ru</strong>kcija<br />
Elektriskā zāles pļaujmašīna<br />
D<br />
<strong>GB</strong><br />
F<br />
<strong>NL</strong><br />
S<br />
<strong>DK</strong><br />
N<br />
<strong>FIN</strong><br />
I<br />
E<br />
P<br />
<strong>PL</strong><br />
H<br />
<strong>CZ</strong><br />
<strong>SK</strong><br />
<strong>GR</strong><br />
SLO RUS<br />
HR<br />
UA<br />
RO<br />
TR<br />
BG<br />
EST<br />
LT<br />
LV
D<br />
<strong>GB</strong><br />
F<br />
<strong>NL</strong><br />
S<br />
<strong>DK</strong><br />
N<br />
<strong>FIN</strong><br />
I<br />
E<br />
P<br />
<strong>PL</strong><br />
H<br />
<strong>CZ</strong><br />
WICHTIGE INFORMATION<br />
Bitte vor dem Benutzen des Gerätes<br />
durchlesen und gut aufbewahren<br />
IMPORTANT INFORMATION<br />
Read before use and retain for future<br />
reference<br />
RENSEIGNEMENTS IMPORTANTS<br />
A lire avant usage et à conserver pour<br />
référence ultérieure<br />
BELAN<strong>GR</strong>IJKE INFORMATIE<br />
Leest u deze informatie voor het geb<strong>ru</strong>ik<br />
en bewaar ze voor toekomstige<br />
raadpleging<br />
VIKTIG INFORMATION<br />
Läs anvisningarna före användningen och<br />
spara dem för framtida behov<br />
VIGTIGE O<strong>PL</strong>YSNINGER<br />
Du bør læse b<strong>ru</strong>gsanvisningen før b<strong>ru</strong>g og<br />
gemme til senere henvisning<br />
VIKTIG INFORMASJON<br />
Les b<strong>ru</strong>ksanvisningen nøye før b<strong>ru</strong>k og<br />
oppbevar den for senere b<strong>ru</strong>k<br />
VIGTIGE O<strong>PL</strong>YSNINGER<br />
Du bør læse b<strong>ru</strong>gsanvisningen før b<strong>ru</strong>g og<br />
gemme til senere henvisning<br />
INFORMAZIONI IMPORTANTI<br />
Leggere prima dellʼuso e conservare per<br />
ulteriore consultazione<br />
INFORMACIÓN IMPORTANTE<br />
Léase antes de utilizar y consérvela como<br />
referencia en el futuro<br />
INFORMAÇÕES IMPORTANTES<br />
Leia antes de utilizar e guarde para<br />
consulta futura<br />
UWAGA Zapoznać się z treścią niniejszej<br />
inst<strong>ru</strong>kcji przed użyciem i zachować ją do<br />
dalszego użytkowania urządzenia<br />
FONTOS INFORMÁCIÓ<br />
Használat előtt olvassa el, és tartsa meg<br />
későbbi felhasználásra<br />
DŮLEŽITÁ INFORMACE<br />
Než začnete stroj používat, přečtěte si<br />
pozorně tento návod a uschovejte jej pro další<br />
použití v budoucnu<br />
<strong>SK</strong><br />
<strong>GR</strong><br />
RUS<br />
SLO<br />
HR<br />
UA<br />
RO<br />
TR<br />
BG<br />
EST<br />
LT<br />
LV<br />
DÔLEŽITÉ INFORMÁCIE<br />
Pred použitím si prečítajte nasledovné<br />
informácie a odložte si ich pre budúcu<br />
potrebu<br />
ΣΗΜΑΝΤΙΚΕΣ ΠΛΗΡΟΦΟΡΙΕΣ<br />
∆ιαβάστε αυτό το φυλλάδιο πριν από τη<br />
χρήση της συσκευής και φυλάξτε το για<br />
µελλοντική αναφορά<br />
ВАЖНАЯ ИНФОРМАЦИЯ<br />
Прочитайте перед тем, как включить<br />
триммер, и сохраните для дальнейшего<br />
использования.<br />
POMEMBNA INFORMACIJA<br />
Preberite pred uporabo in shranite za<br />
prihodnjo uporabo<br />
VAŽNE INFORMACIJE<br />
Pročitati prije upotrebe i sačuvati za<br />
buduće osvrte<br />
ВАЖЛИВА ІНФОРМАЦІЯ<br />
Прочитайте перед початком роботи і<br />
збережіть для подальшого<br />
використання<br />
Manual de inst<strong>ru</strong>cţiuni<br />
Inainte să folosiţi mașina de tuns pent<strong>ru</strong><br />
prima oară, citiţi cu atenţie manualul de<br />
inst<strong>ru</strong>cţiuni pent<strong>ru</strong> a-i înţelege conţinutul.<br />
ÖNEMLİ BİLGİLER<br />
Kullanmadan önce okuyunuz ve ileride<br />
başvurmak üzere saklayınız.<br />
ВАЖНА ИНФОРМАЦИЯ<br />
Прочетете преди употреба и запазете за<br />
бъдещи справки<br />
OLULINE TEAVE<br />
Enne seadme kasutuselevõtmist lugege<br />
kasutusjuhend läbi ning säilitage see tuleviku<br />
tarbeks.<br />
Operatoriaus inst<strong>ru</strong>kcijÅ rinkinys<br />
Perskaitykite |¡ inst<strong>ru</strong>kcijÅ rinkin¡ labai<br />
atidãiai, kad pilnai suprastum>te turin¡, prie|<br />
prad>dami naudoti vejos/ ãol>s pjov>jƒ.<br />
ВАЖЛИВА ІНФОРМАЦІЯ<br />
Прочитайте перед початком роботи і<br />
збережіть для подальшого<br />
використання
5<br />
6<br />
4<br />
5<br />
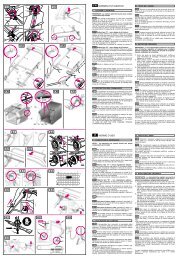
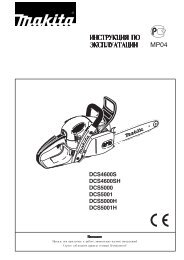
D - INHALT<br />
1. Holm-Oberteil<br />
2. Holm-Unterteil x 2<br />
3. Endkappe Holm-Unterteil x 2<br />
4. Kabelhalter x 2<br />
5. Spannhebel x 4<br />
6. Gewindebolzen x 4<br />
7. Unterlegscheibe x 4<br />
8. Schraube x 2<br />
9. Holmaufnahme x 2<br />
10. Feder x 2<br />
11. Mulchkit<br />
12. Tragegriff<br />
13. Oberteil Fangbox<br />
14. Unterteil Fangbox x 2<br />
15. Warnsymbole<br />
16. Produkttypenschild<br />
17. Bedienungsan-weisung<br />
<strong>GB</strong> - CONTENTS<br />
1. Upper handle<br />
2. Lower handle x 2<br />
3. Lower handle plug x 2<br />
4. Cable clip x2<br />
5. Cam Lock x 4<br />
6. Barrel Nut x 4<br />
7. Washer x 4<br />
8. Bolt x 2<br />
9. Pivot Block x 2<br />
10. Spring x 2<br />
11. Mulching Plug<br />
12. Grassbox handle<br />
13. Grassbox Upper<br />
14. Grassbox lower x 2<br />
15. Warning Symbols<br />
16. Product rating label<br />
17. Inst<strong>ru</strong>ction Manual<br />
F - TABLE DES MATIÈRES<br />
1. Guidon supérieur<br />
2. Guidon inférieur x 2<br />
3. Embout de la poignée inférieure x 2<br />
4. Attache câble x 2<br />
5. Clavette de came x 4<br />
6. Ecrou tube x 4<br />
7. Rondelles x 4<br />
7<br />
7<br />
6<br />
10<br />
9<br />
4<br />
3<br />
2<br />
1<br />
15<br />
8<br />
16<br />
10<br />
9<br />
8. Boulons x 2<br />
9. Cale de rotation x 2<br />
10. Ressort x 2<br />
11. Pièce pour le paillage<br />
12. Poignée du bac<br />
13. Partie supérieure du bac<br />
14. Partie inférieure du bac x 2<br />
15. Etiquette de précautions dʼemploi<br />
16. Plaquette des Caractéristiques<br />
du Produit<br />
17. Manuel dʼInst<strong>ru</strong>ctions<br />
<strong>NL</strong> - INHOUD<br />
1. Bovenstuk van duwboom<br />
2. Onderstuk van duwboom x 2<br />
3. Dop van onderste handgreep x 2<br />
4. Snoerklem x 2<br />
5. Sluitnok x 4<br />
6. Cilinderbout x 4<br />
7. Pakkingring x 4<br />
8. Bout x 2<br />
9. Scharnierblok x 2<br />
10. Veer x 2<br />
11. Mulchplug<br />
12. Handgreep grasbak<br />
13. Bovenste deel grasvangbak<br />
14. Onderste deel grasvangbak x 2<br />
15. Waarschuwingssymbolen<br />
16. Product-informatielabel<br />
17. Handleiding<br />
S - INNEHÅLL<br />
1. Övre handtag<br />
2. Nedre handtag 2 st<br />
3. Plugg för undre handtag x 2<br />
4. Kabelklämma 2 st<br />
5. Kamlås x 4<br />
6. Valsmutter x 4<br />
7. Bricka 4 st<br />
8. Bult 2 st<br />
9. Drejeblok x 2<br />
10. Fjäder x 2<br />
11. Plugg för flistugg<br />
12. Handtag för gräsuppsamlare<br />
13. Gräslådans överdel<br />
14. Gräslådans<br />
2<br />
6<br />
3<br />
6<br />
7<br />
6<br />
5<br />
12<br />
5<br />
11<br />
14<br />
17<br />
13<br />
underdel x 2<br />
15. Varningssymboler<br />
16. Produktmärkning<br />
17. B<strong>ru</strong>ksanvisning<br />
<strong>DK</strong> - INDHOLD<br />
1. Øvre håndtag<br />
2. Nedre håndtag x 2<br />
3. Prop til det nederste håndtag X 2<br />
4. Kabelklemme x 2<br />
5. Låsearm x 4<br />
6. Tromlemøtrik x 4<br />
7. Spændeskive x 4<br />
8. Bolt x 2<br />
9. Drejeblok x 2<br />
10. Fjeder x 2<br />
11. Komposteringsprop<br />
12. Opsamlerhåndtag<br />
13. Øverste del af græsboksen<br />
14. Nederste del af græsboksen x 2<br />
15. Advarselssymboler<br />
16. Produktets mærkeskilt<br />
17. B<strong>ru</strong>gsvejledning<br />
N - INNHOLD<br />
1. Øvr håndtak<br />
2. Nedre håndtak x 2<br />
3. Plasthette til nedre håndtak x 2<br />
4. Kabelklemme x 2<br />
5. Kamlås x 4<br />
6. Hylsemutter x 4<br />
7. Skive x 4<br />
8. Bolt x 2<br />
9. Dreibar brakett x 2<br />
10. Fjær x 2<br />
11. Bioplugg<br />
12. Håndtak til gressoppsamler<br />
13. Øvre del av gressoppsamleren<br />
14. Nedre del av gressoppsamleren x 2<br />
15. Waarschuwingssymbolen<br />
16. Produktmerking<br />
17. B<strong>ru</strong>ksanvisning
<strong>FIN</strong> - SISÄLTÖ<br />
1. Ylempi kahva<br />
2. Alempi kahva x 2<br />
3. Alakahvan tulppa x 2<br />
4. Johdon pidike x 2<br />
5. Lukitsin x 4<br />
6. Hylsymutteri x 4<br />
7. Tiivistysrengas x 4<br />
8. Pultti x 2<br />
9. Säätökiekko x 2<br />
10. Jousi x 2<br />
11. Bioleikkuriosa<br />
12. Ruohonkerääjän kahva<br />
13. Ruoholaatikon yläosa<br />
14. Ruoholaatikon alaosa x 2<br />
15. Varoitusmerkit<br />
16. Ruohonleikkurin arvokilpi<br />
17. Käyttöopas<br />
I - INDICE CONTENUTI<br />
1. Impugnatura superiore<br />
2. Impugnatura inferiore x 2<br />
3. Tappo manico inferiore x 2<br />
4. Morsetto per il cavo x 2<br />
5. Fermo a camma x 4<br />
6. Dado lungo x 4<br />
7. Rondella x 4<br />
8. Bullone x 2<br />
9. Blocco perno x 2<br />
10. Molla x 2<br />
11. Coperchio pacciame<br />
12. Maniglia cesto raccoglierba<br />
13. Parte superiore del cesto<br />
raccoglierba<br />
14. Parte inferiore del cesto<br />
raccoglierba x 2<br />
15. Simboli di avvertenza<br />
16. Etichetta dati del prodotto<br />
17. Manuale di ist<strong>ru</strong>zioni<br />
E - CONTENIDO<br />
1. Empuñadura superior<br />
2. Empuñadura<br />
inferior x 2<br />
3. Tapón de la barras inferiores x 2<br />
4. Grapa de cable x 2<br />
5. Cierre de leva x 4<br />
6. Tuerca cilíndrica x 4<br />
7. Arandela x 4<br />
8. Perno x 2<br />
9. Bloque de pivote x 2<br />
10. Resorte x 2<br />
11. Tapón del mantillo<br />
12. Mango del recogedor<br />
13. Caja Superior de Césped<br />
14. Caja Inferior de Césped x 2<br />
15. Símbolos de alarma<br />
16. Placa de Características del<br />
Producto<br />
17. Manual de inst<strong>ru</strong>cciones<br />
P - LEGENDA<br />
1. Guiador superior<br />
2. Guiador inferior x 2<br />
3. Bucha do manípulo inferior x 2<br />
4. Grampo do cabo x 2<br />
5. Bloqueio de came x 4<br />
6. Porca cilíndrica x 4<br />
7. Anilha x 4<br />
8. Cavilha x 2<br />
9. Bloqueio do pivot x 2<br />
10. Mola x 2<br />
11. Tampão para espalhar relva<br />
12. Pega da Caixa da Relva<br />
13. Parte superior do depósito de<br />
relva<br />
14. Parte inferior do depósito de<br />
relva x 2<br />
15. Símbolos de advertência<br />
16. Rótulo de Avaliação do Produto<br />
17. Manual de Inst<strong>ru</strong>cções<br />
<strong>PL</strong> - ZAWARTOSC KARTONU<br />
1. Górny uchwyt<br />
2. Dolny uchwyt x 2<br />
3. Zaślepka dolnego uchwytu x 2<br />
4. Zaczep kabla x 2<br />
5. Rączka Zacisku Krzywkowego x<br />
4<br />
6. Nakrętka z Otworem<br />
Gwintowanym x 4<br />
7. Podkładka x 4<br />
8. Ś<strong>ru</strong>ba x 2<br />
9. Blok Obrotowy x 2<br />
10. Sprężyna x 2<br />
11. Zaślepka do Mulczowania<br />
12. Uchwyt kosza na traw∆<br />
13. Górna cz∆·π pojemnika na traw∆<br />
14. Dolna cz∆·π pojemnika na traw∆ x 2<br />
15. Symbole Ostrzegawcze<br />
16. Tabliczka znamionowa<br />
17. Inst<strong>ru</strong>kcja Obsługi<br />
H - TARTALOMJEGYZÉK<br />
1. Felső tolókar<br />
2. Alsó tolókar 2x<br />
3. Az alsó kar dugója x 2<br />
4. Kábelrögzítő 2x<br />
5. Bütykös zár x 4<br />
6. Hengeres anya x 4<br />
7. Alátét 4x<br />
8. Csavar 2x<br />
9. Forgócsap x 2<br />
10. Rugó x 2<br />
11. Védő dugó<br />
12. Fűgyűjtő fogantyú<br />
13. Fűgyűjtő felső része<br />
14. Fűgyűjtő alsó<br />
része x 2<br />
15. Figyelmeztető jelek<br />
16. Termékminősítő címke<br />
17. Kezelési útmutató<br />
<strong>CZ</strong> - POPIS STROJE<br />
1. Horní <strong>ru</strong>koje�<br />
2. Spodní <strong>ru</strong>koje� x 2<br />
3. Krytka dolní části držadla x 2<br />
4. Úchytka kabelu x 2<br />
5. Vačková páka x 4<br />
6. Válcová natice x 4<br />
7. Podložka x 4<br />
8. Šroub x 2<br />
9. Otočný blok x 2<br />
10. P<strong>ru</strong>žina x 2<br />
11. Mulčovací zátka<br />
12. Rukoje� sběracího koše<br />
13. Horní část koše na trávu<br />
14. Dolní část koše na trávu x 2<br />
15. Výstražné značky<br />
16. Výrobní štítek<br />
17. Návod k používání<br />
<strong>SK</strong> - OBSAH<br />
1. Vrchná <strong>ru</strong>kovä�<br />
2. Spodná <strong>ru</strong>kovä� x 2<br />
3. Príchytka na dolnej rúčke x 2<br />
4. Svorka na kábel x 2<br />
5. Vačkový zámok x 4<br />
6. Válcová matica x 4<br />
7. Podložka x 4<br />
8. Sk<strong>ru</strong>tka x 2<br />
9. Čepový blok x 2<br />
10. P<strong>ru</strong>žina x 2<br />
11. Prípojka s krytom<br />
12. Rúčka kontajnéra na trávu<br />
13. Vrchná čas� schránky na trávu<br />
14. Spodná čas� schránky na trávu x 2<br />
15. Varovné symboly<br />
16. Prístrojový štítok<br />
17. Prí<strong>ru</strong>čka<br />
<strong>GR</strong> - ΠΕΡΙΕΧΟΜΕΝΑ<br />
1. Κάτω λαβή<br />
2. Eπάνω λαβή x 2<br />
3. Τάπα κάτω λαβής x 2<br />
4. Κλιπ καλωδίου x 2<br />
5. Ασφάλεια εκκέντρου x 4<br />
6. Παξιμάδι κυλίνδρου x 4<br />
7. Ροδέλα x 4<br />
8. Μπουλόνι x 2<br />
9. Μπλοκ στροφέα x 2<br />
10. Ελατήριο x 2<br />
11. Τάπα τεμαχισμού<br />
12. Λαβή καλαθιού κομμένου<br />
γρασιδιού<br />
13. Επάνω μέρος καλαθιού<br />
κομμένου γρασιδιού<br />
14. Κάτω μέρος καλαθιού κομμένου<br />
γρασιδιού x 2<br />
15. Προειδοποιητικά σύμβολα<br />
16. Ετικέτα Κατάταξης Προϊόντος<br />
17. Εγχειρίδιο Οδηγίας<br />
RUS - СОДЕРЖИМОЕ:<br />
1. Верхняя часть рукоятки<br />
2. Нижняя часть рукоятки x 2<br />
3. Заглушка нижней секции<br />
рукоятки x 2<br />
4. Зажим кабеля x 2<br />
5. Эксцентриковый зажим х 4<br />
6. Цилиндрическая гайка х 4<br />
7. Шайба x 4<br />
8. Болт x 2<br />
9. Поворотная планка х 2<br />
10. Пружина х 2<br />
11. Вставка для мульчирования<br />
12. Ручка сборника срезанной травы<br />
13. Верхняя часть сборника<br />
срезанной травы<br />
14. Нижняя часть сборника<br />
срезанной травы x 2<br />
15. Предупреждающие символы<br />
16. Этикетка с характеристиками<br />
изделия<br />
17. Руководство по использованию<br />
SLO - VSEBINA<br />
1. Zgornje držalo<br />
2. Spodnje držalo x 2<br />
3. Čep za spodnjo ročico x 2<br />
4. Sponka za kabel x 2<br />
5. Zaklep odmikala x 4<br />
6. Navrtka x 4<br />
7. Podložka x 4<br />
8. Vijak x 2<br />
9. Zaklep vrtenja x 2<br />
10. Vzme x 2t<br />
11. Pripomoček za mulčenje<br />
12. Ročka zbiralnika za travo<br />
13. Zgornji deli zbiralnika trave<br />
14. Spodnji del zbiralnika traves x 2<br />
15. Opozorilni simboli<br />
16. Tipna tablica<br />
17. Priročnik<br />
HR- SADRŽAJ<br />
1. Gornja drška<br />
2. Donja <strong>ru</strong>čica x 2<br />
3. Štitnik donje <strong>ru</strong>čice x 2<br />
4. Kvačica za kabel x 2<br />
5. Zupčasti vijak x 4<br />
6. Cilindrična matica x 4<br />
7. Brtva x 4<br />
8. Vijak s maticom x 2<br />
9. Blokator osovine x 2<br />
10. Op<strong>ru</strong>ga x 2<br />
11. Uređaj za mljevenje<br />
12. Ručka kutije za travu<br />
13. Gornji dio kutije za travu<br />
14. Donji dio kutije za travu x 2<br />
15. Simboli upozorenja<br />
16. Etiketa s ocjenom proizvoda<br />
17. Pri<strong>ru</strong>čnik s uputama
UA - ЗМІСТ<br />
1. Верхня ручка<br />
2. Нижня ручка<br />
3. Пробка нижньої ручки x 2<br />
4. Скоба для кабелю х2<br />
5. Фіксатор x 4<br />
6. Циліндрична гайка x 4<br />
7. Мийка х 4<br />
8. Болт х 2<br />
9. Поворотний блок x 2<br />
10. Пружина x 2<br />
11. Контейнер для подрібнення<br />
12. Ручка ємності для трави<br />
13. Верхня ємність для трави<br />
14. Нижня ємність для трави x 2<br />
15. Символи-попередження<br />
16. Маркування номінальної<br />
характеристики виробу<br />
17. Інструкція з експлуатації<br />
RO - COMPONENTELE<br />
1. Mâner superior<br />
2. 2 x mâner inferior<br />
3. Dop pent<strong>ru</strong> mâne<strong>ru</strong>l inferior x 2<br />
4. 2 x coliere pent<strong>ru</strong> cablu<br />
5. Ştift de blocare x 4<br />
6. Piuliţă tambur x 4<br />
7. 4 x șaibe<br />
8. 2 x șu<strong>ru</strong>buri<br />
9. Articulaţie cu pivot x 2<br />
10. Arc x 2<br />
11. Opritor pent<strong>ru</strong> repunerea ierbii tunse<br />
12. Mâne<strong>ru</strong>l cutiei pent<strong>ru</strong> iarbă<br />
13. Partea superioară a cutiei pent<strong>ru</strong><br />
iarbă<br />
14. 2 x partea inferioară a cutiei<br />
pent<strong>ru</strong> iarbă<br />
15. Simboluri de avertisment<br />
16. Plăcuţa de identificare a<br />
produsului<br />
17. Manual de inst<strong>ru</strong>cţiuni<br />
A B1<br />
B2 B3<br />
TR - İÇİNDEKİLER<br />
1. Alt Kol<br />
2. Üst Kol x 2<br />
3. Alt kol tapası x 2<br />
4. Kablo klipsi x2<br />
5. Kam Kilidi x 4<br />
6. Kovan Somunu x 4<br />
7. Contası x 4<br />
8. Cıvatası x 2<br />
9. Pivot Bloğu x 2<br />
10. Yay x 2<br />
11. Saman Örtüsü Fişi<br />
12. Çim Kutusu Tutamağı<br />
13. Çim Kutusu Üst Kısım<br />
14. Çim Kutusu Alt Kısım x 2<br />
15. Uyarı Sembolleri<br />
16. Ürün Sınıflandırma Etiketi<br />
17. Talimat Elkitabı<br />
BG - СЪДЪРЖАНИЕ<br />
1. Горна дръжка<br />
2. Долна дръжка<br />
3. Капачка на долната дръжка x 2<br />
4. Кабелна клема х2<br />
5. Палец за затягане x 4<br />
6. Цилиндрична гайка x 4<br />
7. Шайба х 4<br />
8. Болт? х 2<br />
9. Шарнирен Блок x 2<br />
10. Пружина x 2<br />
11. Накрайник за торене<br />
12. Дръжка на кош за трева<br />
13. Горна част на кош за трева<br />
14. Долна част на кош за трева x 2<br />
15. Предупредителни символи<br />
16. Табелка с данни за продукта<br />
17. Инструкции за употреба<br />
EST - OSAD<br />
1. Ülemine käepide<br />
2. Alumine käepide x 2<br />
3. Alumise käepideme kork x 2<br />
4. Juhtme klamber x2<br />
5. Nukilukk x 4<br />
6. To<strong>ru</strong>mutter x 4<br />
7. Seib x4<br />
8. Polt x2<br />
9. Liigendplokk x 2<br />
10. Ved<strong>ru</strong> x 2<br />
11. Multšip<strong>ru</strong>nt<br />
12. Rohukasti käepide<br />
13 Rohukasti pealis<br />
14 Rohukasti alus x 2<br />
15. Hoiatusmärgid<br />
16. Toote kasutusvõimsuse tabel<br />
17. Kasutusjuhend<br />
LT - SUDEDAMOSIOS DALYS<br />
1. Viršutinė rankena<br />
2. Apatinė rankena x 2<br />
3. Apatinės rankenėlės kaištis x 2<br />
4. Laido segtukas x2<br />
5. Galinis užraktas x 4<br />
6. Cilindro veržlė x 4<br />
7. Poveržlė x4<br />
8. Varžtas x2<br />
9. Ašies antgalis x 2<br />
10. Spy<strong>ru</strong>oklė x 2<br />
11. Mulčiavimo kaištis<br />
12. Žolės dėžės rankena<br />
13. Žolės dėžės viršutinė dalis<br />
14. Žolės dėžės apatinė dalis x 2<br />
15. Įspėjamieji ženklai<br />
16. Gaminio klasės etiketė<br />
17. Inst<strong>ru</strong>kcija<br />
LV - IEPAKOJUMA SATURS<br />
1. Aug|]jais rokturis<br />
2. Apak|]jais rokturis x 2<br />
3. Apakšējā roktura tapa x 2<br />
4. Kabe±a skava x 2<br />
5. Ekscentra slēdzis x 4<br />
6. Cilindriskais uzgrieznis x 4<br />
7. Blœv]jums x4<br />
8. Skr·ve x4<br />
9. Šarnīrs x 2<br />
10. Atspere x 2<br />
11. Mulčēšanas ieliktnis<br />
12. Z◊les sav◊c]jgroza rokturis<br />
13 Z◊les sav◊c]jgroza aug|da±a<br />
14 Z◊les sav◊c]jgroza apak|da±a x 2<br />
15. Brœdin◊juma simboli<br />
16. Izstr◊d◊juma datu uzlœme<br />
17. Lieto|anas rokasgr◊mata
C1 C2<br />
D 5<br />
1 E1<br />
E3<br />
E6<br />
4<br />
2<br />
3<br />
x3<br />
x3<br />
E4 E5<br />
F1<br />
✓ ✖<br />
E2<br />
F3 F4 F5<br />
F2
F6 G1 G2<br />
H1 H2 J 1<br />
K<br />
M1<br />
L<br />
M2 M3<br />
CH CH CH<br />
M4 M5<br />
3<br />
2<br />
M6<br />
1
N P1 P2<br />
Q2<br />
1<br />
P3 P4<br />
Q3<br />
R1<br />
R2 R3 R4<br />
R5 R6 S<br />
Q1
D Zur Reinigung KEINE<br />
Flüssigkeiten verwenden.<br />
<strong>GB</strong> DO NOT use liquids for<br />
cleaning.<br />
F NE PAS utiliser de produit<br />
liquide pour le nettoyage.<br />
<strong>NL</strong> Voor het reinigen NOOIT<br />
vloeistoffen geb<strong>ru</strong>iken.<br />
S ANVÄND INTE vätskor för<br />
rengöring.<br />
<strong>DK</strong> BRUG IKKE væske til<br />
rengøring.<br />
N Flytende midler MÅ IKKE<br />
b<strong>ru</strong>kes til rengjøring.<br />
<strong>FIN</strong> ÄLÄ käytä nesteitä<br />
puhdistamiseen.<br />
I NON usare liquidi per la<br />
pulizia.<br />
D Reparaturen dürfen nur von<br />
GARDENA Servicestellen<br />
oder von GARDENA<br />
autorisierten Fachhändlern<br />
durchgeführt werden.<br />
<strong>GB</strong> Repairs may only be<br />
carried out by GARDENA<br />
service centres or dealers<br />
authorised by GARDENA.<br />
F Pour des raisons de sécurité,<br />
les réparations ne doivent être<br />
effectuées que par le Service<br />
Après- Vente de GARDENA<br />
France ou lʼun des Centres<br />
SAV agrées GARDENA.<br />
<strong>NL</strong> Reparaties mogen alleen door<br />
de GARDENA technische<br />
dienst of door GARDENA<br />
geautoriseerde vakhandels<br />
uitgevoerd worden.<br />
S Reparationer får endast<br />
utföras av GARDENA<br />
service eller av<br />
återförsäljares service<br />
auktoriserad av GARDENA.<br />
<strong>DK</strong> Reparationer må kun<br />
udføres af GARDENA<br />
service centre eller<br />
forhandlere, der er<br />
autoriseret af GARDENA.<br />
N Reparasjon vil muligens kun bli<br />
utført av GARDENAs<br />
servicesenter eller autoriserte<br />
GARDENA-forhandlere.<br />
<strong>FIN</strong> Korjaukset voidaan<br />
ainoastaan suorittaa<br />
GARDENAʼn<br />
huoltokeskusten tai<br />
GARDENAʼn valtuuttamien<br />
myyjien toimesta.<br />
I Le riparazioni possono<br />
essere eseguite solo dai<br />
centri assistenza<br />
GARDENA o da personale<br />
specializzato autorizzato<br />
GARDENA.<br />
E NO utilice líquidos para la<br />
limpieza.<br />
P NÃO use líquidos para<br />
limpar.<br />
<strong>PL</strong> NIE używać płynów do<br />
czyszczenia.<br />
H NE használjon folyadékokat<br />
tisztításra.<br />
<strong>CZ</strong> K čištění NEPOUŽÍVEJTE<br />
kapaliny.<br />
<strong>SK</strong> NEPOUŽÍVAJTE na<br />
čistenie tekuté materiály.<br />
<strong>GR</strong> MHN καθαρίζετε µε υγρά.<br />
RUS НЕ используйте жидкости<br />
для очистки.<br />
SLO NE uporabljajte raznih<br />
tekočin za čiščenje.<br />
HR NEMOJTE koristiti tekućine<br />
za čišćenje.<br />
E Las reparaciones solo<br />
pueden hacerlas los<br />
centros de servicio de<br />
GARDENA o los<br />
distribuidores autorizados<br />
por GARDENA.<br />
P As reparações podem não<br />
ser feitas nos centros de<br />
serviço ou concessionários<br />
autorizados da GARDENA.<br />
<strong>PL</strong> Naprawy mogą być<br />
wykonywane tylko w<br />
placówkach serwisowych<br />
GARDENA lub u dealerów<br />
autoryzowanych przez<br />
GARDENA.<br />
H Javítást csak a GARDENA<br />
szervizközpontok vagy a<br />
GARDENA által<br />
meghatalmazott<br />
márkakereskedők<br />
végezhetnek.<br />
<strong>CZ</strong> Opravy mohou provádět<br />
pouze servisní střediska<br />
firmy GARDENA nebo<br />
prodejci schválení firmou<br />
GARDENA.<br />
<strong>SK</strong> Opravy môžu byť<br />
prevedené iba v servisnom<br />
stredisku GARDENA alebo<br />
u predajcov autorizovaných<br />
spoločnosťou GARDENA.<br />
<strong>GR</strong> Οι επισκευές διεξάγονται<br />
μόνο από τα κέντρα<br />
σέρβις της GARDENA ή<br />
από εξουσιοδοτημένους<br />
αντιπροσώπους της<br />
GARDENA.<br />
RUS Починка устройства<br />
может быть выполнена<br />
только сервис-центрами<br />
компании GARDENA или<br />
официальными<br />
посредниками GARDENA.<br />
SLO Popravila lahko opravijo<br />
samo servisni centri<br />
GARDENA ali prodajalci, ki<br />
jih je pooblastilo podjetje<br />
GARDENA.<br />
UA Для очищення НЕ<br />
ВИКОРИСТОВУЙТЕ<br />
рідину.<br />
RO NU utilizaţi pent<strong>ru</strong> curăţire<br />
lichide.<br />
TR Temizleme için sıvılar<br />
KULLANMAYIN.<br />
BG НЕ използвайте течности<br />
за почистване<br />
EST ÄRGE kasutage<br />
puhastamiseks vedelikke.<br />
LT Nenaudokite skysčiÅ<br />
valymui.<br />
LV Tœrœ|anai NEIZMANTOJIET<br />
|∑id<strong>ru</strong>mus.<br />
HR Popravak mogu izvršiti<br />
GARDENA servisni centri ili<br />
prodajna mjesta koje je<br />
GARDENA za to ovlastila.<br />
UA Ремонт може<br />
здійснюватися винятково<br />
в сервісних центрах<br />
GARDENA, або<br />
дилерами, які<br />
авторизовані GARDENA.<br />
RO Reparaţiile se vor efectua<br />
doar de către centrele de<br />
service GARDENA sau de<br />
către dealerii autorizaţi de<br />
către GARDENA.<br />
TR Onarım çalışmaları,<br />
yalnızca GARDENA servis<br />
merkezleri veya GARDENA<br />
tarafından onaylanan<br />
satıcılar tarafından<br />
yürütülebilir.<br />
BG Ремонти могат да се<br />
извършват единствено<br />
от центровете по<br />
подръжката на<br />
GARDENA или<br />
упълномощени от нея<br />
представители.<br />
EST Parandustöid tohivad teha<br />
vaid GARDENA<br />
teeninduskeskused või<br />
GARDENA volitatud<br />
edasimüüjad.<br />
LT Remontuoti prietaisą galima<br />
tik GARDENA techninės<br />
priežiūros cent<strong>ru</strong>ose arba<br />
pas įgaliotą GARDENA<br />
atstovą.<br />
LV Remontu drīkst veikt tikai<br />
GARDENA klientu<br />
apkalpošanas centri vai<br />
GARDENA apstiprināti<br />
tirgotāji.
Safety<br />
If not used properly this product can be dangerous! This product can cause serious injury to the operator and others,<br />
the warnings and safety inst<strong>ru</strong>ctions must be followed to ensure reasonable safety and efficiency in using this product.<br />
The operator is responsible for following the warning and safety inst<strong>ru</strong>ctions in this manual and on the product.<br />
Explanation of Symbols on the product<br />
Warning<br />
Read the user inst<strong>ru</strong>ctions carefully to make<br />
sure you understand all the controls and what<br />
they do.<br />
Always keep the product on the ground when<br />
operating. Tilting or lifting the product may cause<br />
stones to be thrown out.<br />
Keep bystanders away. Do not operate whilst<br />
people especially children or pets are in the<br />
area.<br />
Beware of sharp blades - remove plug from<br />
mains before maintenance or if cable is<br />
damaged.<br />
Blades continue to rotate after the machine is<br />
switched off.<br />
Keep the cable supply away from the cutting<br />
means<br />
General<br />
1. This product is not intended for use by persons (including<br />
children) with reduced physical, sensory or mental<br />
capabilities, or lack of experience and knowledge, unless<br />
they have been given supervision or inst<strong>ru</strong>ction concerning<br />
the use of the product by a person responsible for their<br />
safety. Children should be supervised to ensure that they<br />
do not play with the product. For safety reasons, children<br />
under the age of 16 or people who are not familiar with<br />
these operating inst<strong>ru</strong>ctions should not use this product.<br />
2. Only use the product in the manner and for the<br />
functions described in these inst<strong>ru</strong>ctions.<br />
3. Never operate the product when you are tired, ill or<br />
under the influence of alcohol, d<strong>ru</strong>gs or medicine.<br />
4. The operator or user is responsible for accidents or<br />
hazards occurring to other people or their property.<br />
Electrical<br />
1. The use of a Residual Current Device (R.C.D.) with a<br />
tripping current of not more than 30mA is<br />
recommended. Even with a R.C.D. installed 100%<br />
safety cannot be guaranteed and safe working<br />
practice must be followed at all times. Check your<br />
R.C.D. every time you use it.<br />
2. Before use, examine cable for damage, replace it if<br />
there are signs of damage or ageing.<br />
3. Do not use the product if the electric cables are<br />
damaged or worn<br />
4. Immediately disconnect from the mains electricity<br />
supply if the cable is cut, or the insulation is damaged.<br />
Do not touch the electric cable until the electrical supply<br />
has been disconnected. Do not repair a cut or<br />
damaged cable. Replace it with a new one.<br />
5. Your extension cable must be uncoiled, coiled cables<br />
can overheat and reduce the efficiency of your mower.<br />
6. Keep cable away from product, always work away from<br />
the power point mowing up and down, never in circles.<br />
7. Do not pull cable around sharp objects.<br />
8. Always switch off at the mains before disconnecting<br />
any plug, cable connector or extension cable.<br />
9. Switch off, remove plug from mains and examine electric<br />
supply cable for damage or ageing before winding cable<br />
ENGLISH - 1<br />
for storage. Do not repair a damaged cable, replace it<br />
with a new one. Use only genuine replacement cable.<br />
10. Always wind cable carefully, avoiding kinking.<br />
11. Never carry the product by the cable.<br />
12. Never pull on the cable to disconnect any of the plugs.<br />
13. Use only on AC mains supply voltage shown on the<br />
product rating label.<br />
14. Our products are double insulated to EN60335.<br />
Under no circumstances should an earth be<br />
connected to any part of the product.<br />
Cables<br />
If extension cables are used, these must comply with<br />
the minimum cross-sections in the table below:<br />
Voltage Cable Cross<br />
length section<br />
220-240V/ 50Hz Up to 20 m 1.5 mm 2<br />
220-240V/ 50Hz 20 - 50 m 2.5 mm 2<br />
1. Only use extension cables specifically designed for<br />
outdoor use.<br />
Preparation<br />
1. While using your product always wear substantial<br />
footwear and long trousers.<br />
2. Make sure the lawn is clear of sticks, stones, bones,<br />
wire and debris; they could be thrown by the blade.<br />
3. Before using the machine and after any impact, check<br />
for signs of wear or damage and repair as necessary.<br />
4. Replace worn or damaged blades together with their<br />
fixings in sets to preserve balance.<br />
Use<br />
1. Use the product only in daylight or good artificial light.<br />
2. Avoid operating your product in wet grass, where feasible.<br />
3. Take care in wet grass, you may lose your footing.<br />
4. On slopes, be extra careful of your footing and wear<br />
non-slip footwear.<br />
5. Operate your product across the face of slopes,<br />
never up and down.<br />
6. Exercise extreme caution when changing direction<br />
on slopes. Walk never <strong>ru</strong>n.<br />
7. Make sure you always take up a safe and stable stance<br />
whilst working, especially on slopes. Do not use the<br />
mower close to swimming pools or garden ponds.<br />
8. Do not walk backwards when operating, you could trip.<br />
9. Never cut grass by pulling the product towards you.<br />
10. Switch off before pushing the product over surfaces<br />
other than grass.<br />
11. Never operate the product with damaged guards or<br />
without guards in place.<br />
12. Keep hands and feet away from the cutting means at<br />
all times and especially when switching on the motor.<br />
13. Do not tilt product when the motor is <strong>ru</strong>nning.<br />
14. Do not put hands near the grass discharge chute.<br />
15. Never pick up or carry a product when it is operating<br />
or still connected to the mains supply.<br />
16. Remove the plug from the mains :<br />
- before leaving the product unattended for any period;<br />
- before clearing a blockage;<br />
- before checking, cleaning or working on the appliance;<br />
- if you hit an object. Do not use your product until you are<br />
sure that the entire product is in a safe operating condition.;<br />
- if the product starts to vibrate abnormally. Check<br />
immediately. Excessive vibration can cause injury.<br />
Maintenance and storage<br />
1. Caution: Do not touch rotating blade(s)<br />
2. Keep all nuts, bolts and screws tight to be sure the<br />
product is in safe working condition.<br />
3. Check the grassbox frequently for wear or deterioration.<br />
4. Replace worn or damaged parts for safety.<br />
5. Only use the replacement parts specified for this product.<br />
6. Be careful during adjustment of the product to<br />
prevent entrapment of the fingers between moving<br />
blades and fixed parts of the machine.<br />
7. Store in a cool dry place and out of reach of<br />
children. Do not store outdoors.
Where to Use Your GARDENA PowerMax 36 E/42 E Mower<br />
The GARDENA mower is designed for cutting lawns<br />
in and around the garden.<br />
Do not use the mower on a slope steeper than 20°<br />
maximum.<br />
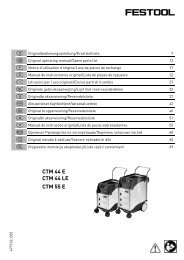
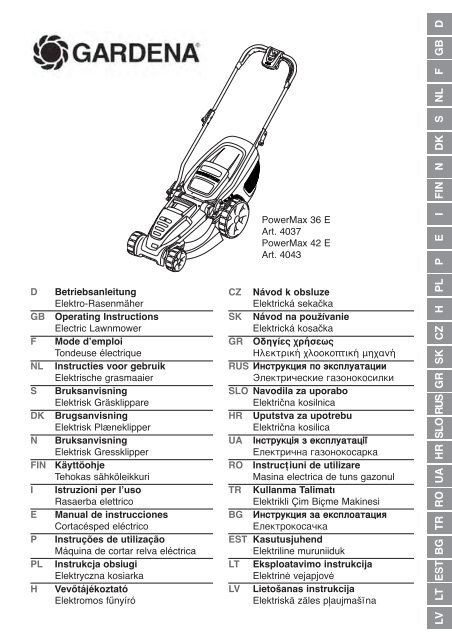
1. Pull the lower handle bolt until it locks into position<br />
as illustrated in fig B1.<br />
2. Place the Spring over the Bolt (B2)<br />
3. Insert the Pivot Block on to the Bolt (B3)<br />
Repeat for the other side.<br />
4. Insert the Barrel Nut into the Cam Lock as illustrated<br />
in fig C1.<br />
5. Ensuring the Lower Handle is in the correct position (C2),<br />
insert the Lower Handle (D1) on to the Bolt (D2) until it is<br />
firmly fitted into the Pivot Block (D3).<br />
6. Place the Washer (D4) and Cam Lock (D5) on to the Bolt<br />
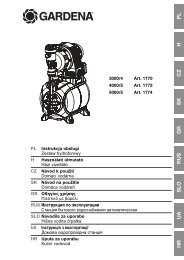
Grassbox Handle Assembly<br />
1. Locate the grassbox handle into the slots in the grassbox<br />
upper and push until it clicks into position. (G1)<br />
2. Looking at the underside of the lid (G2), ensure the<br />
clips of the grassbox handle are securely located.<br />
Grassbox Assembly<br />
1. Locate the the grassbox halves together by aligning<br />
the clips Ensure all clips are correctly located before<br />
clicking into position. (H1)<br />
2. Locate the grassbox lid onto the assemble grassbox by<br />
aligning the clips. Ensure all clips are correctly located<br />
before clicking into position H2)<br />
Fitting Fully Assembled Grassbox to Lawnmower.<br />
1. Lift safety flap (J1)<br />
2. Make sure the discharge chute is clean and free<br />
Grassbox Assembly<br />
To prevent injury, the mower must not be used for<br />
trimming bushes, hedges, sh<strong>ru</strong>bs, for cutting and<br />
p<strong>ru</strong>ning of climbers or grass on roofs or in balcony<br />
boxes. In addition, the mower must not be used for<br />
chopping up branches, twigs or for levelling<br />
irregularities in the soil.<br />
IMPORTANT INFORMATION<br />
When received from the Manufacturer, the wheels are in a raised position. Do not switch<br />
on the product before removing from the raised position into position 5. (See fig A)<br />
Assembly of Lower Handles to Lawnmower<br />
• Height of cut is adjusted by raising or lowering the<br />
wheels using the height adjustment lever (L1)<br />
• There are five heights of cut on this product (20 - 60<br />
mm).<br />
To Start your Lawnmower<br />
1. Attach the extension cable to the back of the switchbox.(M1)<br />
2. Form a loop in the cable and push the loop through<br />
the slot. (M2)<br />
3. To secure, position the loop over the hook and pull<br />
the cable back through the slot (M3).<br />
4. Connect the plug to the mains and switch on.<br />
The switchbox is provided with a lock-off button<br />
(M4) to prevent accidental starting.<br />
6. Press and hold the lock-off button (M4) on the<br />
Cutting Height Adjustment<br />
Starting and Stopping<br />
(D2) and turn the Cam Lock 3 times clockwise, as<br />
illustrated in fig E1.<br />
7. Ensuring the raised markings on the Cam Lock and<br />
the deck are aligned (E2), fold down the Cam Lock<br />
towards the Handle as illustrated in fig E3, and<br />
continue to turn clockwise (E4) until tightened.<br />
8. The Cam Lock can be unlocked and locked as<br />
illustrated in fig E5.<br />
Repeat for the other side.<br />
9. Insert the two Lower handle plugs into the top of<br />
each of the Lower handles (E6).<br />
Assembly of Upper Handles to Lower Handles<br />
1. Insert the Barrel Nut into the Cam Lock as illustrated<br />
in fig F1.<br />
2. Attach the Upper Handle to the Lower Handle with<br />
the Round Headed Bolt, Washer and Cam Lock as<br />
illustrated in fig F2<br />
3. Turn the Cam Lock 3 times clockwise, as illustrated<br />
in fig F3.<br />
ENGLISH - 2<br />
4. Fold down the Cam Lock towards the Handle as<br />
illustrated in fig F4, and continue to turn clockwise<br />
(F5) until tightened.<br />
5. The Cam Lock can be unlocked and locked as<br />
illustrated in fig F6.<br />
Repeat for the other side.<br />
from debris (J2)<br />
3. Locate fully assembled grassbox onto 2 location<br />
points (J3) at the rear of the deck as illustrated in<br />
pic. K<br />
4. Locate safety flap onto the top of the grassbox.<br />
Ensure the grassbox is securely located.<br />
IMPORTANT ! AFTER FITTING ENSURE NO GAP<br />
REMAINS BETWEEN THE SAFETY FLAP AND<br />
THE <strong>GR</strong>ASSBOX.<br />
• Removal is the reverse procedure.<br />
• For larger areas of grass where grass collection is not<br />
required you can use your lawnmower without the<br />
grassbox. Ensure the Safety Flap is fully closed. The<br />
design of the safety flap permits the cut grass to be<br />
discharged downward behind the machine.<br />
NOTE<br />
A medium height of cut is recommended for most<br />
lawns. The quality of your lawn will suffer and<br />
collection will be poor if you cut too low.<br />
switchbox, then squeeze one of the Start/Stop levers<br />
towards the upper handle (M5).<br />
7. Continue to squeeze the start/stop lever towards the<br />
upper handle and release the lock-off button (M6).<br />
NOTE - There are two start/stop levers fitted. Either<br />
one can be used for starting the lawnmower.<br />
IMPORTANT - Do not use the start/stop levers<br />
intermittently<br />
To Stop your Lawnmower<br />
1. Release the pressure on the Start/Stop lever.
CH (Schweiz)<br />
To ensure you have a secure connection between the<br />
lawnmower and the extension cable we strongly recommend<br />
you use the following method of attaching the cable:<br />
1. Plug the short connection lead into the socket of the<br />
extension cable. (M1).<br />
2. Form a loop in the end of the extension cable near to<br />
• As the grassbox fills up, grass will be visible through<br />
the window (N1).<br />
Using as a mulcher<br />
1. Your lawnmower is supplied with a mulching plug. (P1)<br />
2. Stop your lawnmower as described in Starting and<br />
Stopping.<br />
3. Lift safety flap and insert the mulching plug into rear<br />
Your product can be used to cut grass using the<br />
following methods:-<br />
1. Grassbox Fitted:- grass is collected effectively and<br />
compacted into the grassbox. (Q1)<br />
2. Mulch Plug Fitted:- grass cuttings are finely<br />
chopped to return nutrients to your lawn (Q2).<br />
3. Rear Discharge:- Effectively cuts long grass with no<br />
need to empty the grassbox (Q3)<br />
How to Mow<br />
1. Start mowing the edge of the lawn nearest to the<br />
power point so the cable is laid out on the lawn you<br />
Cleaning<br />
USE GLOVES<br />
IMPORTANT:- It is very important that you keep your<br />
lawnmower clean. Grass clippings left in any of the<br />
air intakes or under the deck could become a<br />
potential fire hazard.<br />
1. Remove grass from under the deck with b<strong>ru</strong>sh. (R1)<br />
2. Using a soft b<strong>ru</strong>sh - remove grass clippings from all<br />
air intakes (R2), the discharge chute (R3) and the<br />
grass box (R4).<br />
3. Using a soft b<strong>ru</strong>sh, remove grass clippings from the<br />
vision window (R5).<br />
4. Wipe over the surface of your lawnmower with a dry<br />
cloth (R6).<br />
Fails to Operate<br />
1. Is the correct Starting procedure being followed?<br />
See ʻTo Start your Lawnmowerʼ<br />
2. Is the Power Turned On?<br />
3. Check the fuse in the plug, if blown replace.<br />
4. Fuse continues to blow?<br />
Immediately disconnect from the mains electricity<br />
supply and consult your GARDENA Service Centre.<br />
Poor Grass Collection<br />
1. Disconnect from the mains electricity supply.<br />
2. Clean the outside of the air intakes, the discharge<br />
chute and the underside of the deck.<br />
3. Raise to a higher height of cut. See Cutting Height<br />
Adjustment.<br />
4. If poor collection persists.<br />
Immediately disconnect from the mains electricity<br />
supply and consult your GARDENA Service Centre.<br />
Grassbox Full Window<br />
Mulching Plug<br />
How to Mow<br />
Caring for your Lawnmower<br />
Fault Finding Hints<br />
ENGLISH - 3<br />
the socket and secure this in the strain relief feature at<br />
the top of the switchbox (M2, M3) This will cause the<br />
socket to hang in a downward direction.<br />
If the short connection lead is damaged, it must be<br />
replaced by the manufacturer, its service agent or<br />
similarly qualified persons in order to avoid a hazard.<br />
• When the window/grassbox is full it is time to empty<br />
the grassbox.<br />
discharge chute, (P2) ensuring it is securely fitted. (P3)<br />
4. The mulching plug prevents grass from being<br />
collected by blocking the collection chute on the<br />
underside of the deck. (P4)<br />
have already cut.<br />
2. Mow twice a week during the growing season, your lawn<br />
will suffer if more than a third of its length is cut at one time.<br />
Do Not Overload Your Mower<br />
Mowing long thick grass may cause the motor speed to<br />
drop, you will hear a change in the motor sound. If the<br />
motor speed drops you may overload your lawnmower<br />
which may cause damage. When mowing in long thick<br />
grass a first cut with the cutting height set higher will help<br />
reduce the load. See Cutting Height Adjustment.<br />
IMPORTANT:- Never use water for cleaning your<br />
lawnmower. Do not clean with chemicals, including<br />
petrol, or solvents - some can destroy critical plastic parts.<br />
Storing your Lawnmower:<br />
• Loosen the Cam Locks to enable the handles to be<br />
folded over the product (S).<br />
• Store in a dry place where your lawnmower is<br />
protected from damage<br />
At the End of the Mowing Season<br />
1. Replace bolts, nuts or screws, if necessary.<br />
2. Clean your lawnmower thoroughly.<br />
3. Make sure that the electric cable is stored correctly<br />
to prevent damage.<br />
Excessive Vibration<br />
1. Disconnect from the mains electricity supply.<br />
2. Check that the blade is fitted correctly?<br />
3. If the blade is damaged or worn, replace it with a new one.<br />
4. If vibration persists?<br />
Immediately disconnect from the mains electricity<br />
supply and consult your GARDENA Service Centre.<br />
Lawnmower becomes heavy to push<br />
1. Disconnect from the mains electricity supply.<br />
2. In long grass or uneven ground, the height of cut<br />
should be raised to a higher position. See Cutting<br />
Height Adjustment.<br />
3. Check that the wheels and rollers can rotate freely.<br />
4. If problem persists?<br />
Immediately disconnect from the mains electricity<br />
supply and consult your GARDENA Service Centre.
Husqvarna UK Ltd. products are manufactured under<br />
an Environmental Management System (ISO 14001)<br />
using, where practical, components manufactured in the<br />
most environmentally responsible manner, according to<br />
company procedures, and with the potential for<br />
recycling at the end of the productsʼ life.<br />
• Packaging is recyclable and plastic components have<br />
been labelled (where practical) for categorised<br />
recycling.<br />
• Awareness of the environment must be considered<br />
when disposing of ʻend-of-lifeʼ product.<br />
• If necessary, contact your local authority for disposal<br />
information.<br />
GARDENA guarantees this product for 2 years (starting<br />
from the date of purchase). This guarantee covers all<br />
serious defects of the unit that can be proved to be<br />
material or manufacturing faults.<br />
Under warranty we will either replace the unit or repair it<br />
free of charge if the following conditions apply:<br />
• The unit must have been handled properly and in<br />
keeping with the requirements of the operating<br />
inst<strong>ru</strong>ctions.<br />
• Neither the purchaser or a non-authorised third party<br />
have attempted to repair the unit.<br />
Environmental Information<br />
Warranty / Service<br />
Service Recomendations<br />
• Your product is uniquely identified by a silver product rating label.<br />
• We strongly recommend that your product is serviced at least every twelve months.<br />
EU Certificate of Conformity<br />
The undersigned GARDENA Manufacturing GmbH, Hans-Lorenser-Str. 40, D-89079 Ulm, hereby certifies that, when<br />
leaving our factory, the units indicated below are in accordance with the harmonised EU guidelines, EU standards of<br />
safety and product specific standards. This certificate becomes void if the units are modified without our approval.<br />
Description of Unit.............Electric Lawnmower<br />
Type...................................36 E, 42 E<br />
Year of CE marking...........2008<br />
EU Directives:<br />
98/37/EC, 2006/42/EC, 2004/108/EC, 2000/14/EC, 2006/95/EC<br />
Harmonised EN:<br />
EN60335-1, EN60335-2-77, EN836, EN ISO 12100-1, EN ISO 12100-2<br />
Working area related emission characteristic Level LpA according to EN836 given in the table.<br />
Vibrations Value avhw according to EN836 given in the table.<br />
The Noise Level LWA values according to 2000/14/EC are given in the table.<br />
Conformity Assessment Procedure..................Annex VI<br />
Notified Body.................................................... Intertek, Cleeve Road<br />
Leatherhead, Surrey<br />
KT22 7SB, England<br />
Ulm 01/10/2008<br />
Peter Lameli<br />
Technical Dept. Manager<br />
Type<br />
Width of Cut (cm)<br />
Speed of rotation cutting device (rpm)<br />
Power (W)<br />
Measured Sound Power LWA (dB(A))<br />
Guaranteed Sound Power LWA (dB(A))<br />
Level LpA (dB(A))<br />
Value avhw (m/s2 )<br />
Weight (Kg)<br />
ENGLISH - 4<br />
The symbol on the product or on its packaging<br />
indicates that this product may not be treated as household<br />
waste. Instead it shall be handed over to the applicable<br />
collection point for the recycling of electrical and electronic<br />
equipment. By ensuring this product is disposed of<br />
correctly, you will help prevent potential negative<br />
consequences for the environment and human health,<br />
which could otherwise be caused by inappropriate waste<br />
handling of this product. For more detailed information<br />
about recycling of this product, please contact your local<br />
council office, your household waste disposal service or the<br />
shop where you purchased the product.<br />
The blade is a wearing part and is not covered by the<br />
guarantee.<br />
This manufacturerʼs guarantee does not affect the<br />
userʼs existing warranty claims against the dealer/<br />
seller.<br />
If a fault occurs with your Powermax 36 E/42 E<br />
Lawnmower, please return the faulty unit together with a<br />
copy of the receipt and a description of the fault, with<br />
postage paid to one of the GARDENA Service Centres<br />
listed on the back of these operating inst<strong>ru</strong>ctions.<br />
36 E<br />
36<br />
3.850<br />
1500<br />
95<br />
96<br />
80.4<br />
1.56<br />
13.5<br />
42 E<br />
42<br />
3.600<br />
1700<br />
95<br />
96<br />
84.9<br />
1.53<br />
13.9
Deutschland / Germany<br />
GARDENA<br />
Manufacturing GmbH<br />
Central Service<br />
Hans-Lorenser-Straße 40<br />
D-89079 Ulm<br />
Produktfragen:<br />
(+49) 731 490-123<br />
Reparaturen:<br />
(+49) 731 490-290<br />
service@gardena.com<br />
Argentina<br />
Husqvarna Argentina S.A.<br />
Vera 745<br />
(C1414AOO) Buenos Aires<br />
Phone: (+54) 11 4858-5000<br />
diego.poggi@ar.husqvarna.com<br />
Australia<br />
Husqvarna Australia Pty. Ltd.<br />
Locked Bag 18<br />
Gosford NSW 2250<br />
Phone: (+61) (0) 2 4372 1500<br />
customer.service@<br />
husqvarna.com.au<br />
Austria / Österreich<br />
Husqvarna Austria GmbH<br />
Consumer Products<br />
Industriezeile 36<br />
4010 Linz<br />
Tel.: (+43) 732 77 01 01- 90<br />
consumer.service@<br />
husqvarna.at<br />
Belgium<br />
GARDENA Belgium NV/SA<br />
Sterrebeekstraat 163<br />
1930 Zaventem<br />
Phone: (+32) 2 7 20 92 12<br />
Mail: info@gardena.be<br />
Brazil<br />
Palash Comércio e<br />
Importação Ltda.<br />
Rua São João do Araguaia, 338<br />
– Jardim Califórnia –<br />
Ba<strong>ru</strong>eri – SP - Brasil –<br />
CEP 06409-060<br />
Phone: (+55) 11 4198-9777<br />
eduardo@palash.com.br<br />
Bulgaria<br />
Хускварна България ЕООД<br />
1799 София<br />
Бул. „Андрей Ляпчев” Nº 72<br />
Тел.: (+359) 2 80 99 424<br />
www.husqvarna.bg<br />
Canada / USA<br />
GARDENA Canada Ltd.<br />
100 Summerlea Road<br />
Brampton, Ontario L6T 4X3<br />
Phone: (+1) 905 792 93 30<br />
info@gardenacanada.com<br />
Chile<br />
Antonio Martinic y Cia Ltda.<br />
Cassillas 272<br />
Centro de Cassillas<br />
Santiago de Chile<br />
Phone: (+56) 2 20 10 708<br />
garfar_cl@yahoo.com<br />
Costa Rica<br />
Compania Exim<br />
Euroiberoamericana S.A.<br />
Los Colegios, Moravia,<br />
200 metros al Sur del Colegio<br />
Saint Francis - San José<br />
Phone: (+506) 297 68 83<br />
exim_euro@racsa.co.cr<br />
Croatia<br />
KLIS d.o.o.<br />
Stanciceva 79<br />
10419 Vukovina<br />
Phone: (+385) 1 622 777 0<br />
gardena@klis-trgovina.hr<br />
Cyp<strong>ru</strong>s<br />
FARMOKIPIKI LTD<br />
P.O. Box 7098<br />
74, Digeni Akrita Ave.<br />
1641 Nicosia<br />
Phone: (+357) 22 75 47 62<br />
condam@spidernet.com.cy<br />
Czech Republic<br />
GARDENA spol. s r.o.<br />
Tuшanka 115<br />
627 00 Brno<br />
Phone: (+420) 548 217 777<br />
gardena@gardenabrno.cz<br />
Denmark<br />
GARDENA<br />
Husqvarna Consumer Outdoor<br />
Products<br />
Salgsafdelning Danmark<br />
Box 9003<br />
S-200 39 Malmö<br />
info@gardena.dk<br />
Estonia<br />
Husqvarna Eesti OÜ<br />
Consumer Outdoor Products<br />
Kesk tee 10, Aaviku küla<br />
Rae vald, Harju maakond<br />
75305<br />
kontakt.etj@husqvarna.ee<br />
Finland<br />
Oy Husqvarna Ab<br />
Consumer Outdoor Products<br />
Lautatarhankatu 8 B / <strong>PL</strong> 3<br />
00581 HELSINKI<br />
info@gardena.fi<br />
France<br />
GARDENA France<br />
Immeuble Exposial<br />
9-11 allée des Pierres Mayettes<br />
ZAC des Barbanniers, B.P. 99<br />
-F- 92232 GENNEVILLIERS<br />
cedex<br />
Tél. (+33) 01 40 85 30 40<br />
service.consommateurs@<br />
gardena.fr<br />
Great Britain<br />
Husqvarna UK Ltd<br />
Preston Road<br />
Aycliffe Industrial Park<br />
Newton Aycliffe<br />
County Durham<br />
DL5 6UP<br />
info.gardena@<br />
husqvarna.co.uk<br />
Greece<br />
HUSQVARNA <strong>GR</strong>EECE S.A.<br />
Branch of Koropi<br />
Ifestou 33A<br />
Industrial Area Koropi<br />
194 00 Athens – Greece<br />
V.A.T. EL094094640<br />
Phone: (+30) 210 66 20 225<br />
info@husqvarna-consumer.gr<br />
Hungary<br />
Husqvarna<br />
Magyarország Kft.<br />
Ezred u. 1- 3<br />
1044 Budapest<br />
Phone: (+36) 80 20 40 33<br />
gardena@gardena.hu<br />
Iceland<br />
Ó. Johnson & Kaaber<br />
Tunguhalsi 1<br />
110 Reykjavik<br />
ooj@ojk.is<br />
Ireland<br />
Michael McLoughlin & Sons<br />
Hardware Limited<br />
Long Mile Road<br />
Dublin 12<br />
Italy<br />
GARDENA Italia S.p.A.<br />
Via Donizetti 22<br />
20020 Lainate (Mi)<br />
Phone: (+39) 02.93.94.79.1<br />
info@gardenaitalia.it<br />
Japan<br />
KAKUICHI Co. Ltd.<br />
Sumitomo Realty &<br />
Development Kojimachi<br />
BLDG., 8F, 5-1 Nibanncyo,<br />
Chiyoda-ku, Tokyo 102-0084<br />
Phone: (+81) 33 264 4721<br />
m_ishihara@kaku-ichi.co.jp<br />
Latvia<br />
SIA „Husqvarna Latvija”<br />
Consumer Outdoor Products<br />
Bakužu iela 6, Riga, LV-1024<br />
info@husqvarna.lv<br />
Lithuania<br />
UAB Husqvarna Lietuva<br />
Consumer Outdoor Products<br />
Ateities pl. 77C<br />
LT-52104 Kaunas<br />
centras@husqvarna.lt<br />
Luxembourg<br />
Magasins Jules Neuberg<br />
39, <strong>ru</strong>e Jacques Stas<br />
Luxembourg-Gasperich 2549<br />
Case Postale No. 12<br />
Luxembourg 2010<br />
Phone: (+352) 40 14 01<br />
api@neuberg.lu<br />
Netherlands<br />
GARDENA Nederland B.V.<br />
Postbus 50176<br />
1305 AD ALMERE<br />
Phone: (+31) 36 521 00 00<br />
info@gardena.nl<br />
Neth. Antilles<br />
Jonka Enterprises N.V.<br />
Sta. Rosa Weg 196<br />
P.O. Box 8200, Curaçao<br />
Phone: (+599) 9 767 66 55<br />
pgm@jonka.com<br />
New Zealand<br />
Husqvarna New Zealand Ltd.<br />
PO Box 76437<br />
Manukau City 2241<br />
Phone: (+64) 09 9202410<br />
Norway<br />
GARDENA<br />
Husqvarna Consumer Outdoor<br />
Products<br />
Salgskontor Norge<br />
Kleverveien 6<br />
1540 Vestby<br />
info@gardena.no<br />
Poland<br />
Husqvarna Poland Spółka z o.o.<br />
Oddział w Szymanowie<br />
Szymanów 9 d<br />
05-532 Baniocha<br />
Phone: (+48) 22 727 56 90<br />
gardena@gardena.pl<br />
Portugal<br />
GARDENA Portugal Lda.<br />
Sintra Business Park<br />
Edifício 1, Fracção 0-G<br />
2710-089 Sintra<br />
Phone: (+351) 21 922 85 30<br />
info@gardena.pt<br />
Romania<br />
MADEX INTERNATIONAL SRL<br />
Soseaua Odaii 117-123,<br />
Sector 1,<br />
Bucureєti, RO 013603<br />
Phone: (+40) 21 352 76 03<br />
madex@ines.ro<br />
Russia<br />
ООО ГАРДЕНА РУС<br />
123007, г. Москва<br />
Хорошевское шоссе, д. 32А<br />
Тел.: (+7) 495 380 31 92<br />
info@gardena-<strong>ru</strong>s.<strong>ru</strong><br />
Singapore<br />
Hy- Ray PRIVATE LIMITED<br />
40 Jalan Pemimpin<br />
#02-08 Tat Ann Building<br />
Singapore 577185<br />
Phone: (+65) 6253 2277<br />
shiying@hyray.com.sg<br />
Slovak Republic<br />
GARDENA spol. s r.o.<br />
Tuшanka 115<br />
627 00 Brno<br />
Phone: (+420) 548 217 777<br />
gardena@gardenabrno.cz<br />
Slovenia<br />
GARDENA d.o.o.<br />
Brodiљиe 15<br />
1236 Trzin<br />
Phone: (+386) 1 580 93 32<br />
servis@gardena.si<br />
South Africa<br />
GARDENA<br />
South Africa (Pty.) Ltd.<br />
P.O. Box 11534<br />
Vorna Valley 1686<br />
Phone: (+27) 11 315 02 23<br />
sales@gardena.co.za<br />
Spain<br />
GARDENA IBÉRICA S.L.U.<br />
C/ Basauri, nº 6<br />
La Florida<br />
28023 Madrid<br />
Phone: (+34) 91 708 05 00<br />
atencioncliente@gardena.es<br />
Sweden<br />
GARDENA<br />
Husqvarna Consumer Outdoor<br />
Products<br />
Försäljningskontor Sverige<br />
Box 9003<br />
200 39 Malmö<br />
info@gardena.se<br />
Switzerland / Schweiz<br />
Husqvarna Schweiz AG<br />
Consumer Products<br />
Industriestrasse 10<br />
5506 Mägenwil<br />
Phone: (+41) (0) 848 800 464<br />
info@gardena.ch<br />
Turkey<br />
GARDENA / Dost Diþ Ticaret<br />
Mümessillik A.Þ. Sanayi<br />
Çad. Adil Sokak No. 1<br />
Kartal - Ýstanbul<br />
Phone: (+90) 216 38 93 939<br />
info@gardena-dost.com.tr<br />
Ukraine / Україна<br />
ТОВ «ГАРДЕНА УКРАЇНА»<br />
Васильківська, 34, 204-Г<br />
03022, Київ<br />
Тел. (+38) 044 498 39 02<br />
info@gardena.ua<br />
4037-20.960.01/1008<br />
© GARDENA<br />
Manufacturing GmbH<br />
D-89070 Ulm<br />
http://www.gardena.com