
You also want an ePaper? Increase the reach of your titles
YUMPU automatically turns print PDFs into web optimized ePapers that Google loves.
MAJIK-I<br />
INTEGRATED AMPLIFIER<br />
OWNER’S MANUAL
IMPORTANT SAFETY INSTRUCTIONS<br />
Explanation of symbols used in this manual or on the rear/underside of the<br />
apparatus:<br />
This symbol is intended to alert the user to the presence of uninsulated<br />
dangerous voltages within the enclosure of sufficient magnitude to cause<br />
electric shock.<br />
This symbol is intended to alert the user to the presence of important<br />
operation, maintenance and servicing information in the instruction and<br />
service manuals.<br />
For apparatus connected to the mains electricity supply<br />
CAUTION<br />
• To reduce the risk of electric shock do not remove the cover.<br />
• No user serviceable parts inside.<br />
• Refer servicing to qualified service personnel.<br />
• Replace the mains fuse in the plug with one of the same type and<br />
rating.<br />
• Disconnect supply cord before changing fuse.<br />
WARNING<br />
To reduce the risk of fire or electric shock do not expose this apparatus to<br />
rain or moisture. Shock hazard - do not open.<br />
MAINS PLUGS<br />
• This apparatus is supplied with a non-rewireable mains plug for the intended<br />
country.<br />
• Replacement mains leads can be obtained from your <strong>Linn</strong> retailer.Should<br />
you need to change the plug please dispose of it carefully. A plug with bared<br />
conductors is dangerous if engaged in a live socket.<br />
• The Brown wire must be connected to the Live (Line) supply pin.<br />
• The Blue wire must be connected to the Neutral supply pin.<br />
• The Green/Yellow wire must be connected to the Earth (Ground) supply pin.<br />
Please contact your retailer or a competent electrician if you are in any doubt.<br />
Refer to the rear or underside of the product for fuse and power<br />
consumption information.<br />
MAJIK-I<br />
i
ii<br />
General Safety Instructions<br />
1. Read these instructions.<br />
2. Keep these instructions.<br />
3. Heed all warnings.<br />
4. Follow all instructions.<br />
5. Do not use the apparatus near water, for example near a bathtub, washbowl,<br />
kitchen sink, laundry tub, in a wet basement, near a swimming pool etc.<br />
6. Clean only with dry cloth.<br />
7. Do not block any ventilation openings. Install in accordance with the<br />
manufacturer’s instructions. Site the apparatus so that its location or position<br />
does not interfere with its proper ventilation. For example, the apparatus should<br />
not be situated on a bed, sofa, rug, or similar surface that may block the ventilation<br />
openings, or placed in a built in installation such as a bookcase or cabinet that may<br />
impede the flow of air through the ventilation openings.<br />
8. Do not install near any heat sources such as radiators, heat registers, stoves,<br />
or other apparatus (including amplifiers) that produce heat.<br />
9. Do not defeat the safety purpose of the polarised or grounding type plug.<br />
A polarised plug has two blades with one wider than the other. A grounding type<br />
plug has two blades and a third grounding prong. The wide blade or the third prong<br />
is provided for your safety. If the provided plug does not fit into your outlet, consult<br />
an electrician for replacement of the obsolete outlet.<br />
10. Protect the power cord from being walked on or pinched particularly at<br />
plugs, convenience receptacles, and at the point where they exit from the<br />
apparatus.<br />
11. Only use attachments/accessories specified by the manufacturer.<br />
12. Use only with the stand, tripod, bracket, or table specified by the<br />
manufacturer, or sold with the apparatus.<br />
13. Unplug this apparatus during lightning storms or when unused for long<br />
periods of time.<br />
MAJIK-I<br />
14. Refer all servicing to qualified service personnel. Servicing is required when the<br />
apparatus has been damaged in any way, such as power-supply cord or plug has<br />
been damaged, liquid has been spilled or objects have fallen into the apparatus, the<br />
apparatus has been exposed to rain or moisture, does not operate normally, or has<br />
been dropped.<br />
15. Wall or ceiling mounting. Mount the apparatus to a wall or ceiling<br />
only as recommended by the manufacturer.<br />
16. Power sources. Connect the apparatus to a power supply only of the type<br />
described in the operating instructions or marked on the apparatus.<br />
17. Mains plug. Use the mains plug to disconnect the apparatus from the mains supply.<br />
The mains plug must be accessible at all times. Use the mains switch (if applicable)<br />
when the apparatus is not in use.<br />
18. Power lines. An outdoor antenna should be located away from power lines.<br />
19. Outdoor antenna grounding. If an outdoor antenna is connected to the apparatus,<br />
ensure that the antenna system is grounded to provide some protection against<br />
voltage surges and static build up. In the USA see article 810 of the National<br />
Electrical Code ANSI/NFPA 70 concerning installation requirements.<br />
20. Telephone line. Do not connect the apparatus to a telephone line except where<br />
specifically instructed to do so.<br />
21. Objects and liquid entry. Do not let objects or liquids fall into the apparatus.<br />
Do not expose the apparatus to dripping or splashing.<br />
Do not place a vessel containing liquid on top of the apparatus.<br />
22. No naked flame sources, such as lighted candles, should be placed on the<br />
apparatus.<br />
23. The apparatus has been designed for use in moderate and tropical climates.
UK Users Please Read This<br />
Important Safety Information<br />
Fuse replacement<br />
This appliance is fitted with a non-rewireable 13 amp mains plug. The plug<br />
contains a 5 amp fuse. If the fuse has blown it can be replaced as follows:<br />
a) Pull out the red fuse cover/carrier.<br />
b) Remove and dispose of the blown fuse.<br />
c) Fit a new 5 amp BS1362 approved fuse into the carrier and push the carrier<br />
back into the plug.<br />
Always ensure the fuse cover is fitted. If the fuse cover is missing do not use the<br />
plug. Contact your <strong>Linn</strong> retailer to obtain a replacement fuse cover.<br />
Fuses are for fire protection and do not protect against electric shock.<br />
Mains plug replacement<br />
Should your mains plug need replacing and you are competent to do this proceed<br />
as follows. If you are in doubt contact your <strong>Linn</strong> retailer or a competent electrician.<br />
a) Disconnect the plug from the mains supply.<br />
b) Cut off the plug and dispose of it safely. A plug with bared conductors is<br />
dangerous if engaged in a live socket.<br />
c) Only fit a 13 amp BS1363A approved plug with a 5 amp fuse.<br />
d) The cable wire colours or a letter will be marked at the connection points of<br />
most quality plugs.<br />
e) Attach the wires securely to their respective points. The Brown wire must<br />
go to the Live pin, the Blue wire must go to the Neutral pin, and the Green/<br />
Yellow wire must go to the Earth pin.<br />
f) Before replacing the plug top ensure that the cable restraint is holding the<br />
outer sheath of the cable firmly and that the wires are correctly connected.<br />
WARNING<br />
THIS APPLIANCE MUST BE EARTHED.<br />
CE Declaration of Conformity<br />
<strong>Linn</strong> Products Ltd declare that this product is in conformance with the Low Voltage<br />
Directive 73/23/EEC and Electromagnetic Compatibility 89/336/EEC as amended<br />
by 92/31/EEC and 93/68/EEC.<br />
The conformity of the designated product with the provisions of Directive number<br />
73/23/EEC (LVD) is proved by full compliance with the following standards:<br />
Standard number Date of issue Test type<br />
EN60065 2002 General requirements<br />
Marking<br />
Hazardous radiation<br />
Heating under normal conditions<br />
Shock hazards under normal<br />
operating conditions<br />
Insulation requirements<br />
Fault conditions<br />
Mechanical strength<br />
Parts connected to the mains<br />
supply<br />
Components<br />
Terminal devices<br />
External flexible cords<br />
Electrical connections and<br />
mechanical fixings<br />
Protection against electric shock<br />
Stability and mechanical hazards<br />
Resistance to fire<br />
The conformity of the designated product with the provisions of Directive number<br />
89/336/EEC (EMC) is proved by full compliance with the following standards:<br />
Standard number Date of issue Test type<br />
EN55013 2001 Conducted emissions<br />
EN55013 2001 Absorbed emissions<br />
EN55020 2002 Immunity<br />
MAJIK-I<br />
iii
iv<br />
FCC notice<br />
Note: This equipment has been tested and found to comply with the limits for<br />
a Class B digital device, pursuant to Part 15 of the FCC Rules. These limits<br />
are designed to provide reasonable protection against harmful interference<br />
in a residential installation. This equipment generates, uses and can radiate<br />
radio frequency energy and, if not installed and used in accordance with the<br />
instructions, may cause harmful interference to radio communications. However,<br />
there is no guarantee that interference will not occur in a particular installation.<br />
If this equipment does cause harmful interference to radio or television reception,<br />
which can be determined by turning the equipment off and on, the user is<br />
encouraged to try to correct the interference by one or more of the following<br />
measures:<br />
• Reorient or relocate the receiving antenna.<br />
• Increase the separation between the equipment and receiver.<br />
• Connect the equipment into an outlet on a circuit different from that to which<br />
the receiver is connected.<br />
• Consult the dealer or an experienced radio/TV technician for help.<br />
Waste Electrical and Electronic Equipment<br />
(WEEE) Directive<br />
Waste Electrical and Electronic Equipment Directive Directive 2002/96/EC<br />
of the European Parliament and of the Council<br />
The symbol (right) is shown on this product. It indicates that the product<br />
should not be disposed of with regular household waste, but should be<br />
disposed of separately.<br />
Electrical and electronic equipment can contain materials that are hazardous<br />
to the environment and human health and therefore should be disposed of at a<br />
designated waste facility or returned to your retailer for the appropriate recycling to<br />
take place (see www.linn.co.uk for further information).<br />
If you wish to dispose of this product and the product still functions, please<br />
consider recycling/reusing it by donating it to a charity shop, selling it or partexchanging<br />
it with your retailer.<br />
MAJIK-I<br />
Copyright and Acknowledgements<br />
Copyright © 2007 <strong>Linn</strong> Products Ltd. First edition September 2007.<br />
<strong>Linn</strong> Products Limited, Glasgow Road, Waterfoot, Eaglesham, Glasgow,<br />
G76 OEQ, Scotland, United Kingdom<br />
All rights reserved. No part of this publication may be reproduced, stored in<br />
a retrieval system, or transmitted, in any form or by any means, electronic,<br />
mechanical, photocopying, recording, or otherwise, without the prior written<br />
permission of the publisher.<br />
The content of this manual is furnished for information use only, is subject to<br />
change without notice, and should not be construed as a commitment by<br />
<strong>Linn</strong> Products Limited.<br />
<strong>Linn</strong> Products Limited assumes no responsibility or liability for any errors or<br />
inaccuracies that may appear in this manual.<br />
Trade marks used in this publication: <strong>Linn</strong> and the <strong>Linn</strong> logo are registered trade<br />
marks of <strong>Linn</strong> Products Limited. <strong>Majik</strong>, Aktiv and Chakra are trade marks of<br />
<strong>Linn</strong> Products Limited.<br />
Printed in the United Kingdom.<br />
PACK 1353/E
CONTENTS<br />
INTRODUCTION 1<br />
FEATURES 2<br />
INSTALLATION 3<br />
Unpacking 3<br />
Positioning 3<br />
Ventilation requirements 3<br />
Other devices 3<br />
Important information – phono input 4<br />
Important information – protection 4<br />
CONNECTING 5<br />
Back panel 5<br />
Connecting a line-level source product 6<br />
Connecting a turntable 6<br />
Connecting to an exteral power amplifier 7<br />
Connecting to an analogue recording device 7<br />
Connecting to loudspeaker terminals 7<br />
Connecting headphones 8<br />
Connecting to an AUX source 8<br />
Connecting to the mains supply 8<br />
OPERATION 9<br />
Front panel 9<br />
Handset 10<br />
Handset modes 11<br />
Standby 12<br />
Basic controls 13<br />
Source selection 13<br />
Volume control 14<br />
Additional controls 14<br />
Balance adjustment 15<br />
Recording 15<br />
SETUP MENUS 16<br />
Entering and navigating setup menus 16<br />
Display configuration 17<br />
Source configuration 18<br />
Audio configuration 19<br />
Unit configuration 20<br />
RS232 configuration 21<br />
Defaults 22<br />
Unit information 23<br />
TECHNICAL SPECIFICATIONS 24<br />
GUARANTEE AND SERVICE 26<br />
MAJIK-I<br />
v
INTRODUCTION<br />
The <strong>Majik</strong>-I integrated amplifier<br />
<strong>Linn</strong> was founded more than 30 years ago on the belief that music is fundamental<br />
to human well-being and that music reproduced to the highest standards can<br />
bring lasting pleasure.<br />
The desire to reproduce music to the highest quality remains the driving force<br />
behind the company today, and that commitment is manifested in the <strong>Majik</strong>-I<br />
integrated amplifier. This advanced product utilises the very latest technology to<br />
take you closer to the music you love. And the inclusion of a phono-stage ensures<br />
that the <strong>Majik</strong>-I is well equipped to satisfy the discerning audiophile.<br />
The <strong>Majik</strong>-I integrated amplifier is the perfect partner for <strong>Linn</strong>’s <strong>Majik</strong> CD player.<br />
Whether as part of a complete <strong>Majik</strong> system or as the integrated amplifier in your<br />
existing system, with the <strong>Majik</strong>-I you will rediscover your music collection.<br />
MAJIK-I<br />
1
2<br />
FEATURES<br />
Chakra amplifier technology<br />
The Chakra amplifier design uses an array of large transistors as ‘boosters’ around<br />
a single chip integrated circuit. When output current is less than a few amps all<br />
the power output comes from the single chip circuitry, maximising the speed and<br />
linear properties of this design. At higher output currents the transistors provide<br />
the majority of the output current, leaving the integrated circuit to operate well<br />
within its capability and able to correct any error instantaneously.<br />
The design is very compact, reducing the circuit area and length of the signal path<br />
and is also highly efficient, producing much less heat than traditional designs.<br />
Switch mode power supply (SMPS)<br />
SMPS is an electronic power supply which converts and regulates the incoming<br />
mains voltage, and also provides the internal audio circuitry with excellent<br />
electrical isolation from the outside world. The SMPS replaces the bulky, heavy<br />
and noisy transformer found in most amplifiers, as well as a number of other<br />
sizeable components.<br />
The major benefits of SMPS over conventional power supplies include: small<br />
size, high efficiency, fast response, high mains input tolerance and, with its much<br />
reduced material use, environmental friendliness.<br />
Also, SMPS does not emit distortion into the local mains supply, as conventional<br />
large power supplies tend to do. And if you upgrade from an amplifier with a<br />
conventional power supply to the <strong>Majik</strong>-I amplifier, aside from the benefits of<br />
the improved amplification, the sound of your entire system will almost certainly<br />
improve as a result of the cleaner mains supply.<br />
MAJIK-I<br />
Aktiv* operation<br />
Standard ‘passive’ crossovers are driven by the audio signal itself and so some of<br />
the signal is effectively lost. Aktiv crossovers are powered by the SMPS (see left)<br />
and therefore much more of the audio signal is delivered to the loudspeaker. They<br />
are also able to exert a much greater degree of control over the signal and these<br />
qualities combine to provide a significant improvement in sonic performance over<br />
standard operation.<br />
Your authorised <strong>Linn</strong> retailer can convert your <strong>Majik</strong>-I amplifier to Aktiv operation<br />
with the insertion of a specially designed <strong>Linn</strong> Aktiv module.<br />
Protection<br />
Over-current protection<br />
If the output current goes above the power amplifier’s designated safe operating<br />
level, it shuts down instantly for a few seconds in order to protect itself and the<br />
loudspeaker drive units to which it is connected.<br />
Over-temperature protection<br />
Similarly, if the amplifier’s temperature rises above its safe operating limit, the<br />
amplifier will cease operation until the temperature drops to a safe level and will<br />
then automatically resume.<br />
* The term ‘Aktiv’ refers to the proprietary <strong>Linn</strong> active modules and loudspeaker<br />
configuration.
INSTALLATION<br />
Unpacking<br />
The <strong>Majik</strong>-I is supplied with the following accessories:<br />
• luminous handset<br />
• 2 x AAA batteries for the handset<br />
• mains lead<br />
• warranty pack<br />
• this manual<br />
We recommend you retain the packaging for reuse in case you need to transport<br />
the unit at a later date.<br />
Positioning<br />
Ventilation requirements<br />
Despite the efficiency of the design, your <strong>Majik</strong>-I integrated amplifier still requires to<br />
dissipate considerable power in the form of heat. It should therefore be sited in a<br />
position that does not restrict the airflow around it.<br />
min 4”<br />
(10 cm)<br />
For best results:<br />
• Allow at least 10 cm / 4” free space above and to each side of the unit for air<br />
circulation which will allow this heat to dissipate.<br />
• If the unit is sited a cabinet, air must be able to flow through from<br />
front-to-back. An enclosed cabinet will severely restrict heat dissipation.<br />
• Ensure that nothing is placed above or below the amplifier that might block<br />
or restrict the vents.<br />
If the <strong>Majik</strong>-I has inadequate ventilation and/or is played very enthusiastically for a<br />
period of time, its temperature may rise above the designated operating level and<br />
the amplifier will shut down until it has cooled sufficiently.<br />
Other devices<br />
Ideally, your <strong>Majik</strong>-I integrated amplifier should not be located directly above<br />
or adjacent to other heat-producing products such as radiators, other power<br />
amplifiers, etc. If multiple amplifiers are being used and space is restricted, placing<br />
them side by side is preferable to stacking.<br />
It is advisable to site your <strong>Majik</strong>-I away from (and if possible connected to a power<br />
socket on a different circuit from) powerful electrical or electronic products such<br />
as TV sets, computers, cookers, fridges etc. This will prevent the possibility of the<br />
strong electrical and electromagnetic emissions or interference given off by such<br />
devices adversely affecting the performance of your amplifier.<br />
MAJIK-I<br />
3
4<br />
Important information – phono input<br />
Please read the following carefully before installing the unit in your system – your<br />
unit may need to be reconfigured by your <strong>Linn</strong> retailer.<br />
The <strong>Majik</strong>-I integrated amplifier includes a phono input, which allows connection<br />
of a phono turntable. Even if you do not have a turntable, please consider the<br />
following points:<br />
LINE INPUT 6 / PHONO can be configured to operate as a moving-magnet (MM)<br />
or moving-coil (MC) phono stage, or an extra ‘line-level’ input. See note below for<br />
an explanation of these terms.<br />
When shipped, LINE INPUT 6 / PHONO is factory-set to operate as an MM phono<br />
stage.<br />
If you wish LINE INPUT 6 / PHONO to operate in line-level mode, this requires an<br />
internal hardware reconfiguration, which must be carried out by an authorised<br />
<strong>Linn</strong> retailer. If you require LINE INPUT 6 / PHONO to operate in moving-coil (MC)<br />
mode, this requires an MC Upgrade Kit (available from your <strong>Linn</strong> retailer) and an<br />
internal hardware reconfiguration, which must be carried out by an authorised<br />
<strong>Linn</strong> retailer. Dismantling or adjustment by persons other than <strong>Linn</strong> appointed<br />
personnel could invalidate the manufacturer’s warranty.<br />
If you wish to know the current configuration of LINE INPUT 6 / PHONO, this can<br />
be viewed in the <strong>Majik</strong>-I setup menus (see Setup Menus, page 16).<br />
Notes:<br />
Unlike line-level inputs, phono stages require to amplify extremely small signal<br />
levels, so if they are not treated with great care they can be susceptible to noise<br />
and signal degradation. <strong>Linn</strong> have therefore designed the phono stage as a<br />
hard-wired circuit, rather than a switchable or software configurable adjustment.<br />
This has been done in order to optimise audio performance and remove<br />
components such as switches, which could potentially degrade the signal<br />
in this most precise of circuits.<br />
MAJIK-I<br />
‘Moving-magnet’ and ‘moving-coil’ are the two types of phono cartridge available.<br />
If you have a turntable and are not sure which type of cartridge you have, consult<br />
the cartridge packaging, its manufacturer’s published information or the retailer<br />
from whom it was purchased. ‘Line-level’ inputs are for connection of line-level<br />
(fixed volume) products such as CD players, radio tuners, DVD players, video<br />
recorders, etc.<br />
Important information – protection<br />
Operation<br />
If the power amplifier section overheats or detects an overload condition, it will<br />
shut down in order to protect itself and the loudspeaker drive unit(s) to which it is<br />
connected.<br />
Duration<br />
Once the condition that caused the amplifier to activate its protection has passed,<br />
the amplifier will automatically resume normal operation. How long the power<br />
amplifier section remains in protection will depend on the cause. If the protection<br />
operates for more than a few seconds it could indicate overheating which may<br />
take some minutes of cooling to rectify.<br />
A long delay (10 minutes or more) could indicate a persistent overload condition<br />
(e.g. one of the components connected to the amplifier is faulty). Try switching<br />
the <strong>Majik</strong>-I off at the mains for 30 minutes or so and try again. If it remains non-<br />
operational, consult your retailer who can examine your system and determine the<br />
source of the problem.
CONNECTING<br />
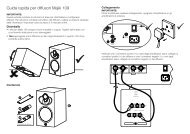
Back panel<br />
1. POWER: OFF, ON<br />
For switching the power to the unit on and off<br />
2. Mains input<br />
For connection to the mains supply.<br />
See Connecting to the mains supply, page 8<br />
3. RIGHT, LEFT SPEAKER<br />
Amplified output for connection to loudspeakers<br />
4. PRE OUT<br />
Line-level outputs for connection to an external power amplifier<br />
1 2 3 4 5 6 7 8 9<br />
5. TAPE OUT<br />
Fixed volume outputs for connection to a tape recorder or other analogue<br />
recording device<br />
6. ANALOGUE AUDIO INPUTS 1 – 5<br />
For connection to line-level source products, such as a CD player, radio<br />
tuner, tape deck, etc<br />
7. ANALOGUE AUDIO INPUT 6 / PHONO<br />
INPUT 6 can be configured as a moving-magnet, moving-coil or line-level<br />
input (the factory setting is moving-magnet). See Important information –<br />
phono input, page 4<br />
8. EARTH GROUND<br />
For connecting the earthing lead from the tonearm cable of a turntable,<br />
if required. Also for connecting the unit to an earthing terminal if no mains<br />
earth is available<br />
9. RS232 IN and OUT<br />
For RS232 inter-connection. An RS232 control product can be connected to<br />
the IN socket and used to control the <strong>Majik</strong>-I. The OUT socket can be used<br />
to relay commands to other RS232 controllable products downstream<br />
Important:<br />
Before making any connections, switch off all products in your system at the<br />
mains.<br />
MAJIK-I<br />
5
6<br />
Connecting a line-level source product Connecting a turntable<br />
L<br />
R<br />
Notes:<br />
LINE INPUT 6 / PHONO may need to be reconfigured if connected to a line-level<br />
source product (this adjustment must be done by an authorised <strong>Linn</strong> retailer).<br />
See Important information – phono input, page 4.<br />
Input names, as they appear on the front panel display, can be customised for<br />
your convenience. See Setup Menus, page 16.<br />
MAJIK-I<br />
FROM SOURCE PRODUCT TO<br />
ANY AVAILABLE LINE INPUT<br />
FROM TURNTABLE<br />
Important notes:<br />
LINE INPUT 6 / PHONO may need to be reconfigured if connected to a turntable<br />
which is fitted with an MC cartridge (this adjustment must be done by an<br />
authorised <strong>Linn</strong> retailer). See Important information – phono input, page 4.<br />
If an earthing lead is fitted to the tonearm cable, best results are usually achieved<br />
by connecting it to the EARTH GROUND terminal.<br />
CONNECT EARTH<br />
LEAD IF FITTED<br />
If, however, its connection introduces noise (hum etc.) or a reduction in sound<br />
quality, then disconnect it: certain tonearms/cartridges function better with no<br />
earth connection.<br />
Input names, as they appear on the front panel display, can be customised for<br />
your convenience. See Setup Menus, page 16.<br />
L<br />
R
Connecting to an external power amplifier<br />
L<br />
R<br />
TO POWER AMPLIFIER<br />
Connecting to an analogue recording device<br />
(e.g. tape deck)<br />
TO ANALOGUE RECORDING DEVICE<br />
connect to the device’s record inputs<br />
L<br />
R<br />
Connecting to loudspeaker terminals<br />
Connect each channel as shown.<br />
TO LOUDSPEAKER<br />
RED OR POSITIVE (+)<br />
CONNECTION<br />
The binding-post terminals can be used as sockets for the connection of 4 mm<br />
banana plugs or can be used as binding posts for the connection of bare wires or<br />
spade-terminated cables by loosening the outer section of the binding, inserting<br />
the cable or terminal and re-tightening the binding post to clamp it in place.<br />
Ensure that all the binding posts are tight.<br />
BANANA<br />
PLUG<br />
SPADE-TERMINATED<br />
CABLE<br />
TO LOUDSPEAKER<br />
BLACK OR NEGATIVE (–)<br />
CONNECTION<br />
BARE WIRE<br />
CONNECTION<br />
MAJIK-I<br />
7
8<br />
Connecting headphones<br />
Connecting to an AUX source, e.g. MP3 player<br />
MAJIK-I<br />
AUX<br />
FROM HEADPHONES<br />
Note:<br />
Audio output to loudspeakers will be muted when headphones are connected.<br />
FROM AUX SOURCE<br />
Notes:<br />
The AUX source will be automatically selected as the current source when a jack is<br />
connected.<br />
The volume of the AUX source should be adjusted to provide the best performance<br />
without distorting the audio.<br />
Connecting to the mains supply<br />
Important – Do not connect to the mains supply until all other connections have<br />
been made. All products in the system must be powered down while connecting/<br />
disconnecting.<br />
The unit must always be earthed when connected to mains power. Use<br />
the earthed, moulded mains lead supplied. Never use an unearthed mains plug,<br />
socket or adaptor with this unit. The mains lead supplied may be fitted with a<br />
fused plug, depending on local regulations. If this is the case, always replace this<br />
fuse with another of the same type and rating.<br />
Your <strong>Majik</strong>-I can be connected to any worldwide mains voltage with no<br />
adjustment. The <strong>Majik</strong>-I incorporates Automatic Voltage Selection (AVS)<br />
and the power supply automatically adjusts for the incoming mains supply.<br />
The unit uses a switch mode power supply (SMPS) in place of the bulky, heavy,<br />
noisy and inefficient transformer (and associated circuitry) found in conventional<br />
designs. This <strong>Linn</strong> designed power supply provides excellent tolerance to lesser<br />
quality mains supplies, allowing it to perform at close to its best, even with<br />
supplies that are quite badly corrupted.
OPERATION<br />
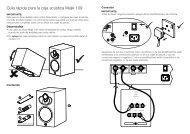
Front panel<br />
1. Front panel display<br />
2.<br />
Mutes and un-mutes the volume<br />
3. VOLUME - / VOLUME +<br />
Adjust the volume level<br />
4. (headphone socket)<br />
Accepts a 3.5 mm headphone jack<br />
2 1<br />
5<br />
3 4 6 7<br />
5. � (standby)<br />
Brings the unit out of, or puts into, standby<br />
6. AUX (auxiliary source socket)<br />
For connecting a portable auxiliary source, e.g. MP3 player.<br />
Accepts a 3.5 mm jack<br />
7. SOURCE - / SOURCE +<br />
Change source<br />
MAJIK-I<br />
9
10<br />
MAJIK-I<br />
1<br />
2<br />
3<br />
4<br />
5<br />
6<br />
7<br />
8<br />
9<br />
10<br />
11<br />
12<br />
13<br />
Handset<br />
1. LEDs<br />
Indicate when a signal is being transmitted from the handset. The LED<br />
pattern indicates the handset’s current mode of operation. See Handset<br />
modes, below<br />
2. AMP<br />
Changes the handset mode for pre-amplifier control (the functions marked in<br />
blue text on the handset). See Handset modes, below<br />
3. SHIFT<br />
Allows access to RECORD and OFF functions. See Handset modes,<br />
below<br />
4.<br />
Mutes / unmutes the audio output<br />
5. /<br />
Adjust volume level<br />
6. ▲ / ▼/ ◀ / ▶<br />
For navigating setup menus and adjusting various features<br />
7. AUDIO ADJUST<br />
Accesses adjustable audio features<br />
8. Direct source keys<br />
Provide direct selection of sources<br />
9. � / OFF<br />
Brings unit out of, or puts into, standby / Emits a discrete ‘OFF’ command –<br />
required for certain control applications<br />
10. RECORD<br />
For setting up/altering a record path
11. SRC - / SRC + (source - / source +)<br />
Change source<br />
12. ●<br />
Selects/executes options and certain commands<br />
13. SETUP<br />
Enters/exits setup menus<br />
Handset modes<br />
For convenience, the handset has been designed to operate a number of different<br />
<strong>Linn</strong> products. This is to ensure that the number of handsets required to operate<br />
a <strong>Linn</strong> system is minimised. The handset is therefore capable of operating in a<br />
variety of modes:<br />
Amp mode<br />
Press the AMP key. The pre-amplifier functions (printed in blue above or below the<br />
keys) will then be the primary handset keys and both LEDs will light when one of<br />
the keys is pressed.<br />
DVD mode<br />
Press the DVD key. The DVD functions will then be assigned as the primary<br />
handset keys and the ‘DVD’ LED will light when one of the keys is pressed.<br />
CD mode<br />
Press SHIFT + DVD. The CD functions will then be assigned as the primary<br />
handset keys and the ‘CD’ LED will light when one of the keys is pressed.<br />
SHIFT functions<br />
Pressing SHIFT, followed (within 2 seconds) by one of the keys with red type<br />
above it will access the function as indicated by the red type. Note – unlike the<br />
‘mode’ functions above, the handset is not reassigned, therefore SHIFT must be<br />
pressed each time a shift function is accessed.<br />
Note:<br />
The handset mode and the product being controlled will determine which keys<br />
are operational. Some keys will only operate with specific products and may be<br />
non-functional for others.<br />
MAJIK-I<br />
11
12<br />
Standby<br />
When connected to the mains supply your <strong>Majik</strong>-I will take approximately eight<br />
seconds to configure itself. During this time three dots will be shown on the display<br />
and the unit will ignore front panel and handset commands. After the <strong>Majik</strong>-I has<br />
completed this process it will enter standby mode and the display will show the<br />
standby symbol �.<br />
MAJIK-I<br />
�<br />
To toggle between standby mode and operating mode:<br />
• Press � on the handset or front panel.<br />
Notes:<br />
Any of the front panel keys will also bring the unit out of standby.<br />
Standby mode reduces the power used by the unit and is useful for situations<br />
where the unit is not being used for a short time and/or requires to be switched<br />
on remotely. For longer periods of non-use, switching off at the mains (using the<br />
mains switch at the rear or unplugging) is recommended.
Basic controls<br />
Source selection<br />
SOURCE –<br />
SOURCE – / +<br />
SOURCE +<br />
To select a source:<br />
• Repeatedly press, or press and hold SOURCE – / SOURCE + on the<br />
handset or front panel to scroll through the available sources. The handset<br />
does not need to be in Amp mode.<br />
or<br />
• If the input types for the audio sources have been configured in the setup<br />
menus, directly select the source using the source selection keys on the<br />
handset. See Setup Menus, page 16. The handset must be in Amp mode.<br />
or<br />
• Inserting a 3.5 mm jack into the front panel AUX socket, automatically selects<br />
this input. Removing the 3.5 mm jack automatically de-selects the input and<br />
causes the <strong>Majik</strong>-I to revert to the last source selected.<br />
Notes:<br />
The names for the inputs, as displayed on the front panel, and the input types can<br />
be customised for your convenience (see Setup Menus, page 16).<br />
Setting an input type to ‘None’ (see Setup Menus, page 16) means that the input<br />
will not be available for selection.<br />
When there is not a jack inserted in the AUX socket, this input will not be available<br />
for selection.<br />
MAJIK-I<br />
13
14<br />
Volume control Additional controls<br />
To change the volume setting:<br />
• Repeatedly press, or press and hold / on the handset, or<br />
VOLUME – / VOLUME + on the front panel.<br />
Volume range is from 0 to 100 (in 0.5 steps).<br />
To mute and un-mute the volume:<br />
• Press on the handset or front panel.<br />
Note:<br />
The handset volume and mute keys are not affected by the handset mode.<br />
MAJIK-I<br />
VOLUME – /+ VOLUME – /+ SOURCE – /+<br />
SHIFT<br />
SOURCE –<br />
◀ / ▶<br />
AUDIO ADJUST<br />
RECORD<br />
SOURCE +
Balance adjustment (handset must be in Amp mode)<br />
To adjust the balance setting:<br />
• Press AUDIO ADJUST on the handset.<br />
The display will show the current balance setting.<br />
• Use ◀ / ▶ on the handset or VOLUME - / + on the front panel to adjust the<br />
balance to the left and right respectively.<br />
Balance range is from 10 increments to the left to 10 increments to the right, with<br />
neutral balance being 0.<br />
Recording<br />
To record a source:<br />
• Press RECORD on the handset (SHIFT + 8).<br />
• Select the source you wish to record using SOURCE - / + on the front panel<br />
or handset.<br />
The selected source will then be output at a fixed volume from the TAPE OUT<br />
outputs and can be recorded by an analogue recording device.<br />
Notes:<br />
The <strong>Majik</strong>-I has separate listen and record paths, enabling you to record one<br />
source while listening to another.<br />
Setting the record path to ‘No source’ means that no record path will be set.<br />
Sources with type set to ‘None’ will not be shown.<br />
MAJIK-I<br />
15
16<br />
SETUP MENUS<br />
The setup menus can be used to configure the <strong>Majik</strong>-I to customise aspects of its<br />
operation to suit your requirements, to operate in a particular type of installation, or<br />
to view important functional data.<br />
Entering and navigating setup menus<br />
Using the handset:<br />
• Put the handset into Amp mode by pressing the AMP key.<br />
• Press SETUP.<br />
• Navigate up or down the options within a menu, using ▲ / ▼.<br />
• Press ▶ or ● to select an option.<br />
• Press ◀ to go back to the previous option or menu.<br />
• Press SETUP to exit setup.<br />
or<br />
Using the front panel:<br />
• Press and hold until ‘MAIN MENU’ appears on the front panel display.<br />
• Navigate up or down the options within a menu, using SOURCE +<br />
or SOURCE –.<br />
• Press VOLUME + or � to select an option.<br />
• Press VOLUME – to go back to the previous option or menu.<br />
• Press to exit setup.<br />
MAJIK-I<br />
Note:<br />
For each option the currently selected setting will be indicated by a tick ✔<br />
beside it.<br />
The main menu consists of four sub-menus:<br />
Display configuration<br />
Source configuration<br />
Audio configuration<br />
Unit configuration
Display configuration<br />
Option Settings Description Default setting<br />
Display Brightness Auto<br />
Percentage<br />
(2 – 100%)<br />
Display Content Source and Volume<br />
Volume<br />
Source<br />
Last Used<br />
If set to ‘Auto’, the display brightness will change with the surrounding lighting conditions (dimmer surroundings<br />
=> dimmer display / brighter surroundings => brighter display).<br />
To select ‘Auto’, scroll up or down the percentage settings and the ‘Auto’ option will appear in place of 0%.<br />
With ‘Percentage’, you can select a setting between 2% and 100%. The display brightness will (while out of<br />
standby) remain set to the specified brightness setting.<br />
If set to ‘Source and Volume’, both the currently selected source and the current volume setting will be<br />
displayed on the front panel.<br />
If set to ‘Volume’, only the current volume setting will be displayed.<br />
If set to ‘Source’, only the current source setting will be displayed.<br />
If set to ‘Last Used’, the last setting (source or volume) to be adjusted will remain on the display.<br />
Note:<br />
The above settings are applicable only when the unit is out of standby, is not in display-sleep mode and is<br />
not being adjusted.<br />
Display Timeout 1 – 10 seconds Determines how long, after an adjustment is made, before the display reverts to its ‘Display Content’ setting<br />
as detailed above.<br />
Sleep Display Delay Delay in minutes and<br />
seconds<br />
(0 seconds to 5 minutes)<br />
Off<br />
The time setting determines how long after the last command has been received that the display goes to<br />
sleep (where only 3 dots are visible on the display).<br />
If set to ‘Off’, the display will not go to sleep.<br />
100%<br />
Source and Volume<br />
2 seconds<br />
Off<br />
MAJIK-I<br />
17
18<br />
Source configuration<br />
The options listed below are available for each source. Select the source you wish to adjust and amend as required.<br />
Option Settings Description Default setting<br />
Name N/A Allows you to customise the input name as it appears on the display. Any name can be entered, up to a maximum of 12<br />
characters (including spaces).<br />
Type Aux (auxiliary)<br />
None<br />
Satellite<br />
Cable<br />
TV<br />
DAT<br />
Tape 2/VCR<br />
Tape 1<br />
Phono/Aux 2<br />
Tuner<br />
DVD<br />
CD<br />
To change the selected input name:<br />
• Use the ▼/▲ keys on the handset or SOURCE – / + keys on the front panel to change the flashing character.<br />
• Use the ▶ key on the handset or VOLUME + key on the front panel to move to the next character.<br />
• Use the ◀ key on the handset or VOLUME – key on the front panel if you wish to move to the previous character.<br />
• Once you are happy with your changes press ● on the handset or � on the front panel.<br />
To exit and go back to the menu, repeatedly press the ◀ key on the handset or VOLUME – on the front panel.<br />
The source type selected allows the input to be directly selected from the handset (see Handset, page 16), as an<br />
alternative to scrolling through the inputs.<br />
Notes:<br />
Assigning ‘None’ as a source type means the input will not be available for selection – useful for bypassing unconnected<br />
source inputs.<br />
Not all source types listed are available for direct selection on the handset supplied. Some are only available on older <strong>Linn</strong><br />
handsets.<br />
If more than one source input has been configured as the same source type, repeatedly pressing the relevant key on the<br />
handset will scroll through all those that apply.<br />
Volume Offset -15 to +15 Allows the volume level of each source input to be adjusted up or down, relative to the others.<br />
Allows you to equalise the volume across all sources. For example if a CD player and a radio tuner are connected, the<br />
CD player’s output volume may be louder than that of the tuner so this feature saves volume adjustment when switching<br />
between these sources.<br />
MAJIK-I<br />
Note:<br />
The volume difference will not be visible on the volume display – so when switching between offset sources, the volume<br />
display will not reflect the offset.<br />
Socket<br />
Aux<br />
Input 1<br />
Input 2<br />
Input 3<br />
Input 4<br />
Input 5<br />
Input 6<br />
Socket<br />
Aux<br />
Input 1<br />
Input 2<br />
Input 3<br />
Input 4<br />
Input 5<br />
Input 6<br />
0<br />
Name<br />
Aux<br />
<strong>Majik</strong> CD<br />
Input 2<br />
Input 3<br />
Input 4<br />
Input 5<br />
Phono<br />
Type<br />
Aux<br />
CD<br />
Aux<br />
Aux<br />
Aux<br />
Aux<br />
Phono
Audio configuration<br />
Option Settings Description Default setting<br />
Volume Rate 1/10 to 10/10 Allows you to adjust the rate at which the volume changes when the VOLUME – / + keys are held down.<br />
1/10 = slowest, 10/10 = fastest.<br />
Mute Rate 1/10 to 10/10 Allows you to change the rate at which the volume mutes/unmutes when the MUTE key is pressed.<br />
1/10 = slowest, 10/10 = fastest.<br />
Volume Limit 0 to 100 Allows you to limit the unit’s maximum volume.<br />
For example, if you set the volume limit to 60, the volume cannot be raised above 60.<br />
Volume Preset 0 to 100 Allows you to adjust the volume level that the unit will be set to when it comes out of standby. 40<br />
Headphone<br />
Offset<br />
-15 to +15 Allows the volume of the headphone output to be adjusted up or down, relative to the loudspeaker volume.<br />
This option enables you to compensate for the different outputs of different headphone types. So after adjusting the<br />
offset, when headphones are connected or disconnected, the volume should not require adjusting.<br />
0<br />
8/10<br />
8/10<br />
100<br />
MAJIK-I<br />
19
20<br />
Unit configuration<br />
Option Settings Description Default setting<br />
Selection Timeout 1 – 10 seconds Allows you to adjust the time taken for source selection to take effect. A delay allows you time to scroll through and view<br />
available sources.<br />
Startup Source None<br />
Last used<br />
AUX<br />
PHONO<br />
Input 5<br />
Input 4<br />
Input 3<br />
Input 2<br />
<strong>Majik</strong> CD<br />
Standby Record From None<br />
Last used<br />
AUX<br />
PHONO<br />
Input 5<br />
Input 4<br />
Input 3<br />
Input 2<br />
<strong>Majik</strong> CD<br />
Handset Commands Enabled<br />
Disabled<br />
Allows you to set which source input will be selected when the unit comes out of standby.<br />
Note:<br />
The names shown are configured in the Source Configuration options.<br />
1 second<br />
Last used<br />
Allows you to set a source to be output at TAPE OUT while the unit is in standby. Last used<br />
If set to ‘Enabled’, the unit will accept remote commands from the handset.<br />
If set to ‘Disabled’, the unit will not accept remote commands from the handset. (Setup menus will only be accessible and<br />
adjustable via the front panel controls.)<br />
RS232 Configuration N/A This option accesses the RS232 setup sub-menu – used to configure the unit to communicate with other RS232 enabled<br />
products.<br />
Defaults N/A This option accesses the defaults sub-menu – used for saving and recalling configurations. N/A<br />
Unit Information N/A Not adjustable – for information only. Allows the unit’s software/hardware revisions to be viewed. This category is mainly<br />
intended for <strong>Linn</strong> personnel and <strong>Linn</strong>-appointed service agents.<br />
MAJIK-I<br />
Enabled<br />
N/A<br />
N/A
RS232 configuration<br />
Option Settings Description Default setting<br />
Baud Rate 230400<br />
115200<br />
57600<br />
38400<br />
28800<br />
19200<br />
14400<br />
9600<br />
4800<br />
Parity Even<br />
None<br />
Odd<br />
Data Bits 7<br />
8<br />
Stop Bits 1<br />
2<br />
RS232 Events Enabled<br />
Disabled<br />
Set the baud rate to suit the RS232 protocol being used. 9600<br />
Set parity to suit the RS232 protocol being used. Even<br />
Set the data bits to suit the RS232 protocol being used. 7<br />
Set the stop bits to suit the RS232 protocol being used. 1<br />
If set to ‘Enabled’, the unit passes information regarding its internal status to an external device that accepts RS232<br />
data.<br />
Disabled<br />
MAJIK-I<br />
21
22<br />
Defaults<br />
Option Settings Description Default setting<br />
Save Installation Save After the unit has been configured, you can save the settings by selecting this item. The saved Installation settings can be<br />
restored at any time should the unit’s setup be changed (see below).<br />
Any alterations to the product’s setup that you wish to keep as a new Installation can be stored by selecting this item, which<br />
will overwrite the existing Installation settings.<br />
Restore Installation Save If you have made changes to the setup that you do not wish to keep, use this option to restore the previously saved<br />
Installation settings.<br />
Restore Factory Defaults Reset Resets all options in all menus to their factory default settings. N/A<br />
MAJIK-I<br />
N/A<br />
N/A
Unit information<br />
Option Settings Description Default setting<br />
H8 S/W N/A Allows the unit’s software revision to be viewed. N/A<br />
Main Board ID N/A Allows the unit’s mainboard hardware revision to be viewed. N/A<br />
Front Panel Board ID N/A Allows the unit’s front panel hardware revision to be viewed. N/A<br />
Phono Board ID N/A Allows the unit’s phono stage hardware revision to be viewed. N/A<br />
Input 6 type Line Level Not adjustable – for information only. Reconfigurating, if required, is implemented via a hardware adjustment which can be Phono MM<br />
Phono MM<br />
Phono MC<br />
carried out by your <strong>Linn</strong> retailer.<br />
MAJIK-I<br />
23
24<br />
TECHNICAL SPECIFICATIONS<br />
Connector types<br />
Headphone<br />
Aux input<br />
Line outputs<br />
Tape outputs<br />
Line inputs<br />
Speaker outputs<br />
Input impedance<br />
MM phono input<br />
Line inputs<br />
Aux input<br />
Input voltage<br />
MM phono input<br />
Line inputs<br />
Aux input<br />
Phono stage gain<br />
3.5 mm jack<br />
¨<br />
RCA Phono<br />
¨<br />
¨<br />
4mm Banana / Binding Post<br />
48 kΩ 68 pF<br />
10 kΩ<br />
100 kΩ<br />
70 mV peak @ 1cm/sec 1kHz<br />
8.5 V peak, 6 V rms<br />
4.5 V peak, 3.1 V rms<br />
MM phono input +40 dB (x 100) @ 1 kHz<br />
Output impedance<br />
Line out<br />
Tape out<br />
Headphones<br />
Output voltage<br />
Line outputs<br />
Tape outputs<br />
Headphones<br />
Output offset<br />
Line outputs<br />
Tape outputs<br />
Headphones<br />
Speaker outputs<br />
MAJIK-I<br />
300 Ω<br />
300 Ω<br />
11 Ω<br />
8.8 V peak, 6 V rms<br />
8.8 V peak, 6 V rms<br />
8.8 V peak, 6 V rms<br />
< 2 mV<br />
< 2 mV<br />
< 2 mV<br />
< 3 mV<br />
Signal-to-noise ratio<br />
Line inputs<br />
MM phono input<br />
Better than -120 dB<br />
Better than -90 dB<br />
Channel balance Better than +/- 0.2 dB<br />
Channel separation<br />
Line inputs<br />
MM phono input<br />
Better than -106 dB<br />
Better than -90 dB<br />
Gain range -80 dB - +20 dB<br />
Gain resolution 0.5 dB<br />
Unity gain volume 0 dB = volume 80<br />
Dynamic range 120 dB<br />
Damping factor Greater than 170<br />
Signal level for clipping 755 mV rms<br />
Harmonic distortion < 0.01%<br />
Load tolerance Unconditionally stable into all loudspeaker loads<br />
Frequency response<br />
Pre-amp<br />
Power-amp<br />
Speaker output voltage 28.8 V peak<br />
Power consumption<br />
Standby<br />
Operational<br />
Maximum continuous<br />
Mains supply voltage<br />
(auto-ranging)<br />
2.5 Hz – 170 kHz (-3 dB)<br />
2.5 Hz – 48 kHz (-3 dB)<br />
20 W<br />
30 W<br />
300 W<br />
100 – 120 V ac (±10%) 50 – 60 Hz<br />
220 – 240 V ac (±10%) 50 – 60 Hz
Fuse replacement 250 V, T10 A<br />
Dimensions 381 mm (W) x 80 mm (H) x 355 mm (D)<br />
15 1/16” (W) x 3 1/8” (H) x 14” (D)<br />
Shipping dimensions 520 mm (W) x 220 mm (H) x 490 mm (D)<br />
20 1/4” (W) x 8 3/4” (H) x 19 1/4” (D)<br />
Weight 4.90 kg<br />
10.78 lb<br />
Shipping weight 6.50 kg<br />
14.33 lb<br />
Control 6 control keys on front panel<br />
Remote controllable (handset supplied)<br />
MAJIK-I<br />
25
26<br />
GUARANTEE AND SERVICE<br />
This product is guaranteed under the conditions which apply in the country of<br />
purchase and your statutory rights are not limited. In addition to any statutory<br />
rights you may have, <strong>Linn</strong> undertake to replace any parts which have failed due<br />
to faulty manufacture. To help us, please ask your <strong>Linn</strong> retailer about the <strong>Linn</strong><br />
warranty scheme in operation in your country.<br />
In parts of Europe, the United States of America and some other markets,<br />
extended warranty may be available to customers who register their purchase<br />
with <strong>Linn</strong>. A warranty registration card is included with the product and should be<br />
returned to <strong>Linn</strong> as soon as possible. Alternatively, you can register your warranty<br />
online at www.linn.co.uk.<br />
WARNING<br />
Unauthorised servicing or dismantling of the product invalidates the<br />
manufacturer’s warranty. There are no user serviceable parts inside the product<br />
and all enquiries relating to product servicing should be referred to authorised<br />
retailers only.<br />
Technical support and information<br />
For technical support, product queries and information, please contact either your<br />
local retailer or one of the <strong>Linn</strong> offices opposite.<br />
Full details of your local retailer/distributor can be found on the <strong>Linn</strong> web site:<br />
www.linn.co.uk<br />
Important<br />
Please keep a copy of the sales receipt to verify the purchase date of the product.<br />
Please ensure that your equipment is insured by you during any transit or<br />
shipment for repair.<br />
MAJIK-I<br />
<strong>Linn</strong> Products Limited<br />
Glasgow Road, Waterfoot, Eaglesham, Glasgow G76 0EQ, Scotland, UK<br />
Phone: +44 (0)141 307 7777<br />
Fax: +44 (0)141 644 4262<br />
Helpline: 0500 888909<br />
Email: helpline@linn.co.uk<br />
www.linn.co.uk<br />
<strong>Linn</strong> Incorporated<br />
8787 Perimeter Park Boulevard, Jacksonville, FL 32216 USA<br />
Phone: +1 (904) 645 5242<br />
Fax: +1 (904) 645 7275<br />
Helpline: 888-671-LINN<br />
Email: helpline@linninc.com<br />
www.linninc.com<br />
<strong>Linn</strong> Deutschland GmbH<br />
Hühnerposten 1d, D-20097 Hamburg, Deutschland<br />
Phone: +49-(0) 40-890 660-0<br />
Fax: +49-(0) 40-890 660-29<br />
Email: info@linngmbh.de<br />
www.linn.co.uk
PACK 1353