POSITION PAPER • The Parrallel Squat - Bigger Faster Stronger
POSITION PAPER • The Parrallel Squat - Bigger Faster Stronger
POSITION PAPER • The Parrallel Squat - Bigger Faster Stronger

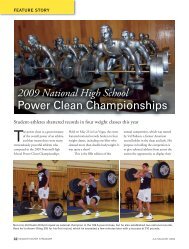
Create successful ePaper yourself
Turn your PDF publications into a flip-book with our unique Google optimized e-Paper software.
Ideal foot position varies with an individual’s<br />
anatomy, but whatever position the athlete<br />
uses he or she must make certain that the<br />
knees are aligned with the feet.<br />
SQUAT TECHNIQUE<br />
<strong>The</strong> parallel squat can be a tricky lift.<br />
Technique and correct position mean everything.<br />
You must execute every technique<br />
guideline to perfection when attempting a<br />
new max. You must be psyched, but it must<br />
be a controlled psych. Now, on to the squat.<br />
<strong>The</strong> squat has four main phases: the start,<br />
the descent, the bottom position, and the<br />
upward drive. You must concentrate on perfect<br />
technique during all parts of the squat to<br />
achieve maximum results.<br />
START. You should be looking straight<br />
ahead at a target. Your mind should be clear<br />
and intense, thinking about technique:<br />
spreading the chest, locking in the lower<br />
back, and performing your descent pattern.<br />
You must take a huge breath and hold it just<br />
before the descent. For a one-rep max, take<br />
two breaths-first, a huge breath you hold to<br />
let the air settle deep within the rib cavity,<br />
and second, a quick breath as you begin the<br />
descent to expand the chest even further.<br />
DESCENT. You should descend in an<br />
even, controlled pattern. Some athletes descend<br />
inch by inch and take forever, which is<br />
a mistake. Some athletes rapidly crash down<br />
out of control, which is dangerous. By using<br />
an even, controlled pattern, your technique<br />
will likely be better. Throughout the descent,<br />
you should hold your breath. Always spread<br />
the chest, lock in the lower back, look at<br />
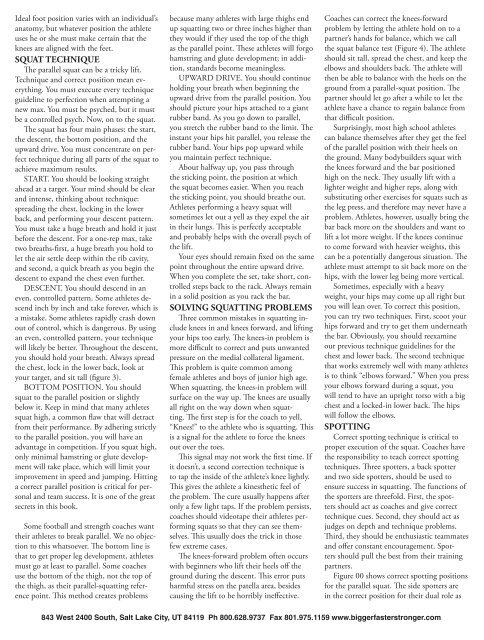
your target, and sit tall (figure 3).<br />
BOTTOM <strong>POSITION</strong>. You should<br />
squat to the parallel position or slightly<br />
below it. Keep in mind that many athletes<br />
squat high, a common flaw that will detract<br />
from their performance. By adhering strictly<br />
to the parallel position, you will have an<br />
advantage in competition. If you squat high,<br />
only minimal hamstring or glute development<br />
will take place, which will limit your<br />
improvement in speed and jumping. Hitting<br />
a correct parallel position is critical for personal<br />
and team success. It is one of the great<br />
secrets in this book.<br />
Some football and strength coaches want<br />
their athletes to break parallel. We no objection<br />
to this whatsoever. <strong>The</strong> bottom line is<br />
that to get proper leg development, athletes<br />
must go at least to parallel. Some coaches<br />
use the bottom of the thigh, not the top of<br />
the thigh, as their parallel-squatting reference<br />
point. This method creates problems<br />
because many athletes with large thighs end<br />
up squatting two or three inches higher than<br />
they would if they used the top of the thigh<br />
as the parallel point. <strong>The</strong>se athletes will forgo<br />
hamstring and glute development; in addition,<br />
standards become meaningless.<br />
UPWARD DRIVE. You should continue<br />
holding your breath when beginning the<br />
upward drive from the parallel position. You<br />
should picture your hips attached to a giant<br />
rubber band. As you go down to parallel,<br />
you stretch the rubber band to the limit. <strong>The</strong><br />
instant your hips hit parallel, you release the<br />
rubber band. Your hips pop upward while<br />
you maintain perfect technique.<br />
About halfway up, you pass through<br />
the sticking point, the position at which<br />
the squat becomes easier. When you reach<br />
the sticking point, you should breathe out.<br />
Athletes performing a heavy squat will<br />
sometimes let out a yell as they expel the air<br />
in their lungs. This is perfectly acceptable<br />
and probably helps with the overall psych of<br />
the lift.<br />
Your eyes should remain fixed on the same<br />
point throughout the entire upward drive.<br />
When you complete the set, take short, controlled<br />
steps back to the rack. Always remain<br />
in a solid position as you rack the bar.<br />
SOLVING SQUATTING PROBLEMS<br />
Three common mistakes in squatting include<br />
knees in and knees forward, and lifting<br />
your hips too early. <strong>The</strong> knees-in problem is<br />
more difficult to correct and puts unwanted<br />
pressure on the medial collateral ligament.<br />
This problem is quite common among<br />
female athletes and boys of junior high age.<br />
When squatting, the knees-in problem will<br />
surface on the way up. <strong>The</strong> knees are usually<br />
all right on the way down when squatting.<br />
<strong>The</strong> first step is for the coach to yell,<br />
“Knees!” to the athlete who is squatting. This<br />
is a signal for the athlete to force the knees<br />
out over the toes.<br />
This signal may not work the first time. If<br />
it doesn’t, a second correction technique is<br />
to tap the inside of the athlete’s knee lightly.<br />
This gives the athlete a kinesthetic feel of<br />
the problem. <strong>The</strong> cure usually happens after<br />
only a few light taps. If the problem persists,<br />
coaches should videotape their athletes performing<br />
squats so that they can see themselves.<br />
This usually does the trick in those<br />
few extreme cases.<br />
<strong>The</strong> knees-forward problem often occurs<br />
with beginners who lift their heels off the<br />
ground during the descent. This error puts<br />
harmful stress on the patella area, besides<br />
causing the lift to be horribly ineffective.<br />
Coaches can correct the knees-forward<br />
problem by letting the athlete hold on to a<br />
partner’s hands for balance, which we call<br />
the squat balance test (Figure 4). <strong>The</strong> athlete<br />
should sit tall, spread the chest, and keep the<br />
elbows and shoulders back. <strong>The</strong> athlete will<br />
then be able to balance with the heels on the<br />
ground from a parallel-squat position. <strong>The</strong><br />
partner should let go after a while to let the<br />
athlete have a chance to regain balance from<br />
that difficult position.<br />
Surprisingly, most high school athletes<br />
can balance themselves after they get the feel<br />
of the parallel position with their heels on<br />
the ground. Many bodybuilders squat with<br />
the knees forward and the bar positioned<br />
high on the neck. <strong>The</strong>y usually lift with a<br />
lighter weight and higher reps, along with<br />
substituting other exercises for squats such as<br />
the leg press, and therefore may never have a<br />
problem. Athletes, however, usually bring the<br />
bar back more on the shoulders and want to<br />
lift a lot more weight. If the knees continue<br />
to come forward with heavier weights, this<br />
can be a potentially dangerous situation. <strong>The</strong><br />
athlete must attempt to sit back more on the<br />
hips, with the lower leg being more vertical.<br />
Sometimes, especially with a heavy<br />
weight, your hips may come up all right but<br />
you will lean over. To correct this position,<br />
you can try two techniques. First, scoot your<br />
hips forward and try to get them underneath<br />
the bar. Obviously, you should reexamine<br />
our previous technique guidelines for the<br />
chest and lower back. <strong>The</strong> second technique<br />
that works extremely well with many athletes<br />
is to think “elbows forward.” When you press<br />
your elbows forward during a squat, you<br />
will tend to have an upright torso with a big<br />
chest and a locked-in lower back. <strong>The</strong> hips<br />
will follow the elbows.<br />
SPOTTING<br />
Correct spotting technique is critical to<br />
proper execution of the squat. Coaches have<br />
the responsibility to teach correct spotting<br />
techniques. Three spotters, a back spotter<br />
and two side spotters, should be used to<br />
ensure success in squatting. <strong>The</strong> functions of<br />
the spotters are threefold. First, the spotters<br />
should act as coaches and give correct<br />
technique cues. Second, they should act as<br />
judges on depth and technique problems.<br />
Third, they should be enthusiastic teammates<br />
and offer constant encouragement. Spotters<br />
should pull the best from their training<br />
partners.<br />
Figure 00 shows correct spotting positions<br />
for the parallel squat. <strong>The</strong> side spotters are<br />
in the correct position for their dual role as<br />
843 West 2400 South, Salt Lake City, UT 84119 Ph 800.628.9737 Fax 801.975.1159 www.biggerfasterstronger.com