e-Pro Live Assembly Manual - Pearl Music Europe
e-Pro Live Assembly Manual - Pearl Music Europe
e-Pro Live Assembly Manual - Pearl Music Europe

You also want an ePaper? Increase the reach of your titles
YUMPU automatically turns print PDFs into web optimized ePapers that Google loves.
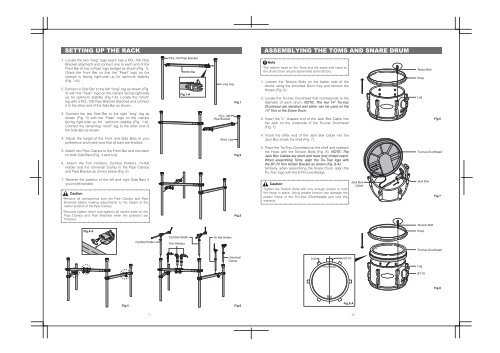
SETTING UP THE RACK<br />
1. Locate the two “long” legs (each has a PCL-100 Pipe<br />
Bracket attached) and connect one to each end of the<br />
Front Bar (it has a <strong>Pearl</strong> logo badge) as shown (Fig. 1).<br />
Orient the Front Bar so that the “<strong>Pearl</strong>” logo on the<br />
clamps is facing right-side up for optimum stability<br />
(Fig. 1-A).<br />
2. Connect a Side Bar to the left “long” leg as shown (Fig.<br />
2) with the “<strong>Pearl</strong>” logo on the clamps facing right-side<br />
up for optimum stability (Fig.1-A). Locate the “short”<br />
leg with a PCL-100 Pipe Bracket attached and connect<br />
it to the other end of the Side Bar as shown.<br />
3. Connect the last Side Bar to the right “long” leg as<br />
shown (Fig. 3) with the “<strong>Pearl</strong>” logo on the clamps<br />
facing right-side up for optimum stability (Fig. 1-A).<br />
Connect the remaining “short” leg to the other end of<br />
the Side Bar as shown.<br />
4. Adjust the height of the Front and Side Bars to your<br />
preference and make sure that all bars are levelled.<br />
5. Attach two Pipe Clamps to the Front Bar and one each<br />
on both Side Bars (Fig. 4 and 4-A).<br />
6. Attach the Tom Holders, Cymbal Holders, Hi-Hat<br />
Holder and the Universal Clamp to the Pipe Clamps<br />
and Pipe Bracket as shown below (Fig. 5).<br />
7. Reverse the position of the left and right Side Bars if<br />
you’re left-handed.<br />
Caution<br />
*Remove all components from the Pipe Clamps and Pipe<br />
Brackets before making adjustments to the height of the<br />
rackor position of the Pipe Clamps.<br />
*Securely tighten (don’t over-tighten) all handle bolts on the<br />
Pipe Clamps and Pipe Brackets when the positions are<br />
finalized.<br />
Fig.4-A<br />
Fig.4<br />
Cymbal Holder<br />
PCL-100 Pipe Bracket<br />
Fig.1-A<br />
Cymbal Holder<br />
Tom Holders<br />
Bar<br />
Long Leg<br />
PCL-100<br />
Pipe Bracket<br />
Short Leg<br />
Hi-Hat Holder<br />
Fig.1<br />
Fig.2<br />
Fig.3<br />
sample<br />
Universal<br />
Clamp<br />
Fig.5<br />
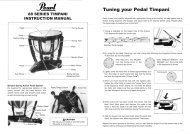
ASSEMBLYING THE TOMS AND SNARE DRUM<br />
Note<br />
*The bottom head on the Toms and the snare side head on<br />
the Snare Drum are pre-assembled at the factory.<br />
1. Loosen the Tension Bolts on the batter side of the<br />
drums using the provided Drum Key and remove the<br />
Hoops (Fig. 6).<br />
2. Locate the Tru-trac Drumhead that corresponds to the<br />
diameter of each drum. NOTE: The two 14” Tru-trac<br />
Drumhead are identical and either can be used on the<br />
14” Tom or the Snare Drum.<br />
3. Insert the “L” shaped end of the Jack Box Cable into<br />
the Jack on the underside of the Tru-trac Drumhead<br />
(Fig. 7).<br />
4. Insert the other end of the Jack Box Cable into the<br />
Jack Box inside the shell (Fig. 7).<br />
5. Place the Tru-Trac Drumhead on the shell and reattach<br />
the Hoop with the Tension Bolts (Fig. 8). NOTE: The<br />
Jack Box Cables are short and have only limited reach.<br />
When assembling Toms, align the Tru-Trac logo with<br />
the BT-70 Tom Holder Bracket as shown (Fig. 8-A).<br />
Similarly, when assembling the Snare Drum, align the<br />
Tru-Trac logo with the E-<strong>Pro</strong> <strong>Live</strong> Badge.<br />
Caution<br />
*Tighten the Tension Bolts with only enough tension to hold<br />
the Hoop in place. Using greater tension can damage the<br />
plastic frame of the Tru-trac Drumheads and void the<br />
warranty.<br />
- 7 - - 8 -<br />
Lug<br />
BT-70<br />
Fig.8-A<br />
Jack Box<br />
Cable<br />
Tesion Bolt<br />
Hoop<br />
Lug<br />
Fig.6<br />
Tru-trac Drumhead<br />
Jack Box<br />
Tension Bolt<br />
Hoop<br />
Fig.7<br />
Tru-trac Drumhead<br />
Lug<br />
BT-70<br />
Fig.8