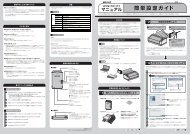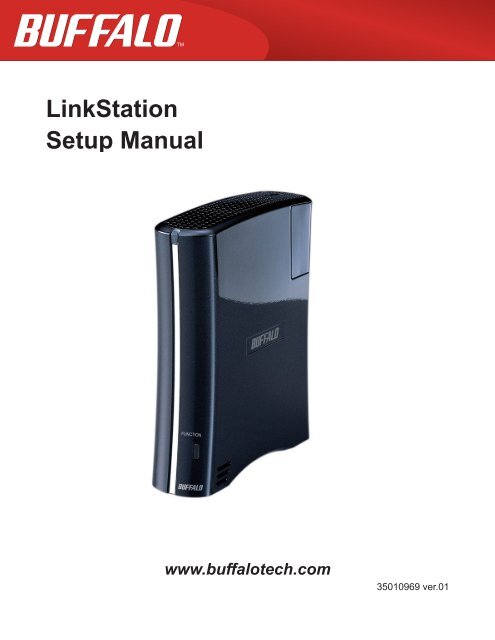
LinkStation Setup Manual www.buffalotech.com
LinkStation Setup Manual www.buffalotech.com
LinkStation Setup Manual www.buffalotech.com

Create successful ePaper yourself
Turn your PDF publications into a flip-book with our unique Google optimized e-Paper software.
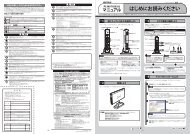
<strong>LinkStation</strong><br />
<strong>Setup</strong> <strong>Manual</strong><br />
<strong>www</strong>.<strong>buffalotech</strong>.<strong>com</strong><br />
35010969 ver.01
Contents<br />
Chapter 1 <strong>Setup</strong> ................................................................3<br />
LinkNavigator <strong>Setup</strong> ................................................................ 3<br />
Diagrams and Layout .............................................................. 5<br />
Chapter 2 Using your <strong>LinkStation</strong> ...................................7<br />
Open Shared Folder ................................................................ 7<br />
Open shared folder from the second PC ................................. 8<br />
Adding the <strong>LinkStation</strong> ............................................................ 9<br />
Power Switch .......................................................................... 10<br />
Web Administration Tool .......................................................... 11<br />
Add a shared folder ................................................................. 13<br />
Adding Users ........................................................................... 15<br />
Adding Groups ........................................................................ 17<br />
Access Restrictions ................................................................. 18<br />
Admin Password ..................................................................... 24<br />
Initialization ............................................................................. 25<br />
Chapter 3 Useful Functions .............................................27<br />
WebAccess ............................................................................. 27<br />
BitTorrent Client ....................................................................... 35<br />
Direct Copy ............................................................................. 41<br />
Time Machine .......................................................................... 43<br />
Sleep Timer ............................................................................. 48<br />
<strong>LinkStation</strong> <strong>Setup</strong> <strong>Manual</strong> 1
Appendix .....................................................................50<br />
Specifications .......................................................................... 50<br />
Status LED .............................................................................. 51<br />
Software .................................................................................. 54<br />
Info folder ................................................................................ 55<br />
Troubleshooting ...................................................................... 56<br />
Data Backup ............................................................................ 58<br />
<strong>LinkStation</strong> <strong>Setup</strong> <strong>Manual</strong> 2
Chapter 1<br />
<strong>Setup</strong><br />
LinkNavigator <strong>Setup</strong><br />
In order to set up your <strong>LinkStation</strong> (initial setting), from your <strong>com</strong>puter, you will need to install<br />
LinkNavigator, that is included on the Utility CD that <strong>com</strong>es with this unit. Navigator2<br />
program, which will also be installed during set up, can be used to open shares on the unit.<br />
In a DHCP network environment, you will simply have to connect this device to the network and<br />
power it on to use. Make sure that the router and <strong>LinkStation</strong> are connected via a LAN cable before<br />
turning the unit on. It is suggested that the workgroup setting, network drive mapping, date, time<br />
and other settings be configured manually using the following procedures.<br />
1<br />
2<br />
Insert the Utility CD to your <strong>com</strong>puter.<br />
LinkNavigator will launch.<br />
NOTE: - For Windows Vista, click [Run LSNavi.exe] when the auto-play screen is displayed.<br />
When the message "Windows needs your permission to continue", click "Continue".<br />
Run the setup.<br />
– For Mac OS, double click on the [LinkNavigator] icon on the utility CD.<br />
- Please disable your anti-virus software and/or firewall feature of your OS if it is enabled.<br />
You may not be able to set up this device if they are enabled. Refer to the software’s<br />
manual for information on how to disable and enable these features. After set<br />
up is <strong>com</strong>plete, you can re-enable the features.<br />
Click [Begin Installation].<br />
The example here shows the Windows' screen (on LS-<br />
XHL).<br />
NOTE: If this screen is not displayed on Windows,<br />
Double click on icon (LSNavi.exe) included in<br />
the Utility CD.<br />
<strong>LinkStation</strong> <strong>Setup</strong> <strong>Manual</strong> 3
Chapter1 <strong>Setup</strong><br />
3<br />
4<br />
5<br />
6<br />
7<br />
Follow the instructions on the screen to connect and set up (initialize) the <strong>LinkStation</strong>.<br />
Now you have <strong>com</strong>pleted the setup (initial settings) of your <strong>LinkStation</strong>.<br />
Click on the top right corner of the <strong>LinkStation</strong> to close the LinkNavigator.<br />
Then, open the shared folder of the <strong>LinkStation</strong> using NAS Navigator2 which was installed<br />
during setup.<br />
Launch NAS Navigator2.<br />
NOTE: On Windows, click [start] - [All Programs] - [BUFFALO] - [BUFFALO NAS Navigator] -<br />
[BUFFALO NAS Navigator2].<br />
- On Mac OS, double click on [NAS Navigator2] icon in the Dock.<br />
Now you have <strong>com</strong>pleted the setup.<br />
Hub or Router<br />
Double click on the <strong>LinkStation</strong>'s icon.<br />
The example here shows the Windows' screen (on LS-<br />
XHL).<br />
The shared folder in the <strong>LinkStation</strong> is displayed.<br />
NOTE: On Mac OS, <strong>LinkStation</strong> is either mounted as a drive icon on the desktop, or displayed<br />
in the sidebar on the Finder.<br />
You can now use the <strong>LinkStation</strong>'s shared folder to save files just like another hard drive.<br />
<strong>LinkStation</strong> <strong>Setup</strong> <strong>Manual</strong> 4
Chapter1 <strong>Setup</strong><br />
Diagrams and Layout<br />
The following list shows the name of each <strong>com</strong>ponent of the <strong>LinkStation</strong>.<br />
Front<br />
1<br />
2<br />
1 Status LED<br />
Blue light is ON: Power ON Blue light is OFF: Power OFF<br />
Amber light is flashing: The amber light flashes if there is<br />
a message. Flashing pattern varies depending<br />
on each message. For more information,<br />
please refer to "Status LED" on page 51.<br />
Red light is flashing: Red light flashes when an error occurs.<br />
Flashing pattern varies depending on each<br />
message. For more information, please refer to<br />
"Status LED" on page 51.<br />
2 Function switch<br />
This is used for the Direct Copy function (function to copy a<br />
media file which is stored in the storage device connected<br />
to a USB connector to <strong>LinkStation</strong>), for removing USB devices<br />
which is connected to the <strong>LinkStation</strong> or for initializing<br />
settings of the <strong>LinkStation</strong>. Refer to "Direct Copy" on page<br />
41, "To remove a USB device" on page 42, and "Initialization"<br />
on page 25 for more information.<br />
<strong>LinkStation</strong> <strong>Setup</strong> <strong>Manual</strong> 5
Chapter1 <strong>Setup</strong><br />
Back<br />
3<br />
4<br />
5<br />
6<br />
7 8<br />
5<br />
7 8<br />
3 Fan<br />
Do not block the fan when installing the unit.<br />
4 USB Connector (USB 2.0/1.1 Series A)<br />
A USB Mass Storage device, a card reader (except one that<br />
recognizes more than 2 memory cards), a UTP device, such<br />
as a digital camera, <strong>com</strong>patible UPS devices, or a <strong>com</strong>patible<br />
USB Printer, may be connected to the <strong>LinkStation</strong> USB port<br />
on the back of the unit. USB devices such as USB hub, mouse<br />
or keyboard may not be used.<br />
5 Power Switch AUTO: Power the <strong>LinkStation</strong> automatically<br />
when the PC is on.<br />
ON: Turn the <strong>LinkStation</strong> ON.<br />
OFF (The factory default): Turn the <strong>LinkStation</strong> OFF.<br />
6 LAN Port Connect a LAN cable.<br />
The LED next to the LAN port is the LINK/ACT LED. The LED<br />
will turn green when the unit is Linked, and flashes green<br />
when there is network activity.<br />
7 Power Connector Connect the supplied AC.<br />
When the AC adapter is connected, the LED light next to the<br />
power connector will turn green.<br />
8 Hook Used as a strain relief for AC Adapter cable..<br />
<strong>LinkStation</strong> <strong>Setup</strong> <strong>Manual</strong> 6
Chapter 2<br />
Using your <strong>LinkStation</strong><br />
Open Shared Folder<br />
1<br />
2<br />
3<br />
Launch NAS Navigator2.<br />
NOTE: On Windows, click [start] - [(All) Programs] - [BUFFALO] - [BUFFALO NAS Navigator] -<br />
[BUFFALO NAS Navigator2].<br />
- On Mac OS, double click on [NAS Navigator2] icon in the Dock.<br />
The shared folder of the <strong>LinkStation</strong> is displayed.<br />
Double click on the <strong>LinkStation</strong>'s icon.<br />
The example here shows the Windows' screen<br />
(on LS-XHL).<br />
NOTE: On Mac OS, <strong>LinkStation</strong> is mounted as a drive icon on the desktop, or displayed in the<br />
sidebar on the Finder.<br />
You can now use the <strong>LinkStation</strong>'s shared folder to save files just like another hard drive.<br />
<strong>LinkStation</strong> <strong>Setup</strong> <strong>Manual</strong> 7
Chapter2 Using your <strong>LinkStation</strong><br />
Open shared folder from the second PC<br />
You will not have to perform the setup (initial settings) again if you have already set up the <strong>LinkStation</strong><br />
from one <strong>com</strong>puter.<br />
You will have to install NAS Navigator2 on each additional <strong>com</strong>puter, to open the <strong>LinkStation</strong> shared<br />
folders.<br />
1<br />
2<br />
3<br />
4<br />
Insert the Utility CD to your <strong>com</strong>puter.<br />
LinkNavigator will launch.<br />
NOTE: - For Windows Vista, click [Lang.exe] when the auto-play screen is displayed. When the<br />
message "Windows needs your permission to continue", click "Continue".<br />
– For Mac OS, double click on the [LinkNavigator] icon in the utility CD.<br />
NOTE: If this screen does not launch automatically,<br />
Click [Options] - [Additional Software Installation].<br />
On Mac OS, click [Install NAS Navigator].<br />
double click on icon (LSNavi.exe) included on the Utility CD.<br />
Follow the instruction on the screen to install NAS Navigator 2.<br />
After NAS Navigator2 is installed, click on the right top of the LinkNavigator to close it.<br />
Then, open the shared folder of the <strong>LinkStation</strong> using NAS Navigator2 which was just installed.<br />
<strong>LinkStation</strong> <strong>Setup</strong> <strong>Manual</strong> 8
Chapter2 Using your <strong>LinkStation</strong><br />
5<br />
6<br />
7<br />
Launch NAS Navigator2.<br />
NOTE: On Windows, click [start] - [All Programs] - [BUFFALO] - [BUFFALO NAS Navigator] -<br />
[BUFFALO NAS Navigator2].<br />
- On Mac OS, double click on [NAS Navigator2] icon in the Dock.<br />
Follow the instruction on the screen to install NAS Navigator 2.<br />
The shared folder in the <strong>LinkStation</strong> is displayed.<br />
Double click on the <strong>LinkStation</strong>'s icon.<br />
NOTE: On Mac OS, <strong>LinkStation</strong> is mounted as a drive icon on the desktop, or displayed in the<br />
sidebar on the Finder.<br />
<strong>Setup</strong> is <strong>com</strong>pleted.<br />
You can now use the <strong>LinkStation</strong>'s shared folder to save files just like another hard drive.<br />
Adding the <strong>LinkStation</strong><br />
You will have to run the LinkNavigator for each <strong>LinkStation</strong>s that you add to your network. (You cannot<br />
set up multiple <strong>LinkStation</strong>s at the same time.)<br />
<strong>LinkStation</strong> <strong>Setup</strong> <strong>Manual</strong> 9
Chapter2 Using your <strong>LinkStation</strong><br />
Power Switch<br />
The <strong>LinkStation</strong>’s power can be automatically turned ON or OFF with your <strong>com</strong>puter. Install NAS<br />
Navigator2 on a <strong>com</strong>puter and set “Auto Power Management feature”.<br />
Auto:<br />
In this mode, <strong>LinkStation</strong> will automatically turn off when <strong>com</strong>puters with<br />
NAS Navigator2 installed turn off. The <strong>LinkStation</strong> will automatically power<br />
on when any of the <strong>com</strong>puters on the network power on. (The <strong>LinkStation</strong><br />
uses very low power consumption using this feature)<br />
ON:<br />
The <strong>LinkStation</strong> stays on, even when <strong>com</strong>puters are off.<br />
OFF:<br />
Turns <strong>LinkStation</strong> off. (Factory default)<br />
Note: Damage can occur to the <strong>LinkStation</strong> if the AC adapter is removed<br />
while in the ON position.<br />
NOTE: Some environment may not recognize “AUTO” or this unit may not synchronize with the<br />
<strong>com</strong>puter’s power behavior. When this occurs, switch it to “ON”.<br />
- It may take a while until the Power LED turns off after you turn off your <strong>com</strong>puter.<br />
- Set the Power switch to “ON” position when you set up the <strong>LinkStation</strong>. Otherwise (or when it is<br />
set to “AUTO”), the <strong>LinkStation</strong> may shutdown during the setup. After the initial setup, switch it<br />
to “AUTO” to synchronize with the power of your <strong>com</strong>puter.<br />
- If the <strong>LinkStation</strong> is off while using the power linking feature with PC due to a power outage<br />
or AC adapter is removed, switch the Power switch to ON and boot <strong>LinkStation</strong>. Put the Power<br />
Switch back to the “AUTO” position after <strong>LinkStation</strong> boot up, enabling the power linking feature<br />
with PC.<br />
- Keep in mind that immediately after the Power switch is switch to the “ON” or “AUTO” position,<br />
the <strong>LinkStation</strong> will not shut down for about 5 minutes while it checks the status of your <strong>com</strong>puter.<br />
<strong>LinkStation</strong> <strong>Setup</strong> <strong>Manual</strong> 10
Chapter2 Using your <strong>LinkStation</strong><br />
Web Administration Tool<br />
To display the <strong>LinkStation</strong> configuration screen, follow the procedure below.<br />
1<br />
2<br />
3<br />
Launch NAS Navigator2.<br />
NOTE: On Windows, click [start] - [All Programs] - [BUFFALO] - [BUFFALO NAS Navigator] -<br />
[BUFFALO NAS Navigator2].<br />
- On Mac OS, double click on [NAS Navigator2] icon in the Dock.<br />
Right click on the <strong>LinkStation</strong> icon (on Mac OS click<br />
the icon while holding down the control key), select<br />
[Open Web Admin] in the displayed menu.<br />
NOTE: When the total of more than 2 <strong>LinkStation</strong>s and<br />
TeraStations are connected on the same<br />
network, multiple icons will be displayed.<br />
Select the <strong>LinkStation</strong> you want to display.<br />
- When selecting the <strong>LinkStation</strong> icon, you<br />
can verify individual information of Link-<br />
Station such as IP address.<br />
Enter your user name and password, and click [Login].<br />
NOTE: To display the configuration screen, use the following<br />
user name and password.<br />
User name: admin<br />
Password: password<br />
After you login, change the password for security purposes.<br />
<strong>LinkStation</strong> <strong>Setup</strong> <strong>Manual</strong> 11
Chapter2 Using your <strong>LinkStation</strong><br />
4<br />
Now displaying the <strong>LinkStation</strong>'s configuration has been <strong>com</strong>pleted.<br />
NOTE: Compatible browsers for the configuration screen are Internet Explorer 6.0 Service Pack 2 or<br />
later, Firefox 1.5 or later, and Safari 3 or later.<br />
The configuration screen may not be displayed properly in any other browser which is not<br />
listed above.<br />
For Windows, install Internet Explorer 6.0 Service Pack 2 or later or Firefox 1.5 or later.<br />
For Mac OS X 10.3.9, install Firefox 1.5 or later.<br />
For Mac OS X 10.4, install Safari 3 or later, or Firefox 1.5 or later.<br />
NOTE: The configuration screen contains the following items.<br />
The configuration screen is displayed.<br />
NOTE: The current status of the <strong>LinkStation</strong> (a <strong>LinkStation</strong><br />
name, IP address, workgroup and hard<br />
disk information) is displayed.<br />
• Shared folders<br />
You can add/delete shared folders, set access restrictions,<br />
and configure for a direct copy.<br />
• Users/Groups<br />
Register and delete users/groups.<br />
• Networks<br />
Register and delete a network or workgroup.<br />
• Systems<br />
Perform Name, time, disk check format, backup, mail notification settings, timer ON/OFF,<br />
UPS synchronization settings, initialization, and <strong>com</strong>plete disk format.<br />
• Extension<br />
Configure for WebAccess, Print Server, and Time Machine.<br />
<strong>LinkStation</strong> <strong>Setup</strong> <strong>Manual</strong> 12
Chapter2 Using your <strong>LinkStation</strong><br />
Add a shared folder<br />
To add a shared folder, use the following procedure.<br />
NOTE: Refer to page 11 for the procedures to display the configuration screen.<br />
1<br />
2<br />
Now you have created a new shared folder.<br />
In the <strong>LinkStation</strong> configuration screen, click [Create<br />
Folder] in [Shared Folders].<br />
1) Set a shared folder name, attributes and other<br />
settings.<br />
NOTE: If you would like to copy the settings of an<br />
existing folder, select a source folder at<br />
[Copy Settings From].<br />
2) Click [Save].<br />
<strong>LinkStation</strong> <strong>Setup</strong> <strong>Manual</strong> 13
Chapter2 Using your <strong>LinkStation</strong><br />
To protect your data in a shared folder accidentally being deleted (Using Recycle Bin).<br />
You can configure a recycle bin for each folder on the configuration screen above (Not available<br />
for AppleTalk and FTP connections). It is just like a recycle bin on your OS. Deleted data in a shared<br />
folder will be temporarily moved to a [Recycle Bin] folder. To recover deleted data, open the [Recycle<br />
Bin] folder and move files.<br />
To set a shared folder to Read-only<br />
A shared folder will be<strong>com</strong>e Read-Only when you select the [Read Only] attribute of a shared folder<br />
in the Shared Folder Configuration screen and click [Save].<br />
NOTE: This is set to [Read & Write] by factory default.<br />
• A shared folder whose attribute is set to Read Only cannot be written by any users or<br />
groups who has a privilege to read and write, therefore this folder will be read only for all<br />
users.<br />
• A shared folder whose attribute is set to Read Only or a USB hard disk with NTFS/HFS+<br />
format, the message "(Read Only)” is added to the descriptions of that share folder.<br />
<strong>LinkStation</strong> <strong>Setup</strong> <strong>Manual</strong> 14
Chapter2 Using your <strong>LinkStation</strong><br />
Adding Users<br />
To add a user, use the following procedure.<br />
NOTE: Refer to page 11 for the procedures to display the configuration screen.<br />
1<br />
2<br />
Now you have <strong>com</strong>pleted adding a user.<br />
1) Click [Users/Groups] - [Local Users] on the<br />
<strong>LinkStation</strong> configuration screen.<br />
2) Click [Create User].<br />
1) Enter a name and descriptions of a user.<br />
2) Click [Save].<br />
<strong>LinkStation</strong> <strong>Setup</strong> <strong>Manual</strong> 15
Chapter2 Using your <strong>LinkStation</strong><br />
• Use the same user name and password for <strong>LinkStation</strong> as Window's network login. If these values<br />
are different, a shared folder which you have set access restrictions cannot be accessed.<br />
Also, you cannot access a shared folder even though the screen to enter a user name and password<br />
is displayed if the network login name is different on Windows Vista/XP/2000 and Windows Server<br />
2003/Server 2008. You must login to Windows using the user name and password set here.<br />
To confirm an owner, use the following procedure.<br />
• In properties screen of each file or folder, open a new window using [Security] tab - [Advanced Settings]<br />
button, and verify in the [Owner] tab.<br />
• Right click on the bar on which [Name], [Size], [Type], and [Date Modified] and other information<br />
regarding My Computer or Explorer are displayed, you can select information to be displayed.<br />
From the menu popped up by right clicking, you can verify [Owner].<br />
(The procedure to check an owner is different for each OS. The example above shows for Windows<br />
XP.)<br />
<strong>LinkStation</strong> <strong>Setup</strong> <strong>Manual</strong> 16
Chapter2 Using your <strong>LinkStation</strong><br />
Adding Groups<br />
To add a group, use the following procedure.<br />
NOTE: Refer to page 11 for the procedures to display the configuration screen.<br />
1<br />
2<br />
1) Click [Users/Groups] - [Local Groups] on the<br />
<strong>LinkStation</strong> configuration screen.<br />
2) Click [Create Group].<br />
1) Enter a group name and description for that<br />
group.<br />
NOTE: If a group ID is left blank, a group ID will<br />
be automatically assigned.<br />
2) Select users who join a group, click [Add].<br />
3) Click [Save].<br />
<strong>LinkStation</strong> <strong>Setup</strong> <strong>Manual</strong> 17
Chapter2 Using your <strong>LinkStation</strong><br />
Access Restrictions<br />
Use the following methods to restrict users on the <strong>LinkStation</strong>.<br />
Access restrictions for locally registered users<br />
Follow the procedures described on page 19.<br />
Access restrictions by using Delegate Authority server feature<br />
Follow the procedures described on page 21.<br />
NOTE: You can set access restrictions per shared folder, but you cannot set restrictions to folders in a<br />
shared folder.<br />
• User/Group permissions can not be set from the security tab on the properties screen of a folder<br />
when using a Windows SMB server.<br />
<strong>LinkStation</strong> <strong>Setup</strong> <strong>Manual</strong> 18
Chapter2 Using your <strong>LinkStation</strong><br />
Access restrictions for locally registered users<br />
You can set the access restrictions for shared folders by user name and group name for locally registered<br />
users.<br />
1 If you are using Windows, create a new Windows user account and set a password.<br />
You can create a user account and password for Windows in the [User Accounts] within Control Panel.<br />
If you do not want to create a new account, write down an account and password which has been<br />
already registered on Windows.<br />
2 Register a user and group for the <strong>LinkStation</strong>.<br />
1) Register a user name that will use the <strong>LinkStation</strong>.<br />
Follow the procedures described in "Adding Users" on page 15.<br />
2) Register a group name that will use the <strong>LinkStation</strong>.<br />
Follow the procedures described in "Adding Groups" on page 17.<br />
3 Set the access restrictions for shared folders.<br />
NOTE: Refer to page 11 for the procedures to display the configuration screen.<br />
1) In the <strong>LinkStation</strong> configuration screen, click [Shared Folders] - [Folder <strong>Setup</strong>].<br />
2)<br />
3)<br />
Click a shared folder you want to set access restrictions<br />
for.<br />
Click the checkbox for [Access Restrictions].<br />
<strong>LinkStation</strong> <strong>Setup</strong> <strong>Manual</strong> 19
Chapter2 Using your <strong>LinkStation</strong><br />
4)<br />
5)<br />
6)<br />
7) Click [Save].<br />
Now you have <strong>com</strong>pleted the settings for access restrictions.<br />
Click [Add].<br />
NOTE: The procedure described here shows an example<br />
of how to set the access restrictions<br />
for local users. To set the access restrictions<br />
for local group, click [Local Groups]-[Add].<br />
1) Click a user you want to permit to access, and insert<br />
a checkmark.<br />
NOTE: If you have selected [Local Groups] in Step 4,<br />
click the group you want to permit to access.<br />
2) Click [Add].<br />
Select privilege of the user or group you added.<br />
If you log on from a Microsoft Network Domain, you can set the access restrictions with the user<br />
names/group names which are registered on the domain.<br />
- If the read-only and writable privileges are both given to a specific user, that user will have readonly<br />
access.<br />
<strong>LinkStation</strong> <strong>Setup</strong> <strong>Manual</strong> 20
Chapter2 Using your <strong>LinkStation</strong><br />
Access restrictions by using the Delegate Authority server feature<br />
Follow the below procedure to permit access by administration all user accounts and passwords that<br />
access <strong>LinkStation</strong> using a delegate server.<br />
The network administrators or a person who has proper knowledge regarding Microsoft should<br />
<strong>com</strong>plete this procedure. Consult your network administrator for details.<br />
• Setting access permission per user/group from the properties screen security tab is not supported<br />
when using a SMB server.<br />
There are restrictions when administrating through delegate authority server. You must read restrictions<br />
below.<br />
• You cannot set access restrictions if you do not access the <strong>LinkStation</strong> while logged in to windows<br />
using the account information.<br />
• If you are not accessing the <strong>LinkStation</strong> while logging into Windows using the account information<br />
registered to the authentication server.<br />
• You cannot connect as a guest user via AFP if you use the delegate Authority option.<br />
• You cannot connect as anonymous via FTP id you use the Delegate Authority option.<br />
For Windows Vista, Windows Server 2003/Server 2008 Users<br />
When using Delegate Authority to External SMB server feature to restrict access, you need to change<br />
the security settings on Windows Vista, Windows Server 2003/Server 2008.<br />
Select [Start] - [Programs] - [BUFFALO] - [File Sharing Security Level Change Tool] - [File Sharing Security<br />
Level Change Tool], and then select [Change security level] to change the security settings (Select<br />
"Recover default security level" change it back to the previous setting).<br />
NOTE: "File Sharing Security Level Change Tool" can be installed only on Windows Vista using the CD<br />
included.<br />
- During the initial setup, the message, "Start changing file sharing security level. Will you<br />
continue?" will be displayed. If you click [Yes], follow the instructions on the screen and<br />
restart your PC .<br />
<strong>LinkStation</strong> <strong>Setup</strong> <strong>Manual</strong> 21
Chapter2 Using your <strong>LinkStation</strong><br />
1<br />
2<br />
3<br />
1) Click [Network] - [Workgroup] on the <strong>LinkStation</strong><br />
configuration screen.<br />
2) Click [Modify Settings].<br />
1) Enter the workgroup name.<br />
NOTE: If you specify the Windows Domain Controller<br />
as an external SMB authentication<br />
server, you need to match the workgroup<br />
of this unit to the Windows Domain Controller<br />
name.<br />
2) Select [Delegate Authority to External SMB<br />
Server].<br />
1) Enter the name or IP address of an authentication<br />
server.<br />
NOTE: When connecting using AFP and FTP, always<br />
use an IP address. It may not be<br />
authenticated if a server name is used.<br />
2) Click [Use Windows Domain Controller as Authentication<br />
Server] and [Automatic User Registration]<br />
to insert check marks.<br />
3) Click [Enable Authentication Shared Folder]<br />
to insert the check mark, and enter the shared<br />
folder name for the authentication test.<br />
4) Click [Save].<br />
<strong>LinkStation</strong> <strong>Setup</strong> <strong>Manual</strong> 22
Chapter2 Using your <strong>LinkStation</strong><br />
4 You can restrict the access to the shared folder by the user name selected.<br />
A user that has been registered to the specified authentication server will be automatically registered<br />
as a <strong>LinkStation</strong>'s user when he/she opens the shared folder for authentication (you can also<br />
register users directly).<br />
- A user who is automatically registered will belong to the "hdusers" group. They can be set to belong<br />
to any group from the Group settings.<br />
- You can restrict the access to the shared folder by the user name obtained.<br />
- Names of users who are registered are listed in the [Users/Groups] - [External Users]. To delete a<br />
user, select a user and click [Delete].<br />
- When connecting using AFP and FTP, always use an IP address. It may not be authenticated if a<br />
server name is used.<br />
- Enter the IP address when specifying a server in other segment (such as the network over the router).<br />
- AFP connection and FTP connection does not allow to obtain user information by delegating authority<br />
to external SMB server.<br />
Now you have <strong>com</strong>pleted the settings for the Authentication Server.<br />
<strong>LinkStation</strong> <strong>Setup</strong> <strong>Manual</strong> 23
Chapter2 Using your <strong>LinkStation</strong><br />
Admin Password<br />
Configure the administrator's password of the <strong>LinkStation</strong>.<br />
NOTE: Refer to page 11 for the procedures to display the configuration screen.<br />
1<br />
2<br />
3<br />
Click [Users/Groups] - [Local Users] on the <strong>LinkStation</strong><br />
configuration screen.<br />
Select [admin] and click [Edit User].<br />
1) Enter a password twice for confirmation.<br />
2) Click [Save].<br />
NOTE: The administrator's user name, "admin" cannot be changed.<br />
- You cannot set the access restriction and WebAccess feature by specifying the administrator's<br />
user name, "admin". Use the user name "admin" as a user name to login the <strong>LinkStation</strong><br />
configuration screen.<br />
Now you have <strong>com</strong>pleted the settings for the administrator's password.<br />
<strong>LinkStation</strong> <strong>Setup</strong> <strong>Manual</strong> 24
Chapter2 Using your <strong>LinkStation</strong><br />
Initialization<br />
To restore the configuration of the <strong>LinkStation</strong>, follow the procedures below.<br />
1<br />
2<br />
3<br />
Place the power switch to ON position while holding down the function switch. The blue<br />
function switch will flash (for 1 minute).<br />
While the function switch is flashing blue press the function switch again. The status LED will<br />
start flashing (blue). The status LED is flashing in amber when starting the initialization process.<br />
NOTE: It will take 2-3 minutes until the initialization begins.<br />
When the status LED which flashes turns to the illuminated blue, the initialization process has<br />
been <strong>com</strong>pleted.<br />
NOTE: When the <strong>LinkStation</strong> is initialized, the IP address, the Ethernet frame size settings, and<br />
the administrator (admin) password is set to factory defaults. If you choose not to<br />
initialize the administrator's password on the configuration screen, only the IP address<br />
and the Ethernet frame size setting is reset. You can initialize other items on<br />
the <strong>LinkStation</strong> configuration screen.<br />
- If you do not want to initialize the administrator (admin) 's password even though<br />
you initialize the <strong>LinkStation</strong>, select [Keep current admin password] in the<br />
[System]-[Restore/Format] - [Restore Factory Defaults] screen, and click [Apply].<br />
- If you have configured not to initialize the administrator's (admin) password during<br />
initializing process, you can no longer configure the <strong>LinkStation</strong> if you forget<br />
the password. Write your password down and never forget it.<br />
- To set up the <strong>LinkStation</strong> again, you need to initialize the <strong>LinkStation</strong> from the configuration<br />
screen again. At this time, you must select [Restore admin password to<br />
factory defaults] first and then click [Restore <strong>LinkStation</strong>].<br />
Now initialization of the <strong>LinkStation</strong>'s configuration has been <strong>com</strong>pleted.<br />
<strong>LinkStation</strong> <strong>Setup</strong> <strong>Manual</strong> 25
Chapter2 Using your <strong>LinkStation</strong><br />
Initialization on the configuration screen<br />
On the <strong>LinkStation</strong> configuration screen, you can initialize following settings in addition to the initialized<br />
items described above.<br />
NOTE: The following settings will be initialized;<br />
<strong>LinkStation</strong> name, Description, NTP settings, Workgroup settings, Shared service settings,<br />
the access restrictions of the shared folder, User settings, User group, mail notification feature<br />
settings, UPS synchronization settings, Backup Settings, Administrator's password, Print<br />
server function, WebAccess feature, Language settings, Timer ON/OFF, HDD spin down, Media<br />
server, BitTorrent, and Time Machine.<br />
1<br />
2<br />
3<br />
4<br />
Click [Restore <strong>LinkStation</strong>].<br />
The [Confirm Operation] screen will be displayed.<br />
Enter the exact same number as shown in the [Confirmation Number] field within 60 seconds,<br />
and click [Apply].<br />
Follow the instructions displayed on the screen.<br />
Now the initialization on the configuration screen has been <strong>com</strong>pleted.<br />
Click [System]-[Restore/Format] on the <strong>LinkStation</strong><br />
configuration screen.<br />
<strong>LinkStation</strong> <strong>Setup</strong> <strong>Manual</strong> 26
Chapter 3<br />
Useful Functions<br />
WebAccess<br />
About WebAccess Feature<br />
This feature allows you to access files in a shared folder on the <strong>LinkStation</strong> via the Internet (you can<br />
access the <strong>LinkStation</strong> from any where to play your music, display pictures, or download/upload<br />
data). You can set the access restrictions on the <strong>LinkStation</strong> per shared folder that you want visible<br />
from other <strong>com</strong>puters.<br />
<strong>LinkStation</strong> is also equipped with auto settings feature for routers via UPnP and redirect feature by<br />
using the buffalonas.<strong>com</strong> server (similar to Dynamic DNS).<br />
WebAccess configuration procedure<br />
NOTE: Refer to page 11 for the procedures to display the configuration screen.<br />
1<br />
2<br />
1) Click [Extensions].<br />
2) Click [WebAccess].<br />
Click the shared folder to be published.<br />
<strong>LinkStation</strong> <strong>Setup</strong> <strong>Manual</strong> 27
Chapter 3 Useful Functions<br />
3<br />
4<br />
1) Select share you want to set access restriction<br />
from [WebAccess Settings].<br />
• Disable: Shared folders will not be published.<br />
• Allow Anonymous: Anyone can access (view)<br />
shared folders.<br />
• Allow All Group / Users: Only <strong>LinkStation</strong> registered<br />
groups/users can access (view).<br />
• Use Inherited Folder Permissions: Use shared<br />
folders access restrictions set from shares<br />
management screen. If access restrictions<br />
are not set in the shared folder management<br />
screen, this option is not displayed.<br />
2) Click [Save].<br />
NOTE: Please note that, depending on settings,<br />
files in a shared folder will be visible on the Internet<br />
without access restrictions.<br />
Click [Save].<br />
<strong>LinkStation</strong> <strong>Setup</strong> <strong>Manual</strong> 28
Chapter 3 Useful Functions<br />
5<br />
NOTE: If you want to transmit data more secure by using SSL encryption, insert a checkmark [HTTPS/<br />
SSL Encryption]. The security alert message will be displayed at this time, proceed with<br />
operation.<br />
• To use the generic DNS service instead of using BuffaloNAS.<strong>com</strong>, enter the host name in<br />
[DNS Hostname].<br />
• If configuring manually without using UPnP, enter the external port of a router side. Port<br />
9000 of the <strong>LinkStation</strong> is default and is used to allow access from the router side the<br />
<strong>LinkStation</strong> (The port on the <strong>LinkStation</strong> side is set to 9000).<br />
• If the <strong>LinkStation</strong> is left unconnected from the Internet a certain period of time, its name<br />
registration will be deleted on the BuffaloNAS.<strong>com</strong> server.<br />
Now you have <strong>com</strong>pleted the settings for the WebAccess feature.<br />
1) Select [Enable].<br />
2) Click [Use BuffaloNAS.<strong>com</strong>] to insert a checkmark.<br />
3) Enter the <strong>LinkStation</strong> name to be published in<br />
[BuffaloNAS.<strong>com</strong> Name].<br />
NOTE: This is the name to enter when accessing<br />
BuffaloNAS.<strong>com</strong>. It does not have to be<br />
the same name as the actual <strong>LinkStation</strong>.<br />
4) Enter the password to save and use the name<br />
in [BuffaloNAS.<strong>com</strong> Key].<br />
5) Click [Auto-Configure Firewall (UPnP)] to insert<br />
a checkmark.<br />
NOTE: This does not work unless the router's UPnP<br />
is enabled.<br />
6) Click [Save].<br />
<strong>LinkStation</strong> <strong>Setup</strong> <strong>Manual</strong> 29
Chapter 3 Useful Functions<br />
Procedure to access (view) published folder set by the WebAccess feature<br />
1<br />
2<br />
Open the following URL in an Internet browser.<br />
(BuffaloNAS.<strong>com</strong>) http://buffalonas.<strong>com</strong>/<br />
To access BuffaloNAS.<strong>com</strong> from iPhone/iPod touch:<br />
1 Tap Safari from "Home" screen, and connect to the Internet.<br />
2 Tap the address bar on top of the "Safari" screen.<br />
3 Enter "http://buffalonas.<strong>com</strong>/" in the address bar, and select "Go".<br />
• The screen shots for step 2 and later screen shots are examples from a PC. The screens<br />
will look different from the actual iPhone/iPod screens.<br />
• You cannot play video files or music files for which DRM is set by using this feature.<br />
• You cannot play video files or music files that are saved in the WebAccess folders where<br />
access restrictions are set.<br />
• You cannot download files saved to iPhone/iPod touch by using this feature (the video<br />
file and music file will be streaming, and the picture files are displayed in the browser).<br />
• The <strong>com</strong>patibility of playing the video files and music files depends on the specifications<br />
of Safari and QuickTime installed on the iPhone/iPod.<br />
• To create a video file which is playable on the iPhone, use off-the-shelf software to convert<br />
to playable formats for the iPhone or iPod touch.<br />
• It does not support uploading files, changing file names, or deleting files.<br />
• iPhone and iPod are trademarks of Apple Inc., registered in the U.S. and other countries.<br />
Enter BuffaloNAS.<strong>com</strong> name which is set in the<br />
WebAccess Service configuration on the <strong>LinkStation</strong>,<br />
and click [Connect].<br />
<strong>LinkStation</strong> <strong>Setup</strong> <strong>Manual</strong> 30
Chapter 3 Useful Functions<br />
3<br />
To view without using BuffaloNAS.<strong>com</strong>, open the following URL on the Internet browser.<br />
http://global IP address of the <strong>LinkStation</strong>:9000/<br />
(For SSL, use https://global IP address of the <strong>LinkStation</strong>:9000/)<br />
On the Internet browser, you can view folder or<br />
files on the <strong>LinkStation</strong> that are published.<br />
NOTE: To verify the IP address of your <strong>LinkStation</strong>, see the configuration screen of your router. Refer<br />
to your router's manual for the procedure of how to verify the IP address.<br />
Now you can access (view) a shared folder of the <strong>LinkStation</strong> which is published.<br />
<strong>LinkStation</strong> <strong>Setup</strong> <strong>Manual</strong> 31
Chapter 3 Useful Functions<br />
The file or folder name will be highlighted when you click on it. Right click on [Link to this file],<br />
and select [Copy Shortcut]. It will copy the address link and can be accessed directly from the<br />
outside. Use this feature when you want to give out this address link. From the right-click menu,<br />
select [Add to Favorites] to bookmark address link.<br />
5 Mail link to this file Send the address link by e-mail.<br />
The file or folder name will be highlighted when you click on it. Click [Mail link to this file] in the<br />
highlighted area, and your mail software will launch with the link address included in the mail<br />
body to this file which is accessible from the outside. Use this feature when you want to distribute<br />
this address link by e-mail.<br />
6 Create FolderCreate a folder.<br />
Click [Create Folder], and then the following screen will be displayed. Enter a folder name to create<br />
in [Folder Name], and click [Create]. The new folder will be created.<br />
• You can use up to 80 characters for a folder name and file name, regardless of full or half bytes<br />
characters (including the extension).<br />
7 Upload Upload files.<br />
Clicking [Upload] will display the following screen. Click [Browse] in the upload files area, and select<br />
a file to be uploaded. Clicking [Upload] will start uploading data you have selected.<br />
Clicking [Upload Files] will display the following screen.<br />
<strong>LinkStation</strong> <strong>Setup</strong> <strong>Manual</strong> 33
Chapter 3 Useful Functions<br />
Select files you want to upload in [Append files], and click [Start upload].<br />
The following conditions that Buffalo has verified to work will apply to upload.<br />
• Up to 2GB in file size<br />
• Up to 100 files per upload<br />
You cannot upload a file if the same file name already exists on the destination.<br />
Delete the file with the identical name in the destination before uploading the new file.<br />
NOTE: About the Preview feature<br />
If a graphic data type file is selected, the word [Preview] is displayed next to the file name. Clicking<br />
[Preview] will display the preview of the selected file on the browser.<br />
Click at the bottom of the image to finish displaying the preview.<br />
Move the mouse cursor on the right top of the preview image, and will be displayed (this will<br />
not be displayed if there is no additional graphic files). Clicking will display the next graphic<br />
data for a preview.<br />
Move the mouse cursor on the left top of the preview image, and will be displayed (this will<br />
not be displayed if there is no previous graphic file). Clicking will display the previous graphic<br />
data for a preview.<br />
<strong>LinkStation</strong> <strong>Setup</strong> <strong>Manual</strong> 34
Chapter 3 Useful Functions<br />
BitTorrent Client<br />
About BitTorrent<br />
BitTorrent is the file sharing protocol and a file sharing software (P2P software) protocol, and uses<br />
P2P (peer-to-peer) networking.<br />
The differences from other traditional file sharing software and this software are:<br />
• You can download files faster since files are distributed on the network and network traffic to file<br />
location will not be concentrated even with a large file.<br />
• It does not keep anonymity, and it is easily known who publishes what files.<br />
NOTE: It is prohibited to use any copyrighted movies and audio files without permission from the<br />
owner.<br />
Chapter 3 Useful Functions<br />
Enabling BitTorrent feature and selecting folders<br />
NOTE: Refer to page 11 for the procedures to display the configuration screen.<br />
1<br />
2<br />
3<br />
4<br />
1) Click [Extensions] - [BitTorrent] on the configuration<br />
screen of the <strong>LinkStation</strong>.<br />
2) Click [Modify Settings].<br />
1) Click [Enable].<br />
2) From the folders for downloads, Select a<br />
shared folder where the files downloaded with<br />
BitTorrent.<br />
3) Click [Save].<br />
Click [Open Download Manager].<br />
The Download Manager screen will be displayed.<br />
There are two methods downloading; Downloading<br />
by adding Torrent information from a URL or<br />
from a file.<br />
<strong>LinkStation</strong> <strong>Setup</strong> <strong>Manual</strong> 36
Chapter 3 Useful Functions<br />
How to download Torrent Information by URL<br />
1<br />
2<br />
3<br />
4<br />
Click [Add Torrent From URL].<br />
1 Enter the URL which has Torrent Information in<br />
the frame at the left of [Add].<br />
2 Click [Add].<br />
NOTE: Torrent Information can be download from BitTorrent Inc.'s website or personal websites.<br />
Follow the terms of use and copyright rules for Torrent Information described in<br />
each website.<br />
Now you have downloaded Torrent Information by adding it from URL.<br />
When the message [Torrent URL has been sent.] is<br />
displayed, click [Okay].<br />
Downloading to the destination folder will begin.<br />
When progress reaches 100%, the download is<br />
<strong>com</strong>pleted.<br />
<strong>LinkStation</strong> <strong>Setup</strong> <strong>Manual</strong> 37
Chapter 3 Useful Functions<br />
How to download Torrent Information by adding it from a file<br />
1<br />
2<br />
3<br />
4<br />
Click [Add Torrent From File].<br />
NOTE: Torrent Information can be download from BitTorrent Inc.'s website or personal websites.<br />
Follow the terms of use and copyright rules for Torrent Information described<br />
for each website.<br />
Downloading to the destination folder will begin.<br />
Now you have downloaded Torrent Information by adding from a file.<br />
1) Click [Browse...] and select Torrent file saved<br />
on the <strong>LinkStation</strong> or your <strong>com</strong>puter.<br />
2) Click [Add].<br />
When progress reaches 100%, the download is<br />
<strong>com</strong>pleted.<br />
<strong>LinkStation</strong> <strong>Setup</strong> <strong>Manual</strong> 38
Chapter 3 Useful Functions<br />
What you can do in the download screen<br />
1<br />
2<br />
3<br />
4<br />
5<br />
6<br />
Click a queue name and click [Stop], this stops downloading.<br />
Click [Start], it resumes downloading.<br />
Click a queue name and click [Remove], the file will be deleted.<br />
Torrent information will be searched in http://<strong>www</strong>.bittorrent.<strong>com</strong>/.Enter a word to search in the<br />
top right of the download screen and click [Search]. The search result will be displayed in a separate<br />
window.<br />
The order of the download queue can be changed by each item. The displayed order can be<br />
switched by clicking following items.<br />
[Name ][Size] [Progress] [Download] [Upload] [ETA]<br />
Click [Settings] to display the configuration screen of BitTorrent.<br />
<strong>LinkStation</strong> <strong>Setup</strong> <strong>Manual</strong> 39
Chapter 3 Useful Functions<br />
What you can do in the configuration screen<br />
1 Port Settings<br />
Changes a port to use for BitTorrent <strong>com</strong>munication. The <strong>LinkStation</strong> is connected to a router, the<br />
port of the router will be automatically set by using UPnP.<br />
To set the port manually without using UPnP, enter the port number (the default setting is "Default<br />
(6881) on any port number on the <strong>LinkStation</strong> side.<br />
2 Bandwidth Management<br />
If this is set to [Automatic], Transmission bandwidth of BitTorrent will be automatically set. If this<br />
is set to [<strong>Manual</strong>], you can specify a maximum bandwidth for download, upload, and seeds. The<br />
default setting is [Automatic].<br />
3 Seeding setting<br />
Set the seed period for a file which is finished downloading.<br />
NOTE: Seeds are defined as a part of the downloading file that is published on other <strong>com</strong>puters.<br />
[Seed until removed] will continue to seed until Torrent information is deleted.<br />
[Stop seeding when ratio reaches] will stop seeding when the upload percentage (a percentage<br />
of the number of byte downloaded against the number of byte uploaded) is achieved to the predefined<br />
value (%).<br />
[Stop seeding after] stop seeding automatically after the pre-defined time (in minute) has been<br />
reached.<br />
The default setting is [Seed until removed].<br />
<strong>LinkStation</strong> <strong>Setup</strong> <strong>Manual</strong> 40
Chapter 3 Useful Functions<br />
Direct Copy<br />
When you use the Direct Copy feature, you can connect a USB device to the <strong>LinkStation</strong> port to copy<br />
movie, music, and image data directly to the <strong>LinkStation</strong> without using <strong>com</strong>puters.<br />
You can connect a USB mass storage class, a card reader (except for a card reader that can recognize<br />
more than 2 memory cards), a UTP device such as digital camera, UPS device which clearly express<br />
<strong>com</strong>patible devices, and a USB printer to the USB connector of the <strong>LinkStation</strong>. You cannot connect<br />
any other USB devices (such as a USB hub, mouse, keyboards and so on).<br />
1 Connect a USB device (USB flash/digital camera/hard disk/card reader) to the <strong>LinkStation</strong>.<br />
The following restrictions apply if a USB device does not fall<br />
into the USB Mass Storage class.<br />
•After a USB device is recognized, the function switch turns<br />
blue (for about 60 seconds).<br />
•You will be able to access the USB device after Blue function<br />
switch goes out.<br />
2 Data is copied from a USB device to the Direct Copy folder after you connect a USB device<br />
and push the function switch on the <strong>LinkStation</strong> while the function switch is flashing blue (for<br />
about 60 seconds).<br />
NOTE: While copying, the functions switch will flash blue. Pushing the function switch one<br />
more time at this time will abort the Direct Copy.<br />
The destination shared folder is set to a [share] folder as default.<br />
Select a different shared from [Shared Folders] - [Direct Copy] - [Modify Settings] on the configuration<br />
screen of a <strong>LinkStation</strong> and click [save]. Then you can change the shared folder's<br />
destination folder.<br />
<strong>LinkStation</strong> <strong>Setup</strong> <strong>Manual</strong> 41
Chapter 3 Useful Functions<br />
Time Machine<br />
If you use Time Machine feature which is the back up method from Apple and is supported on Mac<br />
OS X 1.5 or later, use the following procedure.<br />
NOTE: Refer to page 11 for the procedures to display the configuration screen.<br />
1<br />
2<br />
3<br />
Click [AFP] on [Network] - [Settings] - [Network Service].<br />
Select [Enable] and click [Save].<br />
1) Click [Shared Folders].<br />
2) Click a shared folder you want to set as a backup<br />
destination on Time Machine feature.<br />
<strong>LinkStation</strong> <strong>Setup</strong> <strong>Manual</strong> 43
Chapter 3 Useful Functions<br />
4<br />
5<br />
6<br />
7<br />
1 Select [Apple].<br />
2 Click [Save].<br />
1 Click [Extensions] - [Time Machine].<br />
2 Click [Modify Settings].<br />
1 Select [Enable].<br />
2 Select a shared folder of the <strong>LinkStation</strong> you<br />
have set on step 3-4 from applicable shared<br />
folders.<br />
3 Click [Save].<br />
1 Enter a host name of Macintosh which uses the<br />
Time Machine feature.<br />
2 Enter the MAC address of Macintosh which uses<br />
the Time Machine feature.<br />
3 Click [Create].<br />
<strong>LinkStation</strong> <strong>Setup</strong> <strong>Manual</strong> 44
Chapter 3 Useful Functions<br />
8<br />
9<br />
10<br />
11<br />
Select [System Preferences] from Apple Menu of Mac OS X 10.5.<br />
Click [Time Machine].<br />
Click [Choose Backup Disk].<br />
Select <strong>LinkStation</strong>, and click [Use for Backup].<br />
<strong>LinkStation</strong> <strong>Setup</strong> <strong>Manual</strong> 46
Chapter 3 Useful Functions<br />
12<br />
13<br />
Enter a user name and password to access the shared<br />
folder of the <strong>LinkStation</strong>, click [Connect].<br />
If you do not use access restrictions for the shared folder of the <strong>LinkStation</strong> you set as a backup<br />
destination, enter "admin" in the user name box and your password for "admin" in the<br />
password. If you use the access restrictions feature. enter a user name and password that has<br />
the read and write access right.<br />
Now you have <strong>com</strong>pleted to backup using Time Machine.<br />
Make sure that the switch of Time Machine is "ON".<br />
The number of seconds displayed in [Next Backup]<br />
will be counted down, and a backup job will starts<br />
when it hits zero.<br />
A backup job will be done in background, so you can<br />
operate and shutdown Mac OS as usual.<br />
If you want to recover data or set items you want to<br />
exclude from a backup job, refer to Mac OS Help.<br />
<strong>LinkStation</strong> <strong>Setup</strong> <strong>Manual</strong> 47
Chapter 3 Useful Functions<br />
• The examples of multiple timers are set are as following.<br />
(e.g.1) Currently the timer set on Wednesday 10:00 is working:<br />
Timer 1 Everyday 12:00 - 24:00<br />
Timer 2 not used<br />
Timer 3 not used<br />
• Nothing happens on 12:00 and it moves to Standby mode on 24:00<br />
(e.g.2) Currently the timer set on Wednesday 10:00 is working:<br />
Timer 1 Everyday 9:00 - 18:00<br />
Timer 2 Day specified Wednesday 10:00 - 20:00<br />
Timer 3 not used<br />
• Other than on Wednesdays, it starts to work on 9:00 and moves to Standby mode on 18:00.<br />
On Wednesdays, it moves to Standby mode on 20:00.<br />
(e.g.3) Currently the timer set on Wednesday 10:00 is working:<br />
Timer 1 Everyday 9:00 - 18:00<br />
Timer 2 Day specified Wednesday 10:00 - 25:00<br />
Timer 3 not used<br />
• Other than on Wednesdays, it starts to work on 9:00 and moves to Standby mode on 18:00.<br />
• Other than on Wednesdays, it moves to Standby mode on 1:00 of a next day.<br />
(e.g.4) Currently the timer set on Wednesday 10:00 is working:<br />
Timer 1 Everyday 9:00 - 18:00<br />
Timer 2 Day specified Wednesday 07:30:00 - 22:00:00<br />
Timer 3 not used<br />
• Other than on Wednesdays, it moves to Standby mode on 18:00.<br />
• It starts working on 7:30 of Wednesday, and it moves to Standby mode on 22:00 of a next<br />
day.<br />
During a Standby mode, pressing the <strong>LinkStation</strong>'s function button or move the power switch to<br />
AUTO will cause the status change to the Standby mode to power ON.<br />
Now you have <strong>com</strong>pleted the Timer settings.<br />
<strong>LinkStation</strong> <strong>Setup</strong> <strong>Manual</strong> 49