Field Loading Procedures Drill Pipe Cutters - Jet Research Center
Field Loading Procedures Drill Pipe Cutters - Jet Research Center
Field Loading Procedures Drill Pipe Cutters - Jet Research Center

Create successful ePaper yourself
Turn your PDF publications into a flip-book with our unique Google optimized e-Paper software.
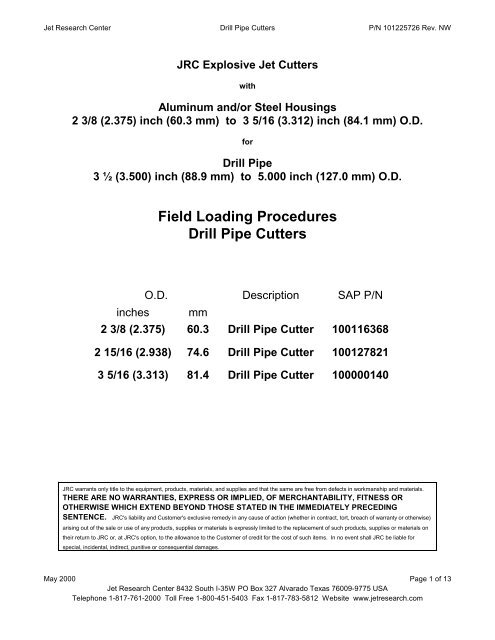
<strong>Jet</strong> <strong>Research</strong> <strong>Center</strong> <strong>Drill</strong> <strong>Pipe</strong> <strong>Cutters</strong> P/N 101225726 Rev. NW<br />
JRC Explosive <strong>Jet</strong> <strong>Cutters</strong><br />
with<br />
Aluminum and/or Steel Housings<br />
2 3/8 (2.375) inch (60.3 mm) to 3 5/16 (3.312) inch (84.1 mm) O.D.<br />
for<br />
<strong>Drill</strong> <strong>Pipe</strong><br />
3 ½ (3.500) inch (88.9 mm) to 5.000 inch (127.0 mm) O.D.<br />
<strong>Field</strong> <strong>Loading</strong> <strong>Procedures</strong><br />
<strong>Drill</strong> <strong>Pipe</strong> <strong>Cutters</strong><br />
O.D. Description SAP P/N<br />
inches mm<br />
2 3/8 (2.375) 60.3 <strong>Drill</strong> <strong>Pipe</strong> Cutter 100116368<br />
2 15/16 (2.938) 74.6 <strong>Drill</strong> <strong>Pipe</strong> Cutter 100127821<br />
3 5/16 (3.313) 81.4 <strong>Drill</strong> <strong>Pipe</strong> Cutter 100000140<br />
JRC warrants only title to the equipment, products, materials, and supplies and that the same are free from defects in workmanship and materials.<br />
THERE ARE NO WARRANTIES, EXPRESS OR IMPLIED, OF MERCHANTABILITY, FITNESS OR<br />
OTHERWISE WHICH EXTEND BEYOND THOSE STATED IN THE IMMEDIATELY PRECEDING<br />
SENTENCE. JRC's liability and Customer's exclusive remedy in any cause of action (whether in contract, tort, breach of warranty or otherwise)<br />
arising out of the sale or use of any products, supplies or materials is expressly limited to the replacement of such products, supplies or materials on<br />
their return to JRC or, at JRC's option, to the allowance to the Customer of credit for the cost of such items. In no event shall JRC be liable for<br />
special, incidental, indirect, punitive or consequential damages.<br />
May 2000 Page 1 of 13<br />
<strong>Jet</strong> <strong>Research</strong> <strong>Center</strong> 8432 South I-35W PO Box 327 Alvarado Texas 76009-9775 USA<br />
Telephone 1-817-761-2000 Toll Free 1-800-451-5403 Fax 1-817-783-5812 Website www.jetresearch.com
<strong>Jet</strong> <strong>Research</strong> <strong>Center</strong> <strong>Drill</strong> <strong>Pipe</strong> <strong>Cutters</strong> P/N 101225726 Rev. NW<br />
Contents<br />
1. Safety Warning ...................................................................................... ..........3<br />
2. Description, Specifications and Recommendations ................................ .…......4<br />
3. <strong>Field</strong> Assembly and Arming <strong>Procedures</strong> with Electric Detonators……. .. ....…...6<br />
4. Disarming and Disassembly <strong>Procedures</strong> with Electric Detonators………..….…9<br />
5. Parts Lists, Specification Table and Drawings…………...... .................... .........10<br />
Ordering Information…………………………………………………………….10<br />
Parts List………………………………………………………………………….11<br />
Specification Table………………………………………………………………12<br />
Drawings Figure 1, <strong>Drill</strong> <strong>Pipe</strong> Cutter Electrical and Detonator Assembly..13<br />
Figure 2, <strong>Drill</strong> <strong>Pipe</strong> Cutter Final Assembly………………...…….13<br />
May 2000 Page 2 of 13<br />
<strong>Jet</strong> <strong>Research</strong> <strong>Center</strong> 8432 South I-35W PO Box 327 Alvarado Texas 76009-9775 USA<br />
Telephone 1-817-761-2000 Toll Free 1-800-451-5403 Fax 1-817-783-5812 Website www.jetresearch.com
<strong>Jet</strong> <strong>Research</strong> <strong>Center</strong> <strong>Drill</strong> <strong>Pipe</strong> <strong>Cutters</strong> P/N 101225726 Rev. NW<br />
1. Safety Warning<br />
The JRC explosive jet cutters contain explosive compounds which are designed to<br />
explode when they receive, intentionally or unintentionally, stimuli capable of bringing<br />
the explosive compounds to detonation. As a result the cutters are capable of causing<br />
extensive bodily injury or death.<br />
Do not attempt to use this product unless you have received training in the handling and<br />
use of oilfield explosive products.<br />
Refer to and apply the procedures listed in the Recommended Practices for Oilfield<br />
Explosives Safety; API Recommended Practice 67 (RP67) and your company’s<br />
operations and safety procedures before assembling or using this product.<br />
The following assembly procedures for drill pipe cutters must be explicitly followed,<br />
without attempts to shortcut, alter, switch, or otherwise deviate in any way; or use<br />
alternate parts from those supplied by <strong>Jet</strong> <strong>Research</strong> <strong>Center</strong> for such assembly.<br />
Failure to follow the assembly instructions can result in extensive bodily injury and<br />
death.<br />
The assembly and arming of the cutters should only take place at the job site where<br />
they are to be used and immediately prior to running the cutter into the pipe. If there is<br />
any delay the device should be disarmed and safely stored.<br />
Before beginning operations a stray voltage and current survey must be performed<br />
between the perforating unit to ground, the rig to ground and wellhead to ground, and<br />
any other structures to ground in the immediate work area. The voltages and currents<br />
measured must be below the acceptable limits. Providing the measurements are below<br />
the acceptable limits, grounding lines must be connected between the perforating unit,<br />
rig, wellhead and any other structures and ground.<br />
The term ‘SAFE’ when used in this document is to referring to a combination of actions<br />
that are designed to render the initiating system incapable of sending power to the<br />
electric detonator. These actions typically involve the shorting of the mono conductor<br />
wireline conductor to ground via a power resistor (for multiconductor the conductors are<br />
connected to one another and ground via power resistors); a key system which<br />
prevents the initiating system from connecting power to the electric wireline; and<br />
disconnecting power to the initiating system. The key is held outside the unit and visible<br />
until the explosive assembly is safely 200 feet (70 m) below ground level or the sea<br />
bed; or the cutter and detonator have been removed and returned to storage.<br />
The term ’Radio Silence’ is used to refer to the combination of actions which involves<br />
the shutting down of radio frequency transmissions within 1000 feet (305 m); the<br />
shutting down and isolating of electric welding equipment and active cathodic<br />
protection.<br />
May 2000 Page 3 of 13<br />
<strong>Jet</strong> <strong>Research</strong> <strong>Center</strong> 8432 South I-35W PO Box 327 Alvarado Texas 76009-9775 USA<br />
Telephone 1-817-761-2000 Toll Free 1-800-451-5403 Fax 1-817-783-5812 Website www.jetresearch.com
<strong>Jet</strong> <strong>Research</strong> <strong>Center</strong> <strong>Drill</strong> <strong>Pipe</strong> <strong>Cutters</strong> P/N 101225726 Rev. NW<br />
Do not handle explosives when electric storms (thunder and/or lightening) are in the<br />
immediate area. Do not handle explosives in a sandstorm or similar situation that can<br />
result in the build up of static electric charges.<br />
2. Description, Specifications and Recommendations<br />
JRC’s explosive jet drill pipe cutters are designed to cut drill pipe under a variety of<br />
conditions. The drill pipe cutters can be run on electric wireline; wireline-in-coiled tubing;<br />
slickline; pipe or coiled tubing. Be sure to follow all the safety practices associated with<br />
the conveyance method and detonation method used to run the drill pipe cutter. This<br />
procedure addresses the initiation of the drill pipe cutters using electric detonators. The<br />
drill pipe cutters can be adapted for use with JRC TCP firing heads using adapter<br />
100014468 (item 4a) and the parts and procedures in manual 100157156 (993.71036)<br />
1 11/16 Inch O.D. PAFH (Pressure Activated Firing Head) and any other relevant firing<br />
head procedures.<br />
To achieve maximum performance JRC recommends the following. (All the<br />
recommendations may not apply to any one application and may not cover all aspects<br />
of the operation).<br />
For every application, choose the largest diameter cutter that can be run in the drill<br />
pipe. The named size of each cutter indicates its outside diameter, O.D.<br />
Centralize the cutter in the drill pipe where possible, especially when running smaller<br />
diameter cutters because of restrictions in the pipe.<br />
Run a gauge run prior to running the drill pipe cutter. This helps to ensure that the<br />
cutter can reach the required depth and it will not be necessary to return a live cutter to<br />
surface. The tool used for the gauge run; dummy cutter, gauge cutter, gauge ring etc.<br />
should be of similar length and the same diameter or slightly larger than the diameter of<br />
the cutter.<br />
The gauge run also reduces the chance of getting a live cutter stuck in the pipe.<br />
Avoid hitting obstructions in the pipe with the cutter. Do not run the cutter into an<br />
obstruction or restriction in an attempt to pass: often referred to as spudding. Never<br />
spud with an explosive tool.<br />
The running-in-hole speed will often be determined by the small clearance between the<br />
cutter and the pipe and the viscosity of the fluid. Do not over-run the cutter with the<br />
wireline. Slow down to pass restrictions and tools in the pipe string. Slow down at the<br />
fluid level.<br />
Shoot drill pipe cutters in the body of a joint of drill pipe. Do not shoot in the connection<br />
or upset, the cutter will not cut the pipe. When cutting drill pipe inside casing cut near a<br />
connection in the drill pipe to take advantage of the standoff between the drill pipe and<br />
the casing to minimize the chance of damage to the casing string.<br />
May 2000 Page 4 of 13<br />
<strong>Jet</strong> <strong>Research</strong> <strong>Center</strong> 8432 South I-35W PO Box 327 Alvarado Texas 76009-9775 USA<br />
Telephone 1-817-761-2000 Toll Free 1-800-451-5403 Fax 1-817-783-5812 Website www.jetresearch.com
<strong>Jet</strong> <strong>Research</strong> <strong>Center</strong> <strong>Drill</strong> <strong>Pipe</strong> <strong>Cutters</strong> P/N 101225726 Rev. NW<br />
The actual depth of the cut relative to a connection will depend upon the next<br />
operations to be performed in the well. It is the client’s decision as to where to cut the<br />
pipe.<br />
Do not shoot a cutter in a size of drill pipe larger than the pipe it is designed for, the<br />
cutter will not cut the drill pipe.<br />
Where possible have the same pressure and weight of fluid inside and outside the drill<br />
pipe to be cut. Large pressure differences can result in the tool string being lost or stuck<br />
after cutting. If necessary shoot some circulation holes to equalize pressures and/or to<br />
circulate the fluids to equalize the pressures before cutting the drill pipe.<br />
If the cutter fails to cut on the first attempt check that the drill pipe is free at the cut<br />
depth. Do not shoot a second cutter at the same depth. The cutter is unlikely to cut on<br />
the second attempt at the same depth because damage to the drill pipe is likely to have<br />
moved the pipe wall beyond the limit of the cutting jet. Shoot a second attempt about 3<br />
feet (1 m) above or below the first attempt depending on how this will influence the next<br />
operations in the well.<br />
The drill pipe cutters are designed to cut with minimal flaring of the drill pipe. The<br />
amount of flare is a function of the pipe, cutter and well conditions. Shooting with low<br />
pressure or gas behind the pipe will result in the most significant flare. The larger<br />
cutters for each pipe size will generally result in a cleaner cut with little flare.<br />
Applying tension to the pipe is generally going to result in a cleaner cut and increase<br />
the chance of making a cut when using an undersized cutter and/or decentralized<br />
cutter, or freeing a partially stuck pipe. In most situations it is not necessary to apply<br />
tension to the pipe to obtain a cut, but, where possible, the pipe weight should be<br />
picked-up so that the pipe is at neutral weight or tension at the cut depth when the cut<br />
is make.<br />
The JRC drill pipe cutters made with HMX explosive have an operating temperature<br />
range up to 400ºF (204ºC) for one hour. Pressure ratings for the drill pipe cutters range<br />
from 8,000 PSI (55 MPa) to 20,000 PSI (138 MPa). See the specification table for the<br />
rating of each cutter. For the Time v Temperature chart for explosive compounds refer<br />
to the JRC catalog or website. For special applications and cutter designs contact JRC.<br />
The JRC drill pipe cutters have Aluminum and/or steel housings. The O.D. of the cutter<br />
after detonation will be slightly larger than when it was originally but the increase in the<br />
diameter should not result in retrieval problems in the pipe sizes for which the cutter<br />
was designed.<br />
The JRC drill pipe cutters can utilize an optional shock absorbing extension mandrel<br />
which minimizes damage to other tools in the tool string. The unique shock grooves<br />
absorb the detonation shock waves transmitted up the tool. The extension mandrel is<br />
recommended when shooting cutters with more than 20 grams of explosive load and in<br />
all cases when delicate tooling is being ran above the cutter. When shooting cutters<br />
with over 100 grams of explosive consider using two extension mandrels.<br />
May 2000 Page 5 of 13<br />
<strong>Jet</strong> <strong>Research</strong> <strong>Center</strong> 8432 South I-35W PO Box 327 Alvarado Texas 76009-9775 USA<br />
Telephone 1-817-761-2000 Toll Free 1-800-451-5403 Fax 1-817-783-5812 Website www.jetresearch.com
<strong>Jet</strong> <strong>Research</strong> <strong>Center</strong> <strong>Drill</strong> <strong>Pipe</strong> <strong>Cutters</strong> P/N 101225726 Rev. NW<br />
The JRC drill pipe cutters utilize safety arming procedures, using resistorized detonator<br />
assemblies and safety assembly equipment. An o-ring secures the detonator ground<br />
wire into a groove on the mandrel, ensuring the detonator is properly grounded. A shunt<br />
plug keeps the system shunted during assembly as the detonator shunt wire is<br />
removed. A protective holder encompasses the detonator, shielding the worker while<br />
the electrical connection is made to the CCL. The drill pipe use resistorized detonators,<br />
minimizing the chance of an accidental firing.<br />
The JRC drill pipe cutters can also be initiated using a Top Fire version of the<br />
RED(Rig Environment Detonator) detonator which further minimizes hazards. A<br />
different adapter is required to adapt the Top Fire RED detonator to the drill pipe<br />
cutters.<br />
JRC’s drill pipe cutters connect to the wireline through a 1.50 inch (38.1 m/m) O.D.<br />
firing head which has a ‘GO’ 1 3/16 – 12UN box at the top.<br />
Information on the explosives shipping classification and UN numbers is included in the<br />
specification table. For more detailed shipping information contact JRC customer<br />
service.<br />
The shelf life of the drill pipe cutters can be regarded as 5 years, providing the cutters<br />
are stored in original packaging and have not been subjected to moisture. After this<br />
period the cutters should be disposed of as explosive items. At 5 years the cutters are<br />
not significantly more or less sensitive than when new; they still contain explosive and<br />
all safety procedures still apply.<br />
Specifications for the drill pipe cutters are listed in a table on page 12.<br />
3. <strong>Field</strong> Assembly and Arming <strong>Procedures</strong> with Electric Detonators<br />
JRC’s drill pipe cutters use a 49 to 61 ohm high temperature resistorized detonator<br />
which reduces the possibility of accidental firing by stray current and provides a broader<br />
operating range and an additional safety factor. All previously established safety rules<br />
and regulations should be followed.<br />
JRC’s drill pipe cutters can also be run with the Top Fire Rig Environment Detonator<br />
(RED) detonator to further minimize hazards. A different adapter is required to run the<br />
Top Fire RED detonator with the drill pipe cutters.<br />
1. This field assembly procedure applies to JRC’s drill pipe cutters. Be sure you have read<br />
and thoroughly understand all safety and assembly procedures before beginning any<br />
assembly. Ensure all required materials are identified and on hand before proceeding<br />
but keep the explosive items in safe storage until after the checks and ensure that the<br />
wireline has been put into ‘SAFE’; and ‘Radio Silence’ and all other safety procedures<br />
are in place before handling the explosive components. Do not attempt to disassemble<br />
any drill pipe cutter charge assembly (item 5).<br />
May 2000 Page 6 of 13<br />
<strong>Jet</strong> <strong>Research</strong> <strong>Center</strong> 8432 South I-35W PO Box 327 Alvarado Texas 76009-9775 USA<br />
Telephone 1-817-761-2000 Toll Free 1-800-451-5403 Fax 1-817-783-5812 Website www.jetresearch.com
<strong>Jet</strong> <strong>Research</strong> <strong>Center</strong> <strong>Drill</strong> <strong>Pipe</strong> <strong>Cutters</strong> P/N 101225726 Rev. NW<br />
2. Refer to Figures 1 and 2.<br />
3. Check the insulation and continuity of the firing head (item 1) and the extension<br />
mandrel (item 2)<br />
4. Check o-rings (item 6, size 214), making sure there are no cuts, nicks or scratches;<br />
install and replace where necessary. Lubricate o-rings and male threads only with a thin<br />
film coating of clean downhole grease.<br />
5. Make up the firing head assembly to the extension mandrel, if used. (The extension<br />
mandrel is used to protect the running tools from the detonation shock. It is<br />
recommended to run the extension mandrel when running cutters with explosive<br />
weights of 20 grams of larger or when there are tools above which may be damaged by<br />
the shock. Consider using two extension mandrels when running cutters with 100<br />
grams, or more, of explosive).<br />
6. Make up the firing head and extension mandrel to the running tools, making sure the<br />
firing head or CCL is made up to the electric wireline cable. Check fire and CCL<br />
function. Correct all problems before proceeding and recheck until correct.<br />
7. Ensure that cable is in the ‘SAFE’ position. Ensure a stray voltage and current survey<br />
has been performed and grounding lines are attached. Ensure ’Radio Silence’ is in<br />
place. Clear the assembly and arming area of none essential personnel.<br />
8. Check the firing circuit for the presence of stray voltage with a blasters multimeter (item<br />
9) in the volts position, between the lower contact and the body of the extension<br />
mandrel; first in the DC and then in the AC voltage position. Ensure that no voltage is<br />
present between the conductor and ground.<br />
9. Remove the firing head and extension mandrel from the tool string. Install the shunt<br />
plug (item 7) into the top of the firing head.<br />
10. Attach the detonator assembly (item 3) to the end of the extension mandrel by pushing<br />
the boot of the detonator assembly onto the end of the extension mandrel. Wrap the<br />
ground wire clockwise, looking from the lower end, into the o-ring groove above the<br />
boot. Push the o-ring (the o-ring size 020 is included with the detonator assembly) up<br />
into the groove ensuring that the end and approximately 2 inches (50 mm) of ground<br />
wire is pressed between the o-ring and the mandrel.<br />
11. Remove the tape and/or label and the temporary shunt wire from the detonator<br />
assembly.<br />
12. Install the appropriate adapter (item 4) for the detonator assembly being used.<br />
13. Make up the protective holder (item 8) hand tight, to the adapter, extension mandrel<br />
and detonator assembly. Wrench tighten the firing head, extension mandrel and<br />
adapter. The shunt plug and protective holder remain hand tight.<br />
May 2000 Page 7 of 13<br />
<strong>Jet</strong> <strong>Research</strong> <strong>Center</strong> 8432 South I-35W PO Box 327 Alvarado Texas 76009-9775 USA<br />
Telephone 1-817-761-2000 Toll Free 1-800-451-5403 Fax 1-817-783-5812 Website www.jetresearch.com
<strong>Jet</strong> <strong>Research</strong> <strong>Center</strong> <strong>Drill</strong> <strong>Pipe</strong> <strong>Cutters</strong> P/N 101225726 Rev. NW<br />
14. Remove the shunt plug.<br />
15. Check the firing head, extension mandrel detonator assembly and adapter for electrical<br />
continuity between the top contact and the body of the firing head using a blasters<br />
multimeter in the 200 ohm position. The meter should read the resistance of the<br />
detonator assembly, typically between 49 and 61 ohms for the resistorized detonator.<br />
16. With the protective holder still in position, make up the firing head, extension mandrel,<br />
detonator, adapter and protective holder assembly to the tool string wrench tight. The<br />
detonator is now connected to the firing circuit. The firing circuit must remain in ‘SAFE’<br />
and ‘Radio Silence’ remain in force until the cutter is typically 200 feet (70 m) below<br />
ground level on land or 200 feet (70 m) below the seabed offshore; or the detonator has<br />
been removed from the wireline and all explosive components have been correctly<br />
stored.<br />
17. Refer to Figure 2.<br />
18. Remove the plastic cap or plug from the drill pipe cutter charge assembly (item 5).<br />
19. Remove the protective holder from the adapter, extension mandrel and detonator<br />
assembly.<br />
20. Make up the drill pipe cutter charge assembly to the adapter, extension mandrel and<br />
detonator assembly and tighten with a strap wrench. Do not use metal wrenches on the<br />
outside diameter of the drill pipe cutter.<br />
21. Measure and record the distance from the center of the drill pipe cutter charge<br />
assembly to the measure point of the tool string; typically the CCL. Also record the part<br />
numbers and date codes of the explosive components used in the assembly.<br />
22. The cutter assembly is now ready to be ran into the pipe. The safety procedures must<br />
be maintained until the assembly has been ran below ground level: typically 200 feet<br />
(70 m) below ground on land or 200 feet (70 m) below the seabed offshore.<br />
23. After attempting to make the cut; even if there are good indications that the cutter<br />
functioned; it is still necessary to go back into ‘SAFE’ and ‘Radio Silence’ when coming<br />
out of the hole while still 200 feet (70 m) below ground level on land or 200 feet (70 m)<br />
below the seabed offshore. Check that the grounding lines are still in place and clear<br />
the disarming and disassembly area of non-essential personnel. The safety precautions<br />
must remain in force until the explosives responsible person has seen that the cutter<br />
functioned and has confirmed that the cutter is no longer a potential explosive hazard. If<br />
the cutter did not function it must be disassembled and disarmed before the safety<br />
procedures are lifted. The disarming and disassembly procedure follows.<br />
4. Disarming and Disassembly <strong>Procedures</strong> with Electric Detonators<br />
In the event of having to disarm and disassemble the drill pipe cutter use the following<br />
procedure.<br />
May 2000 Page 8 of 13<br />
<strong>Jet</strong> <strong>Research</strong> <strong>Center</strong> 8432 South I-35W PO Box 327 Alvarado Texas 76009-9775 USA<br />
Telephone 1-817-761-2000 Toll Free 1-800-451-5403 Fax 1-817-783-5812 Website www.jetresearch.com
<strong>Jet</strong> <strong>Research</strong> <strong>Center</strong> <strong>Drill</strong> <strong>Pipe</strong> <strong>Cutters</strong> P/N 101225726 Rev. NW<br />
If the drill pipe cutter was ran in the well but was unable to detonate it is imperative to<br />
use these procedures to remove the cutter and detonator assembly before attempting<br />
to perform any investigation and testing to find the problem.<br />
If the drill pipe cutter is ran into a well and returned to surface without detonating JRC<br />
normally recommends the replacement of all explosive components and o-ring seals.<br />
JRC always recommends the replacement of all explosive components and o-ring seals<br />
if the assembly has been exposed to temperatures and pressures significantly higher<br />
than ambient. Do not attempt to disassemble any drill pipe cutter charge assembly<br />
(item 5).<br />
a) The same safety procedures applied while assembling and arming the cutter apply for<br />
disarming and disassembly. While the cutter is still deeper than 200 feet (70 m) below<br />
the ground level on land or 200 feet (70 m) below the seabed offshore; ensure that<br />
cable is in the ‘SAFE’ position; grounding lines are attached; ‘Radio Silence’ is in place;<br />
and that the disassembly and disarming area is clear of non-essential personnel.<br />
b) Refer to figures 1 and 2.<br />
c) Remove the drill pipe cutter charge assembly (item 5) from the adapter (item 4), while<br />
monitoring the disassembly for indications of trapped pressure. Be aware of potential<br />
trapped pressure on this and other connections.<br />
d) Install the protective holder (item 8) over the adapter, extension mandrel (item 2) and<br />
detonator assembly (item 3).<br />
e) Install the plastic cap or plug (supplied with the cutter) into the drill pipe cutter charge<br />
assembly and lay safely aside while disarming the detonator.<br />
f) Disconnect the firing head and extension mandrel, with detonator assembly, adapter<br />
and protective holder attached, from the tool string and install the shunt plug (item 7)<br />
into the top of the firing head.<br />
g) Remove the protective holder and adapter from the extension mandrel and detonator<br />
assembly and reinstall a shunt connection to the detonator assembly.<br />
h) Disassemble the detonator assembly from the extension mandrel.<br />
i) Return the detonator with associated labeling to its original packaging and label<br />
appropriately for further use or disposal and store appropriately.<br />
j) Return the drill pipe cutter charge assembly to its original packaging with appropriate<br />
labeling and store appropriately.<br />
May 2000 Page 9 of 13<br />
<strong>Jet</strong> <strong>Research</strong> <strong>Center</strong> 8432 South I-35W PO Box 327 Alvarado Texas 76009-9775 USA<br />
Telephone 1-817-761-2000 Toll Free 1-800-451-5403 Fax 1-817-783-5812 Website www.jetresearch.com
<strong>Jet</strong> <strong>Research</strong> <strong>Center</strong> <strong>Drill</strong> <strong>Pipe</strong> <strong>Cutters</strong> P/N 101225726 Rev. NW<br />
5. Parts List, Specifications and Assembly Drawings<br />
When ordering JRC’s drill pipe cutters use the SAP part numbers. (The IMS part<br />
numbers were replaced by SAP part numbers in 1999. The IMS part numbers are<br />
included here for reference. Some documents refer to the IMS part numbers. Most JRC<br />
explosive product labels have both the SAP and IMS part numbers on the label). To<br />
order a drill pipe cutter it is necessary to order:<br />
Size of drill pipe cutter charge assembly required (item 5),<br />
Detonator required (item 3),<br />
Detonator adapter appropriate for the detonator being used (item 4),<br />
Extension mandrel (item 2) and quantity required,<br />
Along with the firing head (item 1) o-rings (item 6 size 214) shunt plug (item 7)<br />
protective holder (item 8) blasters multimeter (item 9) and <strong>Field</strong> <strong>Loading</strong> Procedure, <strong>Drill</strong><br />
<strong>Pipe</strong> <strong>Cutters</strong> (item 10, this document); if they are not already available.<br />
The firing head can generally be rerun a number of times. The firing head should be<br />
disassembled, cleaned, inspected and redressed with new seals. Check the electrical<br />
insulation and continuity.<br />
The explosive assemblies, adapters, extension mandrels and o-rings are all single use<br />
items.<br />
All the drill pipe cutters use the same firing head, extension mandrel, adapter (to match<br />
the detonator), o-rings, shunt plug and protective holder.<br />
May 2000 Page 10 of 13<br />
<strong>Jet</strong> <strong>Research</strong> <strong>Center</strong> 8432 South I-35W PO Box 327 Alvarado Texas 76009-9775 USA<br />
Telephone 1-817-761-2000 Toll Free 1-800-451-5403 Fax 1-817-783-5812 Website www.jetresearch.com
<strong>Jet</strong> <strong>Research</strong> <strong>Center</strong> <strong>Drill</strong> <strong>Pipe</strong> <strong>Cutters</strong> P/N 101225726 Rev. NW<br />
<strong>Drill</strong> <strong>Pipe</strong> <strong>Cutters</strong> Assembly Parts List<br />
(Refer to Figures 1 and 2)<br />
Item Description SAP P/N IMS P/N Qty<br />
1 Firing Head Assembly 1.50 inch O.D. 100000434 .40525 1<br />
2 Extension Mandrel Assembly 1.50 inch<br />
O.D.<br />
100008258 995.50072 1<br />
3a Detonator Assembly Resistorized HT<br />
(EB161) HNS 475° F for 1 hr.<br />
100000432 .40409 1<br />
3b Detonator assembly RED Top Fire, HMX 100008052 995.55093<br />
375° F for 1 hr<br />
4a Adapter for resistorized detonator assy<br />
(item 3a)<br />
100014468 995.50071 1<br />
4b Adapter for RED Top Fire detonator assy<br />
(item 3b)<br />
100157571 995.19003<br />
5a 2 3/8 (2.375) inch (60.3 mm) O.D.<br />
<strong>Drill</strong> <strong>Pipe</strong> Cutter Charge Assembly HMX<br />
100116368 .30455 1<br />
5b 2 15/16 (2.938) inch (74.6 mm) O.D.<br />
<strong>Drill</strong> <strong>Pipe</strong> Cutter Charge Assembly HMX<br />
100127821 .94151<br />
5c 3 5/16 (3.313) inch (84.1 mm) O.D.<br />
<strong>Drill</strong> <strong>Pipe</strong> Cutter Charge Assembly HMX<br />
100000140 .18774<br />
Spare o-rings for firing head, extension mandrel and adapter, one for each.<br />
6a O-ring 214 Nitrile 90 Duro 100001949 70.33958<br />
6b O-ring 214 Viton 95 Duro 100003922 600.33958<br />
Required assembly items<br />
7 Shunt Plug, 1 3/16" – 12UN ‘GO’ Pin 100010861 .40526 1<br />
8 Protective Holder (for 1.50 Inch Firing<br />
Head)<br />
100010862 .40528 1<br />
9 Blasters Multimeter 100009455 .05187 1<br />
10 <strong>Field</strong> <strong>Loading</strong> Procedure, <strong>Drill</strong> <strong>Pipe</strong> <strong>Cutters</strong> 101225726 (995.81008) 1<br />
Items 9 and 10 are not shown in the figures.<br />
May 2000 Page 11 of 13<br />
<strong>Jet</strong> <strong>Research</strong> <strong>Center</strong> 8432 South I-35W PO Box 327 Alvarado Texas 76009-9775 USA<br />
Telephone 1-817-761-2000 Toll Free 1-800-451-5403 Fax 1-817-783-5812 Website www.jetresearch.com
<strong>Jet</strong> <strong>Research</strong> <strong>Center</strong> <strong>Drill</strong> <strong>Pipe</strong> <strong>Cutters</strong> P/N 101225726 Rev. NW<br />
Description Mat SAP P/N<br />
( IMS P/N)<br />
2 3/8 (2.375) inch<br />
(60.3 mm) O.D.<br />
<strong>Drill</strong> <strong>Pipe</strong> Cutter<br />
2 15/16 (2.938) inch<br />
(74.6 mm) O.D<br />
<strong>Drill</strong> <strong>Pipe</strong> Cutter<br />
3 5/16 (3.313) inch<br />
(84.1 mm) O.D.<br />
<strong>Drill</strong> <strong>Pipe</strong> Cutter<br />
A 100116368<br />
( .30455)<br />
A 100127821<br />
( .94151)<br />
A 100000140<br />
( .18774)<br />
Specifications <strong>Drill</strong> <strong>Pipe</strong> <strong>Cutters</strong>.<br />
Exp<br />
Class<br />
UN No.<br />
1.4S<br />
UN0441<br />
1.1D<br />
UN0059<br />
1.1D<br />
UN0059<br />
Explosive<br />
weight<br />
Grams<br />
Recommended<br />
Usage<br />
HMX 22.0 3 ½ (3.500) inch (88.9 mm)<br />
O.D. 0.449 inch (11.4 mm)<br />
Wall P-105 <strong>Drill</strong> <strong>Pipe</strong> 15<br />
lb/ft (22.3 Kg/m)<br />
HMX 47.4 4 ½ ( 4.500) inch (114.3<br />
mm) 0.337 inch (8.6 mm)<br />
Wall <strong>Drill</strong> <strong>Pipe</strong> 15 lb/ft (22.3<br />
Kg/m)<br />
HMX 61.0 4 ½ (4.500) inch (114.3<br />
mm) 0.430 inch (10.9 mm)<br />
Wall <strong>Drill</strong> <strong>Pipe</strong> 20 lb/ft<br />
(29.8 Kg/m)<br />
5.000 inch (127.0 mm)<br />
0.362 inch (9.2 mm) Wall<br />
<strong>Drill</strong> <strong>Pipe</strong> 19.5 lb/ft (29.0<br />
Kg/m)<br />
Housing Materials: S = Steel S/A = Steel and Aluminum A = Aluminum<br />
Pressure<br />
Rating<br />
20,000 PSI<br />
138 MPa<br />
16,000 PSI<br />
110 MPa<br />
12,000 PSI<br />
83 MPa<br />
May 2000 Page 12 of 13<br />
<strong>Jet</strong> <strong>Research</strong> <strong>Center</strong> 8432 South I-35W PO Box 327 Alvarado Texas 76009-9775 USA<br />
Telephone 1-817-761-2000 Toll Free 1-800-451-5403 Fax 1-817-783-5812 Website www.jetresearch.com<br />
Temp<br />
Rating<br />
for one<br />
Hr<br />
400º F<br />
204º C<br />
400º F<br />
204º C<br />
400º F<br />
204º C
<strong>Jet</strong> <strong>Research</strong> <strong>Center</strong> <strong>Drill</strong> <strong>Pipe</strong> <strong>Cutters</strong> P/N 101225726 Rev. NW<br />
May 2000 Page 13 of 13<br />
<strong>Jet</strong> <strong>Research</strong> <strong>Center</strong> 8432 South I-35W PO Box 327 Alvarado Texas 76009-9775 USA<br />
Telephone 1-817-761-2000 Toll Free 1-800-451-5403 Fax 1-817-783-5812 Website www.jetresearch.com