Simcheck A300 Starting Procedures - SimCheck Software
Simcheck A300 Starting Procedures - SimCheck Software
Simcheck A300 Starting Procedures - SimCheck Software

Create successful ePaper yourself
Turn your PDF publications into a flip-book with our unique Google optimized e-Paper software.
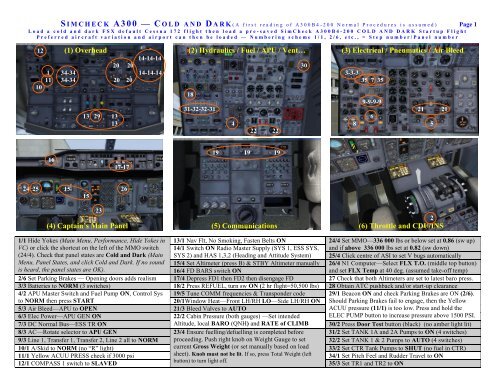
S I M C H E C K A 3 0 0 — C O L D A N D D A R K ( A f i r s t r e a d i n g o f A 3 0 0 B 4 - 2 0 0 N o r m a l P r o c e d u r e s i s a s s u m e d ) Page 1<br />
L o a d a c o l d a n d d a r k F S X d e f a u l t C e s s n a 1 7 2 f l i g h t t h e n l o a d a p r e - s a v e d S i m C h e c k A 300B4- 200 C O L D A N D D A R K S t a r t u p F l i g h t<br />
P r e f e r r e d a i r c r a f t v a r i a t i o n a n d a i r p o r t c a n t h e n b e l o a d e d — N u m b e r i n g s c h e m e 1 / 1 , 2 / 6 , e t c . , = S t e p n u m b e r / P a n e l n u m b e r<br />
12 (1) Overhead (2) Hydraulics / Fuel / APU / Vent… (3) Electrical / Pneumatics / Air Bleed<br />
14-14-14<br />
20 20 30<br />
1 34-34 14-14-14 3-3-3<br />
11 34-34 20 20 35 7 35<br />
10<br />
18<br />
9-9-9-9<br />
31-32-32-31 21 21<br />
13 29 13 6<br />
13 4 8 5<br />
22 22<br />
16<br />
17-17<br />
24 25 15 26<br />
15<br />
23<br />
19 19 19<br />
2<br />
(4) Captain’s Main Panel (5) Communications (6) Throttle and CDU/INS<br />
1/1 Hide Yokes (Main Menu, Performance, Hide Yokes in 13/1 Nav Flt, No Smoking, Fasten Belts ON 24/4 Set MMO—336 000 lbs or below set at 0.86 (sw up)<br />
VC) or click the shortcut on the left of the MMO switch 14/1 Switch ON Radio Master Supply (SYS 1, ESS SYS, and if above 336 000 lbs set at 0.82 (sw down)<br />
(24/4). Check that panel states are Cold and Dark (Main SYS 2) and HAS 1,3,2 (Heading and Attitude System) 25/4 Click centre of ASI to set V bugs automatically<br />
Menu, Panel States, and click Cold and Dark. If no sound 15/4 Set Altimeter (press B) & STBY Altimeter manually 26/4 N1 Computer—Select FLX T.O. (middle top button)<br />
is heard, the panel states are OK).<br />
16/4 FD BARS switch ON<br />
and set FLX Temp at 40 deg. (assumed take-off temp)<br />
2/6 Set Parking Brakes — Opening doors adds realism 17/4 Depress FD1 then FD2 then disengage FD 27 Check that both Altimeters are set to latest baro press.<br />
3/3 Batteries to NORM (3 switches) 18/2 Press REFUEL, turn sw ON (2 hr flight=50,500 lbs) 28 Obtain ATC pushback and/or start-up clearance<br />
4/2 APU Master Switch and Fuel Pump ON, Control Sys 19/5 Tune COMM frequencies & Transponder code 29/1 Beacon ON and check Parking Brakes are ON (2/6).<br />
to NORM then press START<br />
20/1Window Heat—Front LH/RH LO—Side LH/RH ON Should Parking Brakes fail to engage, then the Yellow<br />
5/3 Air Bleed—APU to OPEN 21/3 Bleed Valves to AUTO<br />
ACUU pressure (11/1) is too low. Press and hold the<br />
6/3 Elec Power—APU GEN ON 22/2 Cabin Pressure (both gauges) —Set intended ELEC PUMP button to increase pressure above 1500 PSI.<br />
7/3 DC Normal Bus—ESS TR ON Altitude, local BARO (QNH) and RATE of CLIMB 30/2 Press Door Test button (black) (no amber light lit)<br />
8/3 AC—Rotate selector to APU GEN 23/4 Ensure fuelling/defuelling is completed before 31/2 Set TANK 1A and 2A Pumps to ON (4 switches)<br />
9/3 Line 1, Transfer 1, Transfer 2, Line 2 all to NORM proceeding. Push right knob on Weight Gauge to set 32/2 Set TANK 1 & 2 Pumps to AUTO (4 switches)<br />
10/1 A/Skid to NORM (no “R” light)<br />
11/1 Yellow ACUU PRESS check if 3000 psi<br />
12/1 COMPASS 1 switch to SLAVED<br />
current Gross Weight (or set manually based on load<br />
sheet). Knob must not be lit. If so, press Total Weight (left<br />
button) to turn light off.<br />
33/2 Set CTR Tank Pumps to SHUT (no fuel in CTR)<br />
34/1 Set Pitch Feel and Rudder Travel to ON<br />
35/3 Set TR1 and TR2 to ON
(1) Overhead (2) Hydraulics / Fuel / APU / Vent… (3) Electrical / Pneumatics / Air Bleed<br />
52<br />
36 38 38<br />
45 45<br />
45 45 39<br />
42 42<br />
53 49 44-44 41 41 41 43<br />
46 46 46 46<br />
56<br />
55 55 37<br />
60 50<br />
54 47 40<br />
59 58 57 37 51<br />
(4) Captain’s Main Panel (5) Communications (6) Throttle and CDU/INS<br />
ENGINE START PUSHBACK—Use 1 or 2 to turn the aircraft tail 57/4 Set Autobrakes to MAX<br />
36/1 Set Start Arm switch to ARM, turn Eng Start switch LEFT (1) or RIGHT (2) then apply Parking Brakes 58/4 Press Recall button on MWP to ensure no lights are<br />
to START A or B, pull ENG 2 Start Button<br />
47/4 Press Recall on master warning panel (3rd from left). ON then press TO INHI (just left of Recall) to prevent<br />
37/6 When ENG 2 N2 is 20% turn ON ENG Fuel. Repeat Check there is no Warning Light except Parking Brakes unimportant messages distracting the pilot during take-off<br />
STEPS 36 and 37 to start ENG 1 48/6 Set Flaps and Slats for T/O, i.e., SLATS 8/FLAPS 0 TAKE OFF<br />
On the Overhead Panel (1) set Start Arm switch back to 49/1 Turn Taxi light (Nose Take-off) ON � Apply Brakes—Increase throttles to approx 80% N1<br />
Start Abort and turn Eng Start rotary switch to Crank 50/6 During Taxi phase, ARM Speed Brakes (click lower � Release Brakes and press TOGA (59/4)<br />
38/1 Set Nacelle Anti Ice to OPEN check Valve Disagree part of Speed Brake Lever or Shift-/)<br />
� Below 100kts, apply slight forward yoke pressure<br />
light goes on then off. Then set to CLOSE if not required 51/6 Also during Taxi phase, Press TO CONFIG TEST. � At V2 (yellow bug) start Rotating gradually from 3� to<br />
39/1 Set WING DE ICE as required only once airborne<br />
40/6 Set Pitch Trim in accordance with T/O data or UP2.8<br />
If Config Alarm sounds and red Config light goes ON on<br />
MWP, check Slat/Flap, Pitch Trim or Speed Brake setting<br />
15� nose up<br />
� When Positive Rate of Climb is reached, retract GEAR<br />
41/3 Set APU GEN to OFF, GEN1 and GEN 2 to ON 52/2 Check Brake Temp. If required, turn Brake Fan ON and set gear lever to Neutral position<br />
42/3 Set both PACK VALVES to AUTO 53/1 Once lined up, turn ON Landing lights and Strobes � Adjust pitch to maintain V2+10 to V2+20 (18� nose up)<br />
43/3 Set APU BLEED to CLOSE RESET 54/4 Check HSI heading and recheck Speed, Heading � Disarm Ground Spoilers (Speed Brakes—50/6)<br />
44/2 Set APU Master Switch & Fuel Pump to OFF and Altitude settings on AFCS (46/4)<br />
� At 1700ft set CR thrust 60/4 (bottom-right button on<br />
45/1 Set both Yaw Damper and Pitch Trim to ON 55/5 Transponder to TA, TCAS range to 5 or 10mn and N1 Computer) and maintain V2+10/20 (18� nose up)<br />
46/4 On the AFCS (Auto Flight Control System) set right-bottom switch to ABOVE (not simulated)<br />
initial CRS, SPEED, HEADING, and ALTITUDE 56/4 ARM Auto throttle<br />
Page 2<br />
� Retract Flaps at Yellow Bug—At 3200ft lower nose to<br />
10� increasing speed to Red bug—Engage Autopilot<br />
48