Improving the Faller N Scale Car System Bus
Improving the Faller N Scale Car System Bus
Improving the Faller N Scale Car System Bus

You also want an ePaper? Increase the reach of your titles
YUMPU automatically turns print PDFs into web optimized ePapers that Google loves.
<strong>Improving</strong> <strong>the</strong> <strong>Faller</strong> N <strong>Scale</strong> <strong>Car</strong> <strong>System</strong> <strong>Bus</strong><br />
©2004-2006 - Blaine Bachman<br />
You may download this article for your personal use and research. You may also make paper copies and<br />
distribute <strong>the</strong>m to o<strong>the</strong>r individuals providing that <strong>the</strong> article is copied in its entirety, including <strong>the</strong> byline and<br />
bibliography, no fee is charged (except for nominal costs of reproduction), and this notice remains intact.<br />
You may link to this article on <strong>the</strong> Web provided you do not incorporate it in a frame or o<strong>the</strong>r method that would<br />
lead <strong>the</strong> average user to believe that it is part of ano<strong>the</strong>r Internet site. You may not 'mirror' this article or this site<br />
without permission of <strong>the</strong> copyright owner.<br />
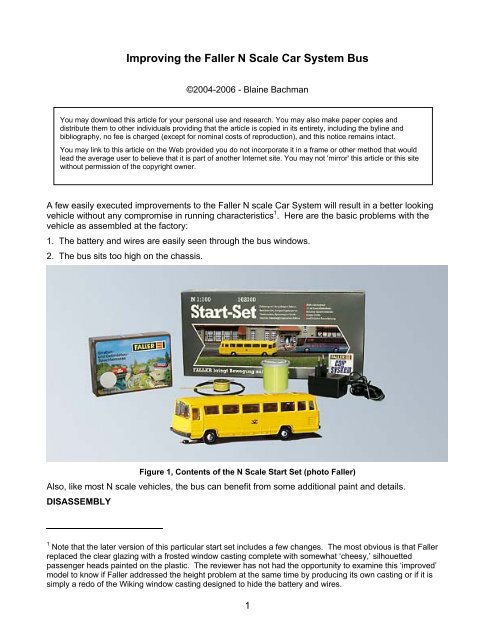
A few easily executed improvements to <strong>the</strong> <strong>Faller</strong> N scale <strong>Car</strong> <strong>System</strong> will result in a better looking<br />
vehicle without any compromise in running characteristics 1 . Here are <strong>the</strong> basic problems with <strong>the</strong><br />
vehicle as assembled at <strong>the</strong> factory:<br />
1. The battery and wires are easily seen through <strong>the</strong> bus windows.<br />
2. The bus sits too high on <strong>the</strong> chassis.<br />
Figure 1, Contents of <strong>the</strong> N <strong>Scale</strong> Start Set (photo <strong>Faller</strong>)<br />
Also, like most N scale vehicles, <strong>the</strong> bus can benefit from some additional paint and details.<br />
DISASSEMBLY<br />
1 Note that <strong>the</strong> later version of this particular start set includes a few changes. The most obvious is that <strong>Faller</strong><br />
replaced <strong>the</strong> clear glazing with a frosted window casting complete with somewhat ‘cheesy,’ silhouetted<br />
passenger heads painted on <strong>the</strong> plastic. The reviewer has not had <strong>the</strong> opportunity to examine this ‘improved’<br />
model to know if <strong>Faller</strong> addressed <strong>the</strong> height problem at <strong>the</strong> same time by producing its own casting or if it is<br />
simply a redo of <strong>the</strong> Wiking window casting designed to hide <strong>the</strong> battery and wires.<br />
1
Step one is to disassemble <strong>the</strong> bus. In my case this was not too difficult; I inserted a hobby knife<br />
blade between <strong>the</strong> chassis and <strong>the</strong> rocker panels and carefully slid it along <strong>the</strong> joint, separating <strong>the</strong><br />
glued areas as I went. One spot was particularly difficult and despite my attempts I did damage <strong>the</strong><br />
bus body shell slightly. A spot of paint will hide <strong>the</strong> defect from all but <strong>the</strong> closest examination.<br />
In order to remove <strong>the</strong> clear plastic window casting, you will have to temporarily detach one of <strong>the</strong><br />
glued on bumpers; I suggest <strong>the</strong> front one for reasons that will become apparent later. Popping <strong>the</strong><br />
window casting loose was not too difficult; <strong>Faller</strong> used a spot of glue to hold it in place but careful<br />
prying, pushing, and twisting will overcome.<br />
MODIFICATION<br />
The window casting must be modified to allow additional clearance for <strong>the</strong> battery so that <strong>the</strong> body<br />
assembly can sit down on <strong>the</strong> chassis at <strong>the</strong> right height. The area that must be removed is <strong>the</strong><br />
'ceiling' of <strong>the</strong> clear casting from just behind <strong>the</strong> windshield to just ahead of <strong>the</strong> second skylight.<br />
There is no foolproof way of doing this as <strong>the</strong> casting is fairly easy to crack and becomes even more<br />
fragile as work progresses. I went at it full-tilt, grinding <strong>the</strong> area away with a rotary file attachment in a<br />
Dremel tool.<br />
Figure 2, Modification to <strong>the</strong> Window Casting<br />
I saved <strong>the</strong> little square of plastic that fits in <strong>the</strong> first skylight with <strong>the</strong> intent of thinning it a bit and<br />
gluing it back in place. As you might imagine, a mere two seconds after I picked it up with my<br />
tweezers, it managed a desperate escape and is now presumably safely ensconced in <strong>the</strong> Electrolux.<br />
I later filled <strong>the</strong> opening with a dollop of Microscale’s Micro Krystal Kleer.<br />
HIDING THE MECHANICALS<br />
Use a #1 or larger paint brush to give <strong>the</strong> battery and visible wires a coat of flat black or dark grey<br />
acrylic paint. While doing this, push <strong>the</strong> wires down as close to <strong>the</strong> chassis as possible, especially <strong>the</strong><br />
one that connects to <strong>the</strong> front of <strong>the</strong> battery.<br />
To fur<strong>the</strong>r camouflage <strong>the</strong> non-scale contents of <strong>the</strong> bus, give <strong>the</strong> window casting a coat of Tamiya X-<br />
19 Smoke Tint paint; this is best done with an airbrush. Do this on <strong>the</strong> inside of <strong>the</strong> casting to avoid<br />
scratches upon reassembly. For added realism, avoid tinting <strong>the</strong> windshield.<br />
ENSURING GOOD OPERATION<br />
Set <strong>the</strong> window casting aside to dry and turn your attention to <strong>the</strong> body. Test fit <strong>the</strong> shell to <strong>the</strong><br />
mechanism and note that <strong>the</strong> chassis can be installed so that its underside is flush with <strong>the</strong> lower<br />
edge of <strong>the</strong> rocker panels (and our modification of <strong>the</strong> window casting will now make this possible).<br />
2
Note too, that <strong>the</strong> tires rub against <strong>the</strong> inside surfaces of <strong>the</strong> fenders. Remove <strong>the</strong> mechanism and<br />
set it aside.<br />
Additional clearance for <strong>the</strong> wheels and tires must be provided by removing some material from <strong>the</strong><br />
inside of <strong>the</strong> wheel wells. This can be done with <strong>the</strong> Dremel and rotary file attachment or more<br />
painstakingly with a hobby knife and a half round jeweler’s file. The idea is to trim <strong>the</strong> inside edge of<br />
<strong>the</strong> fender area back at an approximate 45-60 degree angle <strong>the</strong>reby thinning <strong>the</strong> fender lip to allow<br />
additional space between <strong>the</strong> back side of <strong>the</strong> fender and <strong>the</strong> tire. Test fit <strong>the</strong> mechanism, checking<br />
your progress as you go. Pay particular attention to <strong>the</strong> alignment and clearance of <strong>the</strong> front wheels;<br />
<strong>the</strong>y need to be able to steer through <strong>the</strong>ir entire range without <strong>the</strong> tires rubbing.<br />
Figure 3, Modifications to <strong>the</strong> inside of <strong>the</strong> Wheel Wells<br />
FINISHING AND DETAILS<br />
At this point, you are done with <strong>the</strong> mechanical modifications and internal es<strong>the</strong>tics, but you may want<br />
to spruce up <strong>the</strong> exterior of your bus. I painted mine Conrail Blue to represent an 'Autocorriere' rural<br />
bus, a common sight in Italy during <strong>the</strong> 1970s.<br />
Alpine modelers might want to try <strong>the</strong>ir hand at <strong>the</strong> flashy Swiss version of <strong>the</strong> Post <strong>Bus</strong> scheme. This<br />
typically consists of a white roof that continues down around <strong>the</strong> windows to a red 'belt line' encircling<br />
<strong>the</strong> bus. The rest of <strong>the</strong> body remains yellow except for <strong>the</strong> black rubber fender flares and bump strip<br />
that wraps around to <strong>the</strong> front and rear bumpers. Add <strong>the</strong> letters ‘PTT’ just ahead of <strong>the</strong> traditional<br />
postal horn logo using decals or dry transfers.<br />
Modelers of <strong>the</strong> German scene may want to repaint <strong>the</strong> entire shell maroon to match <strong>the</strong> ubiquitous<br />
DB <strong>Bus</strong>. There are doubtless dozens of prototype schemes you can copy, some of <strong>the</strong>m quite ornate;<br />
or you may devise your own private line. On <strong>the</strong> Internet, a few well-crafted Google image searches<br />
will reveal dozens of photos to stoke <strong>the</strong> fires of your imagination.<br />
You might want to carry <strong>the</strong> body color over to <strong>the</strong> wheels, optionally leaving <strong>the</strong> center of each wheel<br />
silver to represent a chromed hub. While you have <strong>the</strong> body color on your brush, paint <strong>the</strong> panel<br />
beneath each bumper to match <strong>the</strong> body.<br />
3
Paint <strong>the</strong> grille opening flat black <strong>the</strong>n go back and color <strong>the</strong> headlights white and <strong>the</strong> grille 'britework'<br />
silver (<strong>the</strong> silver is optional as some versions had minimal chrome). Paint <strong>the</strong> rib that divides <strong>the</strong><br />
windshield silver as well. A small drop of Micro Krystal Kleer over <strong>the</strong> painted headlight makes for a<br />
fairly convincing lens (I considered adding working lights, but battery life between recharging is<br />
already quite short). Paint <strong>the</strong> tail lights silver, and when dry, paint <strong>the</strong> inner two-thirds of each lens<br />
with Testor's #2724 Stop Light Red and <strong>the</strong> outer one-third with <strong>the</strong>ir #2723 Turn Signal Amber. Add<br />
a couple of tiny license plates to complete <strong>the</strong> effect.<br />
Those wishing to take it to <strong>the</strong> next level (Bam!), can add wipers and rear-view mirrors using parts<br />
found in Gold Medal Models' #160-7 Diesel Details set. Looking at <strong>the</strong> photos I found, I noticed that<br />
<strong>the</strong> mirrors are usually top suspended types; using one mirror from <strong>the</strong> GMM etching and cutting it in<br />
half gives just <strong>the</strong> right appearance to <strong>the</strong> model.<br />
There's just enough room in front of <strong>the</strong> battery to mount a Preiser figure to drive your bus along <strong>the</strong><br />
<strong>Faller</strong> Highway. Starting with a standing figure, trim <strong>the</strong> legs at mid-calf and glue <strong>the</strong> driver to <strong>the</strong><br />
inside ledge of <strong>the</strong> front bumper casting.<br />
REASSEMBLY<br />
Reinstall <strong>the</strong> now-smoked window casting into <strong>the</strong> shell and affix it with a couple of dabs of Micro<br />
Krystal Kleer or white glue. You can now reattach <strong>the</strong> bumper you removed – touch up any disturbed<br />
areas with <strong>the</strong> appropriate paint.<br />
Since it takes quite a bit of pressure to insert <strong>the</strong> charging plug, I added a couple of strips of 0.10”<br />
plastic strip to make an internal ledge along <strong>the</strong> rear sides against which <strong>the</strong> chassis can rest. These<br />
are glued flush against <strong>the</strong> lower edge of <strong>the</strong> window casting and <strong>the</strong> chassis is <strong>the</strong>n installed flush<br />
against <strong>the</strong> lower edge of <strong>the</strong> strips. This effectively prevents <strong>the</strong> glue joint from being broken when<br />
<strong>the</strong> plug is inserted (you still have to hold your thumb against <strong>the</strong> bottom when you remove <strong>the</strong> plug or<br />
<strong>the</strong> entire chassis is likely to come out with it).<br />
Figure 4, Reassembled and Repainted <strong>Bus</strong><br />
Test fitting <strong>the</strong> mechanism, <strong>the</strong> body will now snuggle down onto <strong>the</strong> chassis like it should. Double<br />
check that nothing rubs and make any needed adjustments. I recommend final assembly of <strong>the</strong><br />
mechanism and body using a light coating of clear silicone on <strong>the</strong> mating surfaces. This keeps <strong>the</strong><br />
body firmly in place while assuring that you can easily disassemble <strong>the</strong> bus in <strong>the</strong> future should <strong>the</strong><br />
need arise.<br />
4