

Avervision Document Camera - Stockton Unified School District
Avervision Document Camera - Stockton Unified School District
Avervision Document Camera - Stockton Unified School District

You also want an ePaper? Increase the reach of your titles
YUMPU automatically turns print PDFs into web optimized ePapers that Google loves.
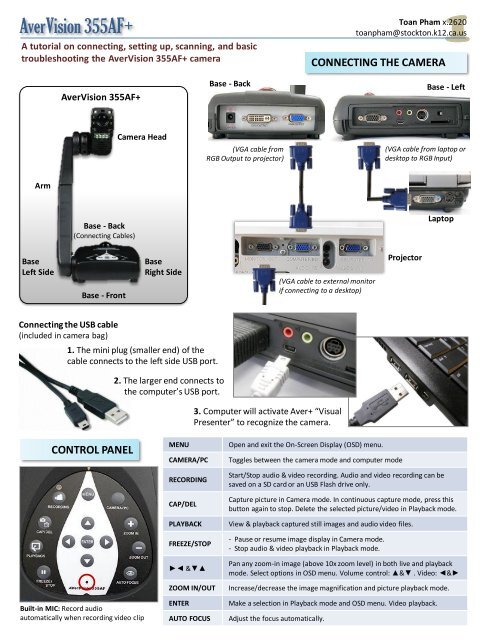
AverVision 355AF+<br />
A tutorial on connecting, setting up, scanning, and basic<br />
troubleshooting the AverVision 355AF+ camera<br />
Arm<br />
Base<br />
Left Side<br />
AverVision 355AF+<br />
Base - Back<br />
(Connecting Cables)<br />
Base - Front<br />
Connecting the USB cable<br />
(included in camera bag)<br />
<strong>Camera</strong> Head<br />
Base<br />
Right Side<br />
1. The mini plug (smaller end) of the<br />
cable connects to the left side USB port.<br />
CONTROL PANEL<br />
Built-in MIC: Record audio<br />
automatically when recording video clip<br />
2. The larger end connects to<br />
the computer’s USB port.<br />
Base - Back<br />
(VGA cable from<br />
RGB Output to projector)<br />
Toan Pham x.2620<br />
toanpham@stockton.k12.ca.us<br />
CONNECTING THE CAMERA<br />
(VGA cable to external monitor<br />
if connecting to a desktop)<br />
MENU Open and exit the On-Screen Display (OSD) menu.<br />
CAMERA/PC Toggles between the camera mode and computer mode<br />
RECORDING<br />
CAP/DEL<br />
Projector<br />
Base - Left<br />
(VGA cable from laptop or<br />
desktop to RGB Input)<br />
Laptop<br />
Start/Stop audio & video recording. Audio and video recording can be<br />
saved on a SD card or an USB Flash drive only.<br />
Capture picture in <strong>Camera</strong> mode. In continuous capture mode, press this<br />
button again to stop. Delete the selected picture/video in Playback mode.<br />
PLAYBACK View & playback captured still images and audio video files.<br />
FREEZE/STOP<br />
►◄ &▼▲<br />
3. Computer will activate Aver+ “Visual<br />
Presenter” to recognize the camera.<br />
- Pause or resume image display in <strong>Camera</strong> mode.<br />
- Stop audio & video playback in Playback mode.<br />
Pan any zoom-in image (above 10x zoom level) in both live and playback<br />
mode. Select options in OSD menu. Volume control: ▲&▼ . Video: ◄&►<br />
ZOOM IN/OUT Increase/decrease the image magnification and picture playback mode.<br />
ENTER Make a selection in Playback mode and OSD menu. Video playback.<br />
AUTO FOCUS Adjust the focus automatically.
AVER + SOFTWARE<br />
Create slideshows<br />
Users can save images, video,<br />
screen captures, and<br />
annotations as a Project file.<br />
Virtual Transparency Mode<br />
Annotate over web pages,<br />
images, PDFs, and more.<br />
Split screen<br />
Arrange the screen in multiple<br />
configurations from one large<br />
screen, up to 6 independent<br />
screens.<br />
Integration with AVerVision<br />
<strong>Document</strong> <strong>Camera</strong>s<br />
Display and control live<br />
images of documents, 3-D<br />
objects, microscope views,<br />
transparencies, slides, and<br />
more in A+ Interactive<br />
Software.<br />
A+ Interactive<br />
Software<br />
AVERVISION 3 SOFTWARE<br />
Doc cam<br />
Settings<br />
Start<br />
Recording<br />
Image<br />
Capture<br />
Image/Video<br />
Playback<br />
Print<br />
Network<br />
Settings<br />
Advanced<br />
Settings<br />
Freehand<br />
Line<br />
Square<br />
Ellipse<br />
Text<br />
Region<br />
Capture<br />
Eraser
SCANNING ASSESSMENTS<br />
Left Side – The TV/RGB toggle button should be<br />
switched to RGB (right position).<br />
<strong>Stockton</strong> <strong>Unified</strong> <strong>School</strong> <strong>District</strong><br />
stockton.illuminateed.com<br />
Username<br />
Password<br />
Next<br />
Log in to Illuminate and find the<br />
assessment you want to scan.<br />
Click on the camera icon to<br />
begin scanning.<br />
Important: Make sure the switches are in<br />
the right position before scanning!<br />
Right Side – The USB toggle button should be<br />
switched to the front of the camera (left position).<br />
SCANNING ANSWER SHEETS<br />
Click on the<br />
assessment link to<br />
access the “Overview”<br />
page to print answer<br />
sheets and other test<br />
materials.<br />
Plugin Installation - Illuminate will prompt you to download the Plugin if<br />
it’s a new computer or there’s been a Plugin update. Click “Install the<br />
GradeCam Plugin” and click “Download” to install the Plugin.<br />
Restart the browser when Gradecam gives you the “All Done!” .
When the scanning window appears, position the answer sheet so that the black box is wholly visible inside the<br />
window with some white space around the edges. Move the camera arm up or down as needed.<br />
Click the Auto Focus button for a clearer image.<br />
SCANNING MODES<br />
There are 2 different scanning modes. Whichever mode<br />
you pick, you should stick with it for your entire scanning<br />
sessions (i.e., do not jump back and forth between modes).<br />
1. Scan Answer Key 2. Scan Student Responses 3. Save & View Results<br />
�<br />
STUDENT MODE<br />
Pick Student Mode if you want each<br />
student's scores to display on the screen as<br />
they are scanned. Press Enter on your<br />
keyboard after scanning to clear the screen<br />
so the next student who scans will not see<br />
how other students performed.<br />
Click on “Settings” for General and Advanced tabs for<br />
“Think” time and Popup frequency settings.<br />
The “Prompt for blanks and multiples” option should be<br />
checked.<br />
TEACHER MODE<br />
As documents are scanned, the<br />
results will appear in the table.<br />
Click “Save & View Results”<br />
when done scanning. Scores will<br />
be saved to Illuminate.
Enter Assessment<br />
Information<br />
Align questions<br />
to standards<br />
- Print answer sheets<br />
- Scan tests<br />
Choose<br />
Standards<br />
CREATING ASSESSMENTS<br />
Enter answer key<br />
- Multiple answers<br />
- Rubric questions
1.<br />
“No camera detected” or “Failed to connect with camera”<br />
- Check doc cam power cord, on/off button, USB cable,<br />
and side switches are at the correct positions.<br />
- Check if Aver+ are is installed.<br />
The A+ icon should be on the desktop<br />
or Aver+ in the Programs menu.<br />
- Plug into a different USB port on the computer.<br />
3.<br />
4.<br />
No scanning window<br />
There’s a scanning window but Gradecam is not scanning<br />
Failed to configure the camera<br />
<strong>Camera</strong> Error: Failed to configure camera.<br />
- Change USB port.<br />
- Restart camera.<br />
- <strong>Camera</strong> drivers need to be installed or reinstalled.<br />
- Click on “Settings” and select the “AverVision Digital Visual Presenter”<br />
camera. Click “Done, Return to Scanning” button.<br />
- Exit Illuminate. Unplug the USB cable from the computer and use<br />
another available USB port. Restart Illuminate.<br />
- Are there stray marks on the answer sheet? The answer sheet printed or copied lightly?<br />
Lighting<br />
Too much light or too little light can be a problem because it creates glare. Bubbles should appear black, not silver<br />
or white. Try one or a combination of the suggestions below. The main purpose is to reduce the amount of glare<br />
on the answer document.<br />
- Turn on/off the light on the camera head. Turn on/off the room light.<br />
- Move the camera to a different part of the table to minimize direct light or shadows.<br />
- Angle the camera arm or elevate the answer sheet at one end with a binder will sometimes work the best.<br />
on/off<br />
light switch<br />
?<br />
<strong>Document</strong><br />
2.<br />
BASIC TROUBLESHOOTINGS<br />
OR<br />
AverVision Digital Visual Presenter 2
Student Small Slip<br />
Student & Parent Letter
There is no <strong>Camera</strong> image on the presentation screen.<br />
1. Check all connections again as shown tutorial.<br />
2. Verify the setting of the display output device; make<br />
sure it is set to the correct input channel.<br />
3. The unit’s power light turns Red in standby mode.<br />
Press the POWER button again to turn it ON and the<br />
LED Power light will turn Green.<br />
4. The default camera display resolution setting is on<br />
1024X768. If your output device does not support this<br />
resolution; no image can be projected. Simply press<br />
hold the MENU and < > button to increase or<br />
decrease the resolution setting.<br />
5. Check the TV/RGB switch on the side and set it<br />
accordingly to the type of display device you have.<br />
6. Check all cables are good among the display device,<br />
AVerVision <strong>Document</strong> <strong>Camera</strong> and your PC, replace<br />
cables if necessary.<br />
There is no computer signal on the presentation screen.<br />
1. Check all cable connections among the display device,<br />
AV355AF and your PC, replace cables if necessary.<br />
2. Connect your PC to the AV355AF first before you<br />
power on your computer.<br />
3. If you are using a Laptop, make sure you set your<br />
laptop to Dual display mode. Refer to your laptop’s<br />
user manual for the proper command.<br />
The picture on the presentation screen is out of focus.<br />
1. Reset your document camera to default by pressing<br />
Menu > Default > Yes > Enter. Finally power-cycle<br />
your camera.<br />
2. Check your output device’s focus adjustment<br />
3. Press the auto focus button on your document<br />
camera’s control panel.<br />
4. Manually adjust the focus from the <strong>Document</strong><br />
camera’s menu or on your remote control.<br />
How do I transfer the images from AV355AF to a<br />
computer?<br />
1. Do no connect USB cable in the beginning. On the<br />
document camera, Press Menu > System Tab > USB<br />
State > Mass Storage > Enter. Now connect the USB<br />
cable between the AV355AF and the computer. In<br />
your computer locate the hard drive and the<br />
copy/cut/paste the images to your computer. To reset<br />
your Unit back to a document camera, unplug and replug<br />
the power cord.<br />
The brightness on the presentation screen is dark and<br />
unreadable<br />
1. Turn on Auto Image in your unit’s Menu<br />
2. Reset your units display by pressing Menu, select Mode<br />
> Text. Return to Menu and select Default > Yes. Finally<br />
power-cycle your camera.<br />
3. Make sure there are sufficient lighting in the room or<br />
Turn on the LED lamp on your document camera head<br />
4. If you are in a dark environment, turn on “Night View”<br />
in your document camera’s menu.<br />
5. Manually adjusts the Brightness and Contrast levels in<br />
the <strong>Camera</strong>’s Menu.<br />
6. Your projector’s bulb may need to be changed.<br />
There are distortions running across the screen.<br />
1. Set your camera to high frame to increase the screen<br />
refresh rate. Press Menu > Basic > Mode > High Frame<br />
> Enter. Then return to Menu, select Default > Yes.<br />
Finally power-cycle your camera.<br />
2. Check all cables are good among the display device,<br />
AV355AF and your PC, replace cables if necessary.<br />
3. Reset your camera to Default by Pressing MENU ><br />
Default > Yes > Enter. Then Power-Cycle your camera.<br />
4. Unplug all Cables from camera, reconnect Cables again<br />
and Plug in the Power cord to the <strong>Camera</strong> last.<br />
How do I record a video using the on-board recording<br />
button?<br />
1. Insert a USB flash drive into the USB memory slot. USB<br />
dip Switch should be moved towards the USB symbol.<br />
Now simply press the “Recording” button on your<br />
unit’s control panel. To stop the recording, press the<br />
“Recording” button again. The video will save in .AVI<br />
format in your USB flash drive. AV355AF can support<br />
USB flash drive from 2GB to 64 GB.<br />
2. Insert a SD card into the SD card memory slot. From<br />
your document camera’s Menu, select Setting tab ><br />
Current Storage > SD memory card > enter. Now simply<br />
press the “Recording” button on your unit’s control<br />
panel. To stop the recording, press the “Recording”<br />
button again. The video will save in .AVI format in your<br />
SD card. AV355AF can support SD card from 1GB to<br />
32GB.<br />
The AVerVision Software cannot detect the document<br />
camera.<br />
1. Make sure your USB cable is connected<br />
2. Make sure the USB cable or computer USB port is not<br />
defective<br />
3. Move the USB switch on the document camera away<br />
from the USB symbol.<br />
4. Check your Device Manager, If Digital presenter driver<br />
shows damaged, right click and select “Update Driver”.<br />
5. Make sure you have the most currently updated<br />
software, download list is found under Download tab.<br />
For more AVerVision 355AF Q&A please visit this page.
Telescoping Arm<br />
HoverCam T3<br />
Setting up and using the T3 HoverCam<br />
Base<br />
<strong>Camera</strong> Head<br />
Light switch, microphone, and<br />
manual focus are located on<br />
the camera’s head<br />
USING T3 SOFTWARE<br />
Video – Present, teach, or demo with a<br />
projector; annotate and record a video.<br />
Scan – Capture high resolution still<br />
images in JPG, PNG, PDF, or other<br />
formats.<br />
Connect – Share your design or ideas<br />
with annotated video conferencing or<br />
screen sharing. (Trial Use Only)<br />
Archive – File your images in folders<br />
and binders, upload to Evernote or<br />
Dropbox.<br />
Connect the USB cable<br />
from the back of the base<br />
of the camera to an<br />
available USB port on the<br />
computer. The HoverCam<br />
software will prompt to<br />
install from the camera.<br />
HoverCam Flex Software Features<br />
Toan Pham x.2620<br />
toanpham@stockton.k12.ca.us<br />
CONNECTING THE CAMERA<br />
- Select video resolution, adjust options.<br />
- Library tab displays folders in your library<br />
- Bottom toolbar: Zoom control, scale images, full<br />
screen, freeze frame, and recording buttons.<br />
- Annotate tool bar<br />
- Actions, Effects, and Library panels<br />
- cropping, straightening, save in selected formats<br />
- Annotate and capturing annotation in a scan<br />
- share annotated video conferences<br />
- share not only the image that the HoverCam is<br />
currently capturing but also an image of the other user.<br />
- talk face-to-face while sharing documents, plans, or<br />
anything else under the HoverCam.<br />
- Edit documents<br />
- Organize, collate, convert, use in other applications<br />
- Print<br />
- OCR<br />
- Cloud service