

All-Wheel Drive and 4-Wheel Drive - Vehicles we focus on
All-Wheel Drive and 4-Wheel Drive - Vehicles we focus on
All-Wheel Drive and 4-Wheel Drive - Vehicles we focus on

You also want an ePaper? Increase the reach of your titles
YUMPU automatically turns print PDFs into web optimized ePapers that Google loves.
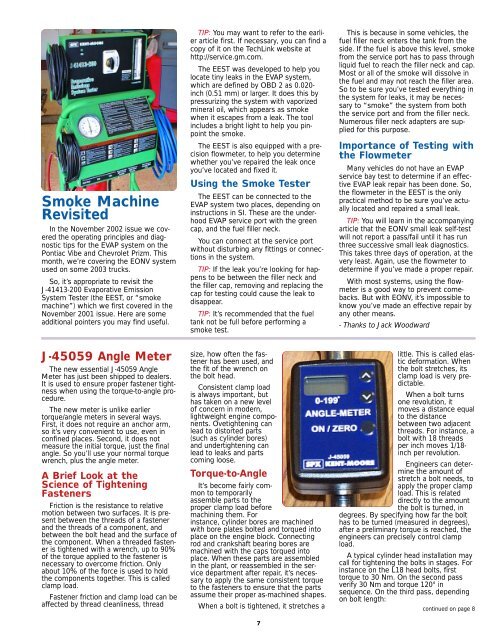
Smoke Machine<br />
Revisited<br />
In the November 2002 issue <str<strong>on</strong>g>we</str<strong>on</strong>g> covered<br />
the operating principles <str<strong>on</strong>g>and</str<strong>on</strong>g> diagnostic<br />
tips for the EVAP system <strong>on</strong> the<br />
P<strong>on</strong>tiac Vibe <str<strong>on</strong>g>and</str<strong>on</strong>g> Chevrolet Prizm. This<br />
m<strong>on</strong>th, <str<strong>on</strong>g>we</str<strong>on</strong>g>’re covering the EONV system<br />
used <strong>on</strong> some 2003 trucks.<br />
So, it’s appropriate to revisit the<br />
J-41413-200 Evaporative Emissi<strong>on</strong><br />
System Tester (the EEST, or “smoke<br />
machine”) which <str<strong>on</strong>g>we</str<strong>on</strong>g> first covered in the<br />
November 2001 issue. Here are some<br />
additi<strong>on</strong>al pointers you may find useful.<br />
J-45059 Angle Meter<br />
The new essential J-45059 Angle<br />
Meter has just been shipped to dealers.<br />
It is used to ensure proper fastener tightness<br />
when using the torque-to-angle procedure.<br />
The new meter is unlike earlier<br />
torque/angle meters in several ways.<br />
First, it does not require an anchor arm,<br />
so it’s very c<strong>on</strong>venient to use, even in<br />
c<strong>on</strong>fined places. Sec<strong>on</strong>d, it does not<br />
measure the initial torque, just the final<br />
angle. So you’ll use your normal torque<br />
wrench, plus the angle meter.<br />
A Brief Look at the<br />
Science of Tightening<br />
Fasteners<br />
Fricti<strong>on</strong> is the resistance to relative<br />
moti<strong>on</strong> bet<str<strong>on</strong>g>we</str<strong>on</strong>g>en two surfaces. It is present<br />
bet<str<strong>on</strong>g>we</str<strong>on</strong>g>en the threads of a fastener<br />
<str<strong>on</strong>g>and</str<strong>on</strong>g> the threads of a comp<strong>on</strong>ent, <str<strong>on</strong>g>and</str<strong>on</strong>g><br />
bet<str<strong>on</strong>g>we</str<strong>on</strong>g>en the bolt head <str<strong>on</strong>g>and</str<strong>on</strong>g> the surface of<br />
the comp<strong>on</strong>ent. When a threaded fastener<br />
is tightened with a wrench, up to 90%<br />
of the torque applied to the fastener is<br />
necessary to overcome fricti<strong>on</strong>. Only<br />
about 10% of the force is used to hold<br />
the comp<strong>on</strong>ents together. This is called<br />
clamp load.<br />
Fastener fricti<strong>on</strong> <str<strong>on</strong>g>and</str<strong>on</strong>g> clamp load can be<br />
affected by thread cleanliness, thread<br />
TIP: You may want to refer to the earlier<br />
article first. If necessary, you can find a<br />
copy of it <strong>on</strong> the TechLink <str<strong>on</strong>g>we</str<strong>on</strong>g>bsite at<br />
http://service.gm.com.<br />
The EEST was developed to help you<br />
locate tiny leaks in the EVAP system,<br />
which are defined by OBD 2 as 0.020inch<br />
(0.51 mm) or larger. It does this by<br />
pressurizing the system with vaporized<br />
mineral oil, which appears as smoke<br />
when it escapes from a leak. The tool<br />
includes a bright light to help you pinpoint<br />
the smoke.<br />
The EEST is also equipped with a precisi<strong>on</strong><br />
flowmeter, to help you determine<br />
whether you’ve repaired the leak <strong>on</strong>ce<br />
you’ve located <str<strong>on</strong>g>and</str<strong>on</strong>g> fixed it.<br />
Using the Smoke Tester<br />
The EEST can be c<strong>on</strong>nected to the<br />
EVAP system two places, depending <strong>on</strong><br />
instructi<strong>on</strong>s in SI. These are the underhood<br />
EVAP service port with the green<br />
cap, <str<strong>on</strong>g>and</str<strong>on</strong>g> the fuel filler neck.<br />
You can c<strong>on</strong>nect at the service port<br />
without disturbing any fittings or c<strong>on</strong>necti<strong>on</strong>s<br />
in the system.<br />
TIP: If the leak you’re looking for happens<br />
to be bet<str<strong>on</strong>g>we</str<strong>on</strong>g>en the filler neck <str<strong>on</strong>g>and</str<strong>on</strong>g><br />
the filler cap, removing <str<strong>on</strong>g>and</str<strong>on</strong>g> replacing the<br />
cap for testing could cause the leak to<br />
disappear.<br />
TIP: It’s recommended that the fuel<br />
tank not be full before performing a<br />
smoke test.<br />
size, how often the fastener<br />
has been used, <str<strong>on</strong>g>and</str<strong>on</strong>g><br />
the fit of the wrench <strong>on</strong><br />
the bolt head.<br />
C<strong>on</strong>sistent clamp load<br />
is always important, but<br />
has taken <strong>on</strong> a new level<br />
of c<strong>on</strong>cern in modern,<br />
light<str<strong>on</strong>g>we</str<strong>on</strong>g>ight engine comp<strong>on</strong>ents.<br />
Ovetightening can<br />
lead to distorted parts<br />
(such as cylinder bores)<br />
<str<strong>on</strong>g>and</str<strong>on</strong>g> undertightening can<br />
lead to leaks <str<strong>on</strong>g>and</str<strong>on</strong>g> parts<br />
coming loose.<br />
Torque-to-Angle<br />
It’s become fairly comm<strong>on</strong><br />
to temporarily<br />
assemble parts to the<br />
proper clamp load before<br />
machining them. For<br />
instance, cylinder bores are machined<br />
with bore plates bolted <str<strong>on</strong>g>and</str<strong>on</strong>g> torqued into<br />
place <strong>on</strong> the engine block. C<strong>on</strong>necting<br />
rod <str<strong>on</strong>g>and</str<strong>on</strong>g> crankshaft bearing bores are<br />
machined with the caps torqued into<br />
place. When these parts are assembled<br />
in the plant, or reassembled in the service<br />
department after repair, it’s necessary<br />
to apply the same c<strong>on</strong>sistent torque<br />
to the fasteners to ensure that the parts<br />
assume their proper as-machined shapes.<br />
When a bolt is tightened, it stretches a<br />
7<br />
This is because in some vehicles, the<br />
fuel filler neck enters the tank from the<br />
side. If the fuel is above this level, smoke<br />
from the service port has to pass through<br />
liquid fuel to reach the filler neck <str<strong>on</strong>g>and</str<strong>on</strong>g> cap.<br />
Most or all of the smoke will dissolve in<br />
the fuel <str<strong>on</strong>g>and</str<strong>on</strong>g> may not reach the filler area.<br />
So to be sure you’ve tested everything in<br />
the system for leaks, it may be necessary<br />
to “smoke” the system from both<br />
the service port <str<strong>on</strong>g>and</str<strong>on</strong>g> from the filler neck.<br />
Numerous filler neck adapters are supplied<br />
for this purpose.<br />
Importance of Testing with<br />
the Flowmeter<br />
Many vehicles do not have an EVAP<br />
service bay test to determine if an effective<br />
EVAP leak repair has been d<strong>on</strong>e. So,<br />
the flowmeter in the EEST is the <strong>on</strong>ly<br />
practical method to be sure you’ve actually<br />
located <str<strong>on</strong>g>and</str<strong>on</strong>g> repaired a small leak.<br />
TIP: You will learn in the accompanying<br />
article that the EONV small leak self-test<br />
will not report a pass/fail until it has run<br />
three successive small leak diagnostics.<br />
This takes three days of operati<strong>on</strong>, at the<br />
very least. Again, use the flowmeter to<br />
determine if you’ve made a proper repair.<br />
With most systems, using the flowmeter<br />
is a good way to prevent comebacks.<br />
But with EONV, it’s impossible to<br />
know you’ve made an effective repair by<br />
any other means.<br />
- Thanks to Jack Woodward<br />
little. This is called elastic<br />
deformati<strong>on</strong>. When<br />
the bolt stretches, its<br />
clamp load is very predictable.<br />
When a bolt turns<br />
<strong>on</strong>e revoluti<strong>on</strong>, it<br />
moves a distance equal<br />
to the distance<br />
bet<str<strong>on</strong>g>we</str<strong>on</strong>g>en two adjacent<br />
threads. For instance, a<br />
bolt with 18 threads<br />
per inch moves 1/18inch<br />
per revoluti<strong>on</strong>.<br />
Engineers can determine<br />
the amount of<br />
stretch a bolt needs, to<br />
apply the proper clamp<br />
load. This is related<br />
directly to the amount<br />
the bolt is turned, in<br />
degrees. By specifying how far the bolt<br />
has to be turned (measured in degrees),<br />
after a preliminary torque is reached, the<br />
engineers can precisely c<strong>on</strong>trol clamp<br />
load.<br />
A typical cylinder head installati<strong>on</strong> may<br />
call for tightening the bolts in stages. For<br />
instance <strong>on</strong> the L18 head bolts, first<br />
torque to 30 Nm. On the sec<strong>on</strong>d pass<br />
verify 30 Nm <str<strong>on</strong>g>and</str<strong>on</strong>g> torque 120° in<br />
sequence. On the third pass, depending<br />
<strong>on</strong> bolt length:<br />
c<strong>on</strong>tinued <strong>on</strong> page 8