

Desktop Train Cab Controller - RailDriver
Desktop Train Cab Controller - RailDriver
Desktop Train Cab Controller - RailDriver

Create successful ePaper yourself
Turn your PDF publications into a flip-book with our unique Google optimized e-Paper software.
A Division of P.I. Engineering<br />
<strong>Desktop</strong> <strong>Train</strong> <strong>Cab</strong> <strong>Controller</strong><br />
Product Manual<br />
<strong>RailDriver</strong><br />
A Division of P.I. Engineering<br />
101 Innovation Parkway<br />
Williamston, Michigan 48895-1663<br />
(517)655-5523<br />
(517)655-4926<br />
e-mail: sales@raildriver.com<br />
www.raildriver.com<br />
P.I. Part #0378, Nov, 2011
Box Contents<br />
As you unpack your <strong>RailDriver</strong>, please check the enclosed items against<br />
this packing list:<br />
� <strong>RailDriver</strong> Control Unit<br />
� <strong>RailDriver</strong> Installation CD<br />
� <strong>RailDriver</strong> Power Supply (AC adapter)<br />
� <strong>RailDriver</strong> Label Sheets & Game Button Identification Strips<br />
� <strong>RailDriver</strong> Operating Manual<br />
Installing Labels for the Controls and Function Keys<br />
Reverser, Throttle, and Brake<br />
decals are applied with the left end<br />
of the label at the top of the control<br />
lever.<br />
2<br />
To remove wiper and light switch<br />
caps for labeling, insert a thin<br />
bladed screwdriver into the slot on<br />
either side of the switch and<br />
carefully pry up until the switch cap<br />
pops off.<br />
To apply legends for the function keys,<br />
pry up carefully, but with force, on the<br />
panel cover, place the legend strips<br />
above the keys. Insert the top of the<br />
panel cover first, and snap the bottom<br />
back into place.<br />
Printable versions of these legend<br />
strips can also be found on our website.
A. RANGE<br />
B. E-BRAKE<br />
C. ALERT<br />
D. SAND<br />
E. P (PANTOGRAPH)<br />
F. BELL<br />
G. FORWARD - N - REVERSE<br />
Use the drawing above to determine the location of the decals.<br />
Connecting Sound and Vibration Features<br />
The following steps are required to enable the <strong>RailDriver</strong> internal subwoofer.<br />
Power and audio connections are not required for operation of the<br />
<strong>RailDriver</strong> controls, but they do enhance the driving experience.<br />
3<br />
H. DYN BRAKE - THROTTLE<br />
I. EMG - CS - SUP - REL<br />
J. AUTO BRAKE - IND BRAKE<br />
K. FULL - REL<br />
L. WIPER<br />
M. LIGHTS
1. Plug the <strong>RailDriver</strong> into the line out sound port on your computer.<br />
2. Plug the speakers (which were in the sound port) into the <strong>RailDriver</strong><br />
pass through sound port.<br />
3. Connect the 12 VDC Power Supply.<br />
4. Set the Amplitude control to mid level (adjust setting when <strong>RailDriver</strong> is<br />
running with your train simulation software).<br />
NOTE: The <strong>RailDriver</strong> <strong>Desktop</strong> contains a speaker which has been<br />
magnetically shielded to prevent color distortion on video displays.<br />
Exposing magnetic media (floppy disk, memory stick, or digital tape) to<br />
magnetic materials may cause data loss.<br />
Installing Your <strong>RailDriver</strong> <strong>Train</strong> <strong>Cab</strong> <strong>Controller</strong><br />
Please refer to the following pages for your simulation:<br />
<strong>Train</strong>z by Auran/N3V: Page 6<br />
RailWorks: Page 7<br />
Rail Simulator: Page 8<br />
Microsoft <strong>Train</strong> Simulator: Page 9<br />
The rapid evolution of train simulator software applications prohibits us<br />
from keeping the most current and relevant instructions in a paper<br />
manual.<br />
Please see the helpmechoose.htm file on the Installation CD for<br />
more information, or visit our website for the most up to date<br />
software and instructions http://www.raildriver.com/support/<br />
4
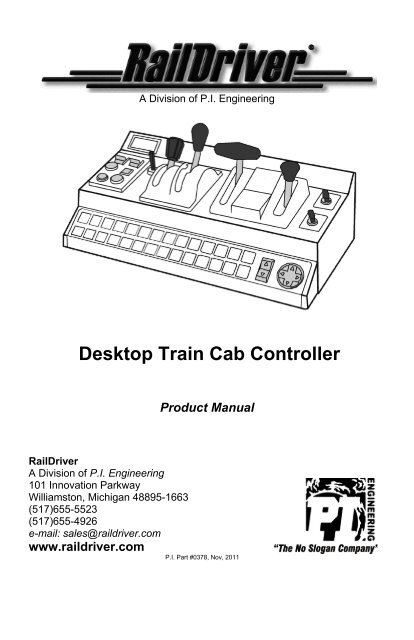
The Default Control Layout<br />
While the <strong>RailDriver</strong> <strong>Desktop</strong> control levers and switches most closely<br />
resemble the Dash 9 layout, they may be configured to operate any type<br />
of engine in most train simulation programs. For details on selecting<br />
alternate control layouts or creating your own custom layout, please refer<br />
to the Help files in our software, or the Technical Support Page on our<br />
web site (www.raildriver.com).<br />
1. (1-28) Programmable game buttons<br />
29. Zoom/Rocker button<br />
30. Four way panning control<br />
31. LED speedometer<br />
32. Gear Shift<br />
33. Emergency Brake<br />
34. Alerter<br />
35. Sander<br />
36. Pantograph<br />
37. Bell<br />
38. Horn/whistle lever (operates forward or back)<br />
39. Reverser (center detent, variable forward and reverse)<br />
40. Combined throttle and dynamic brake (with "gate" center)<br />
41. Automatic brake, (detent before e-brake)<br />
42. Independent brake (w/right motion for bail-off)<br />
43. Rotary wiper switch<br />
44. Rotary headlight switch.<br />
5
Installing your <strong>RailDriver</strong> <strong>Controller</strong> for use with <strong>Train</strong>z<br />
2004, 2006, Classics, Railwayz, 2009, 2010 and 12<br />
The most updated instructions and troubleshooting tips can be found at:<br />
http://www.raildriver.com/support/trainz.php<br />
1. Install <strong>Train</strong>z and any available updates first.<br />
2. Insert the <strong>RailDriver</strong> CD-ROM.<br />
Note: If the program does not start automatically, find<br />
“ainstall.exe” on the <strong>RailDriver</strong> CD and run it.<br />
3. Select the installation option for your specific version of the<br />
<strong>Train</strong>z software. You will be prompted through the installation.<br />
Note: If you have multiple versions of <strong>Train</strong>z, complete a<br />
full <strong>RailDriver</strong> installation and calibration for each version<br />
you have.<br />
4. Plug in the <strong>RailDriver</strong>’s USB connector to a USB port on your<br />
computer.<br />
5. Windows will recognize new hardware and install the drivers<br />
automatically.<br />
6. When the installation is completed, you will be prompted to<br />
calibrate your <strong>Controller</strong>.<br />
7. Follow the prompts through the calibration process and put the<br />
controls in their neutral position when finished.<br />
Operating your <strong>RailDriver</strong> <strong>Controller</strong> with <strong>Train</strong>z<br />
When the <strong>RailDriver</strong> is not active, “rd” will be displayed in the<br />
status window of the controller.<br />
1. After completing a successful calibration, launch <strong>Train</strong>z.<br />
2. From the main menu, select “Driver”.<br />
3. Select your “Route” and “Route Session”.<br />
4. Once the session loads, you will be asked to select a “<strong>Train</strong><br />
Control Mode”, select “<strong>Cab</strong> Mode” for full use of the <strong>Controller</strong>. In<br />
“DCC Mode”, only the throttle is supported.<br />
5. The Status Window on the <strong>Controller</strong> will now display the current<br />
speed.<br />
6
Installing your <strong>RailDriver</strong> <strong>Controller</strong> for use with<br />
RailWorks 3 (<strong>Train</strong> Simulator 2012)<br />
The most updated instructions and troubleshooting tips can be found at:<br />
http://www.raildriver.com/support/railworks.php<br />
1. Install RailWorks 3 and any available updates first.<br />
2. Insert the <strong>RailDriver</strong> CD-ROM.<br />
Note: If the program does not start automatically, find<br />
“ainstall.exe” on the <strong>RailDriver</strong> CD and run it.<br />
3. Select the installation option for “RailWorks/RailWorks 2”.<br />
4. You will be prompted through the installation.<br />
5. Plug in the <strong>RailDriver</strong>’s USB connector to a USB port on your<br />
computer.<br />
6. Windows will recognize new hardware and install the drivers<br />
automatically.<br />
Operating your <strong>RailDriver</strong> <strong>Controller</strong> with RailWorks<br />
When the <strong>RailDriver</strong> is not active, “rd” will be displayed in the<br />
status window of the controller.<br />
1. If on XP, skip to the next step. If on Windows Vista or 7, right<br />
click on the MacroWorks 3 icon and go to "Properties." Select<br />
the "Compatibility" tab and check the box that says "Run this<br />
program as an administrator."<br />
2. Please start MacroWorks 3 if it isn’t already running (if this is<br />
your first time running this, you will be prompted to calibrate now)<br />
3. Run RailWorks.<br />
4. Select and load a Route/Scenario and choose your train if<br />
needed.<br />
5. All controls in the cab will adjust to match the position of the<br />
controls on the <strong>RailDriver</strong>. The Status window on the controller<br />
will now display the current speed.<br />
7
Installing your <strong>RailDriver</strong> <strong>Controller</strong> for Use with Rail<br />
Simulator<br />
The most updated instructions and troubleshooting tips can be found at:<br />
http://www.raildriver.com/support/railworks.php<br />
1. Install Rail Simulator and the mk1 and mk2 updates first.<br />
2. Insert the <strong>RailDriver</strong> CD-ROM.<br />
Note: If the program does not start automatically, find<br />
“ainstall.exe” on the <strong>RailDriver</strong> CD and run it.<br />
3. Select the installation option for “Rail Simulator”.<br />
4. You will be prompted through the installation.<br />
5. Plug in the <strong>RailDriver</strong>’s USB connector to a USB port on your<br />
computer.<br />
6. Windows will recognize new hardware and install the drivers<br />
automatically.<br />
7. When the installation is completed, you will be prompted to<br />
calibrate your <strong>Controller</strong>. Once the calibration has been<br />
completed successfully, you will be taken back to your Windows<br />
desktop.<br />
Operating your <strong>RailDriver</strong> <strong>Controller</strong> with Rail Simulator<br />
When the <strong>RailDriver</strong> is not active, “rd” will be displayed in the<br />
status window of the controller.<br />
1. Please start RD MWII if it is not already running in your system<br />
tray (next to the time).<br />
2. Run Rail Simulator. Once in the simulator, go to Options ><br />
Gameplay and change the “Control Mode” to “Expert”.<br />
3. Select and load a Route.<br />
4. Select the engine you want to drive.<br />
5. Press the blue “<strong>RailDriver</strong> Run/Stop” button (#15 – lower left<br />
corner of the controller).<br />
6. All controls in the cab will adjust to match the position of the<br />
controls on the <strong>RailDriver</strong>. The Status window on the controller<br />
will now display the current speed.<br />
8
Installing Your <strong>RailDriver</strong> <strong>Train</strong> <strong>Cab</strong> <strong>Controller</strong> for use<br />
with Microsoft <strong>Train</strong> Simulator (Windows XP Only)<br />
The most updated instructions and troubleshooting tips can be found at:<br />
http://www.raildriver.com/support/msts.php<br />
1. Install Microsoft <strong>Train</strong> Simulator and any available updates first.<br />
2. Insert the <strong>RailDriver</strong> CD-ROM.<br />
Note: If the program does not start automatically, find<br />
“ainstall.exe” on the <strong>RailDriver</strong> CD and run it.<br />
3. Select the installation option for “Microsoft <strong>Train</strong> Simulator”.<br />
4. You will be prompted through the installation.<br />
5. Plug in the <strong>RailDriver</strong>’s USB connector to a USB port on your<br />
computer.<br />
6. Windows will recognize new hardware and install the drivers<br />
automatically.<br />
7. Reboot your computer when prompted.<br />
Operating your <strong>RailDriver</strong> <strong>Controller</strong> with Microsoft<br />
<strong>Train</strong> Simulator<br />
When the <strong>RailDriver</strong> is not active, “rd” will be displayed in the<br />
status window of the <strong>Controller</strong>.<br />
1. Open <strong>RailDriver</strong> Manager. The first time you start the program,<br />
you will be prompted to calibrate the controller<br />
Note: If you are not prompted to calibrate the controller,<br />
please navigate to the “Options” pull-down menu and select<br />
“Launch <strong>RailDriver</strong> Calibration Setup”.<br />
2. Follow the prompts through the calibration process and put the<br />
controls in their neutral position when finished.<br />
3. Use the pull down menu to select the engine which most closely<br />
matches the locomotive you will be driving in MSTS. Then click<br />
“Play”.<br />
4. Select a route/activity and the same engine you loaded in Step 3,<br />
then click “Start”.<br />
5. Once the cab of your train appears on your monitor, press the<br />
blue “<strong>RailDriver</strong> Run/Stop” button (#15 – lower left corner of the<br />
<strong>Controller</strong>).<br />
6. The Heads-Up Display will be activated and all controls in the<br />
cab will adjust to match the position of the controls on the<br />
<strong>RailDriver</strong>. The Status window on the controller will now display<br />
the current speed.<br />
9
Additional Support<br />
On the enclosed installation disk, you will find complete support for<br />
Microsoft <strong>Train</strong> Simulator®; <strong>Train</strong>Master; <strong>Train</strong>z 2004, 2006, 2009,<br />
2010, 12; RailWorks & Rail Simulator. Just insert the disk and follow the<br />
on-screen instructions.<br />
Please check our web site (www.raildriver.com) for the most current<br />
<strong>RailDriver</strong> software as well as resources for train simulation and train<br />
modeling.<br />
Technical Support<br />
Should you experience difficulties installing or running the <strong>RailDriver</strong><br />
<strong>Desktop</strong>, please contact our Technical Support Department:<br />
Web: http://www.raildriver.com/support/contact.php<br />
E-mail: tech@raildriver.com<br />
Phone: (517) 655-5523<br />
Normal staffing hours are M-F 9-5 EST<br />
How to Find Us<br />
<strong>RailDriver</strong><br />
A Division of P.I. Engineering<br />
101 Innovation Parkway<br />
Williamston, MI 48895 U.S.A.<br />
Telephone: (517) 655-5523 Sales: (800) 628-3185<br />
Fax: (517) 655-4926<br />
Web: www.raildriver.com<br />
E-mail: info@raildriver.com<br />
10
FCC Declaration of Conformity<br />
This device complies with Part 15 of the FCC rules.<br />
Operation is subject to the following two conditions: (1)<br />
This device may not cause harmful interference, and (2)<br />
this device must accept any interference received, including interference that may cause<br />
undesired operation.<br />
This equipment has been tested and found to comply with the limits for a Class B<br />
digital device, pursuant to part 15 of the FCC rules. These limits are designed to<br />
provide reasonable protection against harmful interference when the equipment is<br />
operated in a residential installation. This equipment generates, uses, and can<br />
radiate radio frequency energy and if not installed and used in accordance with the<br />
instruction manual may cause harmful interference to radio communications.<br />
However, there is no guarantee that interference will not occur in a particular<br />
installation. If this equipment does cause harmful interference to radio or television<br />
reception, which can be determined by turning the equipment off and on, the user is<br />
encouraged to try to correct the interference by one or more of the following<br />
measures:<br />
� Reorient or relocate the receiving antenna.<br />
� Increase the separation between the equipment and the receiver.<br />
� Connect the equipment into an outlet on a circuit different from that to which the<br />
receiver is connected.<br />
� Consult the dealer or an experienced radio TV technician for help.<br />
Any changes or modifications not expressly approved by the manufacturer could<br />
void the user’s authority to operate the equipment.<br />
LIMITED WARRANTY<br />
For all <strong>RailDriver</strong> products purchased and installed in the United States and Canada,<br />
P.I. Engineering warrants that the <strong>RailDriver</strong> product will be free from defects in materials<br />
and workmanship under normal use and service, and will meet the specifications presented<br />
by P.I. Engineering at the time of original purchase, for one year as evidenced by a copy of<br />
the purchase receipt. Under this warranty, P.I. Engineering will, at its sole option, repair or<br />
replace any <strong>RailDriver</strong> product which is defective, provided that you are responsible for (i)<br />
the cost of transportation of the product to P.I. Engineering or its designated service facility,<br />
and (ii) any loss or damage to the product resulting from such transportation.<br />
Upon discovery of a defect in the product within the Warranty Period, you should notify<br />
P.I. Engineering Technical Support via telephone to obtain an RMA (return authorization<br />
number) and instructions for shipping the product to a service location designated by<br />
P.I. Engineering. You should send the product, shipping charges prepaid, to the<br />
designated location, accompanied by the return authorization number, your name, address,<br />
and telephone number, proof of purchase, and a description of the defect. P.I. Engineering<br />
will pay for return of product(s) to the customer. P.I. Engineering shall have no<br />
responsibility to repair or replace the <strong>RailDriver</strong> product if the failure has resulted from<br />
accident, abuse, mutilation, misuse, or repair/modification performed by any entity other<br />
than P.I. Engineering.<br />
THIS WARRANTY IS EXCLUSIVE OF ALL OTHER WARRANTIES, WHETHER<br />
EXPRESSED, IMPLIED, OR STATUTORY. P.I. ENGINEERING DOES NOT WARRANT<br />
THIS RAILDRIVER PRODUCT FOR FITNESS FOR A PARTICULAR PURPOSE OR<br />
MERCHANTABILITY. P.I. ENGINEERING AND ITS EMPLOYEES SHALL NOT BE HELD<br />
LIABLE FOR ANY CONSEQUENTIAL, INDIRECT, OR INCIDENTAL DAMAGES, EVEN IF<br />
ADVISED OF THEIR POSSIBILITY, ARISING OUT OF THE USE OR INABILITY TO USE<br />
THIS PRODUCT. SOME STATES DO NOT ALLOW FOR THE EXCLUSION OR<br />
LIMITATION OF CERTAIN LIABILITIES, SO THE ABOVE LIMITATIONS MAY NOT<br />
APPLY TO YOU. THIS WARRANTY GIVES YOU SPECIFIC LEGAL RIGHTS, AND YOU<br />
MAY ALSO HAVE OTHER LEGAL RIGHTS WHICH VARY FROM STATE TO STATE.<br />
11
In the event that the above limitations are held unenforceable, P.I. Engineering’s liability for<br />
any damages to you or to any party shall not exceed the purchase price you paid,<br />
regardless of the form of any claim.<br />
This limited warranty is valid for and only applies to products purchased and used inside<br />
the United States (and its territories) and Canada. This limited warranty is governed by the<br />
laws of the United States of America and the State of Michigan.<br />
<strong>RailDriver</strong> Electronic Design: P.I. Engineering, Inc., Williamston, Michigan<br />
Patent Pending<br />
© 2011 P.I. Engineering, Inc. All rights reserved.<br />
<strong>RailDriver</strong>, Y-mouse, Y-see two, Y-key key, X-keys, and the “P.I. Eclipse” are trademarks of P.I. Engineering, Inc.<br />
PS/2 is a registered trademark of International Business Machines, Inc. All other trademarks are property of their<br />
respective owners.<br />
Other Products from P.I. Engineering<br />
Visit our web site (www.xkeys.com) for detailed descriptions.<br />
X-keys ® User-programmable keyboards and controls<br />
XK-24 USB keypad XK-80 USB keyboard XK-16 Stick XK-3 Foot Pedal<br />
58 Key Pro 20 Key <strong>Desktop</strong> Jog & Shuttle Pro Joystick Pro<br />
Y-mouse Dual<br />
Mouse Adapter<br />
Steam<br />
Firing<br />
Manual<br />
Decorative<br />
Hitch<br />
Coupler<br />
Y-mouse ® Splitters & Adapters<br />
Y-key key<br />
Dual Keyboard<br />
Adapter<br />
12<br />
Y-mouse Keyboard<br />
& Mouse Adapter<br />
for USB<br />
<strong>RailDriver</strong> ® Products<br />
1922<br />
Locomotive<br />
Cyclopedia<br />
1922<br />
Car Builders<br />
Cyclopedia<br />
Y-see two<br />
Video Splitter<br />
1921<br />
Maintenance of<br />
Way Cyclopedia<br />
ShipDriver TM<br />
ShipDriver Watercraft Simulation <strong>Controller</strong> – Dock the keyboard and<br />
mouse. Visit www.shipdriver.com for more information.