Signature Z1 - Primera
Signature Z1 - Primera
Signature Z1 - Primera

Create successful ePaper yourself
Turn your PDF publications into a flip-book with our unique Google optimized e-Paper software.
USER’S GUIDE
WELCOME MESSAGE NOTICE<br />
Thank you for choosing the <strong>Signature</strong> <strong>Z1</strong> CD/DVD Printer. The <strong>Z1</strong><br />
is the perfect tool for labeling all of your custom CDs and DVDs<br />
quickly, easily and with a touch of class. The <strong>Z1</strong> lets you print text<br />
and graphics directly to the surface of discs. Quality is high,<br />
operation is simple, and the printed images are smudge resistant and<br />
completely waterproof.<br />
Please use the CD/DVD Printer on BLANK CDs or DVDs, as the<br />
printing process could damage any data stored on a CD/DVD. Please<br />
ensure the printing surface is SMOOTH AND CLEAN. <strong>Primera</strong><br />
assumes no liability for any loss or corruption of data stored as a<br />
result of using this product.<br />
Be sure to read the SAFETY INSTRUCTIONS as stated in this user’s<br />
manual as handling it improperly might cause damage to the printer or<br />
cause physical harm to the users.<br />
2<br />
The information contained in this manual is subject to change<br />
without notice.<br />
<strong>Primera</strong> shall not be liable for errors contained in this manual or for<br />
any loss or damage in connection with the furnishing, performance,<br />
or use of this manual and product.<br />
No person shall duplicate, photocopy , or reproduce this manual and<br />
application software without the prior written consent of <strong>Primera</strong><br />
Technology, Inc.<br />
Printed in 2004. All right reserved.<br />
TRADEMARKS<br />
Microsoft and Windows are registered trademarks of<br />
Microsoft Corporation.
TABLE OF CONTENTS<br />
○ ○ ○ ○ ○ ○ ○ ○ ○ ○ ○ ○ ○ ○ ○<br />
WELCOME MESSAGE 2<br />
NOTICE 2<br />
○ ○ ○ ○ ○ ○ ○ ○ ○ ○ ○ ○ ○ ○ ○ ○ ○ ○ ○ ○ ○<br />
○ ○ ○ ○ ○ ○ ○ ○ ○ ○ ○ ○ ○ ○ ○ ○ ○ ○<br />
TRADEMARKS 2<br />
○ ○ ○ ○ ○ ○ ○<br />
○ ○ ○ ○ ○ ○ ○ ○ ○<br />
○ ○ ○ ○ ○ ○ ○ ○ ○ ○ ○ ○ ○ ○ ○<br />
INTRODUCING YOUR CD/DVD PRINTER 4~8<br />
What’s in your printer box<br />
Product Specifications<br />
Safety Instructions<br />
General Features of the CD/DVD Printer<br />
Printing Functions<br />
SETTING UP THE CD/DVD PRINTER 8~21<br />
Getting Started : Minimum System Requirement<br />
Installing Application Software<br />
Installing USB Driver<br />
Uninstalling Application Software<br />
Making Connections<br />
Loading the Ribbon Cartridge<br />
Replacing the Ribbon Cartridge<br />
USING THE PRINTER 21~24<br />
Loading a Printable Disc<br />
Removing a Printed Disc<br />
Creating A Label<br />
Importing Images<br />
Creating Curvy Text<br />
3<br />
○ ○ ○ ○ ○ ○ ○ ○ ○ ○ ○ ○<br />
MAINTAINING THE PRINTER 24~26<br />
Preventative Maintenance<br />
Trouble Shooting<br />
Error Messages
CD / DVD Printer<br />
Power Cord AC Adapter USB Cable<br />
Driver CD-ROM<br />
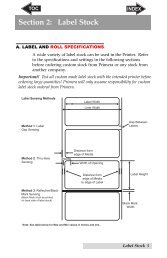
INTRODUCING YOUR CD/DVD PRINTER<br />
What’s in your printer box<br />
Please check and make sure that you have all the items listed below<br />
when you unpack your printer box:<br />
Ribbon Cartridge<br />
Blank CD-R for<br />
Test Printing<br />
If any of the above items are damaged or missing, please contact<br />
your retailer immediately.<br />
4<br />
PRODUCT SPECIFICATIONS<br />
PRINTER<br />
Print Resolution: 200dpi<br />
4x90 degree rotation function supports 4 print areas:<br />
Top & Bottom Section - 2 x 0.94" X 2.36" (24mm x 60mm)<br />
Left & Right Section - 2 x 0.94" X 1.57" (24mm x 40mm)<br />
Input Power Requirements: 100 - 240 V<br />
Output Power Requirements: 24V DC<br />
Power Consumption: max 14.4W<br />
Dimensions of Printer (WxDxH): 9.25" X 7.48" X 2.76"<br />
(235mmx190mmx70mm)<br />
Weight of Printer: 2.2lbs (1 Kg)<br />
Operating Temperature: 50° to 95° F (10° to 35° C)<br />
Storage Temperature: 68° to 140° F (20° to 60° C)<br />
RIBBON CARTRIDGES<br />
The CD/DVD Printer includes one Ribbon Cartridge for<br />
monochrome printing.<br />
Ribbon Cartridge: 27.91 ft (8.5m)<br />
� Black<br />
� Red<br />
� Yellow<br />
� Blue
PRODUCT SPECIFICATIONS<br />
PRINTER CABLE<br />
Your printer comes with a standard USB cable for connecting<br />
the printer to the PC.<br />
Power Cord & AC Adapter<br />
A Power Cord and AC Adapter is supplied for connection to<br />
a power source.<br />
APPLICATION SOFTWARE<br />
The CD/DVD Printer’s application software enables you to design<br />
your CD/DVD label, and communicate your print command to the<br />
printer. You will find the software on the driver CD-ROM supplied.<br />
5<br />
SAFETY INSTRUCTIONS<br />
Please read the safety instructions thoroughly before using the CD/<br />
DVD Printer.<br />
Danger!<br />
Please handle the device according to following safety instructions,<br />
as otherwise it may cause fire or electric shock, which could result<br />
in the possibility of death or serious personal injury.<br />
Do not touch the power cord, USB cable or AC adapter<br />
when your hands are wet.<br />
Do not allow any liquids to get into the product.<br />
Do not use the printer if it starts to emit smoke or strange odor.<br />
Do not abuse the power cord, AC adapter or USB cable.<br />
Do not disassemble or modify the printer.<br />
Do not dispose of the product by incineration as it may explode<br />
in fire.<br />
Keep the plastic bag away from children after unwrapping as<br />
it may cause suffocation.
Caution!<br />
SAFETY INSTRUCTIONS<br />
Please handle the device according to the following instructions, as<br />
otherwise it may lead to damage of the printer.<br />
Do not place the product near any heat sources.<br />
Do not pull the power cord or USB cable during unplugging.<br />
Grip and pull out the plug directly.<br />
Make sure that the power cord is firmly plugged into the<br />
power socket when in use.<br />
Make sure that the USB cable is firmly plugged into both the<br />
PC and the printer when in use.<br />
Do not place any objects on top of the printer.<br />
Do not place the printer on unstable surfaces.<br />
Do not touch the printer head or metallic parts nearby after<br />
use as they may be hot.<br />
Do not use electrical items that are not supplied with the printer.<br />
6<br />
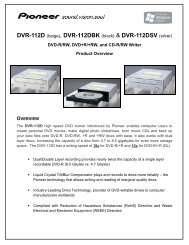
General Features of the CD/DVD Printer<br />
Top View<br />
Access Door<br />
Figure 1<br />
Access Door - For loading and removing the disc and ribbon<br />
cartridge. (Refer to Figure 1)<br />
Front View<br />
Access Door<br />
Power ON/OFF button<br />
Power Button<br />
Figure 2<br />
Press power switch to ON to be ready for applications.<br />
(Refer to Figure 2)<br />
Press power switch to OFF to cancel a print job or shut down<br />
the printer.
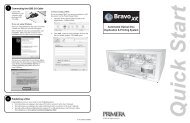
Rear View<br />
AC adapter<br />
terminal<br />
USB Port<br />
Figure 3<br />
AC adapter terminal<br />
Connect the supplied AC adapter to the printer’s AC adapter<br />
terminal (Refer to Figure 3) for connection to power source.<br />
Printer’s USB port<br />
Connect the supplied USB cable to the USB port<br />
(Refer to Figure 3) for connection to your PC.<br />
7<br />
PRINTING FUNCTIONS<br />
The CD/DVD Printer provides printing in up to 4 sectional areas to<br />
create a CD/DVD label.<br />
Top, right, bottom and left areas each covered at 90 0 intervals<br />
Easy-to-use selection of areas to edit.<br />
Supports creation of Text and Graphics Labels<br />
Original text labels<br />
Curved text labels<br />
Resizable images<br />
Curved Text<br />
Print Area<br />
Text<br />
Graphic
PRINTING FUNCTIONS<br />
Support for Text Label Editing<br />
Font setting variations<br />
Selection of font<br />
Selection of font size<br />
Paragraph setting<br />
Bullets and Numbering Setting<br />
Tables insertion<br />
Copy, Cut and Paste features for easy import/export of rich text<br />
Easy to understand window layout<br />
Immediate print preview in window layout<br />
Word processor style layout gives maximum flexibility for<br />
text manipulation.<br />
8<br />
SETTING UP THE CD/DVD PRINTER<br />
Getting Started: Minimum System Requirements<br />
The following are the minimum system requirements for using<br />
the CD/DVD Printer.<br />
Operating Systems<br />
The printer’s application software is designed to operate in<br />
the following environments:<br />
Microsoft Windows 98 Second Edition<br />
Microsoft Windows Millennium Edition (Windows ME)<br />
Microsoft Windows 2000 (Professional)<br />
Microsoft Windows XP (Home or Professional)<br />
Minimum color display of 256 colors<br />
(high color display is recommended)<br />
Minimum resolution of 800 x 600<br />
(higher resolution is recommended)<br />
Hardware Requirements<br />
Minimum requirements of Pentium 90MHz, 32MB RAM<br />
CD-ROM drive<br />
1 USB 1.1 port (USB 2.0 compatible)<br />
Note!<br />
The application software may not be able to function correctly<br />
on certain hardware and software configurations. Ensure that<br />
all available operating system service packs are installed if you<br />
experience difficulties in using the CD/DVD Printer’s<br />
application software.
INSTALLING APPLICATION SOFTWARE<br />
1 . Insert the CD-ROM in your PC.(If auto run is disabled on your<br />
PC, open Windows Explorer and click the CD icon.)<br />
2. The driver set -up instructions will auto-run on the PC.<br />
3. Follow the instructions on the PC and install the<br />
“Microsoft®. NET Framework” (if you do not have the<br />
Microsoft. NET Framework installed on your PC)<br />
4. Install the “CD/DVD Application”.<br />
Note: Depending on your PC configuration, the display screen<br />
may not be the same as shown on the picture below.<br />
9<br />
1 . The InstallShield Wizard will guide you through the program setup.<br />
2 . InstallShield® will search for the Microsoft. NET Framework. If<br />
it is not found, the Microsoft. NET Framework License Agreement<br />
will appear.<br />
Note: Read all the terms and conditions of the License Agreement.<br />
Click “I agree” & “Install” to begin the installation
3. This starts installation<br />
4. A display screen will appear to let you know when the installation<br />
is complete.<br />
Click OK.<br />
The Microsoft.Net Framework application is now installed.<br />
5. **InstallShield will search for the CD-DVD Application on<br />
your PC.<br />
10<br />
6. Key in your User Name & Organization<br />
Click Next<br />
7. If you want the application to be installed in a folder other than<br />
specified, Click Change and input the directory.<br />
Click Next
8. The InstallShield Wizard will install the CD-DVD Printer<br />
Application to the PC.<br />
9. Click Finish.<br />
The application is now installed.<br />
11<br />
** Note : Due to stability, the install wizard may ask for a system<br />
reboot before the CD/DVD Printer Application is installed.<br />
If setup doesn’t continue after a reboot, just re-run<br />
the set-up. The installation will continue from the place<br />
it was interrupted.
1. These instructions are for Microsoft Windows 2000<br />
(Professional)<br />
** Note: Depending on your PC configuration, the display screen<br />
may not be the same as shown on the picture below.<br />
2. Click Next.<br />
This causes the Found New Hardware Wizard to appear.<br />
14<br />
3. Highlight the icon “Search for a suitable driver for my device”.<br />
Click Next.
4. Click Specify a location.<br />
Click Next.<br />
Click Browse . It will locate the driver from<br />
CD-ROM\\Drivers\win2kXP<br />
Click OK. Click Next<br />
5. The Windows driver will search for the CSQ200 driver.<br />
Click Next.<br />
15<br />
6. This starts the installation<br />
Click Finish.
1. These instructions are for Microsoft Windows XP<br />
** Note: Depending on your PC configuration, the display screen<br />
may not be the same as shown on the picture below.<br />
2. Highlight the icon “Install from a list or specific location”.<br />
Click Next.<br />
16<br />
3. Click “Search for the best in these locations”.<br />
Click “Include this location in the search”.<br />
Click Browse<br />
4. It will locate the driver from CD-ROM\\Drivers\win2kXP<br />
Click OK<br />
Click Next
5. The Windows driver will search for the CSQ200 driver<br />
Click Next.<br />
6. Click “Continue Anyway”<br />
This starts the installation<br />
17<br />
7. Click Finish.
UNINSTALLING THE APPLICATION SOFTWARE<br />
1. Click the Windows Start button, point to Settings, and then<br />
click Control Panel.<br />
2. Once the control panel window appears, double click<br />
Add / Remove Programs.<br />
3. Once the dialogue box appears, click CD/DVD Printer Application<br />
in the list of installed software.<br />
4. Click the Remove button. Once the file delete confirmation<br />
dialogue box appears, click Yes to begin the<br />
uninstallation process.<br />
5. Once it is completed, click Close to exit.<br />
18<br />
MAKING CONNECTIONS<br />
The application software for the CD/DVD Printer must be installed<br />
on your PC before connecting the power supply.<br />
1) Connect the power cord to the AC adapter.<br />
2) Connect AC adapter to the printer’s AC adapter terminal & plug<br />
the power cord into a power socket.
MAKING CONNECTIONS<br />
3) Connect the USB cable to the USB port of the PC.<br />
4) Connect the USB cable to the USB port of the printer<br />
The side with the arrow should be pointing down.<br />
Do not disconnect the AC Adapter, power cord or USB cable during<br />
the printing process as it may cause the printer to malfunction.<br />
Only use the power cord and AC Adapter supplied with the printer.<br />
Ensure that you use a standard household power socket rated for<br />
the voltage specified on the supplied AC adapter.<br />
Connect the USB cable directly to the USB port of the PC.<br />
Connecting through a hub or chaining through another USB device<br />
may cause the printer to malfunction.<br />
19<br />
LOADING THE RIBBON CARTRIDGE<br />
1. Tighten the ribbon in the ribbon cartridge by turning the hub<br />
using an object with sharp end. The printer will malfunction<br />
if the ribbon is slack.<br />
Pen<br />
2. Start the CD/DVD printer application.<br />
Cartridge<br />
3. Click the “Change Cartridge” icon on the window<br />
application to move the cartridge holder to the ‘Change<br />
cartridge position” or “cancel” to exit.<br />
4. Open the printer access door.<br />
Access door
LOADING THE RIBBON CARTRIDGE<br />
5. Position the ribbon cartridge so that the ribbon passes under<br />
the cartridge bar.<br />
Cartridge<br />
Cartridge<br />
Bar<br />
Access door<br />
6. Press the ribbon cartridge against the carriage until the cartridge<br />
is in line with the carriage bar.<br />
7. Click the OK button on the cartridge dialogue box and the<br />
cartridge will move back to the home position,<br />
or “Cancel” to exit.<br />
8. Close the printer access door.<br />
20<br />
REPLACING THE RIBBON CARTRIDGE<br />
1. Start the CD/DVD Printer Application<br />
2. Click the “Change Cartridge” icon on the window<br />
application to move the cartridge holder to the “change cartridge<br />
position” or “cancel” to exit.<br />
3. Open the printer access door.<br />
4. Pull out the ribbon cartridge from its position.<br />
Take care that the cartridge does not move, grip the ribbon<br />
cartridge on both sides with your fingers and pull it out.<br />
5. Replace with another ribbon cartridge by pressing it against<br />
the carriage until the cartridge is in line with the carriage bar.
6. Click the OK button on the cartridge dialogue box and the<br />
cartridge will move back to the home position,<br />
or cancel to exit.<br />
7. Close the printer access door.<br />
Caution !<br />
Do not apply too much force to the ribbon winder shaft as it may<br />
lead to damage.<br />
21<br />
USING THE PRINTER<br />
CD/DVD<br />
CD/DVD CATCH<br />
Figure 4<br />
Loading a Printable Disc<br />
1. Open the printer access door<br />
CD/DVD CATCH<br />
press and release<br />
Figure 5<br />
2. Place blank printable disc firmly onto the CD/DVDcatch<br />
(Refer to Figure 4)<br />
3. Close the printer access door<br />
Removing a Printed Disc<br />
1. Open the printer access door<br />
2. Press down the center of the CD/DVD catch to release disc<br />
(Refer to Figure 5)<br />
3. Close the printer access door
CREATING A LABEL<br />
1. Place the disc onto the CD catch with its printing surface facing<br />
up. Do not place the printing surface facing downward as it will<br />
damage the disc.<br />
2. On the Windows desktop, double-click the icon and<br />
the main application window will appear.<br />
Alternatively, you can also run the application by clicking the<br />
Start button followed by Programs. Next, click the<br />
CD/DVD Printer application and select the CD/DVD<br />
Printer from the list.<br />
3. Click on any label boxes to create text.<br />
4. Click on the “Formatted Text Edit” icon<br />
5. A window “Area” will appear<br />
22<br />
6. Configure the layout setting. Make the selection by clicking the<br />
respective pattern icon on the top of the editing window.<br />
7. Select a font<br />
Select the font type, size, style and text alignment in the<br />
editing window.<br />
Edit the content<br />
Click on other label boxes to continue with their editing or<br />
outside these boxes to exit.<br />
8. Print a label<br />
Click the print icon.<br />
The printing display dialog box appears.<br />
Click OK. This will start the printing operation.<br />
9. Save a label by clicking the icon. The printing job is saved<br />
in your Windows My Document folder.<br />
10. To quit the CD/DVD Printer application.<br />
Go to File tab.<br />
On the drop down menu, click Exit.<br />
A dialog box will appear. Click Yes to exit the application.
IMPORTING IMAGES<br />
You can import images into the label from files or folders.<br />
1. Click on any label boxes to import the images.<br />
2. Click on the “Switch to image edit mode” icon.<br />
3. A window “Area” will appear.<br />
4. Click on the “Insert/Change image” icon<br />
5. A window “Image Attributes” will appear “Image Position” and<br />
“Scaling” can be adjusted under here.<br />
23<br />
6. Click on the “Load Image”. The file dialog box will appear,<br />
select the directory and the file that you want to insert.<br />
7. Click OK.<br />
8. The image will be imported to the label box.
CREATING CURVY TEXT<br />
1. Click on any label box to import the curvy text<br />
2. Click on the “Curved Text” icon<br />
3. A window “Area” will appear<br />
4. Click on the “Enter Text” icon<br />
5. A window “Edit Text” will appear<br />
A wide selection of “Font Text” is available.<br />
6. Click “Distance From Centre” to adjust the size of the font.<br />
7. The curvy text will be imported to the label box.<br />
8. Place the cursor outside the box to exit.<br />
24<br />
Print head beneath<br />
carriage bar<br />
MAINTAINING THE PRINTER<br />
Figure 6<br />
Preventative Maintenance<br />
Always maintain the print head in clean condition. For cleaning,<br />
use a cotton swab moistened with alcohol or commercially<br />
available cassette tape recorder head cleaning kit to clean the<br />
print head (Refer to Figure 6)<br />
Prevent dust from collecting on the exterior surface by cleaning<br />
with a cloth moistened with clean water. Do not use alcohol,<br />
thinner, or other volatile agents on the exterior surfaces as it can<br />
damage the casing.
CLEANING THE PRINT HEAD<br />
A dirty print head will produce bad print quality.<br />
Perform the following steps to clean the print head when it<br />
becomes dirty.<br />
Note: Use a cotton bud stick or other soft material to clean<br />
the print head.<br />
1. Click on file and select “Clean Print Head…” on the drop down<br />
menu. (See Figure 7)<br />
2. Click OK to continue.<br />
Figure 7<br />
25<br />
3. The Carriage will move to the cleaning position. Unplug the Power<br />
Cable and the USB Cable before cleaning the Print Head.<br />
Click Ok.<br />
4. Use a cotton bud stick moistened with alcohol to clean the print<br />
head. You can also use a commercially available cassette tape<br />
recorder head cleaning kit to clean the print head. Insert the tip of<br />
the cotton bud stick and slide it lightly back and fro along the area<br />
shown in the Figure 8.<br />
5. Plug the 2 cables back and continue printing.<br />
Figure 8
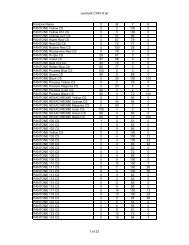
TROUBLESHOOTING<br />
Problem Solution<br />
No response from<br />
my printer<br />
Poor printer<br />
quality<br />
1)Ensure that all the connectors are<br />
connected properly.<br />
2)Ensure that the application software<br />
is installed:<br />
-Disconnect the USB cable and<br />
reinstall the CD/DVD printer<br />
application software.<br />
-Reconnect the cable.<br />
1)If the print head is dirty, clean the<br />
print head as described in the<br />
preventive maintenance above.<br />
2)If the printing density is improper,<br />
adjust the printing desity.<br />
3)If the disc print surface is not<br />
suitable, change the disc media.<br />
Thermal printable media is<br />
recommended.<br />
26<br />
Unable to print<br />
Portions of input<br />
data are not<br />
printed.<br />
Ribbon become<br />
loose<br />
Printer or PC<br />
application hangs<br />
The ribbon cartridge has run out.<br />
Replace the cartridge according to<br />
loading procedure.<br />
Reduce the number of lines or use a<br />
smaller font size.<br />
Remove the cartridge from the printer<br />
and roll the ribbon with a sharp ended<br />
object at the hub of cartridge until it<br />
is tight.<br />
Unplug both USB and Power adapter<br />
cable from the printer. Reconnect<br />
USB and Power adapter cable to<br />
printer.
ERROR MESSAGES<br />
You may sometimes receive the following common error messages<br />
while using the printer. Please follow the following instructions if you<br />
encounter them.<br />
Error Message Action<br />
No ribbon<br />
cartridge in the<br />
printer.<br />
The ribbon is<br />
finished.<br />
Not enough<br />
ribbon for the<br />
next printing.<br />
Load a ribbon cartridge in the printer<br />
and try again. Follow the procedure<br />
under the section on “ loading the<br />
ribbon cartridge”<br />
Unload the ribbon cartridge and load a<br />
new one. Follow the procedure under<br />
the section on “Replacing the ribbon<br />
cartridge.”<br />
Replace the ribbon cartridge before<br />
proceeding on with the next print job.<br />
27
SIGNATURE <strong>Z1</strong> LIMITED WARRANTY<br />
A. What is Covered.<br />
<strong>Primera</strong> technology, Inc. “PRIMERA” warrants to the<br />
original purchaser that the product enclosed with<br />
this Limited Warranty statement and used in the<br />
country of purchase will conform to the<br />
manufacturer’s specifications and be free from<br />
defects in workmanship and materials for a period<br />
of one (1) year from the date of original purchase.<br />
Parts subject to wear and tear will conform to the<br />
manufacturer’s specifications and be free from<br />
defects in workmanship and materials for a period<br />
of ninety (90) days. PRIMERA shall have the sole<br />
right to determine if a part is subject to wear and<br />
tear.<br />
B. What PRIMERA Will Do To Correct Problems.<br />
Should your PRIMERA product prove defective<br />
during this period, please call, FAX or email<br />
PRIMERA’s Technical Support Group at the<br />
telephone number or address listed below for a<br />
Return Merchandise Authorization number “RMA”.<br />
Then, deliver the product securely packaged in its<br />
original container or an equivalent, along with proof<br />
of the date of original purchase and your RMA, to<br />
your place of purchase or an Authorized PRIMERA<br />
Service Center. PRIMERA will, at its option, repair or<br />
28<br />
replace the defective unit at no charge to you.<br />
<strong>Primera</strong> will provide 30 days of free telephonebased<br />
technical support beginning after the first<br />
call is placed. After 30 days has lapsed, there will<br />
be a $10.00 fee per incident. Technical support via<br />
email is provided at no charge. Contact<br />
support@primera.com or call 763-475-6669.<br />
C. What This Warranty Does Not Cover.<br />
This warranty covers only normal officeenvironment<br />
use in the country of original<br />
purchase. PRIMERA is not responsible for warranty<br />
service should the PRIMERA label or logo or the<br />
rating label or serial number be removed or should<br />
the product fail to be properly maintained or fail to<br />
function properly as a result of misuse, abuse,<br />
improper installation, neglect, duty cycle abuse,<br />
improper shipping, damage caused by disasters<br />
such as fire, flood, and lightning, improper<br />
electrical current, software problems, interaction<br />
with non-PRIMERA products, damage caused by<br />
debris or other disc contamination, or service other<br />
than by a PRIMERA Authorized Servicer. Duty cycle<br />
abuse is defined as operation of this equipment<br />
beyond its nominal duty cycle; all repairs thereafter<br />
are to be billed on a time and materials basis.<br />
Postage, insurance, or shipping costs incurred in<br />
presenting your PRIMERA product for warranty
service are your responsibility. If a claimed defect<br />
cannot be identified or reproduced in service, you<br />
will be held responsible for costs incurred.<br />
IMPORTANT: if using a mechanical switch box<br />
between this product and another product, be<br />
certain that it includes surge protection.<br />
Non-warranty damage to your product could result<br />
from the use of unprotected mechanical switch<br />
boxes.<br />
PRIMERA SHALL NOT BE HELD LIABLE FOR THE<br />
INTEGRITY AND/OR LONGEVITY OF ANY TEXT,<br />
PHOTOGRAPHIC IMAGES, DIGITIZED IMAGES,<br />
GRAPHICS, BAR CODES, OR COMBINATION<br />
THEREOF THAT ARE PRODUCED, GENERATED,<br />
OR OTHERWISE TRANSFERRED TO DISCS BY<br />
THE USE OF PRIMERA’S HARDWARE OR<br />
SOFTWARE NOR IS PRIMERA LIABLE FOR THE<br />
INTEGRITY, VIABILITY, OR LONGEVITY OF THE<br />
DATA ENCODED ON THE DISC. THE WARRANTY<br />
AND REMEDY PROVIDED ABOVE ARE EXCLUSIVE<br />
AND IN LIEU OF ALL OTHER WARRANTIES,<br />
EITHER EXPRESS OR IMPLIED, INCLUDING BUT<br />
NOT LIMITED TO IMPLIED WARRANTIES OF<br />
MERCHANTABILITY AND FITNESS FOR A<br />
PARTICULAR PURPOSE. UNLESS STATED<br />
HEREIN, ANY STATEMENTS OR<br />
REPRESENTATIONS MADE BY ANY OTHER<br />
29<br />
PERSON OR FIRM ARE VOID. THE DURATION OF<br />
ANY WARRANTIES, EITHER EXPRESS OR<br />
IMPLIED, INCLUDING BUT NOT LIMITED TO<br />
IMPLIED WARRANTIES OF MERCHANTABILITY<br />
AND FITNESS FOR A PARTICULAR PURPOSE, ON<br />
YOUR PRIMERA PRODUCT SHALL BE LIMITED TO<br />
THE DURATION SET FORTH ABOVE. NEITHER<br />
PRIMERA TECHNOLOGY, INC. NOR ITS<br />
AFFILIATES SHALL BE LIABLE FOR ANY LOSS,<br />
INCONVENIENCE, OR DAMAGE, INCLUDING<br />
DIRECT, SPECIAL, INCIDENTAL, OR<br />
CONSEQUENTIAL DAMAGES, RESULTING FROM<br />
THE USE OR INABILITY TO USE THE PRIMERA<br />
PRODUCT, WHETHER RESULTING FROM<br />
BREACH OF WARRANTY OR ANY OTHER LEGAL<br />
THEORY EVEN IF PRIMERA HAS BEEN ADVISED<br />
OF THE POSSIBILITY OF SUCH DAMAGES.<br />
This Limited warranty is governed by the laws of the<br />
State of Minnesota, United States of America, and<br />
the venue for the resolution of any and all disputes<br />
shall be the county of PRIMERA’s principal place of<br />
business. Any dispute arising out of or relating to<br />
this Limited Warranty shall be submitted to U.S.<br />
Arbitration and Mediation of Minnesota for<br />
mediation. U.S. Arbitration and Mediation of<br />
Minnesota’s rules and procedures governing<br />
mediation shall apply.
Some states and/or countries do not allow<br />
limitations on how long an implied warranty lasts<br />
and some states and/or countries do not allow the<br />
exclusion or limitation of incidental or<br />
consequential damages, so the above limitation<br />
and exclusion may not apply to you. This warranty<br />
gives you specific legal rights, and you may also<br />
have other legal rights, which vary from state to<br />
state and/or country to country. To locate the<br />
PRIMERA Authorized Reseller or PRIMERA<br />
Authorized Service Center nearest you, email, call<br />
or FAX:<br />
Email: sales@primera.com<br />
Telephone: (763) 475-6676<br />
FAX: (763) 475-6677<br />
or write to:<br />
<strong>Primera</strong> Technology, Inc.<br />
Attn: Warranty Service Department<br />
Two Carlson Parkway North<br />
Plymouth, MN 55447-4446 U.S.A<br />
30
HD1PPD1TE17