

Jeep Cherokee DIY Winch Bumper Assembly ... - JCR Offroad
Jeep Cherokee DIY Winch Bumper Assembly ... - JCR Offroad
Jeep Cherokee DIY Winch Bumper Assembly ... - JCR Offroad

You also want an ePaper? Increase the reach of your titles
YUMPU automatically turns print PDFs into web optimized ePapers that Google loves.
<strong>Jeep</strong> <strong>Cherokee</strong> <strong>DIY</strong> <strong>Winch</strong><br />
<strong>Bumper</strong> <strong>Assembly</strong> Instructions<br />
Thank you for purchasing your <strong>DIY</strong> <strong>Bumper</strong> from<br />
Jcr<strong>Offroad</strong>! Be sure to checkout www.jcroffroad.com for<br />
more deals and other great off road products. Please read<br />
these assembly instructions carefully before attempting to<br />
build this <strong>DIY</strong> product.<br />
If you have any questions or are missing parts, please<br />
don’t hesitate to call us at 269-353-1184!<br />
****Jcr<strong>Offroad</strong> can not be held responsible for miss-assembly or faulty assembly. It is your<br />
responsibility to be able to properly weld this product together. Extreme care should be taken to<br />
ensure that the person welding is duly qualified and has experience with the process.****<br />
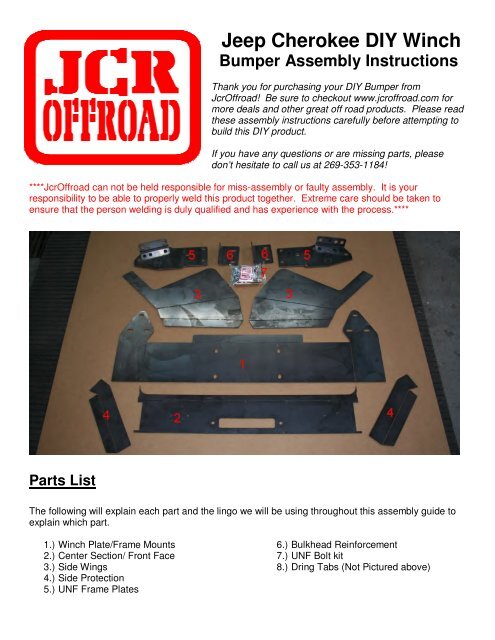
Parts List<br />
The following will explain each part and the lingo we will be using throughout this assembly guide to<br />
explain which part.<br />
1.) <strong>Winch</strong> Plate/Frame Mounts<br />
2.) Center Section/ Front Face<br />
3.) Side Wings<br />
4.) Side Protection<br />
5.) UNF Frame Plates<br />
6.) Bulkhead Reinforcement<br />
7.) UNF Bolt kit<br />
8.) Dring Tabs (Not Pictured above)
Assemebly<br />
1. The first piece you will want to bend will be the (1) front Center Section. You will be bending<br />
one 90* angle. It doesn’t matter which side you make the front.<br />
a.) Clamping the Center Section to a table, bend up the first 90* angle. (see figure 1a)<br />
b.) You may can clamp it either way, figure 1b shows the other option.<br />
2. Set the bent Center Section (2) off to the side. Next you will need to bend the <strong>Winch</strong> Plate and<br />
Mounts (1) There will be three bends, all will be bent to 90*.<br />
a.) Clamp the bumper to the table to bend one of the bumper mounts. Bend up the first<br />
mount to a 90* angle. Bend the other mount up to a 90* angle. (see figure 2)<br />
b.) The last bend will be the 1” flange on the back of the winch plate. Bend up to 90*.
3. Set the bent <strong>Winch</strong> Plate (1) off to the side. Next you will need to bend the two <strong>Bumper</strong> Wings<br />
Both the top bend and bottom bend both will be bent to 90*. ***You will need to bend a Right<br />
and Left, which will end up having two wings that are opposites.****<br />
a.) Clamp one of the <strong>Bumper</strong> Wings to the table. Bend up the first 90* angle. Re-clamp the<br />
wing and bend the second 90* angle. (see figure 3)<br />
b.) Repeat on the second <strong>Bumper</strong> Wing<br />
4. You will now be bending the two Side Protection parts (4). The long angle will be bent to 65*<br />
and the small back flap will be bent over to butt against the other bend. ***You will need to<br />
bend a Right and Left, which will end up having two wings that are opposites.****<br />
a.) If available, it’s best to bend these in a vice. Clamping as shown in Figure(s) 4, you will<br />
bend the 65* angle first.<br />
b.) Next bend the smaller flap over to meet the angle. You may need to tweak the part for<br />
a perfect fit.
5. With all the parts bent, you will now start to tack the bumper together. First you will want to<br />
tack together the <strong>Winch</strong> Plate (1) and Front Center Section (2).<br />
a.) The bend on the Center Section (2) will be the top of the bumper.<br />
6. With the center of the bumper tacked together, you will now tack on the outer Wings (3)<br />
a.) Lay the center of the bumper top down on the table. Lay out the right and left <strong>Bumper</strong><br />
Wing face down on each end. (Figure 6a)<br />
b.) Position one wing to the center section and tack weld it in place. (Figure 6b) Repeat on<br />
other side.<br />
****Be sure to only tack the bumper together at this point. ****
7. Once you have the wings tacked on, carefully flip the bumper over. With the bumper right side<br />
up, you will need to position the top of the <strong>Bumper</strong> wings and tack them in place<br />
8. The next parts to be tack on will be the Side Protection caps (4). Clamp the caps to the<br />
bumper and tack weld each side (Figure 8)
9. After every part is securely tacked , it would be wise to test fit the bumper on your <strong>Jeep</strong> before<br />
final welding, grinding, and finishing. *<br />
10. With the bumper tacked together and fit checked, it is now time to fully weld the bumper<br />
together. We recommend welding the back side first.<br />
11. After the bumper has cooled off some, this is where we recommending doing the grinding.<br />
You may want to do preliminary grinding here and finish grinding at the end, but the shell of the<br />
bumper is easier to grind before the d-ring tabs are welded in.<br />
12. With the bumper welded together and ground, it is now time to install in the Dring tabs.<br />
a.) Insert the tabs from the back (Figure 7a) and tap them into place with a dead blow<br />
hammer. The tabs will sick up around 3/8” in the back. This is correct. (Figure 7b)<br />
b.) Once the alignment of the tabs is verified, weld them completely front and back.<br />
* The Front Uniframe Reinforcement kit will need to be installed before installing the bumper.<br />
Without the additional plates, the bumper mounts will be too wide for the front factory frame rails. If<br />
you have your own or another brand of Uniframe tie in brackets, you will need to remove the front<br />
three bumper mounts in order to install the bumper.

