
You also want an ePaper? Increase the reach of your titles
YUMPU automatically turns print PDFs into web optimized ePapers that Google loves.
SmarResearch<br />
TechnologySource<br />
HART ®<br />
Fieldbus<br />
Profibus<br />
Intrinsic Safety<br />
Configuration Tools<br />
Semiconductors<br />
Training<br />
Custom Design<br />
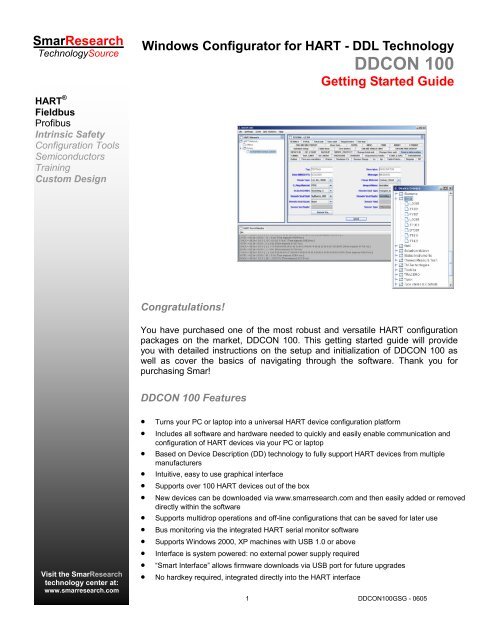
Windows Configurator for HART - DDL Technology<br />
<strong>DDCON</strong> <strong>100</strong><br />
Getting Started Guide<br />
Congratulations!<br />
You have purchased one of the most robust and versatile HART configuration<br />
packages on the market, <strong>DDCON</strong> <strong>100</strong>. This getting started guide will provide<br />
you with detailed instructions on the setup and initialization of <strong>DDCON</strong> <strong>100</strong> as<br />
well as cover the basics of navigating through the software. Thank you for<br />
purchasing Smar!<br />
<strong>DDCON</strong> <strong>100</strong> Features<br />
• Turns your PC or laptop into a universal HART device configuration platform<br />
• Includes all software and hardware needed to quickly and easily enable communication and<br />
configuration of HART devices via your PC or laptop<br />
• Based on Device Description (DD) technology to fully support HART devices from multiple<br />
manufacturers<br />
• Intuitive, easy to use graphical interface<br />
• Supports over <strong>100</strong> HART devices out of the box<br />
• New devices can be downloaded via www.smarresearch.com and then easily added or removed<br />
directly within the software<br />
• Supports multidrop operations and off-line configurations that can be saved for later use<br />
• Bus monitoring via the integrated HART serial monitor software<br />
• Supports Windows 2000, XP machines with USB 1.0 or above<br />
• Interface is system powered: no external power supply required<br />
• “Smart Interface” allows firmware downloads via USB port for future upgrades<br />
• No hardkey required, integrated directly into the HART interface<br />
Visit the SmarResearch<br />
technology center at:<br />
www.smarresearch.com<br />
©<br />
Smar Research Corporation 1 <strong>DDCON</strong><strong>100</strong>GSG - 0605
Contents<br />
1. General Overview<br />
1.1 General Principles ………………………………………………………………………………… 3<br />
1.2 Hardware Overview ………………………………………………………………………………. 3<br />
1.3 Software Overview ………………………………………………………………………………... 3<br />
2. Setup & Installation<br />
2.1 Hardware Setup & Installation …………………………………………………………………… 4<br />
2.2 Software Setup & Installation……………………………………………………………………...5<br />
2.3 Connecting to a HART network…………………………………………………………………... 6<br />
3. Getting Started—General Use<br />
3.1 Opening the <strong>DDCON</strong> <strong>100</strong> Software ……………………………………………………………... 6<br />
3.2 Navigating the <strong>DDCON</strong> <strong>100</strong> Software Interface ……………………………………………….. 7<br />
3.3 Polling for Devices ………………………………………………………………………………… 8<br />
3.3.1 Polling for a Single Device ………………………………………………………………… 8<br />
3.3.2 Polling for a Multiple Devices ……………………………………………………………... 9<br />
3.3.3 Polling by Tag ………………………………………………………………………………. 9<br />
3.4 Navigating Device Parameters …………………………………………………………………... 10<br />
3.5 DDL Options ……………………………………………………………………………………….. 11<br />
3.5.1 Listing Device Drivers ……………………………………………………………………… 11<br />
3.5.2 Adding Device Drivers ……………………………………………………………………... 12<br />
3.5.3 Removing Device Drivers …………………………………………………………………. 12<br />
3.5.4 Requesting Device Drivers ………………………………………………………………... 13<br />
3.6 Offline Devices …………………………………………………………………………………….. 14<br />
3.5.1 Creating a New Offline Device ……………………………………………………………. 14<br />
3.5.2 Opening an Offline Device ………………………………………………………………… 14<br />
4. Technical Information ……………………………………………………………………………….. 15<br />
© Smar Research Corporation 2 <strong>DDCON</strong><strong>100</strong>GSG - 0605<br />
<strong>DDCON</strong> <strong>100</strong> - Getting Started
1. General Overview<br />
1.1 General Principles<br />
<strong>DDCON</strong> <strong>100</strong> is a comprehensive communication and configuration tool package compatible with all HART<br />
devices. The <strong>DDCON</strong> <strong>100</strong> package enables the user to use one package to configure their entire HART<br />
network regardless of the device model or manufacturer of the instruments they may have in their plant.<br />
This is accomplished with the use of DDL. Device Description Language (DDL) is the recently ratified IEC<br />
61804-2 standard specification that enables HART device manufacturers to create uniform driver interfaces<br />
for their devices. This allows access to any HART device based upon their device description (DD) file provided<br />
by the device manufacturer. <strong>DDCON</strong> <strong>100</strong> takes advantage of this standard by integrating DDL technology<br />
into its software. Based upon DDL files, <strong>DDCON</strong> <strong>100</strong> is able to work with devices already on the<br />
market as well as with the many devices to be released in the future.<br />
Included in the package is the <strong>DDCON</strong> <strong>100</strong> software CD and the <strong>DDCON</strong> <strong>100</strong> HART interface. The<br />
<strong>DDCON</strong> <strong>100</strong> software CD includes all necessary files for installation of <strong>DDCON</strong> <strong>100</strong> on your Windows<br />
2000/XP PC or laptop. Also included on the disk is the HART interface USB drivers and the device files for<br />
over <strong>100</strong> HART devices. In the following sections, the <strong>DDCON</strong> <strong>100</strong> hardware and software will be briefly<br />
discussed along with the installation and operating procedures.<br />
1.2 Hardware Overview<br />
The Smar Research <strong>DDCON</strong> <strong>100</strong> HART USB interface provides a complete physical link between any<br />
HART compliant field instrument and a Windows 2000/XP PC with USB ports. The interface is fully self<br />
contained and requires no external power supply. Combined with the <strong>DDCON</strong> <strong>100</strong> software, the <strong>DDCON</strong><br />
<strong>100</strong> interface enables communication and configuration of any HART compliant device from anywhere on<br />
the HART network via your PC. The <strong>DDCON</strong> <strong>100</strong> interface connects to your PC or laptop via the integrated<br />
USB connector at one end, and to the HART network via its pinch connector cable at the other end. Connection<br />
and driver installation details are discussed in the following sections.<br />
1.3 Software Overview<br />
Fig. 1 – <strong>DDCON</strong> <strong>100</strong> Package Contents<br />
The <strong>DDCON</strong> <strong>100</strong> software enables the communication and configuration of HART devices via the <strong>DDCON</strong><br />
<strong>100</strong> USB interface from any Windows 2000/XP compatible PC. The software is based upon DDL technology,<br />
which allows it to be compatible with hundreds of devices on the market. <strong>DDCON</strong> <strong>100</strong> supports many<br />
useful features such as DD defined multidrop operation, polling by tag or address, off-line configuration and<br />
HART serial monitoring to name a few. Because <strong>DDCON</strong> <strong>100</strong> uses the device description files which are<br />
created by the device manufacturer, all parameters, commands, and menus are supported just as the<br />
manufacturer intended. Installation and use of the <strong>DDCON</strong> <strong>100</strong> software is discussed in the following sections.<br />
© Smar Research Corporation 3 <strong>DDCON</strong><strong>100</strong>GSG - 0605<br />
<strong>DDCON</strong> <strong>100</strong> - Getting Started
2. Setup & Installation<br />
2.1 Hardware Setup & Installation<br />
Connecting the <strong>DDCON</strong> <strong>100</strong> interface to your computer:<br />
Connect the USB connector of the <strong>DDCON</strong> <strong>100</strong> interface to an available USB port of your computer. If this<br />
is the first time you have connected the <strong>DDCON</strong> <strong>100</strong> interface to your computer, the USB Drivers must be<br />
installed. Please read Installing the Windows Driver section below. Otherwise, the <strong>DDCON</strong> <strong>100</strong> interface is<br />
now ready to communicate. Please refer to Connecting to a HART Network for further details.<br />
NOTE:<br />
Connection of the <strong>DDCON</strong> <strong>100</strong> interface through a USB hub is not recommended, and proper<br />
functionality cannot be guaranteed. If using a USB hub is required, it must be a powered hub.<br />
Installing the Windows USB Driver:<br />
The first time the <strong>DDCON</strong> <strong>100</strong> is connected on your Windows computer, the Windows USB driver must be<br />
installed. To properly install the USB drivers, the Smar Research Product CD that was included with<br />
<strong>DDCON</strong> <strong>100</strong> is required. Please follow the instructions below:<br />
1. After connecting the <strong>DDCON</strong> <strong>100</strong> interface to your computer, a Found New Hardware window will popup<br />
followed by the Found New Hardware Wizard. Click “Next” to continue.<br />
Fig. 2 – Found New Hardware Windows<br />
2. In the following window, make sure the “Search for a suitable driver for my device” button is selected and<br />
click “Next”.<br />
Fig. 3 – Install Hardware Device Drivers Window<br />
© Smar Research Corporation 4 <strong>DDCON</strong><strong>100</strong>GSG - 0605<br />
<strong>DDCON</strong> <strong>100</strong> - Getting Started
3. In the next window, select the “Specify a Location” box and click “Next”. The will open another window<br />
which prompts the user to enter the location of the driver files. Click the browse button and browse to the<br />
CD-ROM drive containing the Smar Research Product CD. Locate the “<strong>DDCON</strong><strong>100</strong> Drivers” folder on the<br />
Smar Research Product CD and click “OK”. For Example, if the CD-ROM drive letter containing the Smar<br />
Research Product CD is D, browse to the following directory: D:\<strong>DDCON</strong><strong>100</strong> Drivers\<br />
4. A new window should indicate that the wizard has found a driver for the <strong>DDCON</strong><strong>100</strong>. Click “Next”. This<br />
completes the Found New Hardware Wizard. Click “Finish” to complete the installation. At this point the<br />
<strong>DDCON</strong> <strong>100</strong> interface is installed and can be used with the <strong>DDCON</strong> <strong>100</strong> software. For setup and installation<br />
procedures of the <strong>DDCON</strong> <strong>100</strong> software, please refer to the Software Setup & Installation section.<br />
2.2 Software Setup & Installation<br />
Fig. 4 – Locate Driver Files Windows<br />
Fig. 5 – Driver Files Found Windows<br />
Follow the steps below to install <strong>DDCON</strong> <strong>100</strong> onto your PC or laptop:<br />
1. Insert the <strong>DDCON</strong> <strong>100</strong> Product CD into your CD-ROM drive.<br />
2. The <strong>DDCON</strong> <strong>100</strong> Setup window should automatically open.<br />
3. Select Install <strong>DDCON</strong><strong>100</strong> and follow the on screen direction to complete installation.<br />
If the CD does not autorun, browse to your CD-ROM directory and double click the file named autorun.exe.<br />
© Smar Research Corporation 5 <strong>DDCON</strong><strong>100</strong>GSG - 0605<br />
<strong>DDCON</strong> <strong>100</strong> - Getting Started
2.3 Connecting to a HART Network<br />
Once the <strong>DDCON</strong> <strong>100</strong> software and hardware interface have been installed on your PC, <strong>DDCON</strong> <strong>100</strong> can<br />
be connected to your HART network as shown below. The pinch connectors of the interface should be connected<br />
across the positive and negative leads of the 4-20mA HART wiring. The <strong>DDCON</strong> <strong>100</strong> interface can<br />
be connected anywhere along the HART network. This enables <strong>DDCON</strong> <strong>100</strong> to configure devices on the<br />
network locally and remotely. Proper communication requires a minimum load of 250 Ohms on the line. In<br />
cases where this condition is not met, a 250 Ohm resistor can be put in series with the HART line.<br />
3. Getting Started<br />
Transmitter<br />
3.1 Opening the <strong>DDCON</strong> <strong>100</strong> Software<br />
-<br />
+<br />
HART Network<br />
© Smar Research Corporation 6 <strong>DDCON</strong><strong>100</strong>GSG - 0605<br />
USB<br />
Fig. 6 – Typical <strong>DDCON</strong> <strong>100</strong> HART Network Connection<br />
250 Ohms<br />
Once the <strong>DDCON</strong> <strong>100</strong> software and hardware interface have been installed and connected to a HART network,<br />
you are ready to communicate with and configure your HART devices. To start the <strong>DDCON</strong> <strong>100</strong> software<br />
follow the instructions below:<br />
From the Windows Start menu:<br />
1. Select Programs<br />
2. Select <strong>DDCON</strong> <strong>100</strong> folder<br />
3. Click on <strong>DDCON</strong> <strong>100</strong><br />
From the Windows desktop:<br />
1. Double click the <strong>DDCON</strong> <strong>100</strong> icon<br />
If you do not have the <strong>DDCON</strong> <strong>100</strong> hardware interface connected to the PC, you will see the following message:<br />
Fig. 7 – <strong>DDCON</strong> <strong>100</strong> Interface Not Found Message<br />
To continue working in the program with only offline capabilities, click the OK button.<br />
To work with online capabilities, click the OK button, exit the <strong>DDCON</strong> <strong>100</strong> software, properly attach the<br />
<strong>DDCON</strong> <strong>100</strong> hardware interface, insure the USB drivers have been installed and re-open the <strong>DDCON</strong> <strong>100</strong><br />
software following the instructions above.<br />
If you still get this error message after you have properly installed your <strong>DDCON</strong> <strong>100</strong> interface, contact<br />
Smar Research for further assistance.<br />
+<br />
-<br />
Power<br />
Supply<br />
<strong>DDCON</strong> <strong>100</strong> - Getting Started
3.2 Navigating the <strong>DDCON</strong> <strong>100</strong> Software Interface<br />
The startup screen of the <strong>DDCON</strong> <strong>100</strong> software includes three main sections: the <strong>DDCON</strong> <strong>100</strong> Main Menu,<br />
the HART Network Window, and the HART Serial Monitor Window. The layout of the startup screen can be<br />
seen in the figure below.<br />
Fig. 8 – <strong>DDCON</strong> <strong>100</strong> Startup Screen<br />
<strong>DDCON</strong> <strong>100</strong> Main Menu<br />
The <strong>DDCON</strong> <strong>100</strong> Main Menu consists of 5 sub menus: File, Settings, Tools, DDL Options, and Help. These<br />
menus provide access to the basic <strong>DDCON</strong> <strong>100</strong> functions. Below is the hierarchal structure of the various<br />
sub menus.<br />
File Menu<br />
- New Offline Device<br />
- Open Offline Device<br />
- Close Device<br />
- Save<br />
- Save As<br />
- Polling Window<br />
- HART Network Window<br />
- Exit<br />
<strong>DDCON</strong> <strong>100</strong> Main Menu HART Network Window<br />
HART Serial Monitor Window<br />
Settings Menu<br />
- Communication Port<br />
- Language<br />
- Preferences<br />
Tools Menu<br />
- HART Serial Monitor<br />
- HART Messaging<br />
DDL Options<br />
- Add Device Drivers<br />
- Remove Device Drivers<br />
- List Device Drivers<br />
© Smar Research Corporation 7 <strong>DDCON</strong><strong>100</strong>GSG - 0605<br />
Help<br />
- About<br />
HART Network Window<br />
This window displays a hierarchal view of open online and offline devices. By right clicking “Offline” you<br />
may choose to open an offline device or create a new offline device. By right clicking “Online” you may select<br />
to open the polling window. This will allow you to poll for devices on the HART network. For more information<br />
on polling, see the Polling For Devices section of this manual. For more information on offline devices,<br />
see the Offline Devices section of this manual.<br />
HART Serial Monitor Window<br />
The HART Serial Monitor window monitors the send and receive traffic on the HART network. Each send<br />
and acknowledge message is displayed in sequence and may be shown in decimal or hexadecimal format.<br />
This window is an excellent tool for monitoring exactly what the HART network is doing.<br />
<strong>DDCON</strong> <strong>100</strong> - Getting Started
3.3 Polling for Devices<br />
<strong>DDCON</strong> <strong>100</strong> can locate HART devices via the polling window. The polling window can be opened various<br />
ways. To open the polling window via the Main Menu, select “File” -> “Polling Window”. To open the polling<br />
window via the HART Network window, right click “Online” in the HART Network and select “Polling Window”.<br />
As seen below, the polling window allows you the choice of polling by device address, address range (0-<br />
15) or by tag. The details of each method are below. After <strong>DDCON</strong> <strong>100</strong> polls the network, all found devices<br />
will be listed under the Online folder in the HART Network. To open a device, simply double click it. Details<br />
on navigating the device parameters are discussed in the Navigating Device Parameters section of this<br />
document.<br />
3.3.1 Polling for a Single Device<br />
To poll for a single online device by address:<br />
Fig. 9 – Opening the Polling Window<br />
1. Check the “Device Address” box in the polling window<br />
2. Choose the address of the device by selecting it from the option box located next to the “Device Address”<br />
checkbox<br />
3. Click the “Poll” button<br />
Fig. 10 – Polling for a Single Device<br />
The device, if found, will be added to the “Online” directory tree of HART Network window.<br />
© Smar Research Corporation 8 <strong>DDCON</strong><strong>100</strong>GSG - 0605<br />
<strong>DDCON</strong> <strong>100</strong> - Getting Started
3.3.2 Polling for Multiple Devices<br />
To poll for multiple devices:<br />
1. Check the “From Addresses” box in the polling window.<br />
2. Select the start and end address range for your search from the corresponding drop down boxes located<br />
next to the “From Addresses” label.<br />
3. Click the “Poll” button.<br />
If any devices are found within the address range specified, they will all be added to the “Online” directory<br />
tree of the HART Network window<br />
3.3.3 Polling by Tag<br />
To poll for an online device by its Tag description:<br />
Fig. 11 – Polling for Multiple Devices<br />
1. Check the “Tag” box in the polling window.<br />
2. Enter the Tag of the device you are looking for in the field located to the right of the “Tag” box.<br />
3. Click the “Poll” button.<br />
Fig. 12 – Polling by Tag<br />
The device, if found, will be added to the “Online” directory tree of HART Network window.<br />
© Smar Research Corporation 9 <strong>DDCON</strong><strong>100</strong>GSG - 0605<br />
<strong>DDCON</strong> <strong>100</strong> - Getting Started
3.4 Navigating Device Parameters<br />
Devices listed in the HART Network window can be opened by double clicking them or by right clicking the<br />
device and selecting “Open Device”. Once they are double clicked a Device window will load to the right of<br />
the HART Network window. The contents of this device window will vary dependant on the device manufacturer<br />
and model. However, the general layout of a device window is common to all devices. Below is an<br />
example of a typical device window.<br />
The device tag and title is listed at the top of the window. This identifies the device and helps keep track of<br />
windows when multiple devices are listed in the HART network directory tree. Below this is a number of<br />
tabs. These tabs are each associated with a specific device panel. When a device tab is selected, the associated<br />
device variables and parameter fields will appear below the tab. Each panel contains the variables,<br />
functions and parameters as specified in the manufacturer device description. Each field has a label<br />
and a parameter. Editable fields are indicated by a white background. Non editable fields are grayed out.<br />
Drop down lists are indicated by a triangle. To send or save changes to the fields of a particular panel, select<br />
the Send/Save button at the bottom of the panel.<br />
Device Tag and Title<br />
Fig. 13 – Typical Device Window<br />
Menu/Panel Tabs<br />
Editable Field<br />
Field Label<br />
Drop Down List<br />
Non Editable Field<br />
Send/Save Button<br />
© Smar Research Corporation 10 <strong>DDCON</strong><strong>100</strong>GSG - 0605<br />
<strong>DDCON</strong> <strong>100</strong> - Getting Started
3.5 DDL Options<br />
<strong>DDCON</strong> <strong>100</strong> is based on the Device Description Language (DDL). This language was created to offer a<br />
standardized method of detailing all the variables, commands and parameters of a specific device as well<br />
as to describe the basic menu structure and layout that the end user should see when communicating with<br />
a manufacturers device. DDL allows <strong>DDCON</strong> <strong>100</strong> to be compatible with hundreds of HART devices.<br />
<strong>DDCON</strong> <strong>100</strong> is pre-loaded with support for over <strong>100</strong> devices. Supported device drivers can be listed,<br />
added, and removed by following the simple procedures in the following sections. All these options are<br />
available via the main menu “DDL Options”.<br />
Device drivers which are not currently supported can be requested for addition into the <strong>DDCON</strong> <strong>100</strong> database<br />
by contacting Smar Research.<br />
3.5.1 Listing Device Drivers<br />
A list of all the currently installed and supported device drivers can be viewed from within <strong>DDCON</strong> <strong>100</strong>. The<br />
list is categorized by device manufacturer. This list is indicative only of the devices installed on your computer.<br />
Additional devices may be available for download via the <strong>DDCON</strong> <strong>100</strong> product page at<br />
www.smarresearch.com or on your <strong>DDCON</strong> <strong>100</strong> install CD. To view a list of currently installed and supported<br />
devices, follow this procedure:<br />
1. Select “DDL Options” from the <strong>DDCON</strong> <strong>100</strong> Main Menu.<br />
2. Select “List Device Drivers” from the drop down list.<br />
3. Navigate the Device Drivers window and double click the manufacturer folders to view the installed devices<br />
for each manufacturer.<br />
NOTE:<br />
The Device Drivers window only displays installed devices. To add or remove devices, see<br />
sections 3.5.2 and 3.5.3 respectively.<br />
Fig. 14 – Device Drivers List<br />
© Smar Research Corporation 11 <strong>DDCON</strong><strong>100</strong>GSG - 0605<br />
<strong>DDCON</strong> <strong>100</strong> - Getting Started
3.5.2 Adding Device Drivers<br />
While <strong>DDCON</strong> <strong>100</strong> is available with over <strong>100</strong> DDL devices on the installation CD, there may be additional<br />
devices you wish to add. The full list of available device drivers is maintained at www.smarresearch.com.<br />
Here device drivers can easily be downloaded and saved to your hard drive for integration into <strong>DDCON</strong><br />
<strong>100</strong>. Each device driver has its own zip file. This file contains the device information for that particular device.<br />
To add a device driver to <strong>DDCON</strong> <strong>100</strong>, follow the procedure below:<br />
1. Select “DDL Options” from the <strong>DDCON</strong> <strong>100</strong> Main Menu.<br />
2. Select “Add Device Drivers” from the drop down list.<br />
3. Browse to the folder where the device you wish to integrate is located. (On your local hard drive<br />
downloaded via www.smarresearch.com or on the <strong>DDCON</strong> <strong>100</strong> Installation CD “DeviceDrivers” folder)<br />
4. Select “Open”. At this time, you will be shown all the available device drivers contained in the selected<br />
folder.<br />
5. Select the devices you wish to add by highlighting them (for multiple selections hold down the Shift<br />
key) and select “Add To List”. All devices listed under a specific manufacturer can easily be added at<br />
once by highlighting the manufacturer folder and selecting “Add To List”. A device in the “Add To List”<br />
may be deselected by highlighting the device and selecting the “Remove From List” button.<br />
6. Select “Finish” to complete the addition.<br />
The new device(s) can now be configured using <strong>DDCON</strong> <strong>100</strong> and will be shown in the Device Drivers list.<br />
NOTE:<br />
The Device Driver files follow a naming convention of “_mmddrrDEVICE.zip” where:<br />
mm = HART Manufacturer Code<br />
dd = Device Code<br />
rr = Hardware Revision Code<br />
3.5.3 Removing Device Drivers<br />
Fig. 15 – Adding a DDL Device<br />
In some instances it may be desirable to remove device drivers from <strong>DDCON</strong> <strong>100</strong>. Removing a device<br />
driver will disable support for that particular device and free space on your hard drive. To remove a device<br />
driver from <strong>DDCON</strong> <strong>100</strong>, follow the procedure below:<br />
1. Select “DDL Options” from the <strong>DDCON</strong> <strong>100</strong> Main Menu.<br />
2. Select “Remove Device Drivers” from the drop down list.<br />
3. The Remove Device Drivers window will appear. On the left side of the window is a list of installed device<br />
drivers. On the right side of the window is a list of device drivers selected to be removed. Browse<br />
the Device Drivers list for the device driver(s) you wish to remove.<br />
4. Highlight the device driver(s) to remove and select the “Add To List” button. This will move the device<br />
to the Remove Devices List.<br />
5. If you wish to move a device back to the available Device Drivers list, highlight the device driver from<br />
the Remove Devices List and select “Remove From List”<br />
6. Click “Finish” to complete the operation, or click “Cancel” to cancel the remove operation.<br />
The device drivers you selected are now removed from <strong>DDCON</strong> <strong>100</strong>. If you wish to add a device back, see<br />
the Adding Device Drivers section of the manual.<br />
© Smar Research Corporation 12 <strong>DDCON</strong><strong>100</strong>GSG - 0605<br />
<strong>DDCON</strong> <strong>100</strong> - Getting Started
3.5.4 Requesting Device Drivers<br />
Fig. 16 – Removing a DDL Device<br />
When connecting to a device that is not currently loaded into <strong>DDCON</strong> <strong>100</strong>, a message similar to the one in<br />
Fig. 17 will be displayed. The device can still be configured as a generic device, but all proprietary menus,<br />
commands and parameters will not be accessible. Receiving this message can indicate either the device<br />
driver is simply not loaded into your copy of <strong>DDCON</strong> <strong>100</strong>, or that the device driver is not yet supported by<br />
<strong>DDCON</strong> <strong>100</strong>. Devices which are not currently supported can be requested. Before requesting the addition<br />
of a device driver, be sure to check www.smarresearch.com for the latest updates and device driver<br />
downloads as this device driver may already be available. If the device is not listed in your device drivers<br />
list or on the www.smarresearch.com website, you may request the addition of the device by following the<br />
procedure below:<br />
1. Copy the Manufacturer, Device Type and Revision codes as shown in the “Device not recognized” window.<br />
(see example in Fig. 17: Manufacturer = 3e, Device Type = 1, Revision = 3)<br />
2. Send this information along with your complete contact information in an email to<br />
<strong>DDCON</strong>@smarresearch.com. Note: If possible, attach the DDL file of the device to the email.<br />
3. A technical support agent will contact you shortly. Most requests can be accommodated within 1 week.<br />
The <strong>DDCON</strong> <strong>100</strong> DDL device driver files will be emailed to you and added to the Smar Research website.<br />
Fig. 17 – Device Not Recognized Message<br />
© Smar Research Corporation 13 <strong>DDCON</strong><strong>100</strong>GSG - 0605<br />
<strong>DDCON</strong> <strong>100</strong> - Getting Started
3.6 Offline Devices<br />
<strong>DDCON</strong> <strong>100</strong> has the ability to configure devices offline and save the configuration as a file for later use.<br />
This allows a user to setup particular parameters of a specific device while not in the field. Because these<br />
offline devices can be saved, the configurations can be loaded at a later time and downloaded to an online<br />
device. This can especially help automate cases where multiple devices use the same configuration.<br />
Offline devices are configured in the same manner as online devices with a few key differences. Offline<br />
devices will only allow access to offline variables. These variables are defined by the manufacturer and will<br />
vary accordingly. Some devices may not have any offline variables defined by the manufacturer. In these<br />
cases, a message window will indicate this.<br />
3.6.1 Creating an Offline Device<br />
To create a new offline device, follow the procedure below:<br />
1. Right click “Offline” in the HART Network window and select “New Offline Device” from the pop-up<br />
menu.<br />
2. Select the desired device type from the New Device window. Only device drivers which are currently<br />
loaded into <strong>DDCON</strong> <strong>100</strong> will be available.<br />
3. Click “OK” to create the new offline device you have chosen or “Cancel” to close the New Device window.<br />
After selecting “OK”, the device will be added to the Offline directory tree of the HART Network<br />
window and the new Device window will be opened.<br />
NOTE:<br />
The “New Offline Device” option may also be selected via the main menu “File” -> “New Offline Device”.<br />
3.6.2 Opening an Offline Device<br />
To open an offline device, follow this procedure:<br />
Fig. 18 – Creating an Offline Device<br />
1. Right click “Offline” in the HART Network window and select “Open Offline Device” from the options.<br />
2. Browse to the location of the *.ddev offline device configuration you wish to open.<br />
3. Click “Open”. The device file you selected will be added to the Offline directory tree of the HART Network<br />
window and the selected device frame window will appear.<br />
NOTE:<br />
The “Open Offline Device” option may also be selected via the main menu “File” -> “Open Offline Device”.<br />
© Smar Research Corporation 14 <strong>DDCON</strong><strong>100</strong>GSG - 0605<br />
<strong>DDCON</strong> <strong>100</strong> - Getting Started
4. Technical Information<br />
Fig. 19– Opening an Offline Device<br />
System Requirements<br />
Windows 2000, XP<br />
1 USB 1.0 (or greater) port<br />
CD-ROM drive<br />
256 MB RAM<br />
Aprox. 220MB of hard drive space for typical installation (varies dependant on amount installed DDL devices)<br />
Interface Dimensions<br />
Box Length: 3 ¾”<br />
Box Width: 1 ⅜”<br />
Box Height: ¾”<br />
Connections<br />
To PC: USB Type B connector<br />
To HART Network: probe cable with 2 pinch connectors<br />
Cable<br />
Integrated 5’ 2-wire HART cable with 2 pinch connector probes<br />
Integrated 11” USB B Cable<br />
Smar Research reserves the right to make changes to design and functionality of any product without notice. Smar<br />
Research does not assume any liability arising out of the application or use of any product. Smar Research,<br />
Technology Source, and the SRC logo are registered trademarks of Smar Research Corporation. The HART, Fieldbus,<br />
and Profibus Foundation logos are trademarks of their respective owners.<br />
Smar Research Corporation<br />
4250 Veterans Memorial Highway<br />
Holbrook, NY USA 11741<br />
Tel: 631.737.3111 Fax: 631.737.3892<br />
techinfo@SmarResearch.com<br />
www.SmarResearch.com<br />
© Smar Research Corporation 15 <strong>DDCON</strong><strong>100</strong>GSG - 0605<br />
<strong>DDCON</strong> <strong>100</strong> - Getting Started