COLM - DME
COLM - DME
COLM - DME

You also want an ePaper? Increase the reach of your titles
YUMPU automatically turns print PDFs into web optimized ePapers that Google loves.
17/07/2012<br />
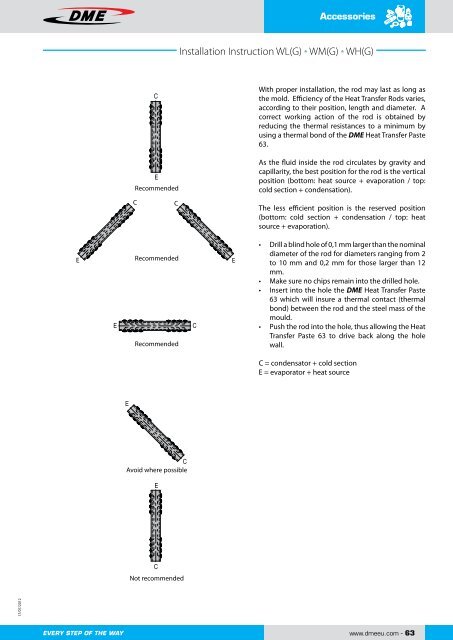
Recommended<br />
C C<br />
E Recommended<br />
E<br />
Recommended<br />
Avoid where possible<br />
Not recommended<br />
Accessories<br />
Installation Instruction WL(G) - WM(G) - WH(G)<br />
With proper installation, the rod may last as long as<br />
the mold. Efficiency of the Heat Transfer Rods varies,<br />
according to their position, length and diameter. A<br />
correct working action of the rod is obtained by<br />
reducing the thermal resistances to a minimum by<br />
using a thermal bond of the <strong>DME</strong> Heat Transfer Paste<br />
63.<br />
As the fluid inside the rod circulates by gravity and<br />
capillarity, the best position for the rod is the vertical<br />
position (bottom: heat source + evaporation / top:<br />
cold section + condensation).<br />
The less efficient position is the reserved position<br />
(bottom: cold section + condensation / top: heat<br />
source + evaporation).<br />
• Drill a blind hole of 0,1 mm larger than the nominal<br />
diameter of the rod for diameters ranging from 2<br />
to 10 mm and 0,2 mm for those larger than 12<br />
mm.<br />
• Make sure no chips remain into the drilled hole.<br />
• Insert into the hole the <strong>DME</strong> Heat Transfer Paste<br />
63 which will insure a thermal contact (thermal<br />
bond) between the rod and the steel mass of the<br />
mould.<br />
• Push the rod into the hole, thus allowing the Heat<br />
Transfer Paste 63 to drive back along the hole<br />
wall.<br />
C = condensator + cold section<br />
E = evaporator + heat source<br />
www.dmeeu.com - 63