Quick Start Guide Guide de démarrage rapide Anweisung für einen ...
Quick Start Guide Guide de démarrage rapide Anweisung für einen ...
Quick Start Guide Guide de démarrage rapide Anweisung für einen ...

Create successful ePaper yourself
Turn your PDF publications into a flip-book with our unique Google optimized e-Paper software.
<strong>Quick</strong> <strong>Start</strong> <strong>Gui<strong>de</strong></strong><br />
<strong>Gui<strong>de</strong></strong> <strong>de</strong> <strong>démarrage</strong> rapi<strong>de</strong><br />
<strong>Anweisung</strong> <strong>für</strong> <strong>einen</strong> schnellen <strong>Start</strong><br />
Snel <strong>Start</strong> Gids<br />
Guía <strong>de</strong> instalación rápida<br />
Guida Rapida<br />
Краткое руководство<br />
Короткий посібник<br />
Skrócona instrukcja Szybki <strong>Start</strong><br />
Manufactured un<strong>de</strong>r license from Dolby Laboratories.<br />
Dolby and the double-D symbol are tra<strong>de</strong>marks of Dolby Laboratories.<br />
Manufactured un<strong>de</strong>r license un<strong>de</strong>r U.S. Patent #’s: 5,451,942; 5,956,674; 5,974,380;<br />
5,978,762; 6,226,616; 6,487,535; 7,212,872; 7,333,929 & other U.S. and worldwi<strong>de</strong><br />
patents issued & pending. DTS and the Symbol are registered tra<strong>de</strong>marks, & DTS-HD,<br />
DTS-HD High Resolution Audio and the DTS logos are tra<strong>de</strong>marks of DTS, Inc. Product<br />
inclu<strong>de</strong>s software. © DTS, Inc. All Rights Reserved.<br />
English ● Français ● Deutsch ● Ne<strong>de</strong>rlands ● Español ● Italiano ● Русский ● Українська ● Polski
Table of Contents<br />
4<br />
12<br />
20<br />
28<br />
36<br />
44<br />
52<br />
60<br />
68<br />
English<br />
<strong>Quick</strong> <strong>Start</strong> <strong>Gui<strong>de</strong></strong><br />
Français<br />
<strong>Gui<strong>de</strong></strong> <strong>de</strong> <strong>démarrage</strong> rapi<strong>de</strong><br />
Deutsch<br />
<strong>Anweisung</strong> <strong>für</strong> <strong>einen</strong> schnellen <strong>Start</strong><br />
Ne<strong>de</strong>rlands<br />
Snel <strong>Start</strong> Gids<br />
Español<br />
Guía <strong>de</strong> instalación rápida<br />
Italiano<br />
Guida Rapida<br />
Русский<br />
Краткое руководство<br />
Українська<br />
Короткий посібник<br />
Polski<br />
Skrócona instrukcja Szybki <strong>Start</strong><br />
Table of Contents<br />
3
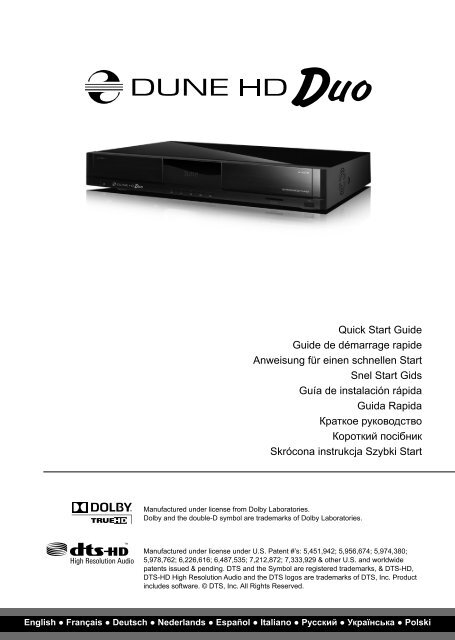
Introduction<br />
Dune HD Duo is an all-in-one solution for up to Full HD (1080p) vi<strong>de</strong>o playback.<br />
Key Features<br />
● The newest Sigma Designs 8642/8643 media processor: enjoy excellent playback and performance<br />
of interactive features.<br />
● HDD player: connect an HDD to the player and play content directly from the HDD.<br />
● Network player: connect the player to a local network and play content directly from PC or NAS (UPnP,<br />
SMB, NFS).<br />
● MKV player: play HD and SD vi<strong>de</strong>o in a popular MKV format and other mo<strong>de</strong>rn vi<strong>de</strong>o file formats,<br />
including top quality HD vi<strong>de</strong>o with very high bitrate.<br />
● RealD: watch 3D vi<strong>de</strong>o in this ultra mo<strong>de</strong>rn format used in cinema for the latest movies.<br />
● HD audio: enjoy top-quality audio tracks (Dolby TrueHD, DTS HD Master Audio, LPCM, FLAC).<br />
● 3 USB ports: conveniently connect HDDs, USB flash drives, USB card rea<strong>de</strong>rs and other USB storage<br />
<strong>de</strong>vices.<br />
● Two HDD racks with hot swap function: easily and quickly insert and exchange up to two internal 3.5’’<br />
SATA HDDs.<br />
● SD card slot: easily play media files on SD memory cards from your camera or other <strong>de</strong>vices, or use an<br />
SD memory card as a local or system storage (required for BD Live function).<br />
● HDMI 1.3: ensure the best possible quality of HD vi<strong>de</strong>o and HD audio.<br />
● A rich set of standard A/V connectors: use S/PDIF optical audio, stereo audio, component vi<strong>de</strong>o,<br />
composite vi<strong>de</strong>o outputs to easily connect any A/V equipment.<br />
● Exten<strong>de</strong>d support for Dolby TrueHD and DTS HD Master Audio: output bitstream (up to 7.1 channels)<br />
or <strong>de</strong>co<strong>de</strong> to LPCM (up to 7.1 channels) for maximum flexibility when connecting audio equipment, and<br />
for exten<strong>de</strong>d support of advanced playback features (such as Picture-in-Picture).<br />
● Vi<strong>de</strong>o output flexibility: output vi<strong>de</strong>o in any resolution and format (from SD to 1080p, 24p/PAL/NTSC).<br />
● Upscaling: high quality upscaling of DVD and any other SD vi<strong>de</strong>o content to Full HD (1080p) or other<br />
HD resolution.<br />
● File browser: convenient file browser with powerful file management (copy, move, <strong>de</strong>lete, rename,<br />
organize, sort).<br />
4 Dune HD Duo <strong>Quick</strong> <strong>Start</strong> <strong>Gui<strong>de</strong></strong>
Extra Functions<br />
● High-quality music playback: play very high-quality (up to 192 Khz / 24-bit) music files in various<br />
formats (FLAC, Monkey’s Audio APE, WAV/PCM, DTS, etc).<br />
● Playlists: build playlists from your fol<strong>de</strong>rs, use your own playlists, use repeat and shuffle functions.<br />
● NAS function: access files on storage <strong>de</strong>vices (HDD, optical drive, etc) attached to the player from the<br />
local network (using SMB or FTP).<br />
● BitTorrent: use built-in BitTorrent client to download files from P2P networks.<br />
● Customizable user interface: work with media collections using cover art and icon browsing (with Full<br />
HD graphics).<br />
● Flash applications: extend the player functionality with FlashLite applications.<br />
● Internet radio: playback and record various Internet radio stations (HTTP/MP3).<br />
● IPTV: playback and record IPTV streams (multicast UDP/RTP) from your Internet provi<strong>de</strong>r*.<br />
● Digital TV option: playback and record Digital TV channels using an optional Digital TV USB dongle**.<br />
● Internet browsing: view Internet Web sites on your TV using the built-in Web browser***.<br />
* Check availability of multicast UDP/RTP streams with your Internet provi<strong>de</strong>r.<br />
** Digital TV USB dongle is not inclu<strong>de</strong>d; this option can be purchased separately.<br />
*** Built-in Web browser has limitations and may not allow to view some Internet Web sites.<br />
English<br />
5
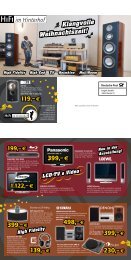
Package Contents<br />
1. Dune HD Duo media player<br />
2. Remote control (batteries may not be inclu<strong>de</strong>d)<br />
6 Dune HD Duo <strong>Quick</strong> <strong>Start</strong> <strong>Gui<strong>de</strong></strong><br />
1<br />
3 4<br />
5 6<br />
NOTE: Additional items (optional) may be inclu<strong>de</strong>d into the package, <strong>de</strong>pending on player configuration,<br />
region, and distributor.<br />
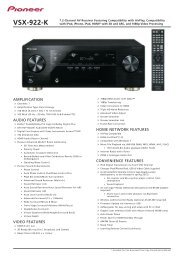
Exterior<br />
Front view<br />
1. On/off button<br />
2. LED indicator<br />
3. HDD rack A<br />
4. Display<br />
Rear view<br />
1. LAN and 2xUSB 2.0 host<br />
2. HDMI 1.3<br />
3. Dedicated bus connector (I 2 C) (for future<br />
connecting external <strong>de</strong>vices)*<br />
4. Composite vi<strong>de</strong>o and S-Vi<strong>de</strong>o output<br />
5. Component (Y/Pb/Pr) vi<strong>de</strong>o output<br />
5. EJECT<br />
6. PLAY/PAUSE<br />
7. STOP<br />
8. PREV<br />
3. Power supply cord<br />
4. AV cable<br />
9. NEXT<br />
10. HDD rack B<br />
11. SD card slot<br />
12. USB 2.0 host<br />
5. HDMI cable<br />
6. <strong>Quick</strong> start gui<strong>de</strong><br />
1 2 3 4 5 6 7 8 9 10 11 12<br />
1 2 3 4 5 6 7 8 9 10 11<br />
6. Coaxial digital audio output<br />
7. Optical digital audio output<br />
8. Analog stereo (left/right) audio output<br />
9. Openings for optional Wi-Fi antennas<br />
10. Multichannel (7.1) analog audio output<br />
11. AC power and power switch<br />
* Not for headphones or other A/V <strong>de</strong>vices; connecting headphones or other A/V <strong>de</strong>vices may damage your<br />
equipment<br />
2
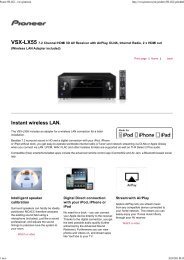
Remote Control<br />
1. Command indicator — fl ashes in response to RC button pressing.<br />
2. EJECT — open/close the optical drive tray. MUTE — turn the<br />
sound on/off. MODE — switch the vi<strong>de</strong>o output mo<strong>de</strong>; control<br />
some other player functions. POWER — toggle the standby mo<strong>de</strong>.<br />
3. A (Red), B (Green), C (Yellow), D (Blue) — access Blu-ray disc<br />
features; control some other player functions.<br />
4. 0–9 — enter numbers and text; control some other player functions.<br />
5. SEARCH — jump to a specifi ed playback position. ZOOM —<br />
change the zoom factor for the vi<strong>de</strong>o content being played. SET-<br />
UP — enter/leave the setup menu; adjust playback settings during<br />
playback.<br />
6. V+/V- (volume up / volume down) — adjust the volume.<br />
7. P+/P- (page up / page down) — scroll up and down in various<br />
lists; control some other player functions.<br />
8. Arrows (LEFT, RIGHT, DOWN, UP), ENTER, RETURN, TOP<br />
MENU, POP UP MENU, INFO — main buttons for controlling<br />
the player (navigate across the items on the screen, open/use<br />
the currently selected item, go back to the previous screen, go<br />
to main menu, show popup menu with actions, show information,<br />
control some other player functions).<br />
9. PLAY, PAUSE, STOP, SLOW, REW, FWD, PREV, NEXT — control<br />
the playback.<br />
10. SUBTITLE, ANGLE/ROTATE, AUDIO, REC, DUNE, URL —<br />
control the playback and some other player functions.<br />
NOTES:<br />
● Use alkaline AAA batteries.<br />
● Observe polarity when inserting batteries.<br />
● Direct the remote control to the player. There must be no obstacles<br />
between the RC and the player.<br />
● If RC functions only at short distances or stops functioning, make<br />
sure to replace the batteries.<br />
● Some RC buttons may have several functions <strong>de</strong>pending on the<br />
current player mo<strong>de</strong>.<br />
● Some RC buttons may be available only in certain player mo<strong>de</strong>s or<br />
only during playback of a certain content.<br />
1<br />
2<br />
3<br />
4<br />
5<br />
6<br />
7<br />
8<br />
9<br />
10<br />
English<br />
7
Getting <strong>Start</strong>ed<br />
Remove the transparent protecting film from the front panel of the player to ensure good look of the player.<br />
Ensure there is enough space around the player for proper cooling. The space at each si<strong>de</strong> should be not<br />
less than 10 cm.<br />
Ensure the RC has batteries installed.<br />
Connect the player to your TV and to other A/V equipment in an appropriate way. Use HDMI connection<br />
to get the best possible quality of vi<strong>de</strong>o and audio. Make sure to switch off the player and all relevant A/V<br />
equipment before connecting them. Ensure your TV and other A/V equipment are configured to use proper<br />
inputs.<br />
Switch on the player. The player will perform its initial loading procedure, which may take up to about 1<br />
minute. During the loading procedure, "DUNE" logo is shown on the TV.<br />
● If you do not see "DUNE" logo on the TV when you switch on the player, it may mean some problem with<br />
the connection between the player and the TV or that a wrong vi<strong>de</strong>o input is chosen in the TV or A/V<br />
receiver/switch. In such a case, recheck the cables and the settings of the TV or A/V receiver/switch, or<br />
try to use different cables or a different way of connecting the player to the TV.<br />
● If you see "DUNE" logo on the TV when you switch on the player, but then the picture disappears and<br />
no other picture appears during at least 10 seconds, it may mean that a wrong vi<strong>de</strong>o output mo<strong>de</strong> is<br />
configured in the player. In such a case, press the "MODE" RC button, and then press one of the RC<br />
buttons "1", "2", "3", "4" or "5" to switch to a different vi<strong>de</strong>o output mo<strong>de</strong> (see "<strong>Quick</strong> Setting of Vi<strong>de</strong>o<br />
Output Mo<strong>de</strong>").<br />
Finally, you should see the main screen of the player menu. The main screen shows items allowing to<br />
use different player functions and access all storage <strong>de</strong>vices and network drives connected to the player.<br />
Adjust the player settings as nee<strong>de</strong>d using "SETUP" item on the main screen of the player menu (or by<br />
pressing the "SETUP" RC button). In particular, you may want to adjust vi<strong>de</strong>o settings, audio settings, and<br />
network settings.<br />
To choose the language of the player menu, use “Setup / General / Interface language” setting.<br />
Use the RC buttons "LEFT", "RIGHT", "UP", "DOWN", "ENTER", "RETURN" to navigate through the<br />
player menu. Use the "MENU" RC button to show the list of available commands. Use the "INFO" RC<br />
button to show the information about the selected item.<br />
<strong>Quick</strong> Setting of Vi<strong>de</strong>o Output Mo<strong>de</strong><br />
The “MODE” RC button allows quick setting of vi<strong>de</strong>o output mo<strong>de</strong> without entering the player setup menu.<br />
This way of vi<strong>de</strong>o output confi guration may be required if you see no picture on the screen after connecting<br />
your player to a TV.<br />
Press the “MODE” RC button and then one of the RC buttons “1”, “2”, “3”, “4”, or “5” to switch to one<br />
of the following vi<strong>de</strong>o output mo<strong>de</strong>s respectively:<br />
1. Composite/Component, PAL<br />
2. Composite/Component, NTSC<br />
3. HDMI, 480i, 60 Hz<br />
4. HDMI, 720p, 60 Hz<br />
5. HDMI, 1080i, 60 Hz<br />
After you see a picture on the TV, press the “ENTER” RC button, and then go to the player setup menu to<br />
perform a more precise confi guration of the vi<strong>de</strong>o output mo<strong>de</strong> if nee<strong>de</strong>d.<br />
NOTE: The procedure of quick setting of vi<strong>de</strong>o output mo<strong>de</strong> can not be used during playback. To ensure this procedure can<br />
be used, switch the player off, then switch the player on, and the wait about 1 minute to ensure the player loading is fi nished.<br />
8 Dune HD Duo <strong>Quick</strong> <strong>Start</strong> <strong>Gui<strong>de</strong></strong>
Connecting USB Drives<br />
To connect a USB drive, ensure you are on the main screen of the player menu and connect the USB drive<br />
to an USB port of the player. The player will recognize the USB drive, and will show an item corresponding<br />
to the USB drive on the main screen.<br />
When connecting a USB drive requiring signifi cant power (such as USB HDD), use an external power<br />
supply for the USB drive. Power provi<strong>de</strong>d by the USB ports of the player may not be enough for correct<br />
functioning of the USB drive.<br />
Do not disconnect or switch off the USB drive when some write operation is in progress.<br />
Using Internal HDD<br />
To insert the internal 3.5” SATA HDD, ensure you are on the main screen of the player menu, open the<br />
HDD rack door, insert the HDD into the HDD rack and close the HDD rack door. The player will recognize<br />
the internal HDD, and will show an item corresponding to the internal HDD on the main screen of the<br />
player menu.<br />
Do not eject the internal HDD when some write operation is in progress.<br />
It is recommen<strong>de</strong>d to use “green” HDD mo<strong>de</strong>ls with small RPM value, small heat emission, and small<br />
power consumption; for more information, please see here:<br />
http://dune-hd.com/support/hw_compat/<br />
Using SD Memory Cards<br />
To insert an SD memory card, ensure you are on the main screen of the player menu and insert the memory<br />
card into the SD card slot of the player. The player will recognize the memory card, and will show an item<br />
corresponding to the memory card on the main screen. Some SD memory cards may not be recognized by<br />
the player or may work incorrectly; in such a case, use other mo<strong>de</strong>ls of SD memory cards.<br />
Do not eject the SD memory card when some write operation is in progress.<br />
Accessing Network Drives<br />
To connect a network drive using SMB or NFS protocol, ensure you are on the main screen of the player menu,<br />
press the "MENU" RC button, and choose "Create Network Fol<strong>de</strong>r", then fi ll the parameters of the network drive<br />
as nee<strong>de</strong>d. The player will show an item corresponding to the confi gured network drive on the main screen.<br />
To browse the list of network resources accessible via SMB or UPnP protocols, use "Network Browser"<br />
item on the main screen of the player menu. NOTE: If some network resources are not shown by the<br />
player, you may need to wait some minutes and then retry (or press the "MENU" RC button and choose<br />
"Refresh" command).<br />
Formatting HDD<br />
To format a HDD attached to the player, select the drive item on the main screen of the player menu, press<br />
the "INFO" RC button and choose "Format Disk" (to format the entire disk) or "Format Partition" (or to format<br />
an already existing disk partition only). The player will format the disk using "EXT2" fi lesystem. NOTE:<br />
To use disks formatted by the player on a Windows PC, you may need to install additional software on the<br />
PC, such as "EXT2FSD" (http://www.ext2fsd.com/).<br />
English<br />
9
Switching the Player On and Off<br />
To switch on the player, ensure the power switch on the rear panel is in “on” state, and press the “POWER”<br />
RC button or the “on/off” button on the front panel.<br />
To put the player into the standby mo<strong>de</strong>, press the “POWER” RC button or the “on/off” button on the front<br />
panel. To exit the standby mo<strong>de</strong>, press any of these buttons again.<br />
Depending on the player settings (see the player setup menu), the “hardware standby” or “software standby”<br />
mo<strong>de</strong> may be used. In the “hardware standby” mo<strong>de</strong>, almost complete power-off takes place and<br />
the player consumes almost no power. In the “software standby” mo<strong>de</strong>, the player produces no signal<br />
on the vi<strong>de</strong>o output, but is still functioning. For example, if you have some storage <strong>de</strong>vices connected to<br />
the player, you may still access them from network (“NAS” function of the player). Exiting the “software<br />
standby” mo<strong>de</strong> takes just a few seconds. When the player is in the “software standby” mo<strong>de</strong>, it still consumes<br />
significant power. It is not recommen<strong>de</strong>d to keep the player in the “software standby” mo<strong>de</strong> for a<br />
while if you do not need it.<br />
To switch off the player completely, toggle the power switch on the rear panel. Do not do it if some drive is<br />
connected to the player and some write operation is in progress.<br />
NOTE: After switching off the player or putting the player into the “hardware standby” mo<strong>de</strong>, it is recommen<strong>de</strong>d<br />
to wait about 1 minute before switching it on again.<br />
NAS (Network Attached Storage)<br />
You can access storage <strong>de</strong>vices connected to the player from the local network using FTP and SMB protocols.<br />
On a Windows PC, just type "ftp://ip_address" or "\\ip_address" in the Windows explorer, where<br />
"ip_address" is the IP address of the player.<br />
WiFi<br />
You can use a USB WiFi adapter to connect the player to the local network via WiFi.<br />
Please see here for the information on supported USB WiFi adapters:<br />
http://dune-hd.com/support/hw_compat/<br />
Limitations<br />
Compatibility of the player with a particular hardware (A/V equipment, network equipment, disk drives, etc)<br />
may <strong>de</strong>pend on various factors (particular hardware mo<strong>de</strong>l, specifi cs of hardware installation and usage,<br />
confi guration of the player and the hardware, etc). If the player does not correctly work with a particular<br />
hardware, try to adjust the confi guration of the player or hardware, try to use the hardware in a different<br />
way, or try to use some other hardware.<br />
Compatibility of the player with a particular media content (fi les, discs, etc) may <strong>de</strong>pend on various factors<br />
(specifi cs of media content encoding, specifi cs of the confi guration of the player, etc). If the player does not<br />
play correctly a particular media content, try to adjust the confi guration of the player, or try to use media<br />
content enco<strong>de</strong>d in a different way.<br />
Updating Your Player and Getting More Information<br />
Please check here for updated versions of player fi rmware (which may improve player functioning and<br />
extend player possibilities):<br />
http://dune-hd.com/fi rmware/<br />
(Note: You can also connect the player to Internet and use the online fi rmware upgra<strong>de</strong> function, see Setup<br />
/ Misc / Firmware Upgra<strong>de</strong>.)<br />
10 Dune HD Duo <strong>Quick</strong> <strong>Start</strong> <strong>Gui<strong>de</strong></strong>
Please check here for more <strong>de</strong>tailed and up-to-date documentation and information on player usage:<br />
http://dune-hd.com/manuals/<br />
http://dune-hd.com/support/<br />
Support for Extension Boards<br />
The Dune HD Duo player is equipped with two extension slots located at the rear panel of the player.<br />
Additional information is available on the Internet site http://www.dune-hd.com<br />
Support for Extension Modules<br />
The functions of Dune HD Duo player can be exten<strong>de</strong>d with Extension Modules of Dune HD Smart product<br />
line, such as Dune HD Smart HE (one more SATA 3.5” HDD with hot swap feature) and Dune HD Smart<br />
ME (two more slots for extension boards). Additional information is available on the Internet site<br />
http://www.dune-hd.com<br />
English<br />
11