
Create successful ePaper yourself
Turn your PDF publications into a flip-book with our unique Google optimized e-Paper software.
THIS INFORMATION HAS BEEN COMPILED FROM THE NEST BOX GUIDE FOR WATERFOWL BY<br />
DUCKS UNLIMITED AND THE CANADIAN WILDLIFE SERVICE, ENVIRONMENT CANADA; AND A<br />
CONSERVATOR ARTICLE BY MEARL ROONEY (VOL.19,NO.3).<br />
GREAT LAKES/ATLANTIC REGIONAL OFFICE | 1220 EISENHOWER PLACE<br />
ANN ARBOR, MI 48108 | T. 734.623.2000 | F. 734.623.2035 | WWW.DUCKS.ORG<br />
If you don’t have any <strong>duck</strong>s using your <strong>box</strong> over the summer, don’t<br />
worry. Waterfowl biologists have seen waterfowl migrating in the<br />
fall scope out potential <strong>nest</strong>ing sites for next spring. This too is a<br />
good reason to keep your <strong>box</strong>es in top condition. You never know<br />
when somebody might be popping in!<br />
If you decide to apply a finish to your<br />
<strong>nest</strong> <strong>box</strong>, use a nontoxic wood preserver<br />
or a light shade of an earth-tone paint.<br />
Every year in the<br />
fall, after the<br />
<strong>nest</strong>ing season<br />
has completed,<br />
PLASTIC PIPE<br />
GUARD<br />
Once a cavity <strong>nest</strong>ing bird starts using your <strong>box</strong>, you’ll likely see<br />
many broods raised over the years.Nesting sites for these birds are<br />
limited in number.When they find a good <strong>nest</strong>ing site, there is a<br />
very good chance they’ll return in following years. When you put<br />
up a <strong>nest</strong> <strong>box</strong> you are committing yourself to maintaining that <strong>box</strong>.<br />
Fall and winter are the best times to remove old <strong>nest</strong>ing material,<br />
tighten any loose screws and mounts, and add new wood shavings.<br />
FINISHING TOUCHES<br />
<strong>Ducks</strong> <strong>Unlimited</strong> does not recommend<br />
applying a finish to cedar <strong>box</strong>es. A finish<br />
might help to extend the life of a plywood<br />
<strong>box</strong>.<br />
NEST BOX MAINTENANCE: A LONG-TERM COMMITMENT<br />
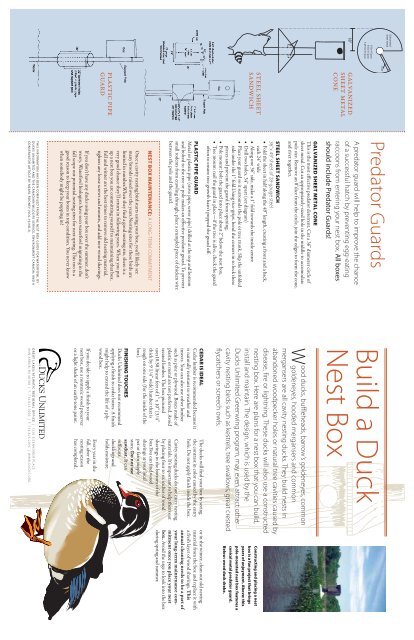
PLASTIC PIPE GUARD<br />
Metal or plastic pipe (stove pipe, sewer pipe) drilled at the top and bottom<br />
and bolted to the tree or pole makes an effective predator guard. To prevent<br />
small rodents from crawling through, place a crumpled piece of chicken wire<br />
between the pole and the guard.<br />
CEDAR IS IDEAL<br />
Cedar lumber is recommended because it<br />
is naturally resistant to weather and<br />
insects. You can also use other lumber<br />
such as pine or plywood. Boxes made of<br />
plastic or metal are not preferred. Avoid<br />
treated lumber. The <strong>box</strong> pictured<br />
uses10.58 linear feet of 1” x 10” (3/4”<br />
thick by 9 1/4” wide) lumber that is<br />
rough on one side (for the inside of the<br />
<strong>box</strong>).<br />
Cavity <strong>nest</strong>ing <strong>duck</strong>s do not carry <strong>nest</strong>ing<br />
materials. It’s important to help them out<br />
by placing four to six inches of wood<br />
shavings in the bottom of the<br />
<strong>box</strong>.You can find wood<br />
shavings at your local<br />
pet or farm supply<br />
store. Do not use<br />
sawdust. It can<br />
suffocate<br />
<strong>duck</strong>lings and<br />
holds moisture.<br />
The <strong>duck</strong>s will find your <strong>box</strong> by seeing<br />
the contrast in color caused by the entry<br />
hole. Do not apply finish inside the <strong>box</strong>.<br />
or in the winter, clean out old <strong>nest</strong>ing<br />
material from the <strong>box</strong> and replace it with<br />
a fresh layer of wood shavings. This<br />
annual cleaning needs to be a part of<br />
your long-term maintenance commitment<br />
once you place your <strong>nest</strong><br />
<strong>box</strong>. Avoid the urge to look into the <strong>box</strong><br />
during spring and summer.<br />
STEEL SHEET<br />
SANDWICH<br />
STEEL SHEET SANDWICH<br />
36” x 49” sheet of 28-gauge steel<br />
• Fold the sheet in half along the 49" length, creating a front and a back,<br />
each 24" wide<br />
• Along one 36" side, make a 1" fold towards the inside centre<br />
• Drill two holes, 34" apart (see diagram)<br />
• Place your guard so it surrounds the pole or tree trunk. Slip the unfolded<br />
side under the 1" fold.Using vice-grips, bend the corners in to lock these<br />
pieces and prevent the guard from opening.<br />
• Pole mount: bolt the guard into place about 2" below the <strong>nest</strong> <strong>box</strong>.<br />
• Tree mount: nail the guard in place—if the tree is alive, check the guard<br />
often to ensure tree growth hasn’t popped the guard off.<br />
GALVANIZED SHEET METAL CONE<br />
This is the most effective predator deterrent. Cut a 36" diameter circle of<br />
sheet metal. Cut an appropriately-sized hole in the middle to accomodate<br />
pole size. Remove an 8"slice from the circle, join the edges to form the cone,<br />
and rivet together.<br />
<strong>Wood</strong> <strong>duck</strong>s, buffleheads, barrow’s goldeneyes, common<br />
goldeneyes, hooded mergansers and common<br />
mergansers are all cavity <strong>nest</strong>ing <strong>duck</strong>s. They build <strong>nest</strong>s in<br />
abandoned woodpecker holes or natural tree cavities caused by<br />
disease, fire or lightning. These <strong>duck</strong>s will also use a constructed<br />
<strong>nest</strong>ing <strong>box</strong>. Here are plans for a <strong>nest</strong> <strong>box</strong> that you can build,<br />
install and maintain. The design, which is used by the<br />
<strong>Ducks</strong> <strong>Unlimited</strong> Greenwing program, may even attract other<br />
cavity <strong>nest</strong>ing birds such as kestrels, tree swallows, great crested<br />
flycatchers or screech owls.<br />
Constructing and placing a <strong>nest</strong><br />
<strong>box</strong> is a fun project that brings<br />
years of enjoyment. Above: this<br />
pole-mounted <strong>nest</strong> <strong>box</strong> features a<br />
conical metal predator guard.<br />
Below: wood <strong>duck</strong> drake.<br />
18"<br />
GALVANIZED<br />
SHEET METAL<br />
CONE<br />
A predator guard will help to improve the chance<br />
of a successful hatch by preventing egg-eating<br />
raccoons from entering your <strong>nest</strong> <strong>box</strong>. All <strong>box</strong>es<br />
should include Predator Guards!<br />
5” for 4” post<br />
6” for 5” post<br />
7.25” for 6” post<br />
rivet<br />
Predator Guards<br />
Build a Duck<br />
Nest Box<br />
Galvanized<br />
sheet metal
8. Attach the roof (6) using four screws from<br />
the top and three screws from the back (be<br />
careful not to screw into the door). The <strong>box</strong><br />
is now ready to install. Don’t forget to put a<br />
4–6 inch layer of wood shavings into the <strong>box</strong><br />
for <strong>nest</strong>ing material.<br />
Hinge for Cleanout Door<br />
FLOOR<br />
FRONT<br />
7. Round the top outside edge of the door with<br />
sandpaper (5). See exploded view. Fasten the<br />
door at the top with one screw from the front<br />
and one from the back.The two screws form<br />
the hinge and allow the door to open. Pin the<br />
door shut with a nail from the front or add a<br />
latch.<br />
BACK<br />
� Boxes should be placed above typical high water levels and at a height that<br />
will allow you to access the <strong>box</strong> for monitoring and maintenance (about 4<br />
to 6 feet above land or water). In terms of distance inland, try to keep your<br />
<strong>box</strong> close to the water.<br />
� Clear an unobstructed flight path to your <strong>nest</strong> <strong>box</strong> by removing branches<br />
that might be in the way.<br />
� The entrance hole to the <strong>box</strong> should face the water.<br />
� You can tip the <strong>box</strong> forward a little bit to help the <strong>duck</strong>lings reach the<br />
entrance.<br />
� Ducklings prefer privacy. Don’t mount <strong>box</strong>es close to human disturbance<br />
or close to other <strong>nest</strong> <strong>box</strong>es.<br />
CLEANOUT<br />
DOOR<br />
SIDE<br />
6. Attach the front (4) using six screws.<br />
STEEL POLES<br />
Make sure the poles are fixed solidly in the soil or marsh bottom, to ensure<br />
that the <strong>nest</strong> <strong>box</strong>es are stable. Drill two holes in this pole to accommodate a<br />
predator guard (see last page).<br />
5. Score the inside face of the front (4) with a<br />
saw. The horizontal slots will provide toeholds<br />
when the <strong>duck</strong>lings climb out. You can<br />
also use hardware cloth.<br />
ROOF<br />
EXPLODED VIEW—not to scale!<br />
TREE TRUNKS<br />
Live and dead trees are suitable. If beavers are around, don’t place <strong>nest</strong> <strong>box</strong>es<br />
on poplar or white birch trees. Beavers eat these trees. Also, avoid placing the<br />
<strong>box</strong> where stiff branches are close to the <strong>box</strong>. Raccoons can climb these<br />
branches and gain access to the <strong>box</strong>.<br />
4. Draw the entry hole on the front (4) using a<br />
pencil (4 1/2" x 3 1/2" oval). Drill a pilot hole<br />
and cut out the entry hole using a jig saw. See<br />
detailed view. Proper entry hole dimensions<br />
are critical.<br />
Live trees can be used for mounting <strong>box</strong>es, but keep a close eye on your <strong>box</strong>.<br />
Growing trees may loosen mounts and make <strong>box</strong>es less attractive to the birds.<br />
9.25"<br />
GOOD PLACEMENT: a dead tree at the water’s edge<br />
BETTER PLACEMENT: a solid dead tree in the water<br />
BEST PLACEMENT: <strong>box</strong>es on poles near standing, flooded, dead trees<br />
3. Drill five 1/2" drainage holes into the floor<br />
(3). Attach the floor by fastening two screws<br />
through the back and two through the side.<br />
9.25"<br />
9.25"<br />
DOOR<br />
ROOF<br />
POSITIONING YOUR NEST BOX<br />
Nest <strong>box</strong>es can be mounted on tree trunks or on steel poles beside the water<br />
or above the water.<br />
2. Attach the back (1) to the side (2) using four<br />
screws fastened from the back of the <strong>box</strong>. See<br />
exploded view.<br />
FLOOR 7.75”<br />
14” 23.5”<br />
1. Measure and cut your wood to produce the<br />
six pieces.Number the pieces as shown.See<br />
material measurements.<br />
9.25"<br />
9.25" 9.25"<br />
Kerf Cuts<br />
(Inside face)<br />
or Hardware<br />
Cloth<br />
WHERE TO FIND TENANTS<br />
To increase the chances of your <strong>nest</strong> <strong>box</strong> being used by waterfowl, it should<br />
be located in an area attractive to cavity <strong>nest</strong>ing <strong>duck</strong>s. You’ll see these birds<br />
using wooded wetlands that contain water year round or, at least, throughout<br />
the summer. You’ll also see them using trees along riverbanks and lake shorelines.<br />
Tools and Materials Needed<br />
handsaw or table saw<br />
drill and 1/2” bit<br />
jigsaw<br />
screwdriver<br />
sandpaper<br />
pencil<br />
measuring tape<br />
straight-edge<br />
wood screws<br />
wood 1 each 1 x 10 x 12’<br />
31” 23.5”<br />
23.5”<br />
Entry Hole 3.5"<br />
BACK SIDE FRONT<br />
Now that you’ve completed construction of your<br />
<strong>nest</strong> <strong>box</strong>, you need to consider where to install it.<br />
Be sure to place the <strong>box</strong> in a location that will be<br />
convenient for monitoring and annual maintenance.<br />
3.25"<br />
4.5"<br />
MATERIAL MEASUREMENTS—not to scale!<br />
DETAILED FRONT VIEW—not to scale!<br />
the Right Place<br />
Procedure<br />
Finding