

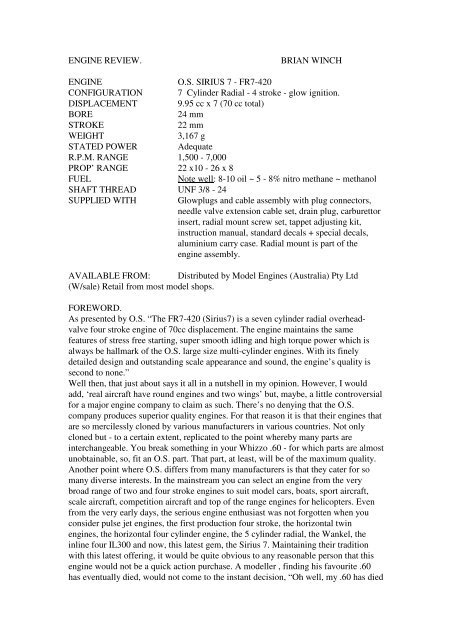
ENGINE REVIEW. BRIAN WINCH ENGINE O.S. SIRIUS 7 ... - cksmac
ENGINE REVIEW. BRIAN WINCH ENGINE O.S. SIRIUS 7 ... - cksmac
ENGINE REVIEW. BRIAN WINCH ENGINE O.S. SIRIUS 7 ... - cksmac

You also want an ePaper? Increase the reach of your titles
YUMPU automatically turns print PDFs into web optimized ePapers that Google loves.
<strong>ENGINE</strong> <strong>REVIEW</strong>. <strong>BRIAN</strong> <strong>WINCH</strong><br />
<strong>ENGINE</strong> O.S. <strong>SIRIUS</strong> 7 - FR7-420<br />
CONFIGURATION 7 Cylinder Radial - 4 stroke - glow ignition.<br />
DISPLACEMENT 9.95 cc x 7 (70 cc total)<br />
BORE 24 mm<br />
STROKE 22 mm<br />
WEIGHT 3,167 g<br />
STATED POWER Adequate<br />
R.P.M. RANGE 1,500 - 7,000<br />
PROP’ RANGE 22 x10 - 26 x 8<br />
FUEL Note well: 8-10 oil ~ 5 - 8% nitro methane ~ methanol<br />
SHAFT THREAD UNF 3/8 - 24<br />
SUPPLIED WITH Glowplugs and cable assembly with plug connectors,<br />
needle valve extension cable set, drain plug, carburettor<br />
insert, radial mount screw set, tappet adjusting kit,<br />
instruction manual, standard decals + special decals,<br />
aluminium carry case. Radial mount is part of the<br />
engine assembly.<br />
AVAILABLE FROM: Distributed by Model Engines (Australia) Pty Ltd<br />
(W/sale) Retail from most model shops.<br />
FOREWORD.<br />
As presented by O.S. “The FR7-420 (Sirius7) is a seven cylinder radial overheadvalve<br />
four stroke engine of 70cc displacement. The engine maintains the same<br />
features of stress free starting, super smooth idling and high torque power which is<br />
always be hallmark of the O.S. large size multi-cylinder engines. With its finely<br />
detailed design and outstanding scale appearance and sound, the engine’s quality is<br />
second to none.”<br />
Well then, that just about says it all in a nutshell in my opinion. However, I would<br />
add, ‘real aircraft have round engines and two wings’ but, maybe, a little controversial<br />
for a major engine company to claim as such. There’s no denying that the O.S.<br />
company produces superior quality engines. For that reason it is that their engines that<br />
are so mercilessly cloned by various manufacturers in various countries. Not only<br />
cloned but - to a certain extent, replicated to the point whereby many parts are<br />
interchangeable. You break something in your Whizzo .60 - for which parts are almost<br />
unobtainable, so, fit an O.S. part. That part, at least, will be of the maximum quality.<br />
Another point where O.S. differs from many manufacturers is that they cater for so<br />
many diverse interests. In the mainstream you can select an engine from the very<br />
broad range of two and four stroke engines to suit model cars, boats, sport aircraft,<br />
scale aircraft, competition aircraft and top of the range engines for helicopters. Even<br />
from the very early days, the serious engine enthusiast was not forgotten when you<br />
consider pulse jet engines, the first production four stroke, the horizontal twin<br />
engines, the horizontal four cylinder engine, the 5 cylinder radial, the Wankel, the<br />
inline four IL300 and now, this latest gem, the Sirius 7. Maintaining their tradition<br />
with this latest offering, it would be quite obvious to any reasonable person that this<br />
engine would not be a quick action purchase. A modeller , finding his favourite .60<br />
has eventually died, would not come to the instant decision, “Oh well, my .60 has died
- I think I will replace it with that new O.S. radial.” For many modellers, it would<br />
require a bit of thinking before jumping to purchase a specialist engine like this. On<br />
the other hand, there are modellers who would just have to have one (like me) just<br />
because you MUST have this engine…and I’ll think about putting it in a model later<br />
on. This engine will be available for many years as it will never age in style,<br />
particularly when you consider it is a look-a-like (example) Pratt and Whitney engine<br />
and the plastic reproductions of those still sell very well for scale effect. In one respect<br />
you might consider it a ‘next series’ up from the superb Sirius FR5 - 300 5 cylinder<br />
which was first available in 1986 - 24 years ago(and still a very popular engine). As<br />
there were no improvements required for the FR5 radial, the only way to upgrade was<br />
to add a few cylinders. While you are at it, a few cosmetic changes and why not make<br />
it a bit more scale like. Well, here we have it so lets look at those changes for a start.<br />
SOMETHING NEW.<br />
Perhaps I should have said that we will look for something established or common in<br />
design. The truth of the matter is that the only recognisable parts or sections are the<br />
stub exhausts, the front housing and the prop drive hub and the prop. For many years<br />
the pushrod covers used on OS engines were formed in stainless steel. When they<br />
developed the sealed lubrication system for their engines, the pushrod covers were<br />
fully machined in aluminium alloy to provide the necessary tight oil seal. The covers<br />
for this radial are also machined aluminium alloy but…with a big difference. In<br />
keeping with the scale appearance, the tubes are machined to a very pleasant shape<br />
with finning around the base, an acute taper down to a parallel section then a shorter<br />
taper where the cover seals into the underside of the rocker box where they seal with<br />
an O ring. The next difference that catches your notice is that the long recognisable<br />
O.S. embossed rectangular rocker cover is gone and replaced by two matt black<br />
covers, again, very much like a full size radial. Actually, O.S. had a similar twin<br />
rocker arrangement with their first 20 cc four stroke (1983) but it was replaced on<br />
later engines with the familiar single cover. The cylinder heads are a new design in<br />
that the intake manifold is very substantial and extends out level with the outer fins.<br />
Obviously this gives maximum purchase for the two manifold screws but it also<br />
allows a perfectly vertical alignment for the induction tube to enter straight into the<br />
fuel distribution section of the crankcase. All very neat and, like the pushrod covers,<br />
the induction tubes are deeply finned. There is a purpose here with that finning. The<br />
rear of any engine is the hottest zone and a mass of metal such as in an engine of this<br />
size would maintain a fairly high and constant temperature. The finning on the<br />
induction tubes would keep the temperature for the fuel at the correct level so that<br />
there was no chance of a form of vapour lock when the engine was running as it<br />
should be run, that is, tuned correctly for optimum running temperature. A small<br />
amount of air would run through the cylinder fins to the induction tubes but it would<br />
certainly be pre-heated by the cylinder itself. The induction tubes are reduced in<br />
diameter where they fit into the crankcase and sealing is by an O ring. There is a slight<br />
extension platform to the right of the intake manifold and one of the four head<br />
retaining crews are fitted here just ahead of the glowplug recess. The cylinders are<br />
quite similar to those used on other O.S. multi engines in that they are finely machined<br />
aluminium alloy with a flat mounting base and finished off in a semi gloss black<br />
anodising (or other metal colouring process). They are a slip fit over the hardened<br />
steel liners - a long standing practice of O.S. that has proven to be almost beyond wear<br />
in model engine cylinder liner use.
Back to the head for a moment, the exhaust pipes supplied with the engine are quite<br />
familiar, being used on several other engines, and they are stainless steel tubes (bent to<br />
shape) retained by a gland or hollow nut, again, a long standing practice. On their own<br />
these pipes have quite low sound volume but, as it is with multi cylinder engines, any<br />
number of them actually reduce the total sound to a very pleasant multi cylinder<br />
rumble. The sound of 7 cylinders is something you would want to hear. As an optional<br />
extra, for certain scale applications, O.S. produces a collector ring exhaust for this<br />
engine and, it too, has a very pleasant engine sound and, of course, all the exhaust<br />
efflux is directed out the bottom of the engine cowl. The collector ring is finished matt<br />
black, very sturdy and, as you would expect, a perfect fit into the seven threaded<br />
exhaust manifolds in the head. When you fit it, wind the nuts in as far as you can with<br />
your fingers until they are all in place then lightly nip each one for the final tightening.<br />
PARTS OF THE CRANKCASE.<br />
The crankcase is made up of five sections - each one with intensive machining and a<br />
superfine finish on all surfaces. From the front we start with the external front housing<br />
that has the main front bearing for the crankshaft, the bored holes for the pushrod<br />
covers and 7 channels leading to holes for the assembly screws. Behind this, inside the<br />
engine, is the inner plate with the rear main bearing and an offset bearing position for<br />
the cam disc drive (and driven) gear. Between this section and the front housing is the<br />
entire cam drive which we will look at further on.<br />
The centre section of the crankcase is quite a bit or work. Around the diameter there<br />
are 7 depressions machined in and the cylinders sit in these as their base location. In<br />
the centre of each depression a section is machined right out to allow the connecting<br />
rods to enter and move as they do during the rotation of the crankshaft. Each end face<br />
of this drum section has 7 tapped holes for the end cover screws plus 4 for each<br />
cylinder base giving 42 holes in all and every one has to be absolutely spot on<br />
accurate. The main rear cover comes in for its share of machining with 7 bored holes<br />
in the outer diameter for the fuel induction tubes, 7 holes for the assembly screws,<br />
seven more holes for the standoff mount pillars and 7 tapped holes for the inner cover<br />
that seals the case off. The centre of this main rear cover is bored in the centre for a<br />
bearing through which the fuel vane driver shaft is supported. The final cover fits<br />
tightly within the rear main cover and is secured with 7 caphead screws flush with the<br />
surface. The cover incorporates the intake manifold for the carburettor and its design<br />
and positioning sets the carburettor in an updraft position (fuel/air mix flows upwards)<br />
but slightly canted to one side to allow clearance for the main mixture needle. Quite<br />
good, in my opinion, as this prevents fuel from siphoning into the fuel chamber when<br />
the engine is not running. A flooded radial engine can be big trouble if you are not<br />
wary.<br />
Inside the cavity formed by the two rear covers there is a fuel distributor with multiple<br />
helical vanes. It is driven by a small driveshaft that is driven by the crankpin of the<br />
crankshaft at engine speed. When this distributor rotates if draws in fuel and loads it<br />
the induction tubes to charge the intake fuel chamber in the head. As, in turn, each<br />
intake valve opens, there is a charge of fuel for instant introduction into the engine for<br />
the next firing - or power - stroke. No fuel lag and all cylinders receive the exact same<br />
amount. Atmospheric pressure plays its part here as it is ever present entering the<br />
chamber via the carburettor and it provides the boost necessary to push the fuel into its<br />
final destination. All very smart and enjoyable to understand.
On the outer rim of the larger back cover there are 7 ‘humps’ and these are drilled for<br />
the standoff attachment screws. The standoff pillars are 28mm long and they are then<br />
attached to the 10mm thick radial mount. This provides an area 38mm deep by<br />
100mm diameter that is open all around to allow for the circulation of fresh and<br />
cooling air to the rear of the engine and into the air intake of the carburettor - a very<br />
important factor of design as many rear intake engines choke on hot, stale air when<br />
there is no rear air circulation. Five x 5mm caphead high tensile screws, spring<br />
washers and Tee nuts (supplied) attach the engine to the firewall of your model and<br />
the mounting structure is so substantial it is not going to flex or vibrate. All you need<br />
do is ensure the firewall is up to the job.<br />
The remaining external component is the carburettor and here we come to a very<br />
interesting point. The 80T series carburettor is of the well established O.S. design<br />
being fuel metering with the main needle valve and the idle adjustment screw parallel<br />
and close together in one end of the main body. The carby connects to the intake<br />
manifold by slipping over the manifold section with an O ring seal. It is secured in this<br />
position with 2 Phillips head screws either side of the air intake section. The carby is<br />
not reversible as, in the opposite position, the mixture adjustments would foul one of<br />
the standoffs. This engine would not be fitted to any old Sunday flier hack - it would<br />
be fitted to a purpose designed scale model which would be planned and setup<br />
correctly from the start so, throttle connection is certainly not going to be a problem.<br />
To assist in connecting, the throttle arm can be either vertically up or down. (The<br />
thought of somebody fitting one of these engines to a large Ugly Stick sends cold<br />
shivers down my back.) With the supplied accessories there is an insert for the<br />
carburettor venturi to be used if you are using pre-mixed fuel with 15% nitro and/or<br />
18% oil content. Read the instruction book well and pay particular attention to the<br />
section on ‘FUELS’. My suggestion is that you mix your own fuel or use a very high<br />
quality brand name fuel rather than a home brew supplied by a back yard fuel blender<br />
(eg. ‘club fuel’). You have a lot of money invested in this engine - incorrect fuel will<br />
kill it.<br />
LOOKING INSIDE.<br />
Firstly, for interest, the firing order of this engine is: 1-3-5-7-2-4-6-1 which makes the<br />
cam sequence an even timing with 4 cams for each intake and exhaust cycle. The<br />
cams are an assembly of three discs bolted together and all three heat treated quite<br />
hard. Two of the discs each have four ‘humps’ on the outer diameter and these are the<br />
cams. The third disc is a fine toothed gear for part of the timing and the assembly<br />
spins via a caged roller bearing on the large diameter of the crankshaft. The gear is<br />
driven by a pinion (small gear) as part of a larger gear which, itself, is driven by a<br />
pinion that is machined into a section of the crankshaft. The second gear and pinion is<br />
supported by a shaft bearing in the number 2 front housing section. In operation, as<br />
the crankshaft rotates, its pinion drives the large section of the second gear (the idler)<br />
and its pinion drives the gear that is the cam assembly. The cam discs rotate and the<br />
timing set by the gearing brings the cams into play to push the cam followers which,<br />
in turn, push the hardened end, high tensile steel pushrods which transfer the action to<br />
the rockers which then open the valves - all in turn and perfectly synchronised. The<br />
use of roller bearings in some parts of the engine and the somewhat slow speed of the<br />
cam gears and assembly is part of the reason why a low lubricant fuel is used.<br />
The crankshaft is quite similar to a single cylinder 4 stroke engine shaft having the<br />
pinion machined into a section after the counterweight and the Woodruff keyway for
the propeller drive hub. Where it varies is the extra length crankpin for the roller<br />
bearing in the rather wide master conrod and the section to drive the fuel vane<br />
driveshaft. The counterweight is quite thin compared to single or twin shafts as its<br />
weight it not really needed much for balancing the reciprocating parts as they balance<br />
each other.<br />
The heart, so to speak, of a radial engine is the master rod/slave rods assembly and<br />
this is the section that evokes many of the questions I am asked in relation to radial<br />
engines. How does it work?<br />
If you study the photo I have included you will obtain a good understanding of how it<br />
is in this engine. The Number 1 piston is connected to the master rod which is a<br />
normal connecting rod shank but the big end is REALLY big. What is normally the<br />
big end eye of the conrod is the centre hole in the master rod and, in this engine, it is<br />
fitted with a needle roller bearing. Looking side on, the large lower end section is<br />
formed into two plates off the master rod shank. Equally spaced around the face of the<br />
plates there are 6 holes bored for the link pins. In each hole location, between the two<br />
plate sections, a slave rod (connecting rod) is fitted and the link pin secures it and<br />
then, itself, it is secured by a circlip on the outside of the second plate. The rest of the<br />
pistons are connected to the slave rods and these can move quite freely with the rods<br />
as the master rod rotates with the crankpin of the crankshaft. In operation, number one<br />
piston is pushed down by the combustion in number 1 cylinder (combustion or firing<br />
stroke) exactly the same as, say, a single cylinder engine and its force drives the<br />
crankshaft around. Obviously, the rotation of the crankshaft is 360 degrees (full circle<br />
rotation) but here we have a sequence of events every one seventh of a turn (51.42<br />
degrees). Okay, at 51.42 degrees, number 2 piston is driven up its liner and it performs<br />
an exhaust stroke on the way up and an induction stroke as it is moved back down - it<br />
is charged with a fuel gas ready for its turn to fire. Continuing with the rotation, at<br />
102.84 degrees, number 3 piston travels up its liner compressing a charge of fuel<br />
previously loaded and it has a combustion stroke - the power from which adds to the<br />
impetus of the crankshaft. This sequence is repeated around the full rotation of the<br />
crankshaft with cylinder 4 on exhaust/induction - cylinder 5 on combustion - cylinder<br />
6 on exhaust/induction - cylinder 7 on combustion then cylinder 1 at the full 360<br />
degrees now on exhaust/induction. As the master rod has been rotating and nearing<br />
the full circle, it has been driving number 2 piston part way up its liner until the<br />
second revolution of the shaft commences and the sequence is changed over to<br />
cylinder 2 - 4 - 6 - 1 firing and the others exhausting/inducting. From this you have<br />
probably deduced that the firing order is 1-3-5-7-2-4-6-1. Why, you might ask, is this<br />
‘hit/miss’ sequence used rather than each cylinder firing one after the other? If the<br />
firing was sequential it would set up a ‘rocking couple’ which we will discuss another<br />
time but, for now, it would rapidly destroy the engine and, at least, rip it off its mount.<br />
Due to the alternate firing pattern and the perfect balance of this engine, the running is<br />
smooth as silk and the sound is like a beautiful engineering opus.<br />
It is here we can understand another little question regarding the low oil content. First<br />
we look at the pistons - stabilised aluminium alloy with iron rings, hollow gudgeon<br />
pin, Teflon rub pads for the pins, identical to those in any other O.S four stroke apart<br />
from the dimensions. In your, say, Alpha four stroke you would use, maybe, 18% oil<br />
in the fuel. During combustion a very small amount of the oily fuel is injected past the<br />
ring as well as through the fine ring gap. This is a minuscule amount of oil but at, say,<br />
7,000 RPM, the amount builds up rapidly and this oil is the sole supply of lubricant to<br />
all the engine below the piston. Obviously quite an adequate supply as your Alpha (or
any other four stroke) is not blowing up due to lack of lubrication. Okay then, one<br />
cylinder supplies enough oil for one engine so…here we have seven cylinders all<br />
carrying out the same lubrication deal. NOW it is easy to understand why 8% to 10%<br />
oil content is quite adequate and you will see proof of this when you note the efflux of<br />
oil from the crankcase breather nipple. Be warned - do not use commercial four stroke<br />
glow fuel in this engine. Repeating - 10% is the maximum amount of oil required -<br />
any more and you risk serious internal damage. Read the instruction manual carefully<br />
and take care to understand the section relating to fuel requirements.<br />
FINAL NOTES.<br />
I think I have covered all the components of the engine other than the propeller<br />
attachment section of the crankshaft. The anodised black propeller drive hub is driven<br />
by a Woodruff key (tall D shape), it has two rings of helical knurling (very positive<br />
grip) and it is 43.75mm diameter. The propeller washer is tapered face steel at<br />
42.5mm diameter and the securing system comprises two hexagon nuts - one being a<br />
collet type nut that locks into the recess of the main nut. The washer and nuts are gloss<br />
black oxidised. According to my count there are no less than 345 parts (plus the<br />
accessories) in the construction of this engine and those parts are secured by no less<br />
than 135 cap head screws. All those parts have to fit each other perfectly and every<br />
screw hole must line up with every tapped hole. Not really a problem as, after all, it IS<br />
an O.S. engine so you would expect nothing less.<br />
It goes without saying that the engine has impeccable manners. Of course it starts first<br />
flick, it does not kick back, the transition is smooth and rapid, idle is something to<br />
enjoy and you will run it at full RPM just for the sound, smoothness and the<br />
realisation of just how powerful this engine is. Don’t take it lightly - it is real serious<br />
power and it is swinging large propellers. Being as smooth as it is when running, it<br />
won’t shake parts off your model but it does need a very substantial firewall of at least<br />
15mm thickness that is well integrated into the structure of the fuselage or wing, if<br />
you are building a twin engine model. Expect to use around 70cc (ml same as cc) of<br />
fuel per minute at around medium flying speed (4,000 to 5,000 RPM).<br />
A pleasure to own and an even greater pleasure to run and use in a model.<br />
Testing was carried out on 3 11.10 with conditions 23 degrees C - 65% humidity. Fuel<br />
was 5% Angus nitro methane, 9% Coolpower Blue oil (from Tate’s Performance<br />
Hobbies) and 85% Coogee methanol. The glow plugs were heated using a Microsens<br />
7- 9 glow driver, a 3.7V-1S4P - 5200mAh LiPo battery and a plug balance unit which<br />
will be subject of a review in the next issue of this magazine.<br />
PROPELLER TESTS.<br />
I used wooden propellers ranging through 22 x 10 to 26 x 8 plus a Bolly carbon 22 x<br />
12. The lowest maximum was 4.760 RPM with the 26 x 8 and the highest was 5.942<br />
RPM with the 22 x 10. Throughout the rest of the range of test propellers there was an<br />
average of 654 RPM difference so, for you, it will be a simple matter of choosing a<br />
propeller to suit your model as this engine will handle any in the range almost<br />
identically. Here is a scene for you imagination. This engine fitted to a big biplane<br />
sitting on the take off strip waiting for the okay to fly and the engine is ticking over -<br />
reliably, at a mere 850 RPM. The test engine is new - still tuned a little rich and far<br />
from being run in. A few more hours on the clock and I am sure I will record and even<br />
lower figure with the Microsens onboard ignition monitoring the plugs.
PHOTOS.<br />
LOGOS<br />
Photos:<br />
1 This is how the engine is before the final assembly. Photos 1/2/3 courtesy of<br />
O.S.<br />
2 This is a master rod assembly as is used in radial engines.<br />
3 Identifying the parts with which you might not be familiar.<br />
4 Scale like pushrod covers to the twin rockers.<br />
5 Recesses are machined into the surfaces of the centre main case for the<br />
cylinder<br />
bases to sit flush.<br />
6 The slight angle of the carburettor allows the main needle and its extension<br />
(when fitted) to clear the standoff pillar.<br />
7 These are the standard supplied exhaust pipes.<br />
8 Very substantial intake manifold area.<br />
9 Easy plug access to all cylinders.<br />
10 Very functional finning on the intake manifolds for maintaining a safe<br />
temperature for the fuel.<br />
11 The matt black rocker covers add a touch of scale realism.<br />
12 Almost a standard fitting on O.S. 4 stroke engines, the 80T version is slightly<br />
modified for mounting on this engine.<br />
13 Deep teeth to grip the propeller and security with the front locking system.<br />
14 This nameplate is on the engine case.<br />
15 You can put this decal nameplate on your model.<br />
16 These solid standoffs ensure the security of the mounting system.<br />
17 Not a lot of area for head bolts - the four used are well placed and accessible.<br />
18 Side view of the collector ring with the header tubes in apparent disarray.<br />
“Okay then - who goes where?”<br />
19 Order - front face. “Right then - you all know now where to go.”