BEL puller-pusher.pdf
BEL puller-pusher.pdf
BEL puller-pusher.pdf

Create successful ePaper yourself
Turn your PDF publications into a flip-book with our unique Google optimized e-Paper software.
<strong>BEL</strong> Puller<br />
For 8" Reverse Osmosis pressure vessels heads installation<br />
General<br />
This tool designated to extract <strong>BEL</strong> End-Cap for 8" Side-Port reverse osmosis pressure vessels<br />
head. Before disassemble any of the vessels parts ensure internal pressure has been unloaded.<br />
Note:<br />
It is highly recommended to replace all seals each time the head is reassembled.<br />
A seal replacement kit is available from <strong>BEL</strong>’s Customer Service.<br />
Email: composite@bel-g.com Web Site: www.belvessels.com<br />
(Part number: 069-080-0101+069-080-1000 (for 1"NPT adapter) or<br />
+ 069-080-1250(for 1.25" NPT adapter) or<br />
+ 069-080-1500(for 1.5"NPT adapter) or<br />
+ 069-080-1510(for 1.5" Victaulic adapter).<br />
Kit assembly<br />
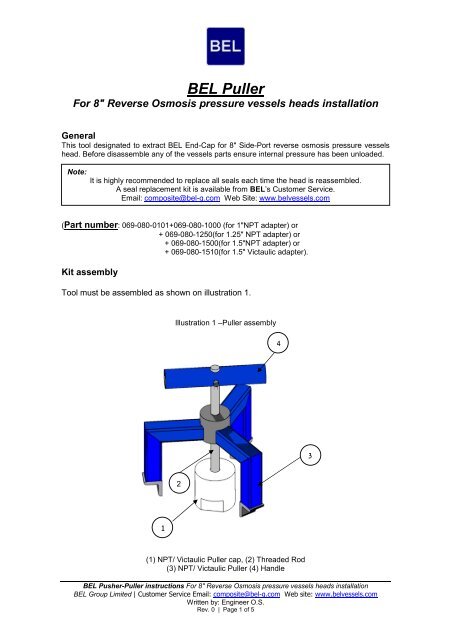
Tool must be assembled as shown on illustration 1.<br />
1<br />
Illustration 1 –Puller assembly<br />
2<br />
(1) NPT/ Victaulic Puller cap, (2) Threaded Rod<br />
(3) NPT/ Victaulic Puller (4) Handle<br />
<strong>BEL</strong> Pusher-Puller instructions For 8" Reverse Osmosis pressure vessels heads installation<br />
<strong>BEL</strong> Group Limited | Customer Service Email: composite@bel-g.com Web site: www.belvessels.com<br />
Written by: Engineer O.S.<br />
Rev. 0 | Page 1 of 5<br />
4<br />
3
NPT and Victaulic Head extraction<br />
NPT End-Cap extraction actions:<br />
1. Tight the Puller's legs to the vessel's wall as shown in picture to support the Puller to the<br />
vessel. (Figure 3-A&B before and after).<br />
2. Screw in fully the NPT cap (clockwise) to the NPT End-Cap while supporting the back<br />
side of the Puller (Figure 3B).<br />
Attention!<br />
To avoid property damage, do not bend the tool while connected to the EndCap.<br />
3. Screw out the Puller's handle (counterclockwise) until the End-cap is extracted, after that<br />
pull out the Puller with the End-cap (Figure 3C).<br />
(A)<br />
Warning!!<br />
To avoid personal injury, be careful not to drop the tool while extracting.<br />
(B)<br />
Figure 3 – NPT head removal steps<br />
<strong>BEL</strong> Pusher-Puller instructions For 8" Reverse Osmosis pressure vessels heads installation<br />
<strong>BEL</strong> Group Limited | Customer Service Email: composite@bel-g.com Web site: www.belvessels.com<br />
Written by: Engineer O.S.<br />
Rev. 0 | Page 2 of 5<br />
(C)
Victaulic End-cap extraction<br />
1. Tight the Puller's legs to the vessel's wall as shown in picture to support the Puller to the<br />
vessel. (Figure 4-A&B before and after).<br />
2. Place the Victaulic <strong>puller</strong> cap carefully inside the End-Cap permeate port (rotate<br />
clockwise) and connect it to the End-cap Victaulic port (Figure 4-C).<br />
Attention!<br />
To avoid property damage, do not bend the tool inside the EndCap permeate port.<br />
3. Screw out the Puller's handle (counterclockwise) until the End-cap is extracted, after that<br />
pull out the Puller with the End-cap (Figure 4-D).<br />
(A)<br />
Warning!!<br />
To avoid personal injury, be careful not to drop the tool while extracting.<br />
(B)<br />
(D)<br />
Figure 4 – Victaulic head removal steps<br />
<strong>BEL</strong> Pusher-Puller instructions For 8" Reverse Osmosis pressure vessels heads installation<br />
<strong>BEL</strong> Group Limited | Customer Service Email: composite@bel-g.com Web site: www.belvessels.com<br />
Written by: Engineer O.S.<br />
Rev. 0 | Page 3 of 5<br />
(C)
<strong>BEL</strong> Pusher<br />
For 8" Reverse Osmosis pressure vessels heads installation<br />
General<br />
This tool designated to install <strong>BEL</strong> EndCap for 8" Side-Port reverse osmosis pressure vessels<br />
head.<br />
Note:<br />
It is highly recommended to replace all seals each time the head is reassembled.<br />
A seal replacement kit is available from <strong>BEL</strong>’s Customer Service.<br />
Email: composite@bel-g.com Web Site: www.belvessels.com<br />
(Part number: 069-080-0100)<br />
Kit assembly<br />
Tool must be assembled as shown on illustration 1. Ensure tool's handle is located far<br />
from the NPT/ Victaulic <strong>pusher</strong> (part 1).<br />
Illustration 1 – Pusher-Puller assembly<br />
4<br />
3<br />
2<br />
<strong>BEL</strong> Pusher-Puller instructions For 8" Reverse Osmosis pressure vessels heads installation<br />
<strong>BEL</strong> Group Limited | Customer Service Email: composite@bel-g.com Web site: www.belvessels.com<br />
Written by: Engineer O.S.<br />
Rev. 0 | Page 4 of 5<br />
1
(1) NPT/ Victaulic <strong>pusher</strong>, (2) Sliding hammer (3) Handles (4) Rod<br />
Head installation<br />
1. Clean the vessel bell internal area with dry rag.<br />
2. Install the Hydraulic O-Ring into the EndCap seal groove.<br />
3. Apply full and rich layer of Glycerin or other lubricant on the O-Ring and on the bell<br />
internal groove.<br />
4. Place the Victaulic <strong>pusher</strong> carefully inside EndCap permeate port (illustration 2-A).<br />
Attention!<br />
To avoid property damage, do not bend the tool inside the EndCap permeate port.<br />
5. Push the sliding hammer quickly towards the NPT/ Victaulic <strong>pusher</strong> until it strikes the<br />
EndCap to it place (illustration 2-B, D).<br />
Warning!!<br />
To avoid personal injury, always grasp the Pusher-Puller handles with both hands.<br />
Ensure tool assembled properly as seen in illustration 1.<br />
A<br />
B<br />
Illustration 2 – NPT/ Victaulic head installation<br />
<strong>BEL</strong> Pusher-Puller instructions For 8" Reverse Osmosis pressure vessels heads installation<br />
<strong>BEL</strong> Group Limited | Customer Service Email: composite@bel-g.com Web site: www.belvessels.com<br />
Written by: Engineer O.S.<br />
Rev. 0 | Page 5 of 5