CamKioskâ„¢ Hand Sink Cart OWNER'S MANUAL - Cambro ...
CamKioskâ„¢ Hand Sink Cart OWNER'S MANUAL - Cambro ...
CamKioskâ„¢ Hand Sink Cart OWNER'S MANUAL - Cambro ...

You also want an ePaper? Increase the reach of your titles
YUMPU automatically turns print PDFs into web optimized ePapers that Google loves.
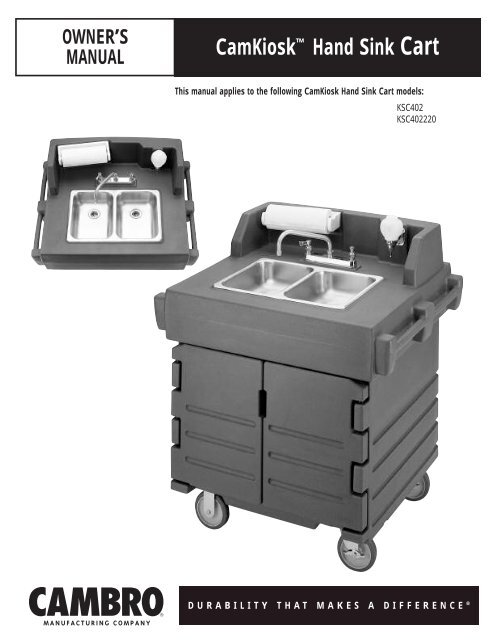
OWNER’S<br />
<strong>MANUAL</strong><br />
CamKiosk <strong>Hand</strong> <strong>Sink</strong> <strong>Cart</strong><br />
This manual applies to the following CamKiosk <strong>Hand</strong> <strong>Sink</strong> <strong>Cart</strong> models:<br />
PMS 185 + White<br />
Use this if 2 colors<br />
PMS 185 + Black<br />
Black + White<br />
KSC402<br />
KSC402220<br />
DURABILITY THAT MAKES A DIFFERENCE ®
Assembly<br />
1.Parts Checklist.................................................................... 2<br />
2.Assembly Instructions.......................................................... 2<br />
Start Up and Daily Operation<br />
1.<strong>Hand</strong> <strong>Sink</strong> Start Up.............................................................. 3<br />
2.Daily Operation and Changing Tanks..................................... 4<br />
3.Connecting <strong>Hand</strong> <strong>Sink</strong> to CamKiosk....................................... 4<br />
Troubleshooting Guide<br />
1.Water Heater........................................................................ 5<br />
2.Water Pump......................................................................... 5<br />
Cleaning Instructions<br />
1.Cleaning and Maintenance Instructions................................. 6<br />
2.Proper <strong>Hand</strong> Washing Procedures...........................................6<br />
Replacement Parts............................................................. 7<br />
Warranty and Service...........................................Back Cover<br />
<strong>Hand</strong> <strong>Sink</strong> <strong>Cart</strong> Parts<br />
1<br />
2<br />
3<br />
4<br />
5<br />
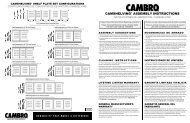
One faucet spout<br />
One towel holder center bar<br />
One soap dispenser<br />
Two waste water tanks (Gray)<br />
Two fresh water tanks (White)<br />
2<br />
3<br />
L<br />
TOWEL HOLDER<br />
SOAP DISPENSER<br />
R<br />
Table of Contents<br />
2<br />
4<br />
1<br />
WASTE WATER TANKS<br />
2<br />
3<br />
Assembly Instructions<br />
1. Install faucet spout by carefully<br />
positioning into center port and<br />
then carefully tighten collar nut.<br />
2. When placing towel bar into bracket,<br />
make sure roller bar is in proper position.<br />
Use L and R markings on roller so<br />
towel roll is feeding from top of roll<br />
towards operator.<br />
3. Make sure drain flex line is positioned<br />
so it can flow to either waste tank<br />
when properly placed in lower<br />
compartment. See Start Up & Daily<br />
Operation for details.<br />
5<br />
FRESH WATER TANKS
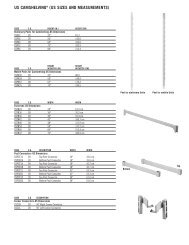
Start Up<br />
First Time Use of <strong>Hand</strong> <strong>Sink</strong> <strong>Cart</strong><br />
1. Fill one of the fresh water tanks with tap water, reconnect pump<br />
line to water tank connector, and loosen cap for ventilation.<br />
2. Check that drain nozzle is in the waste tank spout. Leave cap to<br />
hang by tether line.<br />
3. Plug in electric cord to a convenient 110V outlet.<br />
(Use 220V outside of U.S.). CEE 7 Type Euro Plug (Must use a<br />
grounded 3 wire type cord.)<br />
4. Open hot side valve on faucet about one quarter turn. Turn switch on<br />
electric box to start pump. With water heater turned<br />
off, allow pump to fill water heater until water begins to run<br />
out faucet spout, then shut valve.<br />
5. Do the same for the cold side of faucet. This will bleed off<br />
air in water lines.<br />
Fresh Water Tank Fresh Fresh Water Water Tank Tank<br />
6. Turn on switch on side of water heater, (switch will light up)<br />
and allow time for heater to begin heating water inside tank.<br />
Allow approximately ten (10) minutes.<br />
7. Place second set of tanks in front area pushing first set to the<br />
8.<br />
back of cart. Close door.<br />
You are now ready to use the <strong>Hand</strong> <strong>Sink</strong> <strong>Cart</strong>.<br />
Waste Tank Spout<br />
Out<br />
In<br />
Heat element switch on/off<br />
3<br />
Waste Waste Water Water Tank Tank<br />
Pump<br />
Quick Disconnect<br />
Fitting<br />
Tether Line<br />
Pump<br />
Waste Water Tank<br />
Main switch to turn on<br />
pump and water heater<br />
Inlet side to fresh<br />
water tank connector
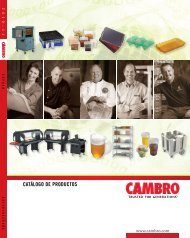
Daily Operation<br />
1. Fill both fresh water tanks.<br />
2. Place one set of tanks (fresh and<br />
waste) into sink cart and connect drain<br />
and pump lines as stated in Start Up.<br />
3. Push to the back of the sink<br />
cart cabinet.<br />
4. Place second set of tanks in front area<br />
for later use and close doors.<br />
Changing Tanks<br />
1. To change to second tank supply,<br />
remove front fresh water tank.<br />
2. Switch drain line nozzle to front<br />
waste tank (B).<br />
3. Switch pump line from empty water<br />
tank to second full tank and place<br />
back into its position in front.<br />
4. Briefly turn on faucet to check that<br />
pump is moving water through system.<br />
If so, close doors. You're ready with 5<br />
gallons more.<br />
To hot side<br />
of faucet<br />
Connecting Your <strong>Hand</strong> <strong>Sink</strong> <strong>Cart</strong> to a CamKiosk<br />
Note: you will need one Bridge Connector (CamKiosk accessory<br />
KMC24, sold separately.)<br />
1. With both <strong>Hand</strong> <strong>Sink</strong> <strong>Cart</strong> and CamKiosk positioned the proper distance,<br />
place top bridge so that it engages with handles of both carts.<br />
2. Install clamp pieces so that they fit over underside of handles on either<br />
side and tighten with 4 arm knobs at each slot position.<br />
3. Using 1 ⁄4" thumb screws, place strap brackets on either side of open space<br />
between carts, look for threaded insert at front corner of each cart, along<br />
bottom edge.<br />
Daily Operation<br />
Warning label<br />
Cap filler spout<br />
To cold<br />
side of<br />
faucet<br />
Waste<br />
B<br />
To reduce the risk of electric shock, disconnect from power<br />
supply before replacing temperature-limiting device.<br />
Do not plug in electrical power supply to water heater until<br />
tank has been completely filled with water. The heating<br />
elements will burn out if not immersed in water.<br />
Unplug electrical power supply before draining water heater<br />
or removing cover.<br />
The internal parts of this tank have been constructed and<br />
tested by the manufacturer to withstand 400˚ F temperature.<br />
Water temperature over<br />
125˚ F can cause severe<br />
burns instantly or death<br />
from scalds. Children,<br />
disabled and elderly are at<br />
highest risk of being scalded.<br />
See instruction manual before<br />
setting temperature on water heater.<br />
Check water before washing.<br />
Temperature limiting valves are available<br />
through manufacturer.<br />
4<br />
Side View<br />
Waste<br />
A<br />
Cold water<br />
inlet<br />
Hot water outlet<br />
Heat control<br />
on-off switch<br />
Pressure relief<br />
valve & discharge<br />
line to drain<br />
Fill spout<br />
with cap<br />
Fresh<br />
B<br />
110V switch &<br />
outlet box with<br />
GFI<br />
Arrester<br />
Fresh<br />
A<br />
Connector<br />
Side View<br />
Outside<br />
power<br />
connection<br />
cord<br />
On/off<br />
switch<br />
Inlet tube to<br />
fresh water<br />
tank<br />
Water pump<br />
See your water heater manual for<br />
adjusting water temperature.<br />
4. Position front panel on strap brackets and install 1 ⁄4" thumb screws into<br />
inserts on bottom edge of panel (leave loose).<br />
5. Going under top bridge, install 1 ⁄4" X 2 1 ⁄2" long 3 lobe knobs through<br />
slots in top of front panel and tighten against top bridge’s<br />
front section.<br />
6. Once front panel is properly positioned, tighten bottom 1 ⁄4" thumb<br />
screws either side along bottom edge of panel and both cart bodies.
Ariston Water Heater Unit<br />
Water Does Not Get Hot<br />
• Make sure power supply is on and working.<br />
• If light does not come on, check that the reset button is<br />
pushed in. This is found behind the face cover of the unit.<br />
You will need a Phillips screwdriver.<br />
• If indicator light works properly but temperature does not get<br />
hot at the tap, test for a plumbing crossover; shut off cold<br />
supply to heater and open hot water tap. No water should be<br />
flowing. Any continued flow indicates a crossover which will<br />
affect the temperature and will need to be corrected.<br />
• Heating element may need to be replaced. (Please refer to your<br />
Ariston water heater handbook for replacement instructions.)<br />
Light Not on<br />
• If light does not come on, but water gets hot, check for<br />
faulty bulb.<br />
• Check reset button mentioned in earlier section.<br />
Brown Water<br />
Brown or rusty water indicates a “spent” anode rod. Replace<br />
anode rod.<br />
Odor in Water<br />
Smelly water could be due to an unusual reaction between local<br />
water and the heater’s anode rod. Check anode rod.<br />
(See section on changing anode rod in Ariston handbook.)<br />
Water Is Too Hot<br />
Remove face plate on front of heater and rotate the temperature<br />
selector counter-clockwise to lower temp. If temperature never<br />
lowers, then replace the thermostat.<br />
(See heater handbook for details on this operation.)<br />
Leaking<br />
Periodically check all water fittings to and from heater unit.<br />
Also remove the face cover and check the gasket to the heating<br />
element inside.<br />
Note : Always keep this operator’s manual and the Ariston water<br />
heater handbook together for operation reference and<br />
troubleshooting points.<br />
Troubleshooting Guide<br />
5<br />
Water Pump<br />
Pump Will Not Start<br />
• Is the motor hot? Thermal breaker may have triggered;<br />
it will reset when cool.<br />
• Check wall outlet for voltage (fuse or breaker).<br />
• Check pressure switch operation and correct voltage at<br />
switch or motor wires.<br />
• Check rectifier or motor for open or grounded circuit.<br />
• Check for locked drive assembly.<br />
Pump Will Not Prime<br />
• Out of product?<br />
• Check strainer for debris.<br />
• Check Inlet tubing / plumbing for severe vacuum leak.<br />
• Inlet / Outlet tube severely restricted (kinked)<br />
• Check for debris in pump inlet / outlet valves.<br />
• Proper voltage with the pump operating (+/- 10%)<br />
• Check pump housing for cracks.<br />
Leaks from Pump Head or Switch<br />
• Check for loose screws at switch or pump head.<br />
• Is switch diaphragm ruptured or pinched?<br />
• Check for punctured diaphragm if fluid is present at<br />
bottom drain holes.<br />
Pump Will Not Shut off (Pressure switch equip.)<br />
• Output line closed and no leaks<br />
• Check for air trapped in outlet line or pump head.<br />
• Check for correct voltage to pump (+/- 10%)<br />
• Check Inlet / outlet valves for debris or swelling.<br />
• Loose drive assembly or head screws.<br />
• Pressure switch operation / adjustment incorrect. Refer<br />
to pump (Shurflo) service bulletin #1031 for differential<br />
and pressure adjustment procedure.<br />
Noisy/Rough Operation<br />
• Mounting feet are compressed too tightly.<br />
• Loose pump head or drive screws.<br />
• Does the mounting surface multiply noise? (flexible)<br />
• Is pump plumbed with rigid pipe causing noise to transmit?<br />
Note: This pump is to be used for the circulation of water only.<br />
No solvents—especially flammable liquids—are to be<br />
used in this system.
Water Tanks<br />
Disconnect the outgoing line from tank and empty the tank. Wash out<br />
with a mild detergent using a soft brush and rinse with fresh water.<br />
Always empty the tank after using and store empty.<br />
Waste Water Tank<br />
Empty the tank and wash out with a mild detergent using a soft<br />
brush and rinse with fresh water. Always empty the tank after<br />
using and store empty.<br />
Casters<br />
Caster maintenance should be performed each time the <strong>Hand</strong> <strong>Sink</strong><br />
<strong>Cart</strong> has been washed or steam cleaned.<br />
1. Grease swivel raceway of caster using a lubricant such as<br />
Lubriplate #930-AA, Keystone #84EPXLT multi-purpose grease or<br />
equivalent. Apply grease using a grease gun with a needle nose<br />
adapter or a tube-type applicator such as Sta-lube Moly-graph<br />
Assembly Lube. If caster is equipped with a zerk grease fitting,<br />
use a standard connector on grease gun. These can be obtained<br />
at most auto parts stores.<br />
2. On casters with a nylon bushing at the hub, use a light oil such<br />
as WD-40. No lubrication is needed on casters with a bearing<br />
hub wheel.<br />
3. Check caster for damage and test caster spin and swivel rotation<br />
before returning to service.<br />
Stainless Steel <strong>Hand</strong> <strong>Sink</strong> <strong>Cart</strong> and Faucet<br />
Under ordinary conditions, light swabbing with soap or detergent,<br />
rinsing with clear water, and wiping with a cloth or dish towel should<br />
remove everyday dirt. Occasional scouring with a household cleanser is<br />
recommended. Remember to rub in the direction of the grain lines in<br />
the metal. Never use steel wool or sharp knives to clean your sink.<br />
The <strong>Hand</strong> <strong>Sink</strong> <strong>Cart</strong> is manufactured for hand washing capability, not<br />
for food preparation. If food is placed in the sink, please beware that<br />
some food, such as mustard, mayonnaise, lemon juice, vinegar, or salt<br />
are acidic or contain chlorides that will attack and corrode stainless<br />
steel if left in the sink for extended periods.<br />
Soap Dispenser<br />
Rinse out soap container with warm water. The dispenser handle<br />
should be cleaned daily with a clean wet cloth. Never use abrasive<br />
cleaners, detergents or steel wool.<br />
Cleaning Instructions<br />
6<br />
Proper <strong>Hand</strong> Washing Procedures<br />
(As recommended by HACCP and FDA)<br />
<strong>Hand</strong>s should always be washed after using the bathroom, coughing,<br />
sneezing, or touching any kind of soiled objects or surfaces.<br />
1. Using soap and warm water (105˚F [40,6˚C]), rub hands<br />
vigorously for 20 seconds. Wash all surfaces, including:<br />
a. Backs of hands<br />
b. Wrists<br />
c. Between fingers<br />
d. Under fingernails (using a nailbrush)<br />
2. Rinse well with warm water.<br />
3. Dry hands with paper towel.<br />
Food handlers must wash hands:<br />
• Before and after touching raw poultry, meats or fish, shell eggs<br />
and fresh produce.<br />
• After touching dirty dishes, equipment, and utensils.<br />
• After using cleaners or chemicals.<br />
• After touching trash, floors, soiled linens, etc.<br />
• After touching head, hair, mouth, wounds, or sores.<br />
• After performing personal needs, eating, smoking, etc.
CODE DESCRIPTION<br />
Casters<br />
60032 1-Left Side Caster 6" Rigid Type, 4-Bolts<br />
60033 1-Right Side Caster 6" Swivel w/Brake, 4-Bolts<br />
44018 1-Impact Plate<br />
Doors<br />
60195 1-Latch Strike Plate, 4-Screws, 4-Star Washers<br />
46038 1-Three Lobe Knob, 1-<strong>Sink</strong> Top Stud<br />
7375 Left Door w/Hardware:<br />
1-Left Door, 3-Pivot Pin, 2-Star Washers, 2-Screws<br />
7376 Right Door w/Hardware:<br />
1-Right Door, 3-Pivot Pin, 2-Star Washers, 2-Screws<br />
60196 1-Latch Hook, 2-Screws, 2-Star Washers<br />
42128B 1-Aluminum Hinge Pivot Pin<br />
42238 1- 3" Hinge Pin<br />
42133 1-Pin Lock Clip<br />
Faucet<br />
47500 1-Chrome Faucet<br />
47537 1-Chrome Faucet ADA Type<br />
Gaskets<br />
12131 1-Gasket for Cap Assembly<br />
<strong>Sink</strong><br />
47501 1-Stainless Steel <strong>Sink</strong> 2 Compartment<br />
47502 1-Drain Basket w/Strainer<br />
47400 1-Center Outlet Assembly<br />
47180 1-2" O.D. Worm Type Hose Clamp<br />
47503 1-Drain, 1-Waste Arm Slip Joint<br />
47504 1-36" Drain Flex/Straight Hose Line (Waste Water)<br />
Soap Dispenser<br />
60214 1-Soap Dispenser, 3-Screws<br />
Tanks<br />
46036 1-Quick Connect Female Coupling (fresh water tank only)<br />
47412 1-Siphon Tube 3 ⁄8" Polytube 24" long (fresh water tank only)<br />
60197 Cap Kit (both fresh & waste tanks): 1-2" Threaded Cap,<br />
1-Tether Line,1-Strap Adapter, 1-White Gasket<br />
Towel Holder<br />
47505 1-Towel Saver Paper Towel Holder<br />
Water Heater Rack Assembly<br />
60190 Water Heater Kit (110V)<br />
60193 1-Pressure Valve, 1-Three Piece Blow Tube<br />
60191 110V Water Pump Kit<br />
47409 1- 1 ⁄2" Pipe Threads Street Elbow 90˚ (Bronze Fitting)<br />
60192 1-Electrical Switch/Outlet Box 110V, 4-Pan Head Screws<br />
47405 1-30" Braided Water Connector<br />
Replacement Parts<br />
7<br />
CODE DESCRIPTION<br />
47406 1-12" Braided Water Connector<br />
60218 Hammer Arrester Pressure Chamber Kit: 1-Hammer Arrester<br />
Unit, 2-Pipe Nipples, 1-Washer, 1-Pipe Tee Fitting,<br />
2-Braided Water Lines, 1-Mount Clip, 1-Pan Head Screw<br />
60225 1-Water Supply Hose, 1-Male Quick Disconnect Fitting<br />
w/Hose Clamp<br />
47408 1-Pipe Tee 1 ⁄2"<br />
47416 1-Pipe Nipple 1 ⁄2"<br />
Water Heater Rack Assembly<br />
47417 1-Hammer Arrester<br />
60194 1-Pipe Fitting Kit<br />
46037 1-Quick-Connect Male 90˚, (for tank to pump line)<br />
47295 1-Wire Tie or Strap<br />
47286 1 <strong>Sink</strong> Tether Line for Cap Assembly for KSC40220<br />
73811 1-Fresh Water Tank w/Cap & Tether / Quick-connect Fitting<br />
738225 1-Waste Water Tank w/Cap & Tether<br />
Well Cover<br />
7385 1-<strong>Sink</strong> Well Plug Section (work deck)<br />
45311 1-Clamping Disc<br />
S06006 3 Lobe Knob with Threads<br />
Special Order - International or Overseas Model KSC40220<br />
60209 220V Water Heater Kit: 1- Water Heater, 2-Hex Bolts,<br />
2-Flat Washers S.A.E., 2-Nuts<br />
60210 220V Water Pump Kit: 1-Water Pump 220V SHURFLO,<br />
4-Hex Bolts, 8-Flat Washers S.A.E.<br />
60291 220V Water Pump Kit: 1-Water Pump 220V FLOJET,<br />
4-Hex Bolts, 8-Flat Washers S.A.E.<br />
60211 220V Electrical Switch Box Kit: 4-Pan Head Screws, 1-Power<br />
Cord w/Sealed Plug, 1-Switch Box, 1-Switch Box Cover,<br />
1-Off/On Switch 220V, Switch Plate, 1-Straight Strain Relief,<br />
1-90˚ Strain Relief, Indicator light<br />
47530 1-220V Indicator Light<br />
47521 1-Switch 220V<br />
47517 1-220V PRCD Trip Switch - G.F.I.<br />
47410 1-90˚ Male Elbow FloJeT Pump only 220V<br />
60266 1-Switch Box, 1-Flip Cover, 1-Gasket, 8-Screws,<br />
1-Switch Plate, 1-Switch 220V On/Off<br />
47518 1 Power Cord for 220V with CEE7 Euro Plug<br />
47519 1 J-Box for 220V Switch<br />
47520 1 Switch box Flip Cover for 220V<br />
47522 1 <strong>Sink</strong> Strain Relief for 220V<br />
47523 1 <strong>Sink</strong> Strain Relief 90˚ for 220V<br />
47543 Switch Plate (wallplate for inside box)
Warranty<br />
<strong>Cambro</strong> offers a one year warranty on the <strong>Hand</strong> <strong>Sink</strong> <strong>Cart</strong>, water heater & water pump. In order to activate the warranty, you must<br />
complete and return the Warranty Registration Card. If you have any questions regarding the warranty, please call us on the<br />
Customer Service Hot Line 800 833 3003.<br />
Service<br />
If you have any questions regarding the CamKiosk or <strong>Hand</strong> <strong>Sink</strong> <strong>Cart</strong>, please contact your Authorized <strong>Cambro</strong> Sales Representative<br />
or the <strong>Cambro</strong> Customer Service Hot Line 800 833 3003.<br />
www.cambro.com<br />
®<br />
TO ORDER REPLACEMENT PARTS:<br />
• Call <strong>Cambro</strong> Customer Service at 800 854 7631 or<br />
• Fax your order to 714 842 3430 or<br />
• Call your local <strong>Cambro</strong> Representative or Distributor<br />
© 2006 <strong>Cambro</strong> Manufacturing Company, 5801 Skylab Road, Huntington Beach, California 92647-2056<br />
Telephone 714 848 1555 Toll Free 800 854 7631 Customer Service Hot Line 800 833 3003<br />
UMKSC0609 Printed in USA. Rev.12/06<br />
MN <strong>Hand</strong> <strong>Sink</strong> 11O6