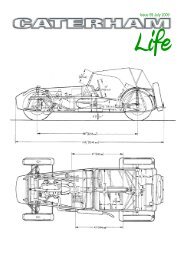

Create successful ePaper yourself
Turn your PDF publications into a flip-book with our unique Google optimized e-Paper software.
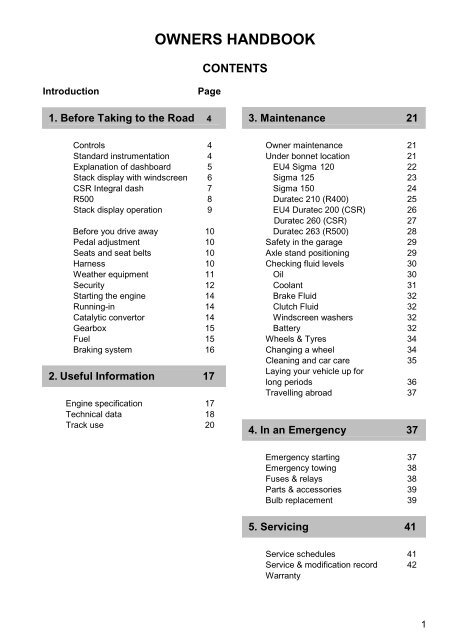
Introduction Page<br />
1. Before Taking to the Road 4<br />
Controls 4<br />
Standard instrumentation 4<br />
Explanation of dashboard 5<br />
Stack display with windscreen 6<br />
CSR Integral dash 7<br />
R500 8<br />
Stack display operation 9<br />
Before you drive away 10<br />
Pedal adjustment 10<br />
Seats and seat belts 10<br />
Harness 10<br />
Weather equipment 11<br />
Security 12<br />
Starting the engine 14<br />
Running-in 14<br />
Catalytic convertor 14<br />
Gearbox 15<br />
Fuel 15<br />
Braking system 16<br />
2. Useful Information 17<br />
Engine specification 17<br />
Technical data 18<br />
Track use 20<br />
<strong>OWNERS</strong> <strong>HANDBOOK</strong><br />
CONTENTS<br />
3. Maintenance 21<br />
Owner maintenance 21<br />
Under bonnet location 21<br />
EU4 Sigma 120 22<br />
Sigma 125 23<br />
Sigma 150 24<br />
Duratec 210 (R400) 25<br />
EU4 Duratec 200 (CSR) 26<br />
Duratec 260 (CSR) 27<br />
Duratec 263 (R500) 28<br />
Safety in the garage 29<br />
Axle stand positioning 29<br />
Checking fluid levels 30<br />
Oil 30<br />
Coolant 31<br />
Brake Fluid 32<br />
Clutch Fluid 32<br />
Windscreen washers 32<br />
Battery 32<br />
Wheels & Tyres 34<br />
Changing a wheel 34<br />
Cleaning and car care 35<br />
Laying your vehicle up for<br />
long periods 36<br />
Travelling abroad 37<br />
4. In an Emergency 37<br />
Emergency starting 37<br />
Emergency towing 38<br />
Fuses & relays 38<br />
Parts & accessories 39<br />
Bulb replacement 39<br />
5. Servicing 41<br />
Service schedules 41<br />
Service & modification record 42<br />
Warranty<br />
1
INTRODUCTION<br />
Congratulations on ownership of your new <strong>Caterham</strong> Seven sports car.<br />
Designed for racing and built for living, your <strong>Caterham</strong> Seven is competition-developed<br />
and capable of performance well in excess of your average super car. Please take the<br />
time to read this manual, get well acquainted with the controls and understand the<br />
maintenance requirements of your car. This will help you appreciate its capabilities to the<br />
full and allow you to derive maximum pleasure from ownership.<br />
As a high performance car, it is likely that your <strong>Caterham</strong> will be subjected to the stresses<br />
and strains of enthusiastic driving, particularly on the track. Therefore it is essential that<br />
the maintenance programme of regular servicing and checks contained in this manual is<br />
adhered to. This will ensure that the vehicle is always in the best possible condition and<br />
performing at its optimum. For all servicing we recommend that you return your car to the<br />
Aftersales Department at <strong>Caterham</strong> Dartford or <strong>Caterham</strong> Midlands. Alternatively you<br />
may find it more convenient to use one of the <strong>Caterham</strong> approved service agents located<br />
around the UK.<br />
Using this Handbook<br />
This handbook has been divided into sections, each dealing with the different aspects of<br />
owning and caring for your <strong>Caterham</strong>. You will find lots of useful and worthwhile advice<br />
and tips to help you get to know and look after your new car.<br />
� ‘Before Taking to the Road’ – Includes controls, pedal adjustment, seat adjustment,<br />
weather equipment, security and other information that you should know before you<br />
drive your new car.<br />
� ‘Useful Information’ – This section is where you will find all the technical data on<br />
your <strong>Caterham</strong> Seven.<br />
� ‘Maintenance’ – Detailed here are all the regular checks you will need to carry out<br />
to ensure you continue to get the best from your <strong>Caterham</strong>.<br />
� ‘In an Emergency’ – Should an emergency arise then here you will find advice on<br />
what you can do, including jump starting, checking the fuses and changing a bulb.<br />
� ‘Servicing’ – This section provides vehicle service information including service<br />
schedules. In addition you will find pages that can be used to keep a record of when<br />
and where a service took place plus an additional section for any future<br />
modifications or upgrades to your vehicle.<br />
WARNING!<br />
Safety warnings are included in this handbook. These indicate either a procedure which<br />
must be followed precisely, or information that should be considered with great care in<br />
order to avoid the possibility of personal injury or serious damage to the vehicle.<br />
3
1. BEFORE TAKING TO THE ROAD<br />
Figure 1: Dashboard layout for models with standard instruments<br />
Figure 1a: Five or six<br />
speed gear shift patterns<br />
4<br />
Controls<br />
1. Brake fail indicator<br />
2. Hazard warning light switch<br />
3. Rear fog light switch<br />
4. Heated windscreen switch<br />
5. Heater fan switch<br />
6. Immobilizer warning light<br />
7. Windscreen washers switch<br />
8. Windscreen wipers switch<br />
9. Side lights/head lights switch<br />
10. Indicators switch<br />
11. Main beam switch<br />
12. Headlamp flasher switch<br />
13. Horn<br />
14. Fuel gauge<br />
15. Temperature gauge<br />
16. Oil Pressure gauge<br />
17. Tachometer<br />
18. Speedometer<br />
19. main beam warning light<br />
20. Indicator warning light<br />
21. Ignition warning light<br />
22. Push starter button<br />
23. Trip reset button<br />
24. Heater valve control
EXPLANATION OF DASHBOARD<br />
Brake fail indicator Single position spring loaded switch, illuminates to indicate low fluid level. Press to test<br />
bulb.<br />
Hazard warning light Single position switch activates all indicators.<br />
Rear fog light Single position switch activates rear fog lights when dipped headlights are illuminated.<br />
Heated windscreen Single position switch activates heating elements to demist front windscreen.<br />
Heater fan Two position switch provides low and high speed fan control.<br />
Windscreen washers Single position spring loaded switch activates washer jets when depressed.<br />
Windscreen wipers 2 position switch to provide low and high speed continuous wipe.<br />
Indicator switch 3 position switch Left-Off-Right (non-self cancelling)<br />
Side/Head lights 2 position switch, first position side lights, second position dipped beam headlight.<br />
Main beam 2 position switch for dip or main beam.<br />
Headlamp flasher Single position spring loaded switch to flash headlights.<br />
Heater valve control This is located on the inside of engine compartment bulkhead, above the driver’s knee.<br />
Pull towards driver to increase heat.<br />
Starter push button Single position spring loaded push switch, press to start engine<br />
Horn push button Single position spring loaded push switch<br />
Speedometer<br />
Indicates road speed in miles per hour and/or<br />
kilometres per hour.<br />
Digital display within speedometer<br />
The display shows the following:<br />
� Odometer reading (shows the total distance<br />
travelled by the car).<br />
� Trip recorder (for recording individual journey<br />
distances). The word trip is also displayed.<br />
Trip recorder reset button<br />
Whenever the ignition switch is turned on, the display<br />
shows the odometer reading. By pressing the trip<br />
recorder reset button briefly, the display will change to<br />
show the trip recorder reading (a further press of the<br />
button returns the display to the odometer reading).<br />
Press and hold the reset button to reset the display to<br />
zero.<br />
Tachometer<br />
Indicates engine speed in revolutions per minute.<br />
NOTE: An electronic limiter will prevent engine speed<br />
rising above a pre-determined factory set level.<br />
Oil Pressure Gauge<br />
The needle indicates the oil pressure measured in bar.<br />
The needle will quickly rise when the engine is started.<br />
If the needle falls into the Red mark during normal<br />
running the oil pressure is at a critical level and severe<br />
engine damage could result; switch off the engine<br />
immediately (safety permitting) and seek qualified<br />
assistance. (Engine pressure will fluctuate as engine<br />
revs change)<br />
WARNING!<br />
Never restart the engine or drive the car with the oil<br />
pressure gauge indicating red.<br />
Temperature Gauge<br />
Indicates the temperature of the engine coolant. During<br />
normal operation, the needle will rise from the lower<br />
(cold) mark to the middle part of the gauge, where it<br />
will remain while the engine is operating at its normal<br />
temperature.<br />
In severe driving conditions, such as very hot weather<br />
or extended hill climbing, the needle may rise. If the<br />
needle rises to the RED mark, the coolant is too hot<br />
and severe engine damage could result; stop the car<br />
as soon as safety permits and seek qualified<br />
assistance.<br />
Fuel gauge<br />
The needle indicates the fuel level. After refuelling, the<br />
gauge slowly rises to the new level once the ignition<br />
switch is turned on.<br />
WARNING! NEVER allow the car to run out of fuel (the<br />
resultant misfire could destroy the catalytic converter).<br />
WARNING LIGHTS<br />
Battery charging – RED<br />
The light illuminates as a bulb check when the ignition<br />
switch is turned to position ‘II’ and extinguishes as<br />
soon as the engine is running. If it remains on, or<br />
illuminates whilst driving, a fault with the battery<br />
charging system is indicated. Seek qualified<br />
assistance.<br />
Direction indicators – GREEN<br />
The indicator warning light flashes in time with the left<br />
or right direction indicator lights, whenever they are<br />
operated. If the warning light fails to illuminate or<br />
flashes very rapidly, this means that one of the<br />
indicator lights is not operating.<br />
5
Figure 2: Dashboard layout for models with Stack Instruments and full windscreen<br />
6<br />
Controls<br />
1. Heated windscreen switch<br />
2. Brake fail indicator<br />
3. Hazard warning light switch<br />
4. Rear fog light switch<br />
5. Side/Head lights switch<br />
6. Heater fan switch<br />
7. Windscreen washers switch<br />
8. Windscreen wipers switch<br />
9. Stack button 1<br />
10. Stack button 2<br />
11. Stack button 4<br />
12. Stack button 3<br />
13. Shift light button<br />
14. Indicator warning light<br />
15. Indicator switch<br />
16. Main beam warning light<br />
17. Starter push button<br />
18. Stack display<br />
19. Horn push button<br />
20. Main beam switch<br />
21. Headlamp flasher switch<br />
22. Gear shift lights<br />
23. Immobiliser warning light<br />
24. Heater valve control
Figure 3: Dashboard layout for CSR with Integral dash<br />
Controls<br />
1. Air vent<br />
2. Oil pressure gauge<br />
3. Temperature gauge<br />
4. Heater fan control switch<br />
5. Fuel gauge<br />
6. Oil temperature gauge<br />
7. Indicators<br />
Side/Head lights<br />
Main beam<br />
Headlamp flasher<br />
8. Tachometer<br />
9. Speedometer<br />
10. Immobilizer warning light<br />
11. Windscreen wipers<br />
Wiper speed control<br />
12. Windscreen washer switch<br />
13. Gear lever<br />
14. Heated screen switch<br />
15. Horn Push button<br />
16. Starter push button<br />
17. Handbrake<br />
18. Rear fog light switch<br />
19. Hazard warning light switch<br />
20. Heater valve control<br />
7
Figure 4: Dashboard layout for R500<br />
Controls<br />
NOTE: For full windscreen option the wiring connection to dashboard buttons for heated screen, wipers etc are<br />
already connected.<br />
8<br />
1. Aero screen<br />
2. Heated screen switch<br />
3. Hazard warning light switch<br />
4. Windscreen washer switch<br />
5. Windscreen wipers switch<br />
6. Launch control push button<br />
7. Gear shift lights<br />
8. Stack display<br />
9. Stack button 3<br />
10. Main beam switch<br />
11. Side/Head light switch<br />
12. Stack button 4<br />
13. Heater valve control<br />
14. Stack button 2<br />
15. Stack button 1<br />
16. Horn push button<br />
17. Starter push button<br />
18. Rear fog light switch<br />
19. Heater fan switch<br />
20. Brake fail indicator
Headlight main beam – BLUE<br />
Illuminates when the headlights are switched to main<br />
beam.<br />
Immobiliser Warning light - Red<br />
See section on Immobilisation.<br />
Stack Display System<br />
The Stack display system combines an analogue<br />
tachometer with a digital display for the following<br />
performance parameters:<br />
1. Vehicle speed<br />
2. Engine speed<br />
3. Oil pressure<br />
4. Oil temperature<br />
5. Water temperature<br />
6. Fuel level<br />
7. Battery Voltage<br />
8. Lap times (optional) available from aftersales.<br />
An alarm light alerts the driver that a warning condition<br />
has been detected. The warning conditions are based<br />
on pre-set alarm values for the above listed<br />
performance parameters 3-7. When the alarm light is<br />
on, a warning message is shown on the digital display<br />
to identify the condition. It is possible to enable or<br />
disable the warning system for each parameter<br />
individually. The warning message can be cancelled by<br />
pressing any switch. Doing this does not turn off the<br />
warning condition alarm light, which stays on until the<br />
condition no longer applies.<br />
The digital display has five screen display options each<br />
showing certain parameters and their values. The<br />
different screen can be changed by pressing button 3.<br />
Screen 1<br />
� Fuel level<br />
� Current speed<br />
� Trip indicator<br />
� Odometer<br />
Press button 3 to change to screen 2<br />
Screen 2<br />
� Oil temperature<br />
� Current speed<br />
� Oil pressure<br />
Press button 3 to change to screen 3<br />
Screen 3<br />
� Water temperature<br />
� Current speed<br />
� Oil pressure<br />
Press button 3 to change to screen 4.<br />
Screen 4<br />
� Current speed<br />
� Battery Voltage<br />
� Ambient air temperature is shown but not utilised<br />
in the set-up. This will default to a reading of -999<br />
Press button 3 to change the display to screen 5<br />
Screen 5<br />
� Number of current lap<br />
� Current speed (mph or km/h)<br />
� Last lap time<br />
� Previous best lap time<br />
Press button 3 to change the display back to screen 1.<br />
NOTE: The minimum oil and water temperature for<br />
which the display gives a true reading is 12°C or 53°F.<br />
The unit displays temperatures that are less than this<br />
as 0°C or 32°F.<br />
Peak values (Tell Tales)<br />
The system records Max (or Min where appropriate)<br />
values for each parameter, when the engine is running<br />
at more than 1200 rpm.<br />
This is to prevent abnormal peak values from being<br />
recorded when, for example, the engine is either not<br />
running, is idling, or is being warmed up.<br />
Displaying the Peak Values<br />
Press and hold button 1 to show the peak values for<br />
the parameters currently being displayed. Release the<br />
switch to return to the normal display.<br />
Resetting Peak Values<br />
The peak values remain stored until reset. To reset,<br />
press and hold button 1 and then press button 4 as<br />
well. This clears all the peak values & lap times.<br />
Alarms<br />
The display system has built-in warnings to alert the<br />
driver when certain parameters either exceed or fall<br />
below their alarm values.<br />
Displaying an Alarm<br />
When an alarm condition occurs, the built in red<br />
warning light turns on, and the digital display gives a<br />
warning message to show the type of alarm.<br />
NOTE: The amber light indicates low fuel warning.<br />
Clearing an Alarm<br />
Press button 2.<br />
Showing the Last Alarm<br />
Press and hold button 2.<br />
9
Lap Times<br />
The lap time for each lap is recorded either by the<br />
infrared time sensor when passing an optional lap time<br />
beacon or when the driver presses button 4.<br />
The most recent lap time is held in screen 5.<br />
The stack display has an internal battery that needs to<br />
be changed every 4-5 years. When the power from this<br />
battery drops below a safe level, an alarm is triggered<br />
and the warning “Internal Battery Low" is displayed.<br />
Contact <strong>Caterham</strong> Aftersales when this occurs.<br />
BEFORE YOU DRIVE AWAY<br />
Pedal Adjustment Facility<br />
On some models the pedals may be adjusted to suit<br />
the driver. Please contact your caterham agent for<br />
details. (CSR/EU4 cars does not have this facility)<br />
Seats/Seat belts/Harness<br />
Forward/backward adjustment<br />
Push the seat adjustment lever to one side to release<br />
the catch enabling the seat to slide back or forward.<br />
Ensure the seat is locked in position before driving off.<br />
WARNING!<br />
DO NOT adjust the seat while the car is in motion.<br />
Head Restraints<br />
Head restraints are designed to restrain rearward<br />
movement of the head in the event of an accident or<br />
sudden stop. On non-race type seats the head<br />
restraints can be removed completely to allow for<br />
fitment of the tonneau cover.<br />
WARNING!<br />
Never drive the car with the head restraints removed.<br />
Seat belt safety<br />
The seat belts supplied with your car are intended for<br />
use by adult sized occupants and must be used by one<br />
occupant ONLY. Seat belts are life saving equipment.<br />
In a collision, unrestrained passengers can be thrown<br />
around inside, or possibly thrown out of the car,<br />
resulting in injury to themselves and to other<br />
occupants.<br />
ENSURE that the passenger is securely strapped in<br />
at all times.<br />
• ALWAYS adjust seat belts to eliminate any slack<br />
in the webbing. DO NOT slacken the webbing by<br />
pulling the belt away from the body – to be fully<br />
effective, the seat belt must remain in full contact<br />
with the body at all times.<br />
10<br />
• ALWAYS fit the lap strap across the pelvis (never<br />
across the abdomen), and ensure that the<br />
diagonal strap passes across the chest, without<br />
slipping off the shoulder, or pressing against the<br />
neck.<br />
• DO NOT fit more than one person into a belt, or<br />
use a seat belt that is twisted or obstructed in any<br />
way that could impede its smooth operation.<br />
• DO NOT wear seat belts over hard or fragile items<br />
in clothing, such as pens, keys, spectacles etc.<br />
• DO NOT allow a baby or infant to be carried on<br />
the lap. The force of a crash can increase effective<br />
body weight by as much as 30 times, making it<br />
impossible to hold on to the child.<br />
• DO NOT allow foreign matter to enter the seat belt<br />
buckles as this can render the buckles inoperative.<br />
• Pregnant women should ask their doctor for<br />
advice about the safest way to wear seat belts.<br />
Caring for seat belts<br />
Regularly inspect the belt webbing for signs of fraying,<br />
cuts and wear, also paying particular attention to the<br />
condition of the fixing points and adjusters.<br />
Care should be taken to avoid contamination of the<br />
webbing from the effects of polish, oil and chemicals<br />
(see ‘Cleaning & car care’).<br />
Three tests for checking seat belts<br />
1) With the seat belt fastened, give the webbing near<br />
the buckle a quick upward pull – the buckle should<br />
remain securely locked!<br />
2) With the seat belt unfastened, unreel the webbing to<br />
the limit of its travel. Check that unreeling is free from<br />
snatches and snags.<br />
3) With the webbing half unreeled, hold the tongue<br />
plate and give it a quick forward pull – the mechanism<br />
must lock automatically and prevent any further<br />
unreeling!<br />
WARNING!<br />
Always replace a seat belt assembly that has withstood<br />
the strain of a severe vehicle impact, or one where the<br />
webbing shows signs of fraying.<br />
Harness<br />
A multi-point harness holds the driver firmly in the seat<br />
at all times (unlike a seatbelt which ‘locks’ on impact<br />
only). Aside from the increased safety benefit and<br />
being held more securely in extreme circumstances<br />
such as a trackday driving, a harness will remove the<br />
tendency for the driver to brace themselves in corners<br />
using the steering wheel, with better control of the car<br />
as a result.<br />
The lap strap is engaged first, ensuring that it is<br />
adjusted so that it sits across the lap at the lowest<br />
point. It should tight enough that it requires effort to<br />
engage. Shoulder straps are then engaged into the<br />
appropriate slot and tightened by pulling on the
adjuster strap. A harness should feel tight when warn<br />
and not allow any movement of the torso. Although<br />
this feels restrictive at first, a driver will quickly get<br />
used to and ultimately prefer this feeling in a Seven.<br />
To exit from the harness, the spring loaded buckle is<br />
rotated 90deg<br />
Figure 5: 4-Point Harness<br />
Figure 6: 6-Point Harness<br />
Harness Adjustment<br />
Slide the tail strap web through the metal three bar<br />
slide to set up the perfect strap length. The shoulder<br />
strap adjusters should sit on the breast bone, by doing<br />
this first you will ensure that the comfort pads are<br />
located in the correct position tighten the lap straps first<br />
making sure the release buckle is in a central position,<br />
final adjustment is taken up by pulling down on the<br />
shoulder straps.<br />
WARNINGS!<br />
Always check your harness regularly for chaffing, stitch<br />
damage or hardware corrosion. Pay particular attention<br />
to areas that may be visible such as under seat or<br />
cowlings, petrol, battery acid, bleach or similar solvent<br />
must not spill onto web.<br />
Always wear your harness as tight as comfort will allow<br />
but no tight that loss of circulation occurs.<br />
Always replaces a harness that has been involved in<br />
an accident or damage has taken place<br />
Never make any changes to your system either by<br />
cutting and re-sewing web or by modifying the<br />
hardware<br />
Weather equipment<br />
Erecting the hood is relatively straightforward if the<br />
correct procedure is followed. Therefore we<br />
recommend the following sequence is adopted:i)<br />
Erect the hoodsticks slacken the buckles to allow<br />
the front hoodsticks to collapse forwards.<br />
ii) Unfold the hood and clip it onto the windscreen<br />
first.<br />
iii) Stretch the rear of the hood over the back of the<br />
car and clip it over the poppers situated on the<br />
back panel starting at the outside and working into<br />
the centre.<br />
iv) Attach to the remaining poppers on the sides of<br />
the vehicle.<br />
v) From the inside of the car, tension the hood by<br />
pulling on the loose end of the straps retensioning<br />
the buckle (the buckle will automatically lock in<br />
position when released). The straps should be<br />
adjusted until the front hoodstick is in line with the<br />
hood seam. (See Fig 6)<br />
11
Figure 7: Tensioning the hood<br />
Figure 8: Hood folding procedure<br />
vi) The Velcro lined strips inside the hood should now<br />
capture the front hoodstick, which prevents the<br />
hood from ballooning at speed.<br />
12<br />
vii) The tops of the sidescreens tuck under the flaps<br />
on the hood sides in order to make the hood<br />
watertight. At the rear, however, the sidescreens<br />
overlap the hood.<br />
Removal and storage<br />
To remove the hood slacken the buckles and remove<br />
in reverse to the above. (Vii to i)<br />
It is important that the hood is folded correctly when<br />
removed in order to avoid unsightly creases and to<br />
prevent the clear plastic windows being scratched. We<br />
suggest that it is always folded and then rolled as<br />
shown in Fig 7.<br />
To help prevent damage, and free up storage space, a<br />
protective hood bag is available from <strong>Caterham</strong> <strong>Cars</strong><br />
Parts Counter.<br />
NOTE: Never store the hood when wet.<br />
Security<br />
Keys/key numbers<br />
You have been supplied with 4 keys: 2 for the ignition<br />
and 2 for the fuel cap. The numbers for these can be<br />
found on a small tag attached to the key ring.<br />
You will also have been supplied with 2 coded<br />
transponder tags.<br />
WARNING!<br />
Keep the key tag and spare key in a safe place – NOT<br />
IN THE CAR!<br />
If the key or tag is lost please contact <strong>Caterham</strong> <strong>Cars</strong><br />
to make arrangements for a additional keys and tags.<br />
Immobilisation<br />
Most <strong>Caterham</strong>s are fitted with an immobiliser as<br />
standard, this will be Sterling Excel vehicle immobiliser<br />
system.<br />
Disarming the system<br />
Insert your ignition key with the transponder unit<br />
attached to the same key ring and the reader unit will<br />
automatically recognise the transponder and disarm<br />
your immobiliser. The LED will stop flashing and turn a<br />
constant red indicating the vehicle can be started<br />
Arming the system<br />
When the vehicle’s ignition is switched off and the keys<br />
are removed from the ignition, the immobiliser will<br />
prepare to arm and the red LED will illuminate. During<br />
this period, the ignition can be switched back on,<br />
cancelling the arming and permitting the vehicle to be<br />
started as normal.<br />
If after twenty seconds the ignition has not been turned<br />
on, then the immobiliser will automatically ‘arm’ and the<br />
red LED will flash. This ‘auto-arming’ sequence means<br />
that it is impossible to leave your vehicle unprotected.
WARNING!<br />
Your system will automatically re-arm within twenty<br />
seconds of disarming if you do not turn the ignition on.<br />
Programming new transponder tags<br />
If you require a new transponder tag for an additional<br />
user, or as a replacement through loss or damage,<br />
please contact <strong>Caterham</strong> Aftersales Department.<br />
Once you have received your new transponder tag,<br />
you will need to programme it. To do this you must<br />
have an existing transponder tag that already operates<br />
the system.<br />
1) Disarm the system using an existing transponder tag<br />
attached to the ignition key.<br />
2) Switch the ignition on and off twice and then turn the<br />
ignition back on, all within 7 seconds (the LED will flash<br />
rapidly).<br />
3) The system will then recognise the transponder tag<br />
on the key ring and re-programme it.<br />
4) The LED will flash once to indicate it recognises the<br />
transponder tag.<br />
5) Remove the ignition key with the transponder tag<br />
attached.<br />
6) Pass a new transponder tag close to the ignition<br />
barrel.<br />
7) The LED will flash twice to indicate that the new<br />
transponder tag is in the memory.<br />
8) Pass any additional transponder tag close to the<br />
ignition barrel.<br />
9) For each transponder tag programmed into the<br />
system the LED will flash a number of times to indicate<br />
how many transponder tags are programmed into the<br />
system.<br />
10) When you have finished, switch the ignition off and<br />
the Sterling Excel will exit the programming mode.<br />
Each time you programme a new transponder tags into<br />
the system it will automatically erase all other<br />
transponder tags in the memory therefore all<br />
transponder tags required to operate the system must<br />
be programmed back in.<br />
NOTE: For EU4 cars the transponder is in the key, if<br />
you require a new transponder as a replacement<br />
through loss or damage please contact your local ford<br />
dealer.<br />
Deleting lost transponder tags from the system<br />
memory<br />
If you lose one of your transponder tags, your vehicle<br />
is no longer totally secure, as anyone who finds your<br />
lost transponder tag could disarm your immobiliser. To<br />
prevent this from happening you are able to delete<br />
transponder tags from the system.<br />
Because your Sterling Excel system will recognise up<br />
to five different transponder tags, you will have to reprogramme<br />
all of your existing transponder tags every<br />
time you enter programming mode.<br />
NOTE: Sterling Excel is an electronic immobiliser and<br />
derives its main power from your car battery. However,<br />
the consumption in the armed state is such that it<br />
should not adversely affect your car battery.<br />
WARNING!<br />
The tags contain delicate electronic circuits and must<br />
be protected from impact and water damage, high<br />
temperatures and humidity, direct sunlight, effects of<br />
solvents, waxes and abrasive cleaners.<br />
Vehicle battery disconnection<br />
If the car battery is disconnected for any reason the<br />
status of the security system prior to disconnection will<br />
be memorised and automatically reset when the<br />
battery is reconnected.<br />
Ignition Switch and Steering Lock<br />
The ignition switch uses the following sequence of key<br />
positions to operate the steering lock, electrical circuits<br />
and starter motor:<br />
‘O’ – Steering locked<br />
With the key removed, the steering column will be<br />
locked and most electrical circuits are non-operational.<br />
‘I’ – Steering unlocked<br />
Turn the switch to position ‘I’ to unlock the steering.<br />
‘II’ – Electrical circuits on<br />
With the switch in position ‘II’ all electrical circuits are<br />
operational.<br />
‘III’ – Starter motor operates<br />
Turn the switch to position ‘III’ to operate the starter<br />
motor; release the key as soon as the engine starts<br />
(the key will automatically return to position ‘II’).<br />
Steering Lock<br />
To unlock the steering:<br />
Insert the key FULLY and turn the ignition switch to<br />
position ‘I’ – a small movement of the steering wheel<br />
may be necessary to disengage the lock.<br />
To lock the steering:<br />
With the ignition switch turned to position ‘O’, remove<br />
the key and turn the steering wheel until the lock<br />
engages.<br />
NOTE: <strong>Cars</strong> fitted with a quick release steering wheel<br />
do not have a steering lock mechanism.<br />
WARNING!<br />
Once the steering lock is engaged it is impossible to<br />
steer the car.<br />
DO NOT remove the key, or turn the ignition switch to<br />
position ‘O’ while the car is in motion.<br />
13
Starting the engine<br />
WARNING!<br />
Before starting the engine ENSURE you are familiar<br />
with the procedures below. Catalytic converters are<br />
easily damaged through improper use, particularly if<br />
the wrong fuel is used or if an engine misfire occurs –<br />
before starting the engine you should be aware of the<br />
precautions detailed in the ‘Catalytic converter’ section.<br />
Never start or leave the engine running in an<br />
unventilated building – exhaust gases are poisonous<br />
and contain carbon monoxide which can cause<br />
unconsciousness and may even be fatal.<br />
Starting the engine:<br />
1) Check that the handbrake is on and that the gear<br />
lever is in neutral.<br />
2) Switch off all unnecessary electrical equipment.<br />
3) Turn the ignition switch to position ‘II’ and release<br />
the key as soon as the engine has started.<br />
NOTE: For cars fitted with a push button start, turn the<br />
ignition switch to position ‘II’ and press the red push<br />
button and release the button as soon as the engine<br />
starts.<br />
WARNING!<br />
DO NOT press the accelerator pedal while starting and<br />
DO NOT operate the starter for more than 15 seconds<br />
at a time. If the engine fails to start switch off and wait<br />
for at least 10 seconds before trying again.<br />
NOTE: When the battery is in a low state of charge,<br />
depress the clutch before starting and hold it down until<br />
the engine is running.<br />
Starting in cold climates<br />
In freezing conditions, fully depress the clutch pedal<br />
while starting and hold it down until the engine is<br />
running. Note that engine cranking times will increase<br />
and that the battery charging light may take several<br />
seconds to extinguish.<br />
Warming up<br />
In the interest of fuel economy, it is advisable to drive<br />
the car soon after starting, remembering that harsh<br />
acceleration or labouring the engine before the normal<br />
operating temperature has been reached can damage<br />
the engine.<br />
14<br />
Running-In<br />
The engine, gearbox, brakes and tyres need time to<br />
‘bed-in’ and adjust to the demands of everyday<br />
motoring. During the first 500 miles (1,000 km) it is<br />
essential that you drive with consideration for the<br />
running-in process and heed the following advice:<br />
� DO NOT allow the engine to exceed 4,000<br />
rev/min in any gear.<br />
� DO NOT operate at full throttle in any gear.<br />
� DO NOT allow the engine to labour in any gear.<br />
� AVOID heavy braking.<br />
After the running-in distance has been completed,<br />
engine speeds may be gradually increased.<br />
Catalytic Converter<br />
The exhaust system on your car incorporates a<br />
catalytic converter, which converts poisonous exhaust<br />
emissions from the engine into environmentally less<br />
harmful gases, thereby reducing atmospheric pollution.<br />
WARNING!<br />
The catalytic converter can be easily damaged through<br />
improper use, particularly if the wrong fuel is used. For<br />
this reason, it is VERY IMPORTANT that you heed the<br />
following precautions:<br />
Filling up with fuel:<br />
Use ONLY fuel recommended for your car (see<br />
Technical Data).<br />
Starting the engine:<br />
WARNING!<br />
DO NOT continue operating the starter if the engine<br />
fails to start after a few attempts (unburnt fuel may be<br />
drawn into the exhaust system, thereby damaging a<br />
catalyst) – seek qualified assistance.<br />
If a misfire is suspected when starting, DO NOT drive<br />
the car or attempt to clear the misfire by pressing the<br />
accelerator pedal. DO NOT attempt to push or tow<br />
start the car. Instead, turn the ignition switch off<br />
immediately and seek qualified assistance.<br />
Driving the car:<br />
Provided the engine has reached its normal operating<br />
temperature, if a misfire is suspected or the car lacks<br />
power while driving, it may be driven SLOWLY (at risk<br />
of catalyst damage) to <strong>Caterham</strong> <strong>Cars</strong> for assistance.<br />
Never<br />
Allow the car to run out of fuel (the resultant misfire<br />
could destroy a catalyst).<br />
An engine burning excessive oil (blue smoke from the<br />
exhaust), will progressively reduce catalyst efficiency.<br />
Do not overload the engine.
Switching off:<br />
DO NOT switch off the engine whilst the car is in<br />
motion, with a forward or reverse drive gear selected.<br />
Vehicle maintenance:<br />
Any engine misfire, loss of engine performance or<br />
engine run-on, could seriously damage the catalytic<br />
converter. For this reason, it is vital that unqualified<br />
persons do not tamper with the engine and that regular<br />
maintenance is carried out by <strong>Caterham</strong> <strong>Cars</strong>, in<br />
accordance with the service interval plan included in<br />
this book.<br />
WARNING!<br />
DO NOT run the engine with a spark plug or lead<br />
removed, or use any device that requires an insert into<br />
a spark plug.<br />
Exhaust temperatures can be extremely high; DO NOT<br />
park on ground where combustible materials, such as<br />
dry grass or leaves, could come in contact with the<br />
exhaust system – in dry weather a fire could result.<br />
Cooling fans may operate after the engine is switched<br />
off. Keep clear of all fans while working in the engine<br />
compartment.<br />
Before carrying out maintenance checks or working in<br />
the engine compartment, ALWAYS observe the safety<br />
precautions listed under ‘Safety in the garage’.<br />
Gearbox<br />
The gear positions are indicated on the gear lever<br />
knob. Synchromesh engagement is provided on all<br />
forward gears and in the neutral position the gear lever<br />
is spring loaded to rest naturally between 3rd and 4th<br />
gears.<br />
Selecting reverse gear<br />
Before selecting reverse gear, ENSURE THE CAR IS<br />
STATIONARY; then, fully depress the clutch pedal and<br />
pause briefly before moving the gear lever into position<br />
by pushing the knob downwards prior to moving the<br />
lever fully to the left and forwards.<br />
Precautions while driving<br />
WARNING!<br />
DO NOT rest your hand on the gear lever while driving;<br />
pressure transmitted from your hand, may cause<br />
premature wear to the gear selector mechanism.<br />
DO NOT rest your foot on the clutch pedal while<br />
driving; excessive wear to the clutch will result!<br />
Figure 9: Five and six speed<br />
gear shift patterns<br />
Fuel<br />
USE ONLY UNLEADED PETROL<br />
95 RON (minimum)<br />
WARNING!<br />
USE ONLY UNLEADED PETROL. Serious damage to<br />
the catalytic converter will occur if incorrect fuel is<br />
used.<br />
Fuel Filling<br />
Always fill the tank SLOWLY until the filler nozzle<br />
automatically cuts-off the fuel supply. DO NOT attempt<br />
to fill the tank beyond this point or spillage could result<br />
due to expansion of the fuel.<br />
The filler tube is designed to accept a narrow filler<br />
nozzle of the type found on pumps that deliver ONLY<br />
unleaded fuel. A flap lies across the filler neck; insert<br />
the filler nozzle sufficiently to fully open the flap before<br />
filling.<br />
15
WARNING!<br />
DO NOT fully fill the tank if the car is to be parked on a<br />
slope in direct sunlight or high ambient temperature –<br />
expansion of the fuel could cause spillage.<br />
Filling difficulties<br />
The fuel delivery rate of filling station pumps can vary<br />
significantly from one garage forecourt to another. This<br />
coupled with the fact that modern pumps are equipped<br />
with a sensor which automatically cuts off the supply<br />
as soon as turbulence is detected in the upper part of<br />
the car’s filler neck could result in isolated fuel filling<br />
problems.<br />
If individual owners experience difficulty, the following<br />
advice may be useful:<br />
� Hold the filler gun with the trigger directly below<br />
the nozzle (at right angles to the ground).<br />
Twisting the gun to either side, is unlikely to ease<br />
the filling process.<br />
� Fill the tank slowly – DO NOT fully squeeze the<br />
trigger.<br />
Braking System<br />
The hydraulic braking system operates through dual<br />
circuits; if one circuit should fail, the other will continue<br />
to function. However, in the event of a brake failure<br />
where only one circuit is operational, the car should<br />
ONLY be driven with EXTREME CAUTION to pull off<br />
the road.<br />
Brake pads<br />
Brake pads and linings require a period of bedding in.<br />
For the first 500 miles, avoid situations where heavy<br />
braking is required.<br />
Remember that regular servicing is vital to ensure that<br />
the brake components are examined for wear at the<br />
correct intervals and changed whenever necessary to<br />
ensure optimum safety and performance.<br />
WARNING!<br />
DO NOT rest your foot on the brake pedal while<br />
driving; this may overheat the brakes, reducing their<br />
efficiency and causing excessive wear.<br />
Handbrake<br />
The handbrake operates on the rear wheels only and<br />
should not require adjustment. To apply the<br />
handbrake, pull the lever up. Always apply the<br />
handbrake FULLY whenever you park the car. To<br />
release, pull the lever up slightly, depress the button<br />
and fully lower the lever.<br />
WARNING!<br />
DO NOT drive with the handbrake applied; this could<br />
damage the rear brakes.<br />
16
2. USEFUL INFORMATION - Engine Specifications<br />
Duratec 263<br />
Duratec 260<br />
Duratec 200<br />
Duratec 210<br />
Sigma 150<br />
Sigma 125<br />
Sigma 120<br />
4 cyl-in-line<br />
4 cyl-in-line<br />
4 cyl-in-line<br />
4 cyl-in-line<br />
4 cyl-in-line<br />
4 cyl-in-line<br />
4 cyl-in-line<br />
Engine Type<br />
1999cc<br />
2261cc<br />
2261cc<br />
1999cc<br />
1596cc<br />
1596cc<br />
1596cc<br />
Capacity<br />
87.5mm<br />
87.5mm<br />
87.5mm<br />
87.5mm<br />
79.0mm<br />
79.0mm<br />
79.0mm<br />
Bore<br />
83.1mm<br />
94.0mm<br />
94.0mm<br />
83.1mm<br />
81.4mm<br />
81.4mm<br />
81.4mm<br />
Stroke<br />
16v DOHC<br />
16v DOHC<br />
16v DOHC<br />
16v DOHC<br />
16v DOHC<br />
16v DOHC<br />
16v DOHC<br />
Cylinder Head<br />
Solid<br />
Solid<br />
Solid<br />
Solid<br />
Solid<br />
Solid<br />
Solid<br />
Valve Actuation<br />
11.75:1<br />
12.0:1<br />
9.7:1<br />
10.8:1<br />
11.0:1<br />
11.0:1<br />
11.0:1<br />
Compression Ratio<br />
263bhp@8500 rpm<br />
260bhp@7500rpm<br />
200bhp@7000rpm<br />
210bhp@7600 rpm<br />
150bhp@6900 rpm<br />
125bhp@6100 rpm<br />
120bhp@6000 rpm<br />
Maximum Power<br />
176lbft@7165 rpm<br />
200lbft@6000rpm<br />
165lbft@5750rpm<br />
150lbft@6300 rpm<br />
120lbft@5600 rpm<br />
120lbft@5350 rpm<br />
113lbft@4000 rpm<br />
Maximum Torque<br />
8500rpm<br />
7800rpm<br />
7500rpm<br />
7600rpm<br />
7500rpm<br />
6800rpm<br />
6450rpm<br />
Maximum RPM<br />
MBE<br />
MBE<br />
MBE CSR 200<br />
Ford EU4<br />
MBE<br />
MBE<br />
MBE<br />
Ford<br />
Ignition System<br />
Four port roller<br />
barrel<br />
Four port roller<br />
barrel<br />
Single butterfly<br />
Single butterfly<br />
Four port throttle<br />
bodies<br />
Single butterfly<br />
Single butterfly<br />
Induction System<br />
Multi point injection<br />
Multi point injection<br />
Multi point injection<br />
Multi point injection<br />
Multi point injection<br />
Multi point injection<br />
Multi point injection<br />
Fuel System<br />
Unleaded 95 RON<br />
Unleaded 95 RON<br />
Unleaded 95 RON<br />
Unleaded 95 RON<br />
Unleaded 95 RON<br />
Unleaded 95 RON<br />
Unleaded 95 RON<br />
Fuel Type<br />
17
Technical data<br />
Vehicle Type<br />
2 Seater, convertible sports car.<br />
Construction<br />
Tubular steel space frame.<br />
Aluminium panels with aluminium honeycomb cockpit<br />
side impact protection.<br />
GRP (Glass-reinforced plastic) or Carbon fibre<br />
nosecone and wings.<br />
Dimensions<br />
Wheelbase<br />
(mm)<br />
Front Track<br />
(mm)<br />
Rear Track<br />
(mm)<br />
Length<br />
(mm)<br />
Width<br />
(mm)<br />
Height (Hood<br />
up) (mm)<br />
Height (Hood<br />
down) (mm)<br />
Turning Circle<br />
(meter)<br />
Internal width<br />
(mm)<br />
Seat to roof<br />
height (mm)<br />
Luggage<br />
capacity (ltr)<br />
18<br />
Classic/Roadsport<br />
Superlight<br />
SV<br />
CSR<br />
2225 2225 2305 2315<br />
1270 1336 1446 1505<br />
1336 1336 1446 1465<br />
3380 3100 3530 3300<br />
1575 1575 1685 1685<br />
1115 1115 1140 1140<br />
990 990 1015 1015<br />
10 10 11 11<br />
930 930 1110 1110<br />
838 838 865 865<br />
120 120 130 130<br />
Kerb Weights<br />
Min Weight Max Weight<br />
Classic 540 840<br />
Roadsport 550 850<br />
SV 575 875<br />
R400 515 815<br />
R500 506 806<br />
CSR 575 875<br />
CSR Superlight 550 850<br />
Braking System<br />
Twin circuit, equal split front/rear, with system warning<br />
of low fluid level. Discs front and rear<br />
Parking brake operating on rear wheels actuated by<br />
hand lever.<br />
Suspension<br />
Front Adjustable double wishbone with<br />
(Except CSR) Anti-roll bar<br />
Coil Springs over dampers<br />
Rear De Dion axle located by lower 'A'<br />
(Except CSR) frame and radius arms or 'A' Frame<br />
and Watts linkage<br />
Progressive Coil springs<br />
Dampers<br />
Optional - Adjustable anti-roll bar<br />
Front CSR only Pushrod actuated double wishbones<br />
with Anti-roll bar. Coil springs over<br />
dampers<br />
Rear CSR only Independent double wishbone.<br />
Coil over spring<br />
Damper units.<br />
Steering<br />
Mechanism Rack and Pinion<br />
Turns lock to lock Standard 2.46<br />
Race 1.75<br />
Road wheel nut torque<br />
All 55lbft 75 n-m<br />
Electrical<br />
12 Volt, Negative earth<br />
Alternator output: 45 amperes<br />
Battery Capacity 30 amps/hrs<br />
47 amps/hrs<br />
Manual Transmission<br />
Hydraulic Clutch Actuation all models
Wheels – Tyres -- Pressure<br />
TYRE PRESSURE<br />
FRONT REAR<br />
Fluid Capacities<br />
Fuel Tank STD 36 L<br />
Fuel Tank SV/CSR 41 L<br />
Oil (incl Filter) wet sump 4.5 L<br />
Dry sump 6.0 L<br />
Gearbox 5/6 speed Std/Sequential 1.9 L<br />
Cooling System without heater (expect CSR) 4.5 L<br />
Cooling System with heater (expect CSR) 5.1 L<br />
CSR radiator 5.5 L<br />
Differential 1.2 L<br />
NOTE: Gearbox and differential fluid capacities are<br />
approximate and the correct level should be obtained<br />
via the level plug<br />
Recommended Fluid Specification<br />
Engine Oil<br />
Ford Sigma Ford Engine oil<br />
Formula E-5W-30<br />
CSR/R400 <strong>Caterham</strong> Motorsport Oil 5W-50<br />
Track driving <strong>Caterham</strong> Motorsport Oil 5W-50<br />
Gearbox Oil*<br />
5/6 SPEED <strong>Caterham</strong> Gearbox Oil EP80 grade<br />
Sequential<br />
Differential<br />
All cars <strong>Caterham</strong> Differential Oil EP90<br />
LSD's Lubeguard Limited Slip Diff additive<br />
Engine Coolant<br />
CSR/R400 Comma X-stream Red OAT<br />
Ford Sigma Ford Super Plus Anti-frezz<br />
Brake Fluid Comma DOT4<br />
TYRE WHEELS<br />
18 -- Front Avon 175/55 R13 CR500 Front 6J x 13” alloy<br />
-- 18 Rear Avon 205/55 R13 CR500 Rear 8J x 13” alloy<br />
20 20 Avon 185/60 R 14 Avon ZV3 6J x 14" alloy<br />
18 18 Avon 195/45 R 15 Avon CR500 6.5J x 15" alloy<br />
24 -- Front Avon 195/45 R15 CR500 Front 6.5J x 15" alloy<br />
-- 23 Rear Avon 255/40 R15 CR500 Rear 9J x 15" alloy<br />
Gearbox ratios<br />
5 SPEED 6 SPEED 6 SPEED SEQ<br />
1 3.36 2.69 2.4<br />
2 1.81 2.01 1.84<br />
3 1.26 1.59 1.48<br />
4 1.00 1.32 1.26<br />
5 0.82 1.13 1.10<br />
6 1.00 1.00<br />
R 3.37 2.96 2.4<br />
19
TRACK USE<br />
ENJOYING TRACK DAYS & COMPETING IN YOUR<br />
CATERHAM SEVEN<br />
Due to the difficulty - and illegality - of using the<br />
<strong>Caterham</strong> Seven’s full performance on the public<br />
roads, many owners choose to use their cars in<br />
competition events, such as circuit racing, sprints and<br />
hill climbs, as well as non-competitive track days.<br />
MOTORSPORT<br />
As an introduction to Motorsport, <strong>Caterham</strong> <strong>Cars</strong><br />
introduced the Academy series in 1995; a race series<br />
exclusively for novice drivers in identical <strong>Caterham</strong><br />
machinery. The Academy package comprises of the<br />
car and a complete multi-discipline season taking the<br />
driver from total novice, through the licence process<br />
and training, on to becoming a bona fide race driver. It<br />
has become the most successful programme of its type<br />
in Europe, turning out more than 50 new racers each<br />
year.<br />
The success of the Academy has led to a complete<br />
‘ladder’ of <strong>Caterham</strong> Motorsport forming to<br />
accommodate all. Ex-Academy drivers typically<br />
continue into Roadsport-B, a full race series tailored for<br />
the newly experienced drivers, in the same car with<br />
minor modifications. Roadsport-A follows with yet<br />
further modifications, producing <strong>Caterham</strong>’s most<br />
popular series. The Roadsports series have been<br />
designed to promote close and cost-effective racing by<br />
virtue of the strict regulations and the use of sealed<br />
engines.<br />
Beyond Roadsports, using Academy based cars, are<br />
the two Superlight championships, using dedicated<br />
cars. The Superlight R400 is <strong>Caterham</strong>’s premier UK<br />
race series and uses a fearsome 210 Bhp engine with<br />
sequential gear box, coupled to a limited slip<br />
differential. It also has bespoke race suspension and<br />
Evon CR500 developed specifically for the car to<br />
deliver phenomenal performance. The Superlight R300<br />
is a 175 Bhp version of the same car, provides a cost<br />
effective step for drivers progression up the ladder.<br />
In addition to the factory series, the well supported<br />
<strong>Caterham</strong> Graduates Racing Club, formed in 1998,<br />
provides an independent home for many ex-Academy<br />
drivers in its three classes; two for Roadsport based<br />
cars and one for the old live axle cars of the 1990’s.<br />
<strong>Caterham</strong> Sevens are also highly popular for hillclimb<br />
and sprint events, from club to national level. These<br />
events are run solely against the clock, with one car on<br />
the course at a time divided into a range of classes.<br />
20<br />
The owners club has its own sprint championship<br />
which is the largest single make series of its kind in the<br />
UK.<br />
The Motor Sports Association (MSA) is responsible for<br />
all forms of motor sport in the UK including all the<br />
above, and in order to compete, a competition licence<br />
must be held. To hold a 'speed' licence for hillclimb<br />
and sprint events you only need to pay the relevant<br />
fee. For a race licence however a one-day ARDS<br />
driving course must be completed and you will need to<br />
pass a medical examination with a doctor. Full details<br />
can be obtained from the MSA or <strong>Caterham</strong> <strong>Cars</strong>.<br />
TRACK DAYS<br />
Track driving days give owners the opportunity to<br />
experience all the performance and handling that their<br />
car can deliver, in a safe and legal environment. Days<br />
are generally operated by Track Day Organisers<br />
(TDO’s), companies that specialise in hiring a circuit for<br />
a day, then selling spaces to the general public. TDO’s<br />
can be found by contacting the circuits, or an internet<br />
search. As the quality of service and time varies, word<br />
of mouth recommendation is a valuable medium.<br />
A day will either be sessioned to typically 20 minutes in<br />
the hour (for novice, intermediate and experienced), or<br />
‘open-pitlane’ which allows the owner to take as much<br />
track time as they want. In the latter case, we would<br />
recommend no more than 20 minutes at a time as<br />
personal fatigue can set in and concentration wander.<br />
Remember to drink plenty of fluids.<br />
The <strong>Caterham</strong> Seven is ideally suited to trackdays and<br />
it can be almost guaranteed that there will be a<br />
<strong>Caterham</strong> at every single day! The light weight and<br />
race bred design means that the car can be driven to<br />
the circuit, used all day and driven home with complete<br />
confidence. These same qualities mean that<br />
<strong>Caterham</strong>s are typically quicker than most cars on<br />
circuit, including much more powerful exotica.<br />
As trackdays cater for the general public in their<br />
regular road cars, only personal safety equipment<br />
(such as a crash helmet) is a requirement. However,<br />
many owners choose to make use of race-developed<br />
safety enhancements for peace of mind. <strong>Caterham</strong><br />
<strong>Cars</strong> would recommend the following options if you<br />
intend using your car on circuit:<br />
� Race harness safety belts (4 point or 6 point)<br />
� Track day roll over bar<br />
� Arm restraints<br />
� Ignition cut out switch<br />
Further safety enhancements include:<br />
� Plumbed in fire extinguisher<br />
� Full race roll cage
� Honeycomb fuel tank or bag tank<br />
� Honeycomb floor impact protection panels<br />
� Rear wheel protection bar<br />
� Bespoke seat<br />
All these parts, along with advice, are available from<br />
the <strong>Caterham</strong> Parts Department and <strong>Caterham</strong> online<br />
store.<br />
Whilst a <strong>Caterham</strong> is perfect for track use, there are a<br />
number of essential checks that should be made to<br />
ensure that your day passes smoothly<br />
� Wheel nuts - must be torqued to the correct<br />
setting (see Technical Data). Check after every<br />
session.<br />
� Tyre pressures – check the hot temperature<br />
immediately after a session. The tyre pressure<br />
will increase beyond that of normal road use and<br />
may need releasing a little. Avon CR500’s<br />
should be approx 22-24psi hot. For more road<br />
orientated tyres, 28psi hot typically gives the best<br />
control.<br />
� Oil and coolant. These should be filled to<br />
maximum marks and checked regularly.<br />
� Remove all loose objects from boot area<br />
� Check brake pad wear and fluid level<br />
� Before taking to the track it is wise to give the car<br />
a general ‘spanner check’ to ensure everything is<br />
tight.<br />
Track usage is among the toughest environments for<br />
any vehicle and even though your <strong>Caterham</strong> has been<br />
designed around this environment it is vital that careful<br />
monitoring of the gauges is carried out whilst driving<br />
under these harsh conditions. The following<br />
recommendations are designed to reduce the risk of<br />
engine damage:<br />
Water Temperature<br />
Always allow the engine to warm up to at least<br />
65�C before using high rpm or full throttle. The<br />
optimum operating water temperature for your<br />
engine is 110�C.<br />
Oil Temperature<br />
Once again high rpm or full throttle should not be<br />
used until the engine oil temperature is at least<br />
50�C. Oil temperature rises with engine rpm and<br />
loading, so it won’t come up to temperature at<br />
idle like the water. Therefore, if your car isn’t<br />
fitted with an oil temperature gauge, we would<br />
recommend building up the maximum revs used<br />
cautiously for the first few laps of use. The oil will<br />
come up to temperature quickly. A maximum oil<br />
temperature of 120�C is recommended. If track<br />
usage causes this figure to be exceeded then<br />
fitment of oil cooler is recommended.<br />
Oil changes<br />
The engine oil should be changed more<br />
frequently with cars used on the track. We<br />
recommend every 1000 track miles as a<br />
minimum. More frequent changes can only be<br />
beneficial.<br />
For Enhanced Track Performance, you may wish to<br />
upgrade your car to include some of the following as<br />
this will improve both your enjoyment and safety whilst<br />
on the track.<br />
� 13" wheels fitted with Avon CR500 road tyres<br />
(This may require adjustable spring<br />
platforms to be fitted. For further<br />
information contact <strong>Caterham</strong> Technical<br />
Department).<br />
� Uprated anti roll bars (front and rear)<br />
� Uprated front or rear springs<br />
� Clutch and throttle pedal stops<br />
� Uprated brake master cylinder<br />
� Race dampers<br />
NOTE: For track use, cars fitted with uprated brake<br />
master cylinder must use race cap to avoid any leaks.<br />
3. Maintenance<br />
Owner Maintenance<br />
In addition to the routine services and inspections<br />
described in this book, the following simple checks<br />
must be carried out more frequently. You can do these<br />
yourself and advice is given on the pages that follow.<br />
21
22<br />
Figure 10a: Underbonnet location – EU4 Sigma 120<br />
1. Brake Fluid Reservoir 6. Windscreen Washer Fluid<br />
2. Clutch Fluid Reservoir 7. Dip stick<br />
3. Battery 8. Engine Oil Filler Cap<br />
4. ECU 9. Coolant Filler Cap<br />
5. Air Box
Figure 10b: Under bonnet location - Sigma 125<br />
1. Brake Fluid Reservoir 6. Air Filter<br />
2. Clutch Fluid Reservoir 7. Windscreen Washer Fluid<br />
3. Battery 8. Dip Stick<br />
4. MAP 9. Engine Oil Filler Cap<br />
5. ECU 10. Coolant Filler Cap<br />
23
24<br />
Figure 10c: Underbonnet location - Sigma 150<br />
1. Brake Fluid Reservoir 6. Air Filter<br />
2. Clutch Fluid Reservoir 7. Windscreen Washer Fluid<br />
3. Battery 8. Dip Stick<br />
4. MAP 9. Engine Oil Filler Cap<br />
5. ECU 10. Coolant Filler Cap
Figure 10d: Underbonnet location – Duratec 210 (R400)<br />
1. Brake Fluid Reservoir 6. Windscreen Washer Fluid<br />
2. Clutch Fluid Reservoir 7. ECU<br />
3. Battery 8. Dip Stick<br />
4. MFU 9. Engine Oil Filler Cap<br />
5. Air filter 10. Coolant Filler Cap<br />
NOTE: Under bonnet location for R400 with dry sump is similar as standard R400 apart from oil tank located near<br />
coolant tank and oil cooler in front of the radiator.<br />
25
26<br />
Figure 10e: Underbonnet location – EU4 Duratec 200 (CSR)<br />
1. Brake Fluid Reservoir 6. Windscreen Washer Fluid<br />
2. Clutch Fluid Reservoir 7. Brake fluid Reservoir<br />
3. Battery 8. Coolant Filler Cap<br />
4. Air box 9. Engine Oil Filler Cap<br />
5. Dip stick<br />
NOTE: SVR Under bonnet location is similar to EU4 CSR apart from the Battery location
Figure 10f: Underbonnet location - Duratec 260 (CSR)<br />
1. Brake Fluid Reservoir 7. Coolant Filler Cap<br />
2. Clutch Fluid Reservoir 8. Breather Bottle<br />
3. Battery 9. Windscreen Washer Fluid<br />
4. ECU 10. Air Filter<br />
5. MFU 11. Engine Oil Filler Cap<br />
6. Dip Stick<br />
NOTE: CSR 200 under bonnet location is similar to 260 apart from air filter which is similar to R400 location<br />
27
28<br />
Figure 10g: Underbonnet location – Duratec 263 (R500)<br />
1. Brake Fluid Reservoir 6. Air Filter<br />
2. Clutch Fluid Reservoir 7. Dry Sump Tank<br />
3. Coolant Filler Cap 8. Engine Oil Filler Cap<br />
4. ECU 9. Oil Cooler<br />
5. Battery<br />
NOTE: The windscreen Screen washer bottle is located above the battery for the cars fitted with full windscreen
Regular checks:<br />
� Operation of lights, horn, direction indicators,<br />
wipers, washers and warning lights.<br />
� Operation of seat belts and brakes.<br />
� Look for fluid deposits on the floor beneath the<br />
car, which may indicate a fluid leak.<br />
Weekly checks:<br />
� Engine oil level.<br />
� Cooling system level.<br />
� Condition and pressure of tyres.<br />
� Brake fluid levels.<br />
� Clutch fluid levels.<br />
� Screen washer reservoir level.<br />
NOTE: Any significant or sudden drop in fluid levels, or<br />
uneven tyre wear, should be reported to <strong>Caterham</strong><br />
<strong>Cars</strong> without delay.<br />
Emission control<br />
Your car is fitted with emission control equipment<br />
designed to meet specific legal requirements. You<br />
should be aware that unauthorised replacement,<br />
modification or tampering with this equipment by an<br />
owner or motor vehicle repairer, could be unlawful and<br />
subject to legal penalties.<br />
In addition, engine settings must not be tampered with.<br />
These have been established to ensure that your car<br />
complies with stringent exhaust emission regulations.<br />
Incorrect engine settings may adversely affect exhaust<br />
Figure 11:<br />
Front Axle Stand<br />
Positioning<br />
Figure 12:<br />
Rear Axle Stand<br />
Positioning<br />
emissions, engine performance and fuel consumption,<br />
as well as causing high temperatures, which could<br />
result in damage to the catalytic converter and the car.<br />
Safety in the garage<br />
If you need to carry out maintenance on your vehicle,<br />
observe the following safety precautions at all times:<br />
WARNINGS!<br />
� ALWAYS keep hands, tools and items of<br />
clothing, clear of all drive belts and pulleys<br />
� DO NOT touch exhaust or cooling system<br />
components until they are cool.<br />
� DO NOT touch electrical leads or components<br />
with the ignition switch turned on.<br />
� NEVER leave the engine running in an<br />
unventilated area – exhaust gases are poisonous<br />
and extremely dangerous.<br />
� DO NOT work beneath the car with a vehicle<br />
lifting jack as the only means of support. (See<br />
axle stand positioning).<br />
� Ensure sparks and naked lights are kept away<br />
from the engine compartment.<br />
� Remove all metal wrist bands and jewellery,<br />
before working in the engine compartment and<br />
NEVER allow the battery terminals, or leads, to<br />
make contact with tools or other metal parts of<br />
the car.<br />
29
Poisonous liquids<br />
Most liquids used in motor vehicles are poisonous and<br />
should not be consumed or brought into contact with<br />
open wounds (these substances include; battery acid,<br />
anti-freeze, brake fluid, petrol, oil and windscreen<br />
washer additives).<br />
Obey all instructions printed on labels and containers!<br />
Used engine oil<br />
Prolonged contact with engine oil may cause serious<br />
skin disorders, including dermatitis and cancer of the<br />
skin. Wash thoroughly after contact.<br />
Checking fluid levels<br />
Due to the nature of the <strong>Caterham</strong> Seven with its high<br />
revving engines and extreme cornering speeds it is<br />
vitally important that the correct engine oil level is<br />
maintained at all times.<br />
Engine oil level cannot be checked too often<br />
We recommend that it be checked at least every 500<br />
miles and before any long journey or before every<br />
session at a track day.<br />
There are several different oil systems fitted to the<br />
Seven, each of which requires a different means for<br />
checking the level. It is important that you are clear on<br />
the correct procedure for the system fitted to your car.<br />
� Standard wet sump arrangements & engines<br />
fitted with oil/air separator tank<br />
� Engines with dry sump Bell tank and swirl tower<br />
Engines with Standard Wet Sump Arrangement<br />
� Start the engine and run until the normal<br />
operating temperature is achieved (90-100°C).<br />
� Stop the engine and remove the dipstick from its<br />
tube and wipe clean before re-dipping, please<br />
leave the dipstick in place for 30sec this will<br />
ensure that the correct indication is achieved.<br />
� The oil should be at the maximum level at all<br />
times. (As a guide the difference between min<br />
and max is approximately 1/2 litre).<br />
� If required, oil should be added via the oil filler<br />
cap on the top of the engine and must be of the<br />
correct specification of oil for your engine type.<br />
(See technical data).<br />
� It is advisable to add a small amount at a time<br />
and recheck by repeating the above procedures<br />
until the correct level is achieved.<br />
� Care should be taken not to overfill the engine<br />
with oil.<br />
� Always make sure the oil filler cap and dipstick<br />
are fitted back in place before restarting the<br />
engine.<br />
30<br />
Figure 13<br />
Engines with dry sump bell tank and swirl tower<br />
Figure 14<br />
� Start the engine and run it until the normal<br />
operating temperature is achieved (90-100°C).<br />
� Switch off the engine.<br />
� Unscrew the tank cap from the top of the swirl<br />
tower. Wipe clean the dipstick provided before<br />
dipping, this will ensure that the correct indication<br />
is achieved. Be sure the dipstick fully home when<br />
dipping.
� The oil should be at the maximum level at all<br />
times. (As a guide the difference between min<br />
and max is approximately 1/2 litre).<br />
� If oil is required it should be added via the oil filler<br />
cap on the top of the engine and must be of the<br />
correct specification for your engine type. (See<br />
technical data).<br />
� It is advisable to add a small amount at a time<br />
and recheck by repeating above procedures until<br />
the correct level is achieved.<br />
� Care should be taken not to overfill the engine<br />
with oil.<br />
� Overfilling this system will result in oil being<br />
blown out into the oil catch tank the next time the<br />
vehicle is driven.<br />
� Always take off the dipstick from the swirl tank<br />
and make sure the oil filler cap and swirl tank cap<br />
are fitted back in place before restarting the<br />
engine.<br />
NOTE: With this system the oil level must be<br />
checked within one minute of the engine being<br />
switched off otherwise the oil will start to drain<br />
back into the engine and a false reading will be<br />
obtained. Should this be the case restart the<br />
engine again and let it run for approximately one<br />
minute before repeating the checking procedure.<br />
Engines with Dry Sump Tank (R400/R500)<br />
Start the engine and run it until the normal operating<br />
temperature achieved (90-100°C). Keep the engine<br />
running, open the dry sump tank cap and look inside,<br />
you will find two baffle levels with centre holes. In<br />
normal condition the oil should run approximately 5mm<br />
below the middle baffle level. Top up the oil if required<br />
Coolant check & top-up<br />
The coolant level should be checked weekly when the<br />
system is cold and topped up with appropriate coolant<br />
(see technical date). Top up to the ‘MAX’ mark shown<br />
on the exterior of the reservoir. If the level falls<br />
appreciably during a short period; suspect leakage or<br />
overheating and arrange for <strong>Caterham</strong> Aftersales to<br />
examine the vehicle.<br />
Anti-freeze<br />
The anti-freeze content of the coolant must be<br />
maintained all the year round. <strong>Caterham</strong> use Comma<br />
X-stream Red and Ford Superplus premium (ready<br />
mixed), however, if a water/antifreeze mix is<br />
substituted for any reason a minimum of 50%<br />
antifreeze is required. To ensure that its anti-corrosion<br />
properties are retained, the anti-freeze content should<br />
be checked by <strong>Caterham</strong> Aftersales once a year. The<br />
coolant should be completely renewed every four<br />
years.<br />
Figure 15: Coolant, Expansion bottle<br />
WARNING!<br />
� DO NOT use anti-freeze to any specification<br />
other than that recommended (see technical<br />
data).<br />
� DO NOT add rust inhibitors or other additives to<br />
the coolant – these may not be compatible with<br />
the coolant or engine components.<br />
� DO NOT remove the reservoir cap when the<br />
cooling system is hot – escaping steam or water<br />
could cause serious injury.<br />
� Anti-freeze is poisonous and can be fatal if<br />
swallowed. If accidental consumption of antifreeze<br />
is suspected, seek appropriate medical<br />
attention immediately.<br />
� Take precautions to prevent anti-freeze coming<br />
in contact with the skin or eyes. If this should<br />
happen, rinse immediately with plenty of water.<br />
� Anti-freeze is inflammable. Take care not to spill<br />
anti-freeze onto a hot engine – a fire may result.<br />
� When topping up, avoid spillage onto painted<br />
body panels – anti-freeze may damage painted<br />
surfaces.<br />
Brake/Clutch fluid check & top-up<br />
Fluid level in the Brake/Clutch reservoir may fall slightly<br />
during normal use, but should not drop below the lower<br />
level mark. If there is any appreciable drop in level over<br />
a short period, consult <strong>Caterham</strong> Aftersales.<br />
Topping-up<br />
Wipe the filler cap clean before removing to prevent<br />
dirt from entering the reservoir and then top-up the<br />
reservoir to the ‘MAX’ mark using a recommended<br />
fluid: (See technical data)<br />
For the clutch reservoir, ‘Max’ and ‘Min’ levels are<br />
highlighted on the outer surface of the reservoir.<br />
31
Figure 16: Brake Fluid reservoir<br />
32<br />
1. Reservoir filler cap<br />
2. ‘MAX’ – maximum level<br />
3. 'DANGER' – minimum level<br />
Use only new fluid from a sealed container (old fluid<br />
from uncapped containers or fluid previously bled from<br />
the system will absorb moisture, and adversely affect<br />
performance).<br />
To refit the cap, replace slowly to prevent leakage and<br />
screw up by hand only.<br />
Figure 17: Clutch fluid reservoir<br />
WARNING!<br />
� DO NOT drive the car if the fluid level is below<br />
the ‘DANGER’ mark.<br />
� Brake/Clutch fluid may damage painted surfaces:<br />
Soak up any spillage with an absorbent cloth<br />
immediately and wash the area with a mixture of<br />
car shampoo and water.<br />
� If Brake/Clutch fluid should come into contact<br />
with the skin or eyes, rinse immediately with<br />
plenty of water.<br />
� Brake/Clutch fluid must be completely replaced<br />
every after two years regardless of mileage.<br />
� Brake/Clutch fluid is inflammable; do not allow<br />
fluid to come into contact with hot components or<br />
naked flames.<br />
Wipers & Washers<br />
Windscreen washers<br />
Check the reservoir level at least every week and topup<br />
with a mixture of water and Comma screenwash.<br />
WARNING!<br />
Screenwash is flammable, particularly if high or<br />
undiluted concentrations are exposed to sparks. Do not<br />
allow screenwash to come into contact with naked<br />
flames or sources of ignition.<br />
Body panels may suffer discolouration as a result of<br />
screenwash spillage. Take care to avoid spillage,<br />
particularly if an undiluted or high concentration of<br />
screenwash is being used. If spillage occurs, wash the<br />
affected area immediately with water.<br />
WARNING!<br />
Do not use an anti-freeze or vinegar/water solution in<br />
the screen washer reservoir – anti-freeze will damage<br />
painted surfaces, while vinegar can damage the<br />
windscreen washer pump.<br />
Washer jets<br />
Once set the water jets should not require further<br />
adjustment. If a jet becomes blocked, use a thin wire or<br />
pin as a probe to clear the obstruction.<br />
Wiper blades<br />
Wash the wiper blades in warm soapy water and<br />
periodically check their condition. If signs of hardness<br />
or cracking in the rubber are found, or if the wipers<br />
leave streaks or unwiped areas on the windscreen<br />
during use, then the wiper blades should be replaced.<br />
Clean the windscreen regularly with glass cleaner and<br />
ensure the screen is thoroughly cleaned before fitting<br />
replacement wiper blades.<br />
Battery<br />
Battery maintenance<br />
The battery is designed to be maintenance free, so<br />
topping-up is unnecessary. The battery will lose charge<br />
if your vehicle is laid up unused. See “Laying your<br />
vehicle up for long periods” later in this section.<br />
WARNING!<br />
Batteries contain acid, which is both corrosive and<br />
poisonous. If spillage occurs:
� On clothing or the skin – remove any<br />
contaminated clothing immediately, flush the skin<br />
with large amounts of water, and seek medical<br />
attention urgently.<br />
� In the eyes – flush with clean water immediately<br />
for at least 15 minutes. Seek medical attention<br />
urgently.<br />
� Swallowing battery acid can be fatal unless<br />
IMMEDIATE action is taken – seek medical<br />
attention urgently.<br />
� During normal operation batteries emit explosive<br />
hydrogen gas – ensure sparks and naked lights<br />
are kept away from the engine compartment.<br />
� For your safety remove all metal wrist bands and<br />
jewellery before working in the engine<br />
compartment and NEVER allow the battery<br />
terminals or vehicle leads to make contact with<br />
tools or metal parts of the vehicle.<br />
WARNING!<br />
� DO NOT reverse the polarity of the battery – the<br />
electrical system will sustain extensive damage if<br />
the battery leads are connected to the wrong<br />
terminals.<br />
Battery removal and replacement<br />
Before disconnecting the battery, switch off all<br />
electrical equipment and remove the ignition key.<br />
To remove: disconnect the negative (‘–’) cable first and<br />
then the positive (‘+’) cable. When reconnecting,<br />
connect the positive cable first and then the negative<br />
cable. Do not allow the battery terminals to make<br />
contact with metal parts of the vehicle.<br />
To release the battery from the car, undo the two bolts<br />
securing the battery clamp and remove the clamp.<br />
When replacing, ensure the battery is fitted the right<br />
way round and that the clamp is secure. Tighten the<br />
clamp bolts until the clamp is free from movement, but<br />
do not overtighten.<br />
Figure 18: Battery and battery clamp<br />
Replacement battery<br />
Only fit a replacement battery of the same type and<br />
specification as the original – other batteries may vary<br />
in size or have different terminal positions which could<br />
cause a fire hazard when connected to the car’s<br />
electrical system.<br />
Battery disposal<br />
Used batteries should be recycled. However, batteries<br />
are hazardous – you should seek advice about<br />
disposal from a <strong>Caterham</strong> dealer or your local<br />
authority.<br />
WARNING!<br />
� Keep the battery upright at all times – damage<br />
will be caused if the battery is tilted more than 45<br />
degrees.<br />
� DO NOT run the engine with the battery<br />
disconnected, or disconnect the battery while the<br />
engine is running.<br />
Battery charging<br />
Batteries generate explosive gases, contain corrosive<br />
acid and produce levels of electric current sufficient to<br />
cause serious injury. While charging always heed the<br />
following precautions:<br />
� Before charging, disconnect and remove the<br />
battery from the vehicle – charging the battery<br />
with the cables connected may damage the<br />
vehicle’s electrical system.<br />
� Make sure the battery charger leads are securely<br />
clamped to the battery terminals BEFORE<br />
switching on the battery charger. Do not move<br />
the leads once the charger is switched on.<br />
� While charging, shield your eyes or avoid leaning<br />
over the battery and keep the area around the<br />
top of the battery well ventilated.<br />
� Do not allow naked lights near the battery<br />
(batteries generate flammable hydrogen during<br />
and after charging).<br />
� When charging is finished, switch off the battery<br />
charger BEFORE disconnecting the leads from<br />
the battery terminals.<br />
� After charging, leave the battery for an hour<br />
BEFORE reconnection to the vehicle – this will<br />
allow time for explosives gases to disperse,<br />
thereby minimising the risk of fire or explosion.<br />
NOTE: Be aware that a battery will take longer to<br />
charge in a cold environment.<br />
WARNING!<br />
� DO NOT charge the battery if it is connected to<br />
the car – this may seriously damage the electrical<br />
system.<br />
� DO NOT charge the battery if it is suspected of<br />
being frozen.<br />
33
Wheels & Tyres<br />
WARNING!<br />
DEFECTIVE TYRES ARE DANGEROUS!<br />
DO NOT drive your car if any tyre is excessively worn<br />
or damaged, or is inflated to an incorrect pressure.<br />
Incorrect tyres can affect the stability and handling<br />
characteristics of your car – only fit replacement tyres<br />
that are identical to the original specification.<br />
Caring for your tyres<br />
Always drive with consideration for the condition of the<br />
tyres, and frequently inspect the tread and side walls<br />
for any sign of distortion (bulges), cuts or wear.<br />
The most common causes of tyre failure are:<br />
� Bumping against kerbs<br />
� Driving over deep pot holes<br />
� Driving with under or over-inflated tyres.<br />
Tyre pressures<br />
Correctly inflated tyres will ensure that you enjoy the<br />
best combination of tread life, ride comfort, fuel<br />
economy and road holding.<br />
Check the pressures at least every week (including the<br />
spare wheel), preferably when the tyres are cold (be<br />
aware that the car can be driven up to one mile (1.6<br />
km), before the tyres start to warm up).<br />
Air pressure naturally increases in warm tyres; if it is<br />
necessary to check the tyres when they are warm<br />
(after the car has been driven for a while, even in cold<br />
weather), you should expect the pressures to have<br />
increased by between 4 and 6 Psi. In this<br />
circumstance, DO NOT let air out of the tyres in order<br />
to match the recommended pressures.<br />
The recommended pressures are shown in ‘Technical<br />
Data’ section of this book.<br />
Remember; incorrectly inflated tyres may wear rapidly<br />
or unevenly, are more easily damaged, and can<br />
seriously affect the car’s handling characteristics.<br />
Tyre wear indicators<br />
The tyres on your car have wear indicators moulded<br />
into the tread pattern at several points around the<br />
circumference. When the tread has worn down to 1.6<br />
mm, the indicators will come to the surface of the tread<br />
pattern, producing the effect of a continuous band of<br />
rubber across the width of the tyre.<br />
The indicators provide warning that there is insufficient<br />
tread remaining to provide good traction, particularly on<br />
wet roads.<br />
NOTE: Due to the minimal weight of the <strong>Caterham</strong> it is<br />
more prone to aquaplaning in wet conditions. It is for<br />
this reason that we recommend tyres are changed at<br />
2.5mm even though the legal minimum is 1.6mm.<br />
34<br />
If tyre wear is uneven (on one side of the tyre only), or<br />
becomes abnormally excessive, the suspension<br />
geometry should be checked.<br />
Valve caps<br />
Keep the valve caps screwed down firmly. They<br />
prevent dirt from entering the valve.<br />
Punctured tyres<br />
Your car is fitted with tubeless tyres, which will<br />
normally lose pressure very slowly if penetrated by a<br />
sharp object, provided it remains in the tyre. If you are<br />
aware of this occurring, reduce speed immediately and<br />
drive with caution until the spare wheel or replacement<br />
tyre can be fitted. Remember, punctured or damaged<br />
tyres must be permanently repaired or replaced, AS<br />
SOON AS POSSIBLE!<br />
NOTE: All cars are supplied with tyre fix repair spray to<br />
repair a small puncture on the tyre surface temporarily.<br />
Please follow the instruction on the repair spray can.<br />
<strong>Caterham</strong> <strong>Cars</strong> recommend to replace the tyre rather<br />
than repair. A tyre repair may not withstand the<br />
performance demands you place upon it<br />
Replacement tyres<br />
Wheel rims and tyres are matched to suit the handling<br />
characteristics of the car. Changing the specification of<br />
a wheel or a tyre, can adversely affect the car’s<br />
handling and ultimately, your own safety in emergency<br />
road situations.<br />
To be safe, ONLY fit replacement tyres that are<br />
identical to the original specification shown in<br />
‘Technical Data’ section of this book.<br />
Changing a Wheel and Tyre assembly<br />
Tools required<br />
� Jack & handle<br />
� Wheel nut spanner<br />
Before you start, ensure that the vehicle is on firm level<br />
ground. Always apply the handbrake and put into 1st<br />
gear.<br />
Positioning the jack<br />
Position the jack under the jacking point (see<br />
illustration).<br />
Turning the jack screw by hand, raise the jack until the<br />
centre of the jack platform fits snugly up to the jacking<br />
point. Do not raise the car.
Figure 19: Front jacking point<br />
Figure 20: Rear jacking point<br />
Removing and refitting the Wheel and Tyre<br />
assembly<br />
Before raising the vehicle, use the wheel brace to<br />
slacken the wheel nuts ½ a turn anti-clockwise.<br />
Ensure the jack is placed as far inboard as possible<br />
when jacking the front of vehicle on lower wishbone.<br />
Attach the jack handle to the jack and turn clockwise<br />
until the tyre is just clear of the ground. (Do not allow<br />
the jack to tilt on its base).<br />
Remove all the wheel nuts and the wheel. (Do not<br />
place the wheel face down on the ground as this may<br />
cause scratching to the surface of the wheel).<br />
Replace the wheel and wheel nuts (tapered end<br />
towards the wheel) and tighten the nuts until the wheel<br />
is seated firmly against the hub.<br />
Lower the car by turning the jack handle anti-clockwise<br />
then remove the jack from under the car. Finally fully<br />
tighten the wheel nuts in a diagonal sequence.<br />
WARNING!<br />
� Always check the tyre pressures before driving<br />
off or as soon afterwards as possible.<br />
� Whenever refitting the wheel nuts it is imperative<br />
that they are tightened to the correct torque.<br />
Check wheel nut torque as soon as possible.<br />
WARNING!<br />
Always observe the following precautions!<br />
� Choose a safe place to stop, away from the main<br />
thoroughfare, and ensure your passenger gets<br />
out of the car and waits in a safe area, away from<br />
other traffic.<br />
� Switch on the hazard warning lights to alert other<br />
road users. Apply the handbrake and engage 1st<br />
gear.<br />
� Ensure the jack is positioned on firm, level<br />
ground. Do not position the jack on metal<br />
gratings or manhole covers, or use additional<br />
material between the base of the jack and the<br />
ground.<br />
� If jacking on a slope, place chocks at the front<br />
and rear of the wheel diagonally opposite the one<br />
to be removed.<br />
� Care must be taken to avoid accidental contact<br />
with any underbody parts, especially the hot<br />
exhaust system components, likely to cause<br />
personal injury during the raising or lowering of<br />
the car.<br />
WARNING!<br />
NEVER jack the car with passengers inside!<br />
NEVER work beneath the car with the jack as the only<br />
means of support. The jack is designed for wheel<br />
changing only!<br />
Cleaning and car care<br />
Washing your car<br />
WARNING!<br />
Take care to avoid contact with a hot exhaust system<br />
when washing the car.<br />
Road dirt, oil, and deposits from birds and trees, can<br />
permanently spoil the paint finish. Wash your car<br />
frequently, using a clean, grit free sponge and<br />
generous quantities of cold or lukewarm water,<br />
containing a car shampoo. Rinse and dry off with a<br />
chamois leather.<br />
� In hot weather, DO NOT wash the car in direct<br />
sunlight – move the car into the shade!<br />
� DO NOT use detergent soap products or<br />
washing up liquid.<br />
During winter months when salt has been used on the<br />
roads, use a hose to wash the underside. Pay<br />
particular attention to wheel arches, panel seams and<br />
to removing accumulations of mud.<br />
When using a hose, do not direct the jet into the heater<br />
air intake ducts, or through the wheels onto the brake<br />
components.<br />
35
WARNING!<br />
Some high pressure cleaning systems available on<br />
garage forecourts are sufficiently powerful to damage<br />
fragile components. Never aim the water jet directly at<br />
components that might easily be damaged.<br />
Removing tar spots<br />
Use a tar removal product such as Auto Glym intensive<br />
tar remover to remove tar spots and stubborn grease<br />
stains from paintwork. Then wash immediately with<br />
soapy water, to remove all traces of the spirit.<br />
Body protection<br />
After washing, inspect the paintwork for damage. Treat<br />
paint chips and scratches with touch-up paint. If the<br />
damage has revealed bare metal, use a coloured<br />
primer first, then apply the base coat and finish off with<br />
a lacquer pencil, if appropriate. Carry out this treatment<br />
after washing, but before polishing or waxing.<br />
However, take care to ensure that car polish and body<br />
cleaning compounds are not applied to the window<br />
glass or seals.<br />
Windscreen<br />
Regularly clean the windscreen, inside and out, using<br />
an approved glass cleaner.<br />
Hood/Sidescreen<br />
The windows in the hood and sidescreen are made of<br />
plastic and should be cleaned with soapy water. Never<br />
use an abrasive cleaner on these windows.<br />
Mirrors<br />
Mirror glass is particularly susceptible to damage; DO<br />
NOT use abrasive cleaning compounds or metal<br />
scrapers.<br />
Wiper blades<br />
Always clean the windscreen before fitting replacement<br />
wiper blades. Regularly wash the wiper blades with<br />
warm soapy water (NEVER use a spirit or petrol based<br />
solvent).<br />
Looking after the interior<br />
Vinyl/plastic/cloth-faced materials: Clean with diluted<br />
upholstery cleaner.<br />
Leather: Seats, steering wheel and any trim features<br />
should be cleaned with warm water and a nondetergent<br />
soap. Dry and polish the leather with a clean,<br />
dry, lint-free cloth.<br />
DO NOT use petrol, detergents, furniture creams or<br />
polishes!<br />
Carpets: Sweep regularly with a brush or vacuum<br />
cleaner and clean with diluted upholstery cleaner.<br />
36<br />
Seat belts<br />
Extend the belts, then use warm water and a nondetergent<br />
soap to clean. On no account use bleaches,<br />
dyes or cleaning solvents – these can weaken the belt<br />
webbing. Finally, allow the belts to air-dry naturally and<br />
do not retract them, or use the car, until they are<br />
completely dry.<br />
Laying your vehicle up for long periods<br />
Should your <strong>Caterham</strong> be laid up unused for more than<br />
12 weeks at a time then we recommend the following<br />
precautionary measures be taken to avoid<br />
unnecessary deterioration:<br />
1. Ensure the bodywork and trim are properly<br />
cleaned and protected to prevent corrosion.<br />
2. Erect and correctly tension weather equipment to<br />
prevent storage damage.<br />
3. Raise car off the ground and place on axle stands<br />
taking the weight of the car off of the tyres.<br />
4. Check Antifreeze content as this will not only<br />
protect your engine from the cold but most<br />
antifreeze also includes additives to prevent<br />
corrosion inside the cooling system.<br />
5. It is importance that the battery charge level is<br />
maintained during storage. Recharging of the<br />
battery may not be successful if the battery is<br />
allowed to discharge below a certain level.<br />
We recommend that a battery conditioner is fitted<br />
to the vehicle whilst in storage as this unit will<br />
maintain a minimum charge at all times. Suitable<br />
device is available from <strong>Caterham</strong> Parts<br />
department. Should this option not be available to<br />
you then the battery should be disconnected and<br />
charged periodically. See section on battery<br />
removal and replacement.<br />
6. Ensure that the handbrake is off and that all the<br />
wheels turn freely as this will help to prevent the<br />
brake pads from sticking to the discs in cold and<br />
damp conditions.<br />
After long periods of storage<br />
Before reusing your vehicle after storage, the following<br />
checks should be carried out:<br />
1. Tyre pressures and condition<br />
2. Check all fluid levels<br />
NOTE: Should your vehicle have been laid up in<br />
excess of 6 months then we strongly recommend that<br />
the engine oil and oil filter are changed and the braking<br />
system is checked. A full safety check is available from<br />
the <strong>Caterham</strong> Aftersales Department.
Travelling abroad<br />
In certain countries, it is illegal to fit parts which have<br />
not been made to the vehicle manufacturer’s<br />
specification.<br />
Owners should ensure that any parts or accessories<br />
fitted to the car while travelling abroad will also<br />
conform to the legal requirements of their home<br />
country.<br />
NOTE: There are certain items you are required to<br />
carry with you whilst travelling abroad. Please consult<br />
your motoring organisation for the latest requirements.<br />
4. IN AN EMERGENCY<br />
Emergency Starting<br />
WARNING!<br />
� During normal use, batteries emit hydrogen gas,<br />
sufficient to cause severe explosions capable of<br />
causing serious personal injury – ensure sparks<br />
and naked lights are kept well away from the<br />
engine compartment.<br />
� DO NOT disconnect the discharged battery.<br />
� Make sure BOTH batteries are of the same<br />
voltage (12 volts) and that the jump leads are<br />
approved for use with 12 volt car batteries.<br />
� To avoid injury, always adopt the following<br />
procedure when using jump leads.<br />
Figure 21: Jump lead connection<br />
Using jump leads from a donor battery, or a battery<br />
fitted to a donor vehicle, is the only approved method<br />
of starting a car with a flat battery. Push or tow starting<br />
is NOT recommended!<br />
1) If a donor vehicle is to be used, the vehicles<br />
should be parked with their battery locations<br />
adjacent to one another. Ensure that the two<br />
vehicles do not touch.<br />
2) Apply the handbrakes and ensure that the gear<br />
levers on both vehicles are in neutral.<br />
3) Turn off the ignition switch and ALL electrical<br />
equipment of BOTH vehicles.<br />
4) Connect the RED jump lead between the positive<br />
(+) terminals of BOTH batteries.<br />
5) Connect the BLACK jump lead from the negative<br />
(–) terminal of the donor battery, to a good earth<br />
point (eg. engine mounting, engine block or other<br />
unpainted surface), remote from the battery and<br />
well away from fuel and brake lines (see<br />
illustrations).<br />
DO NOT connect a jump lead to the negative (–)<br />
terminal of the discharged battery!<br />
6) Check that the cables are clear of the moving<br />
parts of both engines, then start the engine of the<br />
donor vehicle and allow it to idle for a few minutes.<br />
7) Now start the engine of the car with the<br />
discharged battery – DO NOT crank the engine for<br />
more than 15 seconds at a time.<br />
8) Once both engines are running normally, allow<br />
them to idle for two minutes, before switching off<br />
the engine of the donor vehicle and disconnecting<br />
the jump leads. DO NOT switch on any electrical<br />
circuits on the previously disabled vehicle, until<br />
AFTER the jump leads have been removed.<br />
9) Disconnecting the jump leads must be an EXACT<br />
reversal of the procedure used to connect them,<br />
ie: disconnect the BLACK cable from the earth<br />
point on the disabled vehicle FIRST.<br />
37
Emergency towing<br />
Both the front and rear towing eyes are intended for<br />
use ONLY by the emergency services, or qualified<br />
vehicle recovery specialists, to assist in the recovery of<br />
your car should a breakdown or accident occur.<br />
� DO NOT use the lashing eyes to tow your car<br />
behind another vehicle.<br />
� DO NOT using the lashing eyes for towing<br />
another vehicle.<br />
Towing for recovery<br />
If your car is to be towed, most qualified recovery<br />
specialists will use wheel lift equipment to suspend the<br />
front wheels while the rear wheels remain on the<br />
ground. However, if it is necessary for the car to be<br />
towed with all four wheels on the ground, follow this<br />
procedure.<br />
Before being towed:<br />
1) Turn the ignition key to position ‘I’ to unlock the<br />
steering, and then to position ‘II’ to enable the brake<br />
lights, wipers and direction indicators to be operated if<br />
necessary.<br />
2) Place the gear lever in neutral.<br />
3) Release the handbrake.<br />
WARNING!<br />
� DO NOT attempt to tow the car unless the<br />
ignition switch is turned to position ‘I’, in order to<br />
unlock the steering (if, due to an accident or<br />
electrical fault, this is considered unsafe,<br />
disconnect the battery before turning the switch).<br />
� DO NOT remove the ignition key, or turn the<br />
switch to position ‘O’, while the car is in motion.<br />
Fuses and Relays<br />
The fuse box is located under the dashboard on the<br />
vertical face of the engine bulkhead (see figure 21).<br />
Although the fuses and relays are not numbered the<br />
tables below are in the order that they will be found in<br />
the fuse box working from the top down.<br />
Relays<br />
38<br />
Sigma Duratec<br />
Ignition 1 Horn 1<br />
Lights 2 Lights 2<br />
Indicator 3 Hazard 3<br />
Hazard 4 Flasher 4<br />
Starter 5 Stack dash 5<br />
Fuel Pump 6<br />
Cooling Fan 7<br />
Fuses - Sigma<br />
A= Brake Lights 7.5A<br />
B = Reverse Light 5A<br />
C = Instruments 7.5A<br />
D = Heater 7.5A<br />
E = Heated Screen 10A<br />
F = Rear Fog Light 5A<br />
G = R/H Side/Tail Light 7.5A<br />
H = L/H Side/Tail Light 5A<br />
I = Main Beam 15A<br />
J = Dip Beam 15A<br />
K = Wipe/Wash 15A<br />
L = Horn 7.5A<br />
M = Flasher Unit 10A<br />
N = Fuel Pump 15A<br />
O = Power Socket 10A<br />
P = Ignition Supply Engine 15A<br />
Q = Ignition Supply Engine 15A<br />
R = Ignition Supply Engine 15A<br />
S = Ignition Supply Engine 15A<br />
T = Main Feed Engine 15A<br />
U = Acc Cluster engine 7.5A<br />
Fuses – Duratec<br />
A = Brake/Reverse Light 15A<br />
B = Instruments/Heater 10A<br />
C = Ignition Supply (Engine) 15A<br />
D = Heated Screen 10A<br />
E = Rear Fog Light 5A<br />
F = R/H Side Tail Light 7.5A<br />
G = L/H Side Tail Light 5A<br />
H = Main Beam 15A<br />
I = Dip Beam 15A<br />
J = Wipe/Wash 15A<br />
K = Horn 20A<br />
L = Flasher Unit 10A<br />
M = Fuel Pump 15A<br />
N = Battery Supply (Engine) 30A<br />
O = Power Socket 10A<br />
Fuses are simple circuit breakers, which protect<br />
electrical equipment by preventing the electrical circuits<br />
from being overloaded. A ‘blown’ fuse is indicated<br />
when the electrical equipment it protects becomes<br />
inoperative. Check a suspect fuse by removing it from<br />
the fuse box and looking for a break in the wire inside<br />
the fuse.<br />
Renewing a fuse<br />
Always turn off the ignition switch and the appropriate<br />
electrical circuit before removing a fuse. Always<br />
replace a fuse with another of the same (or lower)<br />
rating. If a replacement fuse blows almost immediately,<br />
this indicates a serious electrical problem and the<br />
circuit MUST be checked by <strong>Caterham</strong> <strong>Cars</strong>.
Figure 22: Fuse box and relay location<br />
Fuse colours<br />
The fuses are colour coded to identify their amperage<br />
ratings as follows:<br />
ORANGE 5 amp<br />
BROWN 7.5 amp<br />
RED 10 amp<br />
BLUE 15 amp<br />
YELLOW 20 amp<br />
CLEAR 25 amp<br />
GREEN 30 amp<br />
Parts & Accessories<br />
Service parts & accessories<br />
Only <strong>Caterham</strong> <strong>Cars</strong> and their dealers are able to<br />
provide the full range of recommended parts and<br />
accessories which meet our rigorous standards of<br />
safety, durability and performance.<br />
To ensure your future driving pleasure and safety, we<br />
strongly recommend that only <strong>Caterham</strong> approved<br />
parts are fitted to your car.<br />
All genuine <strong>Caterham</strong> parts and accessories are<br />
guaranteed for twelve months or 6000 miles<br />
(whichever is sooner) with unlimited mileage.<br />
A comprehensive parts resource is available from<br />
<strong>Caterham</strong> Parts Department or via our online part store<br />
at www.caterhamparts.co.uk<br />
Fitment of non-<strong>Caterham</strong> approved parts could affect<br />
the resale value of your car.<br />
WARNING!<br />
� It is extremely hazardous to fit parts or<br />
accessories where installation requires the<br />
dismantling of, or addition to, either the electrical<br />
or fuel systems.<br />
� Fitting parts or accessories that have not been<br />
approved by <strong>Caterham</strong>, or the carrying out of<br />
non-approved alterations or conversions, may be<br />
dangerous and could affect the safety of the car<br />
and occupants, and also invalidate the terms and<br />
conditions of the car’s warranty.<br />
Bulb Replacement<br />
1. Headlamps<br />
Loosen the screw on top of the headlamp bowl until the<br />
rim with the light attached can be unclipped and pulled<br />
free. The wiring is released from the back of the lamp<br />
unit by pulling off the plastic connection. The bulbs can<br />
be changed by removing the rubber dust cover then<br />
squeezing the retaining clip to release the bulb itself.<br />
Care should be taken not to touch the Halogen bulb<br />
glass as this may cause it to blow on first use.<br />
2. Side lamp (front)<br />
First release headlamps as above. Sidelamps are<br />
connected separately into the back of the headlamp<br />
and pull free to enable bulb changing. The side lamp<br />
bulb is a capless bulb and can be removed by pulling it<br />
straight out of its holder.<br />
3. Indicators (front)<br />
Remove the two screws holding the lens in place. The<br />
bulb can then be removed and the new one refitted by<br />
Pushing and turning through 45°.<br />
4. Indicator repeaters (front)<br />
Remove the single screw holding the lens and unclip.<br />
The bulb can then be removed and the new one<br />
refitted by pushing and turning through 45°.<br />
5. Stop/tail and indicators (rear)<br />
The lenses are held in place by two screws which allow<br />
the complete lens to be removed for access. The bulbs<br />
can then be removed and the new ones refitted by<br />
pushing and turning through 45°.<br />
6. Rear fog light, reversing light<br />
The lenses are held in place by two screws which allow<br />
the lens to be removed for access. The bulbs can then<br />
be removed and the new ones refitted by pushing and<br />
turning through 45°. When refitting the lens ensure that<br />
the rubber seal is fitted correctly to prevent water<br />
ingress.<br />
39
7. Number plate lamp<br />
The number plate lamp contains two bulbs which can<br />
be removed and refitted by pushing and turning<br />
through 45°. To gain access to the bulbs the black<br />
cover must be removed, this is held in place by a<br />
single screw in the centre of the cover.<br />
Bulb Replacement Part Numbers from <strong>Caterham</strong><br />
Light Unit Wattage<br />
<strong>Caterham</strong> Part<br />
Number<br />
Headlamp (halogen) 60/55 BB472<br />
Sidelamp 5 LLB501<br />
Front/Rear Indicator 21 LLB382<br />
Tail/Stop 21/5 LLB380<br />
Rear Fog 21 LLB382<br />
Side Repeater Indicator 4 LLB233<br />
Reversing 21 LLB382<br />
Rear Number Plate (x2) 4 LLB233<br />
40
SERVICE SCHEDULES<br />
Service Interval<br />
New Car First Second<br />
Annually or every 6,000 Roadsport & Superlight<br />
First Service Annual Annual<br />
miles if sooner All Ford Sigma & Duratec Engine Variants 3 Months 12 Months 24 Months<br />
(or 1000) (or 6000) (or 12,000)<br />
Engine oil Check and top up (# check level before changing oil) �� �#� �#�<br />
Engine oil Drain and replace � �� ��<br />
Engine oil filter Replace � �� ��<br />
Differential oil level Check and top up �� �� ��<br />
Gearbox oil level Check and top up �� �� ��<br />
Screen washer fluid level Check and top up �� �� ��<br />
Screen washers Check operation and alignment �� �� ��<br />
Brake fluid Check level and top up �� �� �<br />
Coolant Check level and top up �� �� ��<br />
Coolant hoses Check for condition, leaks and security �� �� ��<br />
Alternator drive belt Check tension and condition, replace if necessary �� �� ��<br />
Roller Barrels Check and set balance, idle and throttle pot settings �� �� ��<br />
Lights and bulbs Check all lights and replace bulbs as necessary �� �� ��<br />
Switchgear Check operation �� �� ��<br />
Wheel nut torques Check for tightness �� �� ��<br />
Clutch Check operation, adjustment & fluid level �� �� ��<br />
Handbrake operation Check and adjust �� �� ��<br />
Brake pads Check for wear, replace if necessary � �� ��<br />
CV gaitors Check condition � �� ��<br />
Tyres Check condition and pressure �� �� ��<br />
Seatbelts and harnesses Check for condition and operation � �� ��<br />
Horn Check �� �� ��<br />
Wipers Check condition and operation, replace if necessary � �� ��<br />
Steering joints and gaitors Check � �� ��<br />
Wheel bearing end float Check and adjust � �� ��<br />
Brake hoses Check condition and for leaks �� �� ��<br />
Brake discs Check for condition and wear � �� ��<br />
ECU diagnostics Check if possible �� �� ��<br />
Battery Check security, condition and connections, top up � �� ��<br />
Headlight alignment Check and adjust �� � ��<br />
Exhaust system Check mountings and exhaust condition � � ��<br />
Spark plugs Replace � � �����<br />
Suspension security Check and retorque bolts �� � ��<br />
Suspension bushes Check and replace if necessary � � ��<br />
Front wheel alignment Check and adjust if necessary �� � ��<br />
Brake pipes and unions Check for security and leaks �� � ��<br />
Brake fluid Replace � � ��<br />
Clutch Fluid Replace � � ��<br />
Engine mountings Check � � ��<br />
Air filter Clean, (change at 4 years) � � ����4�<br />
Wheel bearings Repack at 4 years � � ����4�<br />
Brake hoses Replace at 4 years � � ����4�<br />
Coolant Drain and replace at 4 years � � ����4�<br />
Fuel lines Check for security and leaks � � ����6�<br />
Cam belts Replace at 6 years or sooner if prefered ����6�<br />
Road test To check dampers, brakes, steering, instruments etc. �� �� ��<br />
4 - Items are required to be replaced every 4 years 6 - Items are required to be replaced every 6 years<br />
For prices Please contact aftersales<br />
41
SERVICE RECORD continued<br />
43
SERVICE RECORD continued<br />
44
CAMBELT REPLACEMENT<br />
FACTORY UPGRADE RECORD<br />
45
FACTORY UPGRADE RECORD<br />
46