

How to build your own watermaker - Westward II
How to build your own watermaker - Westward II
How to build your own watermaker - Westward II

You also want an ePaper? Increase the reach of your titles
YUMPU automatically turns print PDFs into web optimized ePapers that Google loves.
<strong>How</strong> <strong>to</strong> <strong>build</strong> <strong>your</strong> <strong>own</strong> <strong>watermaker</strong>.<br />
Build a 20, 40 or even 80 gallon per hour unit <strong>your</strong>self!<br />
By Leo Litchfield.<br />
"Water, water, everywhere and not a drop <strong>to</strong> drink." <strong>How</strong> many a hapless sailor has not lamented this cruel paradox? Well, not <strong>to</strong><br />
worry because with modern technology we can make pure, fresh, high quality drinking water from otherwise unpalatable<br />
seawater. Now, you could go out and spend a fortune on a ready made unit but if you're like me, and don't have deep pockets, you<br />
probably can't justify spending so much on a "luxury" item. Sure, there are some <strong>watermaker</strong>s on the market that are in the $2000<br />
range but these are all "survival" type units that make only 1 or 2 gallons per hour and need <strong>to</strong> be run for many hours a day <strong>to</strong><br />
keep up with even modest water use, and would have <strong>to</strong> be run non-s<strong>to</strong>p for several days <strong>to</strong> fill an average sized boat's tank. There<br />
is however, another alternative. For about the same amount of money you would spend on a "survival" unit, you can <strong>build</strong> <strong>your</strong><br />
<strong>own</strong> <strong>watermaker</strong> that makes over 20 gallons per hour! That means you could fill <strong>your</strong> tanks completely in a couple of hours<br />
instead of a couple of days. Plus, if you <strong>build</strong> it <strong>your</strong>self you will know how <strong>to</strong> repair it <strong>your</strong>self, which will save you time and<br />
money in the long run. Also, <strong>build</strong>ing <strong>your</strong> <strong>own</strong> system will enable you <strong>to</strong> place the various parts almost anywhere in the boat so<br />
you can use some of that otherwise unusable space that most boats seem <strong>to</strong> have.<br />
Let's get started.<br />
Operating principles<br />
Let's start with the basics.<br />
Seawater contains about 10,500 <strong>to</strong> 14,000 parts per million (PPM) of <strong>to</strong>tal dissolved solids (TDS), mostly salt (the terms TDS and<br />
PPM are generally used interchangeably). Drinking water has less than 500 TDS. Watermakers make fresh water from saltwater<br />
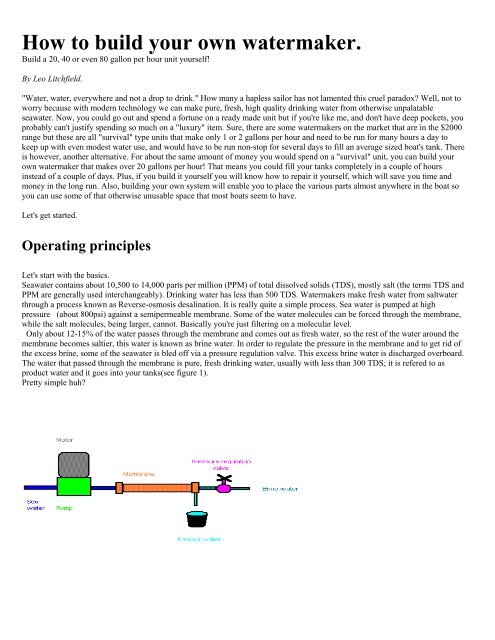
through a process kn<strong>own</strong> as Reverse-osmosis desalination. It is really quite a simple process. Sea water is pumped at high<br />
pressure (about 800psi) against a semipermeable membrane. Some of the water molecules can be forced through the membrane,<br />
while the salt molecules, being larger, cannot. Basically you're just filtering on a molecular level.<br />
Only about 12-15% of the water passes through the membrane and comes out as fresh water, so the rest of the water around the<br />
membrane becomes saltier, this water is kn<strong>own</strong> as brine water. In order <strong>to</strong> regulate the pressure in the membrane and <strong>to</strong> get rid of<br />
the excess brine, some of the seawater is bled off via a pressure regulation valve. This excess brine water is discharged overboard.<br />
The water that passed through the membrane is pure, fresh drinking water, usually with less than 300 TDS; it is refered <strong>to</strong> as<br />
product water and it goes in<strong>to</strong> <strong>your</strong> tanks(see figure 1).<br />
Pretty simple huh?
So far our system has an intake through-hull for seawater, a high-pressure pump, a membrane and pressure vessel(housing), a<br />
pressure regulation valve , a through-hull exit for brinewater and some hoses <strong>to</strong> connect everything.<br />
A complete system.<br />
A few more parts are needed <strong>to</strong> make the system more efficient and for maintenence and control purposes. These are, a supply<br />
pump, a sea strainer, a couple of pre-filters, a vacuum gauge, a high-pressure gauge, a bucket/seawater selecting valve, a tank/test<br />
selecting valve, a brine water overboard/bucket selecting valve, a cleaning and pickling bucket and a product water flow<br />
meter.(see figure 2)<br />
Figure 2<br />
The parts in detail<br />
Now let's review the individual parts and their roles in detail. The parts are listed in the order that the water flows through them.<br />
Part sources and prices will be listed seperately.<br />
Intake seacock/through-hull: You will need a 3/4-inch (minimum) ball-valve seacock/through-hull <strong>to</strong> supply the<br />
seawater for the system. I would recommend giving the <strong>watermaker</strong> its <strong>own</strong> through-hull <strong>to</strong> make sure the high-pressure pump<br />
gets enough water. This will help extend the life of the pump greatly.<br />
A typical seacock/through-hull.
Seawater feed-hose: I like <strong>to</strong> use wire-reinforced non-collapsable marine hose for connecting all the components between<br />
the intake through-hull and the inlet side of the high-pressure pump. Other types of hose can also be used as long as they are<br />
certified for use below the waterline. Don't forget <strong>to</strong> double clamp all hose connections below the water-line and make sure the<br />
hose-clamps you use are "all stainless"!<br />
Sea strainer: Just about any sea-strainer will work as long as the inlet and outlet sizes are at least 3/4 -inch size. The sea<br />
strainer will keep minnows, leaves and other debris out of the system.<br />
Plastic and bronze sea strainers.<br />
Bucket/seawater selecting valve: This is simply a Y-valve that allows you <strong>to</strong> draw water either from the intake throughhull<br />
or from a 5 gallon bucket. This is enables you <strong>to</strong> flush the <strong>watermaker</strong> after each use with 5 gallons of fresh water which<br />
greatly extends the life of the membrane and high-pressure pump. This also enables you <strong>to</strong> pickle and clean the system; more on<br />
this later. A plastic Y-valve like the Bosworth Sea-lect, model #BOS94AB34 will work fine.<br />
Y-valve
Supply pump: Also kn<strong>own</strong> as the feed pump, this pump is used <strong>to</strong> bleed air from all the components between the intake<br />
through-hull and the inlet side of the high-pressure pump. It is vital that the high-pressure pump never runs dry as this can cause<br />
serious damage <strong>to</strong> the pump. Also the high-pressure pump is not self-priming so it needs <strong>to</strong> have some pressure on the inlet side <strong>to</strong><br />
be most efficient. Some supply pumps, like the Jabsco Water Puppy (impeller type) are self-priming and can be mounted above<br />
the waterline but require the impeller <strong>to</strong> be checked/replaced periodically. Others, like the Jabsco Centri-Puppy (centrifugal type)<br />
are not self-priming and must be mounted below the waterline but require less maintenance. Make sure the supply pump you<br />
choose has the same or higher (preferably higher) flow rating as <strong>your</strong> high-pressure pump. The supply pump must be wired so that<br />
it can be switched on independently of the high-pressure pump for air bleeding.<br />
Pre-filters: These are the same as the canister filters you might see under <strong>your</strong> household sink; they have plastic housings and<br />
replaceable elements in various micron grades. These pre-filters are needed <strong>to</strong> filter out sediment and anything else that makes it<br />
through the sea strainer. I like <strong>to</strong> use 2 filters in series, the first with a 10 micron element and the second with a 5 micron element.<br />
Use only synthetic fiber filters; the paper ones don't last long in seawater. Again, make sure the inlets and outlets are at least 3/4<br />
inch. The filter elements can be cleaned several times before being replaced by rinsing them with clean water; try <strong>to</strong> flush them<br />
from the clean side out <strong>to</strong> the dirty side, making sure you don't contaminate the clean side. Note: Never clean the filter elements<br />
with chlorinated water! This includes municipal or "city" water. Chlorine, even in tiny amounts will ruin the membrane!<br />
Filter housings Filter elements
Vacuum gauge: A vacuum gauge plumbed in between the pre-filters and the high-pressure pump is very handy. If it shows<br />
vacuum, you know that the pre-filters are restricting the flow of seawater <strong>to</strong> the high-pressure pump. This means it's time <strong>to</strong> clean<br />
or change the filters. The vacuum gauge should be of the glycerin-filled type otherwise the needle will vibrate with the pulsing of<br />
the high-pressure pump's pis<strong>to</strong>ns making the gauge difficult <strong>to</strong> read.<br />
Vacuum gauge<br />
Note: The use of vacuum gauge is optional, just make sure you clean those filters regularly<br />
High-pressure pump: You will need a high-pressure pump of the triple-plunger positive-displacement type that can flow<br />
about 3 or 4 gallons per minute (GPM) and at least 1000 psi . Cat pumps makes some of the best pumps available and several of<br />
their models fit the bill. Models 247 and 277 are ideal, they have nickel-aluminum-bronze heads for great corrosion resistance and<br />
flow 3.6 and 4.25 GPM respectively. Models 241 and 271 can also be used, they have stainless steel heads but cost significantly<br />
more and are more likely <strong>to</strong> suffer from electrolysis and corrosion. Models 247 and 277 are ideal for belt drive applications<br />
however there are other models more suited <strong>to</strong> being driven directly off an electric mo<strong>to</strong>r. Cat pumps, although very reliable, are<br />
noisy and cause alot pulsation (vibration) in the hose between the high-pressure pump and the membrane(s)(see High-pressure<br />
hose below) so if you are willing <strong>to</strong> spend more, you may prefer Wanner engineering's Hydra-cell line of pumps. These very high<br />
quality pumps are vitually pulsation-free and can be configured for direct drive, or belt drive applications. Always follow the<br />
manufacturers recommendations for installation and maintenance of pumps.<br />
Cat pump Wanner Hydra-cell pump<br />
High-pressure hose: You will need high-pressure hoses between the high-pressure pump and the membrane(s) and<br />
between the membrane(s) and the high-pressure gauge and pressure regulation valve. To be safe you should only use hose that has<br />
a burst rating of at least 3000psi and is rated for water use. Aeroquip and Parker-Hannefin are two of the best brands of hoses and<br />
end-fittings. Bronze or stainless steel fittings are a must. You can have these hoses made at just about any hydraulic supply shop<br />
or, if you spend a little more, you can buy reuseable end-fittings that can be assembled with simple hand <strong>to</strong>ols. This will allow you<br />
<strong>to</strong> make <strong>your</strong> <strong>own</strong> hoses and replace any sections in the future as long as you bring a spare piece of hose the length of the longest<br />
section. When you go <strong>to</strong> the hydraulic supply shop <strong>to</strong> buy <strong>your</strong> hoses and fittings, make sure you bring <strong>your</strong> high-pressure pump,<br />
pressure vessel, pressure regulation valve and high-pressure gauge so that you get all the fittings you will need <strong>to</strong> connect them all<br />
<strong>to</strong>gether.
When the system is running, the hose between the high-pressure pump and the membrane(s) will vibrate intensely and must be<br />
protected from chafe where it comes in<strong>to</strong> contact with anything, including bulkheads, wiring, the hull etc. Making a few coils in<br />
the hose can help dampen the vibation but be careful not <strong>to</strong> let the coils <strong>to</strong>uch as they will chafe on each other <strong>to</strong>o. A good way <strong>to</strong><br />
protect the hose and absorb vibration is <strong>to</strong> cover the hose with the foam pipe insulation available at hardware s<strong>to</strong>res. Secure the<br />
insulation with zip-ties.<br />
Hose with Aeroquip fittings<br />
Membrane and pressure vessel: The membrane is the long, tubular part against which the seawater is pumped at high<br />
pressure. The membrane sits in a housing kn<strong>own</strong> as the pressure vessel. Membranes come in various sizes with the most<br />
economical size being the 2.5 inch by 40 inch size. Using one 2.5"x40" membrane you can make about 20 gallons of fresh water<br />
per hour, use two and you can make over 40 GPH !!! If you are going <strong>to</strong> use two membranes it is best <strong>to</strong> connect them in series in<br />
order <strong>to</strong> keep the brine water flowing fast enough <strong>to</strong> flush the salt from the surface of the membrane .<br />
If you don't have space for 2.5"x40" membrane you could use the 2.5"x21" size although you will need 2 of them <strong>to</strong> make 20<br />
GPH and 4 <strong>to</strong> make 40 GPH. There are also 4"x21" and 4"x40" sizes available. Remember that the product water is only 12-15%<br />
of the water that the high-pressure pump has <strong>to</strong> handle(the rest goes overboard as brine) so if you used the 4"x40" membrane<br />
(which can make over 80 GPH) you would need a high-pressure pump that flows about 10 GPM like the Cat pumps model 1057.<br />
Pressure vessels come in different sizes <strong>to</strong> match the different membranes, they are available in fiberglass or stainless steel. The<br />
fiberglass ones are the best because you will never have <strong>to</strong> worry about them corroding. Pressure vessels come with either 3 or 4<br />
ports; a seawater inlet, a brine water outlet, and either 1 or 2 product water outlets. If you have a pressure vessel with 2 product<br />
water outlets, use the one that is most convenient and plug the other.<br />
High-pressure gauge: This gauge will allow you <strong>to</strong> moni<strong>to</strong>r the pressure in the pressure vessel. The gauge should be<br />
glycerin-filled and be able <strong>to</strong> read pressures as high as 1500 psi and should be rated for use with corrosive liquids. Plumb the
gauge between the brine water outlet of the pressure vessel and the pressure regulation valve using a T-fitting. You can use a<br />
stainless line or small high-pressure hose between the T-fitting and the gauge <strong>to</strong> put the gauge in a convenient location.<br />
High-pressure gauge<br />
Pressure regulation valve: This valve allows you <strong>to</strong> adjust the pressure in the pressure vessel by controlling the amount<br />
of brine water that is bled off. It also keeps the pressure steady should the pump speed fluctuate. The Cat pumps model # 7070 is a<br />
great choice.<br />
Cat pumps model #7070<br />
Brine water hose: Any good quality marine hose will do as long as it's at least 3/4 inch diameter because although the water<br />
d<strong>own</strong>-stream of the pressure regulation valve is not under much pressure it is still flowing at several gallons per minute.<br />
Brine water overboard/bucket selecting valve: A 3/4 inch Y-valve, plumbed between the pressure regulation<br />
valve and the overboard through-hull, is all that's required <strong>to</strong> enable you <strong>to</strong> switch between dumping the brine water overboard or<br />
in<strong>to</strong> a bucket. Why would you need <strong>to</strong> dump brine water in<strong>to</strong> a bucket? Well, you don't really, but sometimes it will be necessary<br />
<strong>to</strong> circulate a cleaning or pickeling solution through the system(see figure 2), more on this later. A plastic Y-valve like the<br />
Bosworth<br />
Sea-Lect Part # BOS94AB34 will work fine (same as Bucket/seawater selecting valve).<br />
Bosworth Sea-Lect
Brine water overboard through-hull: You will need a 3/4 inch diameter through-hull above the waterline <strong>to</strong><br />
discharge the brine water.<br />
Through-hull<br />
Product water hose: 3/8 inch drinking water hose will work fine because the product water is not under much pressure<br />
Product water hose<br />
Product water flow meter: This will tell you how much product water is being produced which indicate when <strong>to</strong> clean<br />
the membranes. The best and least expensive flowmeters are the variable area type, such as the Dwyer instruments model #<br />
MMA-33 or the slightly larger VFB81 . Plumb the flow meter between the product water exit port on the pressure vessel and the<br />
tank/test selecting valve.<br />
Typical flowmeter
Tank/test selecting valve: A Y-valve is needed in the product water line between the flow meter and <strong>your</strong> water tank so<br />
that you can taste or test the product water before it goes in<strong>to</strong> the tank. It may take several minutes of running time before the<br />
product water tastes good, or if you are using a tester, contains less than 500 ppm tds. It is very important that the flow of product<br />
water is never restricted or s<strong>to</strong>pped while the <strong>watermaker</strong> is running because doing so will damage the membrane. This means that<br />
the the water coming from the tank/test selecting valve while it is in the test position must be allowed <strong>to</strong> run; you could run it <strong>to</strong> a<br />
faucet on the galley sink as long as the faucet is secured in the open position so that it cannot inadvertantly be turned off, or you<br />
could just run a hose <strong>to</strong> the cleaning and pickeling bucket and let the water go in there <strong>to</strong> be disposed of later. You can use a Yvalve<br />
like the Conbraco model # 70-603-10.<br />
Conbraco model # 70-603-10<br />
POWER<br />
There are several ways <strong>to</strong> drive the high-pressure pump, each with it's pros and cons so let's review them.<br />
Engine driven: The high-pressure pump can be driven of the main engine using a belt. If you run <strong>your</strong> engine a few hours a<br />
week <strong>to</strong> charge <strong>your</strong> batteries or mo<strong>to</strong>r around you could be making water at the same time. You will need <strong>to</strong> devise a bracket <strong>to</strong><br />
mount the pump <strong>to</strong> the engine and, if <strong>your</strong> engine has V-belts, the bracket will need <strong>to</strong> be adjustable for belt tension. If <strong>your</strong><br />
engine has a serpentine belt it will also have a belt tensioner so <strong>your</strong> pump mounting bracket will not need <strong>to</strong> be adjustable. In<br />
order <strong>to</strong> engage and disengage the pump from the engine you will need an electromagnetic clutch like the ones on an au<strong>to</strong>motive<br />
A/C compressor, on the pump pulley. You will need figure out what size pulley <strong>to</strong> put on the pump so that you do not spin the<br />
pump <strong>to</strong>o fast with the engine at normal cruising rpm. Ideally you want the pump <strong>to</strong> turn between 1000 and 1500 rpm so if <strong>your</strong><br />
engine's cruising speed is 2000 rpm then you would need a pump pulley about 40% larger in circumference than the crankshaft<br />
pulley. This would give you a pump speed of 1200 rpm.<br />
Pros: No electric mo<strong>to</strong>r. No drain on the batteries. No genera<strong>to</strong>r required. Make water while you mo<strong>to</strong>r around.<br />
Cons: Engine must be running. Adjustable pump mounting bracket must be fabricated.<br />
Cat pump with electromagnetic clutch
Genera<strong>to</strong>r driven: If you have a decent size (diesel) genera<strong>to</strong>r on board and you use it regularly, <strong>your</strong> best bet may be <strong>to</strong><br />
belt-drive the high-pressure pump using the genera<strong>to</strong>r's engine. If you do this you can make electricity and water at the same time,<br />
without running <strong>your</strong> main engine and without having <strong>to</strong> rely on an electric mo<strong>to</strong>r <strong>to</strong> power the pump. This setup is otherwise the<br />
same as the Engine driven setup above.<br />
Pros: No electric mo<strong>to</strong>r. No drain on the batteries. Make electricity and water at the same time.<br />
Cons: Genera<strong>to</strong>r must be running. Adjustable pump mounting bracket must be fabricated<br />
120/240 volt: If you have a decent size (diesel) genera<strong>to</strong>r you can power the high-pressure pump using a 120 or 240 volt<br />
electric mo<strong>to</strong>r either directly, or with a belt and pulleys. High-pressure pumps can be purchased with the electric mo<strong>to</strong>rs already<br />
attached or, with a little ingenuity, using a flexible coupling or a belt and pulleys, you can drive the pump with almost any electric<br />
mo<strong>to</strong>r. You will need a mo<strong>to</strong>r with about 2.5 or 3 horsepower and if you are using a flexible coupling, you will need a mo<strong>to</strong>r that<br />
has the right rpm rating for the pump. If you are using a belt and pulleys you can use different sized pulleys on the pump and<br />
mo<strong>to</strong>r <strong>to</strong> achieve the right pump rpm. You will need <strong>to</strong> mount the pump and mo<strong>to</strong>r on a metal plate and make the mounting holes<br />
of one of them slotted so that you will be able <strong>to</strong> tighten the belt.<br />
Pros: Pump can be placed anywhere.<br />
Cons: Genera<strong>to</strong>r must be running<br />
After you have decided how <strong>to</strong> power the pump, and acquired the main components of the system, you will need <strong>to</strong> choose the<br />
best place <strong>to</strong> put each one and fabricate the necessary brackets <strong>to</strong> mount the high-pressure pump and/or mo<strong>to</strong>r. Once that is done<br />
you will need <strong>to</strong> determine the length of the various hoses and head d<strong>own</strong> <strong>to</strong> <strong>your</strong> local hydraulic supply s<strong>to</strong>re with <strong>your</strong> highpressure<br />
pump, pressure vessel(s) high-pressure gauge, and pressure regulation valve <strong>to</strong> pick up the various fittings needed <strong>to</strong><br />
connect everything and, have <strong>your</strong> hoses made(unless you are making <strong>your</strong> <strong>own</strong>). The fittings needed for the low-pressure portion<br />
of the system are available at any good hardware s<strong>to</strong>re and/or <strong>your</strong> local marine supply s<strong>to</strong>re<br />
WIRING<br />
Wiring for the system is fairly simple. For engine driven applications you will need two switches, one <strong>to</strong> activate the<br />
electromagnetic clutch and another for the supply pump. Follow the manufacturers instructions for wiring the supply pump but go<br />
a size or two larger(numericaly smaller) than the recommended wire size. Then wire the switch for the electromagnetic clutch in<strong>to</strong><br />
the "switched" side of the supply pump circuit so that it will be impossible for the clutch <strong>to</strong> be engaged unless the supply pump is<br />
running. In other words, the supply pump switch will also supply power <strong>to</strong> the electromagnetic clutch switch.
If you are using a 120/240 volt mo<strong>to</strong>r you will also need two switches, one for the supply pump and one for the 120/240 volt<br />
mo<strong>to</strong>r. Use a relay, powered by the supply pump switch, <strong>to</strong> break the 120/240 volt circuit so that the high-pressure pump cannot<br />
run without the supply pump running. Make sure the switches and relay you use are rated for the voltage and amperage used.<br />
Caution: If you are not familiar with A/C electrical systems you should let a qualified electrician handle this part of the job; a<br />
mistake here could kill you!<br />
MAKING WATER<br />
Before firing up <strong>your</strong> new creation make certain the through-hull is open, the bucket/seawater selecting valve is in the "seawater"<br />
position, the tank/test selecting valve is in the "test" position and the pressure regulation valve is backed all the way out.<br />
Next, you will need <strong>to</strong> get all the air out of the system; <strong>to</strong> do this, switch on the supply pump and watch the brine water outlet.<br />
When a steady stream of water with no bubbles comes from the brine water outlet(this may take several minutes the first time or<br />
after filter changes), switch on the high-pressure pump. Now check that the needle on the high pressure gauge is steady; if it<br />
jumps around you still have air in the system and should switch off the high-pressure pump and let the supply pump run for a few<br />
more minutes before trying again(if you still get air, it may be entering the system via a leak somewhere between the intake<br />
through-hull and the high-pressure pump; the culprit is often a seal on one of the pre-filters or the lid of the sea strainer). With the<br />
high-pressure pump running and the needle of the high-pressure gauge steady, adjust the pressure regula<strong>to</strong>r until the pressure<br />
reads 800 psi. After a minute or so, you should see product water coming from the "test" port of the tank/test selecting valve.<br />
New membranes come from the manufacturer soaked in formaldehyde so it is important that you run the <strong>watermaker</strong> for an hour<br />
before testing or tasting the product water.<br />
Normally you would only need <strong>to</strong> run the <strong>watermaker</strong> for a few minutes before testing or tasting the water. Once the water passes<br />
the test you can turn the tank/test selecting valve <strong>to</strong> the "tank" position and fill <strong>your</strong> tanks.<br />
TESTING PRODUCT WATER<br />
There are two ways <strong>to</strong> test the salinity of the product water. You can use a TDS meter, available on Ebay for under $20 for a basic<br />
model <strong>to</strong> $130 for a fancy one, or you can just taste it. The average person can taste as few as 1000 PPM of salt in water.<br />
TDS meters... FLUSHING<br />
To shut d<strong>own</strong> the <strong>watermaker</strong>, turn the tank/test selecting valve back <strong>to</strong> the "test" position and fill the 5 gallon cleaning and<br />
pickeling bucket with product water, then slowly adjust the pressure regula<strong>to</strong>r back <strong>to</strong> the no-pressure position. When the highpressure<br />
gauge reads zero, switch off the high-pressure pump but leave the supply pump running. Now put the "bucket" hose<br />
coming from the bucket/seawater selecting valve in<strong>to</strong> the bucket (see figure 2) and turn the valve from the "seawater" <strong>to</strong> the<br />
"bucket" position. When the water in the bucket gets about 1/3 <strong>to</strong> 1/2 way d<strong>own</strong>, switch on the high-pressure pump again (leave<br />
the pressure regula<strong>to</strong>r in the no-pressure position) until there are only a few inches of water left in the bucket, then switch off the
high-pressure pump followed by the supply pump. Remember, air bubbles can damage the high-pressure pump so keep the hose<br />
in the bot<strong>to</strong>m of the bucket during the flushing procedure. Finally, close the through-hull. Flushing the <strong>watermaker</strong> with fresh<br />
water after each use will greatly increase the life of the pumps and membrane(s). Note: Never flush the <strong>watermaker</strong> with<br />
chlorinated water! This includes municipal or "city" water. Chlorine, even in tiny amounts will ruin the membrane!<br />
PICKLING<br />
If you are going <strong>to</strong> leave the <strong>watermaker</strong> unused for more than a couple of weeks you will need <strong>to</strong> pickle it. This will keep<br />
biological growth from developing in the membrane. Biological growth can reduce the amount water produced, cause the water <strong>to</strong><br />
smell like sulfur and ruin the membrane in severe cases.<br />
To pickle the system you will meed some sodium metabisulfite and about 4 gallons of product water. Sodium metabisulfite is an<br />
antiseptic chemical that has many uses, including pho<strong>to</strong>graphy, wine making, dyes, textiles, food preservative, bleaching wool,<br />
antiseptic, and sterlizing in the brewing industry. Sodium metabisulfate is readily available at chemical supply houses, s<strong>to</strong>res<br />
that carry home brewing supplies and on the internet including on Ebay. In order <strong>to</strong> pickle the system you must first flush it, then<br />
remove the filter elements from the pre-filter housings, fill the housings with product water and put them back <strong>to</strong>gether without<br />
the elements. Then mix 8 tablespoons of sodium metabisulfite with 4 gallons of product water in <strong>your</strong> cleaning and pickeling<br />
bucket. Next, turn the bucket/seawater selecting valve and the brine water overboard/bucket selecting valve both <strong>to</strong> the "bucket"<br />
position, put the hoses in the bucket and switch on the supply pump(the tank/test valve should still be in the test position). When<br />
all the air is out of the system turn on the high-pressure pump and let it run for 5 minutes(the pressure regulation valve should still<br />
be in the no-pressure position). Then switch off the pumps and turn all three valves <strong>to</strong> the closed position. The system should be<br />
pickeled again every three months when not in use. The next time you use the <strong>watermaker</strong> you should let it run for about 45<br />
minutes before tasting the product water or putting in<strong>to</strong> <strong>your</strong> tank <strong>to</strong> get rid of the sodium metabisulfate (s<strong>to</strong>re the sodium<br />
metabisulfate in a clearly marked container, away from the reach of children as it is <strong>to</strong>xic in large doses).<br />
CLEANING<br />
If you avoid operating <strong>your</strong> <strong>watermaker</strong> in polluted water and always flush it properly with product water, you will rarely need <strong>to</strong><br />
clean the membrane. <strong>How</strong>ever, even in ideal operating conditions the membrane can become fouled with biological growth,<br />
mineral scale and/or organic matter which will reduce efficiency. In order <strong>to</strong> help you maintain <strong>your</strong> <strong>watermaker</strong> you may find it
helpful <strong>to</strong> make a small maintenance logbook, in which you would record system hours, seawater temperature(see<br />
TEMPERATURE next page), product water flow rate and filter change dates. If <strong>your</strong> product water flow rate drops more than<br />
10% (taking in<strong>to</strong> account temperature) it's time <strong>to</strong> clean the membrane(s). There are several companies producing many types of<br />
products used <strong>to</strong> clean membranes, although most of them fall in<strong>to</strong> one of two categories. Alkaline cleaners are used <strong>to</strong> remove<br />
organic matter including biological growth(if it's not <strong>to</strong>o bad). Acid cleaners are used <strong>to</strong> remove inorganic matter such as mineral<br />
scale or iron deposits.You would normally use one cleaner and then the other; do not mix them! The cleaning procedure will be<br />
similar <strong>to</strong> the pickling procedure above, however, be sure <strong>to</strong> follow the manufacturers directions closely as they vary from one<br />
brand <strong>to</strong> another and the chemicals involved are <strong>to</strong>xic and can produce noxious fumes.<br />
A good source for cleaning products is Koch Membrane Systems, they make some great cleaning products that are easy <strong>to</strong> use.<br />
TEMPERATURE<br />
Keep in mind that the amount of product water produced, increases with feedwater temperature. <strong>How</strong>ever, the <strong>watermaker</strong> should<br />
not be used if the feedwater is warmer than 100°F (38°C) because the membrane will be damaged. The standard temperature for<br />
rating the product water output of membranes is 77°F (25°C) so if you are in colder water, the result is less than the rated amount<br />
of product water; if you are in warmer water, more. (See the chart below) The temperature of the feedwater also affects the<br />
salinity of the product water, so if you are using a TDS meter you will notice that <strong>your</strong> TDS readings will go up slightly in warmer<br />
waters.<br />
Percent of rated<br />
Feedwater temperature product water produced<br />
40°F 4°C 38%<br />
50°F 10°C 54%<br />
60°F 15°C 70%<br />
70°F 21°C 90%<br />
77°F 25°C 100%<br />
80°F 28°C 108%<br />
90°F 32°C 127%<br />
100°F 38°C 147%