The Rainbow Vol. 09 No. 01 - August 1989 - TRS-80 Color ...
The Rainbow Vol. 09 No. 01 - August 1989 - TRS-80 Color ...
The Rainbow Vol. 09 No. 01 - August 1989 - TRS-80 Color ...

You also want an ePaper? Increase the reach of your titles
YUMPU automatically turns print PDFs into web optimized ePapers that Google loves.
DESKTOPH and Epso n-compatible printers.<br />
Your DESKTOPH program w ill have to be<br />
altered to work w ith DRIVERHT or DRIV<br />
E RH E, by merging with it one of four patch<br />
program s - HALTER, HAL TERD , HAL TERE ,<br />
and HAL TERDE - of Listings 3, 4, 5 and 6,<br />
res pective ly . W hich one of the patch programs<br />
you mu st merge w ith DESKTOPH<br />
depend s on what version of th at program<br />
you are using. Prese ntly, there are effectively<br />
four different ve rsions of DESKTOPH .<br />
<strong>The</strong>se different ve rsions are an outgrowth<br />
of sel ling to m any tlESKTOPH use rs a builtin<br />
sc reen dump, enhancements or both. <strong>The</strong><br />
four versions are as follows :<br />
e V ersion I - <strong>The</strong> ori ginal DESKTOPH<br />
w ith 2, I 0 or 19 fonts, w ith or w ithout the<br />
word processor input feature introduced in<br />
<strong>The</strong> Desktop Publisher: A Reprise (September<br />
'88 iss ue of THE RA INBOW).<br />
• V ersion 2 - L ike Version I with the<br />
exception th at a patch program merged<br />
with DESKTOPH gives the 0 command sc reen<br />
clump capabi lities .<br />
• Version3-Like V ersion l , but a patch<br />
program merged w ith DESKTOPH prov ides<br />
so me new command s.<br />
• Version 4-A combinati on ofVersions<br />
2 and 3.<br />
<strong>The</strong> programs HALTER, HAL TERD , HAL <br />
TERE , and HALTERDE are assoc iated w ith<br />
V ersions I , 2, 3 and 4 res pectively, of<br />
DESKTOPH . Each of these patch program s<br />
gives the 0 command of DESKTOPH the<br />
ability to transfer co ntrol to ORIVERHT or<br />
DRIVERHE . Those of you with Epson or<br />
Epson-compatible printers w ill have to<br />
change Line 725 of the patch program<br />
assoc iated w ith your version of DESKTOPH .<br />
ln that line you w ill ha ve to replace DR I v<br />
ERHT with DR!VERHE .<br />
Each patch program ex pand s the powers<br />
of the 0 command further. It adds an<br />
option to the 0 co mmand allowing you to<br />
look at the directory of the disk in Dri ve 0.<br />
For later prinring, you w ill be sav ing eight<br />
or 12 sc ree ns on disk by mea ns of the Save<br />
Screen option of th e 0 command. To keep<br />
trac k of what f iles are already on the disk,<br />
you may occasionally need to use the directory<br />
option of the 0 command. Each patch<br />
program gives DESKTOPH the ability, by<br />
means of the 0 and I commands. to add ress<br />
drives when sav ing and l oad ing sc reen<br />
fi les. If you have more th an one drive, you<br />
may want to save sc reen f iles on a disk in a<br />
drive other than Drive 0. You should then<br />
append to DIR in Line 725 a drive number<br />
1, 2 or 3 correspond ing to th e dri ve you<br />
intend to employ. Some of you hav ing<br />
Version 2 or Version 4 of DESKTOPH may<br />
need to change L ine 725 , by rep lac ing<br />
THENCLS : EXEC&Hl49 w ith the BAS IC com-<br />
mands in the corres ponding part of L ine<br />
725 of your present DESKTOPH . For instance,<br />
many of you using HDUMP10 5 sc reen clump<br />
need to make the replacement:<br />
THENCLS : PRJNT#-2,CHR$(27) : CHR$(20<br />
: EXEC&Hl32A.<br />
When you have typed the patch program<br />
for DESKTOPH and made, if neeclecl , any of<br />
the discussed chan ges in L ine 725 , save it<br />
in ASCII f ormat. For example, to save<br />
HAL TERD in ASCII fo rm at, type :<br />
SAVE " HALTERD " , A and press ENTER.<br />
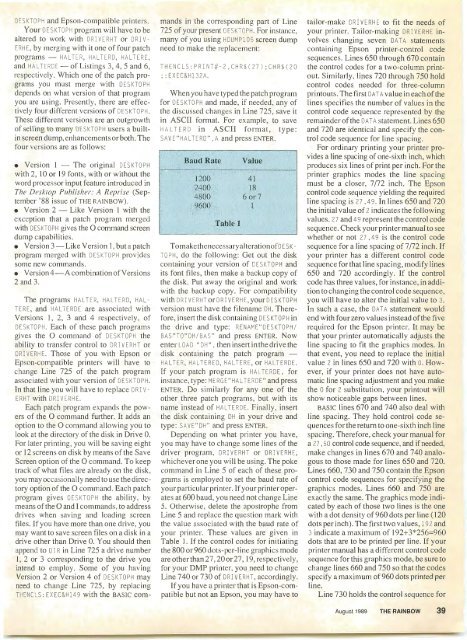
Baud Rate<br />
1200<br />
2400<br />
4<strong>80</strong>0<br />
9600<br />
Table 1<br />
Value<br />
4 1<br />
18<br />
6 or 7<br />
I<br />
Tomakethenecessarya lterat ionofD ESK <br />
TOPH, do the fo llowing: Get out the disk<br />
containing your version of DESK TOP H and<br />
its font fi les, then make a backup copy of<br />
th e disk. Put away the ori ginal and work<br />
w ith the back up copy. For compatibility<br />
w ith 0 RIVE RHT or OR [ V ERH E, your DES KTO PH<br />
version must have the fi lename DH . <strong>The</strong>refore,<br />
inse rt th e disk co ntaining DESKTO PH in<br />
the dri ve and type: RENAME " DESKTOPH/<br />
BAS " TO '' OH/BAS " and press ENTER . <strong>No</strong>w<br />
enter LOAD " OH " , then insert in the drive the<br />
disk containing the patch program -<br />
HALTER . HALTERED, HAL TERE, or HAL TERDE .<br />
If your patch program is HA L TERDE . for<br />
instance, type: MERGE " HAL TERDE " and press<br />
ENTER . Do similarl y for any one of the<br />
other three patch pmgrams, but w ith its<br />
name instead of HAL TERDE . Finally, insert<br />
the disk containing DH in your drive and<br />
type: SAVE " DH" and press ENTER.<br />
Depend ing on what pri nter you have,<br />
you may have to change some lines of th e<br />
dri ve r program , ORIVERHT or DRIVERHE,<br />
whichever one you will be using. <strong>The</strong> poke<br />
command in Line 5 of eac h of these programs<br />
is employed to set the baud rate of<br />
your particul ar printer. If your prin ter operates<br />
at 600 baud, you need not change Line<br />
S. Otherwise, delete the apos trophe from<br />
L ine 5 and replace the qu estion mark w ith<br />
the va lue assoc iated w ith the baud rate of<br />
your printer. <strong>The</strong>se va lues are gi ven in<br />
T able I . If the control codes for initiating<br />
the <strong>80</strong>0 or 960 dots- per- line graph ics mode<br />
are otherthan 27,20 or 27 , 19, res pectively,<br />
for your DMP printer, you need to change<br />
L ine 740 or 730 of DRI vE RHT , accordingly.<br />
If you have a printer that is Epson-compatible<br />
but not an Epson, you may have to<br />
tailor-make DRI VER HE to fit the needs of<br />
your printer. Tailor-m aking DRIVERHE involves<br />
changing seven DATA statements<br />
containing Epson printer-co ntrol code<br />
sequences. Lines 650 through 670 contain<br />
the control codes for a two-column printout.<br />
Similarl y, lines 720 through 750 hold<br />
control codes needed for three-colu mn<br />
printouts. <strong>The</strong> first DATA value in eac h of th e<br />
lines specifies the number of va lues in the<br />
control code sequence represented by the<br />
remainder of the DATA statement. Lines 650<br />
and 720 are identica l and spec ify the control<br />
code sequence for line spac ing.<br />
For ordinary printing your printer provides<br />
a line spacing of one-sixth inch, which<br />
produces six lines of print per inch. For the<br />
printer graphics modes the line spacing<br />
must be a closer, 7/72 inch. <strong>The</strong> Epson<br />
control code seq uence yielding the required<br />
line spaci ng is 27 . 49 . In lines 650 and 720<br />
the initial value of 2 indicates the following<br />
va lues. 27 ancl 49 represent the control code<br />
sequence. Chec k your printer manual to see<br />
w hether or not 27 . 49 is the control code<br />
sequence for a I ine spac ing of 7/72 inch. If<br />
your printer has a different control code<br />
sequence for that line spac ing, modify I ines<br />
650 and 720 accordingly. If the control<br />
code has three values, for instance, in addition<br />
to changing the control code sequence,<br />
you wi ll have to alter the initial value to 3.<br />
In such a case, the DATA statement would<br />
end with fou r zero values instead of the five<br />
required for the Epson printer. It may be<br />
that your printer automatically adjusts the<br />
line spacing to f it the graphics modes. In<br />
that event, you need to replace the initial<br />
va lue 2 in lines 650 and 720 w ith 0. However,<br />
if your printer does not have automatic<br />
line spacing adjustment and you make<br />
the 0 for 2 substitution, your printout w ill<br />
show noticeable gaps between lines.<br />
BAS IC lines 670 and 740 also dea l with<br />
line spacing. <strong>The</strong>y hold control code sequences<br />
for the return to one-sixth inch I ine<br />
spac ing. T herefore, check your manual for<br />
a 27 , 50 control code sequence, and if needed,<br />
make changes in lines 670 and 740 analogous<br />
to those made for I in es 650 and 720.<br />
Lines 660, 730 and 750 contain the Epson<br />
control code sequences for specifying the<br />
graphics modes. L ines 660 and 750 are<br />
exactl y the same. <strong>The</strong> graphics mode indicated<br />
by each of those two lines is the one<br />
w ith a dot density of960dots per line ( 120<br />
dots per inch). <strong>The</strong> fi rst two values, 192 and<br />
3 indicate a m ax imum of 192+ 3*256=960<br />
clots that are to be printed per line. If your<br />
printer manual has a different control code<br />
sequence for thi s graphics mode, be sure to<br />
change I ines 660 and 750 so th at the codes<br />
specify a maximum of960 dots printed per<br />
line.<br />
Line 730 holds the control seq uence for<br />
<strong>August</strong> <strong>1989</strong> THE RAINBOW 39