Starting Struts2 Ian Roughley
Starting Struts2 Ian Roughley
Starting Struts2 Ian Roughley

Create successful ePaper yourself
Turn your PDF publications into a flip-book with our unique Google optimized e-Paper software.
FREE ONLINE EDITION<br />
(non-printable free online version)<br />
If you like the book, please support<br />
the author and InfoQ by<br />
purchasing the printed book:<br />
http://www.lulu.com/content/813300<br />
(only $22.95)<br />
Brought to you<br />
Courtesy of<br />
This book is distributed for free on InfoQ.com, if<br />
you have received this book from any other<br />
source then please support the author and the<br />
publisher by registering on InfoQ.com.<br />
Visit the homepage for this book at:<br />
http://infoq.com/minibooks/starting-struts2
<strong>Starting</strong> <strong>Struts2</strong><br />
Written By:<br />
<strong>Ian</strong> <strong>Roughley</strong>
© 2006 C4Media Inc<br />
All rights reserved.<br />
C4Media, Publisher of InfoQ.com.<br />
This book is part of the InfoQ Enterprise Software Development series<br />
of books.<br />
For information or ordering of this or other InfoQ books, please contact<br />
books@c4media.com.<br />
No part of this publication may be reproduced, stored in a retrieval<br />
system or transmitted in any form or by any means, electronic,<br />
mechanical, photocopying, recoding, scanning or otherwise except as<br />
permitted under Sections 107 or 108 of the 1976 United States<br />
Copyright Act, without either the prior written permission of the<br />
Publisher.<br />
Designations used by companies to distinguish their products are<br />
often claimed as trademarks. In all instances where C4Media Inc. is<br />
aware of a claim, the product names appear in initial Capital or ALL<br />
CAPITAL LETTERS. Readers, however, should contact the<br />
appropriate companies for more complete information regarding<br />
trademarks and registration.<br />
Managing Editor: Diana Plesa<br />
Cover art: Dixie Press<br />
Composition: Dixie Press<br />
Library of Congress Cataloguing-in-Publication Data:<br />
ISBN: 978-1-4303-2033-3<br />
Printed in the United States of America
Acknowledgements<br />
This book would never have been possible without the tireless<br />
effort of all the developers of WebWork, XWork and <strong>Struts2</strong>.<br />
For my transition from open source user to open source<br />
developer, I would like to thank Patrick Lightbody and Jason<br />
Carreira.<br />
To the technical reviewers – Don Brown, Philip Luppens and<br />
Rene Gielen – many thanks for providing the final adjustments<br />
on a moving target. I would like to acknowledge and thank both<br />
Jim Krygowski and James Walker for taking time out of their<br />
busy schedules to provide an impartial judgment on the<br />
continuity and content from a non-<strong>Struts2</strong> perspective. With<br />
their assistance, the readers experience has improved without a<br />
doubt. I would like to thank Floyd Marinescu for his<br />
confidence, and for providing writing opportunities in both<br />
online and published formats.<br />
I would also like to thank my remarkable wife LeAnn (a.k.a.<br />
STR Worldwide). Her continuing support and ongoing review<br />
and non-geek analysis of the manuscript has been invaluable.<br />
iii
Contents<br />
INTRODUCTION 1<br />
WHERE STRUTS2 FITS INTO THE WEB PARADIGM 5<br />
Servlets 6<br />
JSP and Scriptlet Development 6<br />
Action-Based Frameworks 7<br />
Component-Based Frameworks 7<br />
The Great Equalizer – Ajax 8<br />
CORE COMPONENTS 11<br />
Configuration 12<br />
Actions 19<br />
Interceptors 25<br />
Value Stack / OGNL 29<br />
Result Types 31<br />
Results / View Technologies 33<br />
ARCHITECTURAL GOALS 37<br />
Separation of Concerns 37<br />
Loose Coupling 39<br />
Testability 40<br />
Modularization 44<br />
Convention over Configuration 47<br />
PRODUCTIVITY TIPS 49<br />
Re-Using Action Configurations 50<br />
Use Pattern Matching Wildcards in Configurations 51<br />
Utilize Alternate URI Mapping Schemes 52<br />
Know Interceptor Functionality 55<br />
Use Provided Interceptor Stacks 58
Take Advantage of Result Types 60<br />
Utilize Data Conversion 61<br />
Utilize Tabular Data Entry Support 63<br />
Expose Domain Models in the Action 65<br />
Use Declarative Validation Where Possible 66<br />
Move CRUD Operations into the same Action 70<br />
Use Annotation Where Possible 73<br />
Options for View Technologies 79<br />
Know the Provided Tag Libraries and their Features 81<br />
Customize UI Themes 87<br />
Use Global Results for Common Outcomes 89<br />
Manage Exception Handling Declaratively 89<br />
Internationalization 92<br />
INTEGRATING WITH OTHER TECHNOLOGIES 97<br />
Page Decoration and Layout 98<br />
Business Services / Dependency Injection 100<br />
Databases 103<br />
Security 104<br />
Ajax 107<br />
ABOUT THE AUTHOR 109<br />
END NOTES 111
Free Online Version.<br />
Support this work, buy the print copy:<br />
http://infoq.com/minibooks/startingstruts2<br />
1<br />
1<br />
Introduction<br />
Developing web application in Java has come a long way since<br />
the first servlet specification was released in 1997. Along the<br />
way we have learned a lot and, more than a few times, we’ve<br />
improved the ways we develop web applications. Apache Struts<br />
was one of those times that we made a significant stride beyond<br />
what was currently available.<br />
Apache Struts was launched in May 2000 by Craig McClanahan,<br />
with version 1.0 officially released in July 2001. Technically it<br />
was an evolutionary step forward in web development but, more<br />
importantly, it came at the right time. Web development had<br />
been around long enough for many large projects to be built and<br />
enter maintenance phases, and for lessons to have been learned<br />
about re-usability and maintenance. Adding to this heightened<br />
need for a better solution for web application development was<br />
the “dot com boom” – as Apache Struts came on the scene in<br />
2000, the number of web projects was dramatically increasing<br />
and it looked like there was no end in sight. The project was a<br />
welcome solution and become the de facto standard for web<br />
development for several years.<br />
<strong>Struts2</strong> i is the next generation of Apache Struts. The original<br />
proposal, Struts Ti, was born out of a need to evolve Struts in a<br />
direction that the code base did not easily lend itself to. Around<br />
the time of that proposal, there was a movement by Patrick<br />
Lightbody to bring together leaders on several different web<br />
frameworks with the goal of achieving a common framework.<br />
Although the movement lost momentum, a commonality<br />
between WebWork and the goals of Struts Ti at the technology
2 | STARTING STRUTS2<br />
and committer level was found, and the projects were merged<br />
with WebWork providing the base technology ii .<br />
When we speak about WebWork we are really referencing two<br />
projects – XWork and WebWork. XWork is a generic command<br />
framework. It provides many of the core features such as<br />
actions, validation and interceptors, and is completely execution<br />
context independent. XWork also provides an internal<br />
dependency inject mechanism that is used for configuration and<br />
factory implementation management.<br />
WebWork, on the other hand, is a completely context dependent.<br />
It provides a wrapper around XWork with the context that is<br />
needed when working on web applications, along with specific<br />
implementations that make web developer easier.<br />
The goal of <strong>Struts2</strong> is simple – to make web development easier<br />
for the developer. To achieve this goal <strong>Struts2</strong> provides features<br />
to reduce XML configuration via intelligent defaults, utilizes<br />
annotations and provides conventions over configuration.<br />
Actions are now POJOs which increases testability and reduces<br />
coupling in the framework, and HTML form field data is<br />
converted to proper types for the action to use. Still further<br />
decreasing coupling is request processing has been made more<br />
modular by allowing a series of interceptors (custom or <strong>Struts2</strong><br />
provided) to provide pre-processing and post-processing<br />
functionality. Modularity is a common theme – a plug-in<br />
mechanism provides a way to augment the framework; key<br />
classes with the framework can be replaced with custom<br />
implementations to provide advanced features not provided out<br />
of the box; tags can utilize a variety of different rendering<br />
themes (including custom themes); and there are many different<br />
result types available for performing after-action execution tasks<br />
which include, but are not limited to, rendering JSPs, Velocity<br />
and Freemarker templates. And finally, dependency injection is<br />
now a first class citizen – provided via the Spring Framework<br />
plug-in with an option for using Plexus, and work underway for<br />
PicoContainer.
INTRODUCTION | 3<br />
My goal with this book is to familiarize you with the <strong>Struts2</strong><br />
framework and provide you with a solid understanding of the<br />
components that make up the framework and the configuration<br />
options that are available. I will also introduce some ways to<br />
increase your productivity – including default configurations and<br />
implementation features to be aware of; different configuration<br />
options that are available; and development techniques. We will<br />
wrap-up with a discussion of various 3 rd party integrations.<br />
This is not a comprehensive guide to all the features of <strong>Struts2</strong>.<br />
Being a new project, <strong>Struts2</strong> is constantly evolving with ongoing<br />
changes, updates and new features. I urge you to take some time<br />
and visit the projects home page to discover options and features<br />
not covered in this book.<br />
This book refers to <strong>Struts2</strong> version 2.0.6.
2<br />
Where <strong>Struts2</strong> fits into the Web<br />
Paradigm<br />
Free Online Version.<br />
Support this work, buy the print copy:<br />
http://infoq.com/minibooks/startingstruts2<br />
There are many different web frameworks available for today’s<br />
developer. Some of these come from Open Source communities,<br />
some from commercial companies, and yet others are internally<br />
developed for the current web development needs. There are<br />
over 40 iii open source frameworks alone and, although this is a<br />
large number, there are probably as many again (if not<br />
significantly more) internally built frameworks deployed in<br />
production environments.<br />
With so many choices out there, why choose <strong>Struts2</strong>? Here are<br />
some of the features that may lead you to consider <strong>Struts2</strong>:<br />
� Action based framework<br />
� Mature with a vibrant developer and user community<br />
� Annotation and XML configuration options<br />
� POJO-based actions that are easy to test<br />
� Spring, SiteMesh and Tiles integration<br />
� OGNL expression language integration<br />
� Themes based tag libraries and Ajax tags<br />
� Multiple view options (JSP, Freemarker, Velocity and<br />
XSLT)<br />
� Plug-ins to extend and modify framework features<br />
Of all the decisions in choosing a framework, choosing the style<br />
of framework is going to be the most controversial. Let’s take a<br />
look at how we got to today’s web application options, and<br />
where <strong>Struts2</strong> fits into the picture.<br />
5
6 | STARTING STRUTS2<br />
Servlets<br />
Servlets provided the first Java-based foray in to web<br />
development. Following the HTTP protocol, servlets provide a<br />
way to map a URL to a special class whose methods would be<br />
called.<br />
It was quickly recognized that although this was a large step<br />
forward, generating the HTML code from within the Java code<br />
was a maintenance nightmare. Each time a simple user interface<br />
change was needed, the Java developer needed to modify the<br />
Servlet code, recompile the source and then to deploy the<br />
application into the server environment.<br />
JSP and Scriptlet Development<br />
As a result of this “maintenance nightmare,” the style of<br />
development was turned upside-down. Rather than placing the<br />
HTML code within the Servlet or Java code, the Java code was<br />
placed (as script-lets) inside the HTML code – as Java Server<br />
Pages (JSP). Each JSP provided both the logic for processing of<br />
requests, and the presentation logic.<br />
One problem was solved, but another was introduced. The Java<br />
code is the same as used in class files; however there is no<br />
structure of methods or classes. Looking through early JSP files,<br />
you would find one of two things:<br />
� Cut-and-pasted code – Java code that has been copied<br />
from one JSP, to another, and another, etc. Propagating<br />
any defects or errors from the original code, and<br />
increasing the amount of work required to make a<br />
common change.<br />
� Calling common Java formatting objects – common<br />
formatting or logic code was incorporated into a reusable<br />
object. Each JSP then used the common object.<br />
From these findings a best practice as well as a pattern emerged<br />
– use Java objects from JSPs.
WHERE STRUTS2 FITS INTO THE WEB PARADIGM | 7<br />
As the JSP specification evolved, tags were introduced to<br />
encapsulate re-usable java objects. Tags provided a HTML-like<br />
façade for accessing the underlying code, allowing designer<br />
(rather than developers) and IDEs to interact with dynamic<br />
elements to compose page layouts. Examples of the tags<br />
provided by JSP are and<br />
. Along with the provided JSP tag<br />
libraries, JSPs provided a way for developers to create their own<br />
tag libraries.<br />
Action-Based Frameworks<br />
Action based frameworks came onto the scene to combine the<br />
concepts of servlets and JSPs. The idea being to split the request<br />
processing for the page the user sees into processing logic and<br />
the presentation logic, letting each part do what it does the best.<br />
The implementation used a pattern from Smalltalk known as the<br />
model-view-controller pattern – or more recently known as the<br />
front controller, or in Sun parlance Model 2.<br />
In this pattern the servlet is the controller, providing a<br />
centralized point of control for all client page requests. It maps<br />
the request URL to a unit of work know as an action. The<br />
action’s job was to perform specific functionality for a given<br />
URL by accessing the HTTP session, HTTP request and form<br />
parameter, calling business services, and then mapping the<br />
response into a model, whose form is a plain old java object.<br />
Finally, the action returned a result, which was mapped (via<br />
configuration files) to a JSP to render as the view.<br />
<strong>Struts2</strong> is an action based MVC web framework.<br />
Component-Based Frameworks<br />
As web applications became more complex, it was realized that<br />
a page was no longer the logical separation – web applications<br />
had multiple forms per page, links for content updates and many
8 | STARTING STRUTS2<br />
other custom widgets – all which needed processing logic to<br />
perform their tasks.<br />
To address these complexities, component based frameworks<br />
have become popular. They provide a close tie between user<br />
interface components and classes that represent the components,<br />
and they are event-driven and more object orientated than action<br />
based frameworks. A component could be a HTML input field,<br />
a HTML form or custom widgets provided by or created for the<br />
framework. Events, such as form submits or links, are mapped<br />
to methods of the class representing the component, or to special<br />
listener classes. An additional benefit of component based<br />
frameworks is that they allow you to re-use components across<br />
multiple web applications. Examples of component based<br />
frameworks are JSF, Wicket and Tapestry.<br />
The Great Equalizer – Ajax<br />
In the beginning of 2005, a new fascination was starting in web<br />
development. Coined by Jesse James Garrett, Ajax stood for<br />
“Asynchronous JavaScript and XML.” Relatively speaking, the<br />
technologies were nothing new. In fact, the primary web<br />
browser components for making the asynchronous calls – the<br />
XMLHttpRequest Object – had already been available for 6 years<br />
(since version 5 of Internet Explorer).<br />
But what was new was the application of the technology.<br />
Google Maps was one of the first applications to take full<br />
advantage of the technology. The web page had come alive –<br />
you could interact with controls and widgets. By using a mouse<br />
you could scroll maps around the screen; when entering an<br />
address, the information would materialize above the maps<br />
images; and finally, the culmination being route planning which<br />
orchestrated all these features into a useable web application.<br />
And all of this happened without a single page refresh!<br />
User interfaces with Ajax functionality allows the web browser<br />
to make requests to the server for smaller amounts of
WHERE STRUTS2 FITS INTO THE WEB PARADIGM | 9<br />
information, and only when it is needed. The result from the<br />
server request is formatted or manipulated and applied directly<br />
to the page being displayed, with the web browser passing on the<br />
changes to the user. Only the sections of the page that changed<br />
are re-rendered, not the entire page, making the user feel that the<br />
web application is more responsive to their actions.<br />
The requests from the UI act like events – they are more<br />
discrete, conveying information for a single component or<br />
function. No longer does a single action need to retrieve data for<br />
the entire page, they can be more concise and thus more reusable<br />
across applications. In effect, an Ajax user interface<br />
calling an action based framework allows the action framework<br />
to behave in a similar manner to a component based framework.<br />
In fact, this combination of technologies provides a more<br />
loosely-coupled and more re-usable system. The same actions<br />
can provide JSON, XML or HTML fragment views for the Ajax<br />
components as well as being combined with other actions to<br />
provide HTML views for non-Ajax user interfaces.
Free Online Version.<br />
Support this work, buy the print copy:<br />
http://infoq.com/minibooks/startingstruts2<br />
3<br />
Core Components<br />
From a high level, <strong>Struts2</strong> is a pull-MVC (or MVC2)<br />
framework; this is slightly different from a traditional MVC<br />
framework in that the action takes the role of the model rather<br />
than the controller, although there is some overlap. The “pull”<br />
comes from the views ability to pull data from an action, rather<br />
than having a separate model object available.<br />
We have already spoken about what this means conceptually,<br />
but what does it mean at the implementation level? The Model-<br />
View-Controller pattern in <strong>Struts2</strong> is realized with five core<br />
components – actions, interceptors, value stack / OGNL, result<br />
types and results / view technologies.<br />
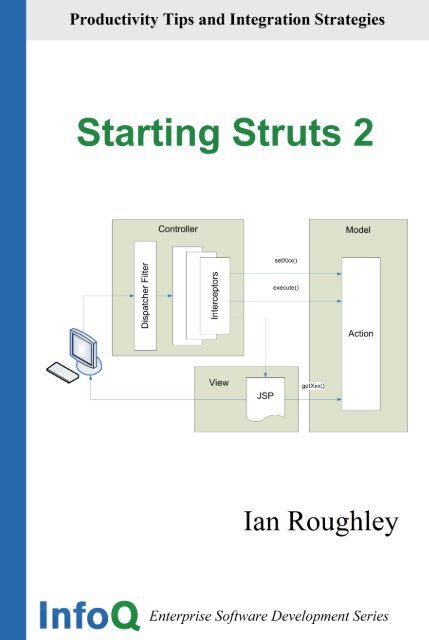
Figure 1: The MVC / <strong>Struts2</strong> Architecture<br />
11
12 | STARTING STRUTS2<br />
Figure 1 overlays the model, view and controller to the <strong>Struts2</strong><br />
high level architecture. The controller is implemented with a<br />
<strong>Struts2</strong> dispatch servlet filter as well as interceptors, the model is<br />
implemented with actions, and the view as a combination of<br />
result types and results. The value stack and OGNL provide<br />
common thread, linking and enabling integration between the<br />
other components.<br />
As we talk about the common components in the chapter, there<br />
will be a lot of information that relates to configuration.<br />
Configuration for the web application, as well as configuration<br />
for actions, interceptors, results, etc. Keep in mind that this<br />
explanation is to provide a background for what can be achieved,<br />
and may not be the most efficient way to configure applications.<br />
In subsequent chapters we will discuss easier and more<br />
productive ways to achieve the same goal, using convention over<br />
configuration, annotations and the zero configuration plug-in.<br />
Before we go into the details on the core components we will<br />
first talk about global configuration.<br />
Configuration<br />
Before configuring <strong>Struts2</strong>, you will first need to download the<br />
distribution or configure it as a dependency in your Maven2<br />
“pom.xml” file:<br />
<br />
org.apache.struts<br />
struts2-core<br />
2.0.6<br />
CORE COMPONENTS | 13<br />
Maven2 is a tool for managing the entire build process of a<br />
project – including compilation of code, running tests,<br />
generating reports and managing build artifacts. The most<br />
interesting aspect for developers is in managing build artifacts.<br />
Dependencies that your application has only need to be uniquely<br />
specified in the projects “pom.xml” configuration file using a<br />
groupId, artifactId and version. Before the artifact is<br />
needed, a local caching repository as well as remote<br />
organizational repositories and the standard ibiblio.com<br />
repositories are searched. If the artifact is found on a remote<br />
repository it is downloaded to the local cache and provided to<br />
the project. As well as the artifact you requested, any additional<br />
transitive dependencies that are needed by the requested artifact<br />
are also downloaded (assuming that they are in-turn specified in<br />
a “pom.xml” configuration file).<br />
<strong>Struts2</strong> is built with Maven2 and provides all the necessary<br />
transitive dependency configurations. For more information on<br />
Maven2, see the Apache web site at http://maven.apache.org.<br />
Once this is done, the configuration of a <strong>Struts2</strong> application can<br />
be broken into three separate files as shown in figure 2.
14 | STARTING STRUTS2<br />
Figure 2: Configuration file scope for framework elements<br />
The web application configuration for the FilterDispatcher<br />
servlet filter needs to be configured in your “web.xml” file:<br />
<br />
action2<br />
<br />
org.apache.struts2.dispatcher.FilterDispatcher<br />
<br />
<br />
<br />
action2<br />
/*<br />
<br />
That’s it for configuring a basic web application. What’s left is<br />
to customize the web application execution environment – which<br />
is done primarily in the “struts.properties” configuration file –<br />
and to configure the components for the web application, which<br />
is achieved via the “struts.xml” configuration file. We will now<br />
look at these two configuration files in more detail.
CORE COMPONENTS | 15<br />
The struts.properties File<br />
This configuration file provides a mechanism to change the<br />
default behavior of the framework. Generally you will not have<br />
a need to modify this file, the exception being when you want to<br />
enable a more friendly developer debugging environment. All<br />
of the properties contained within the “struts.properties”<br />
configuration file can also be configured using the “init-param”<br />
tag in the “web.xml”, as well using the “constant” tag in the<br />
“struts.xml” configuration file (we will talk about this tag’s<br />
usage in the next chapter).<br />
Properties that can be modified allow for changing Freemarker<br />
options – changing the action mapping class, determining<br />
whether XML configuration reloading should occur, what the<br />
default user interface theme is, etc. For the most up-to-date<br />
information on the properties take a looks at the <strong>Struts2</strong> wiki at<br />
http://struts.apache.org/2.x/docs/strutsproperties.html.<br />
A default properties file named “default.properties” is contained<br />
in the Strut2-Core JAR distribution. To enable modifications to a<br />
property, simply create a file called “struts.properties” in the root<br />
of your projects source files classpath. Then, add the properties<br />
that you wish to modify. The new values will now override the<br />
defaults.<br />
In a development environment, there are a couple of properties<br />
that you might consider changing:<br />
» struts.i18n.reload = true – enables reloading of<br />
internationalization files<br />
» struts.devMode = true – enables development mode<br />
that provides more comprehensive debugging<br />
» struts.configuration.xml.reload = true – enables<br />
reloading of XML configuration files (for the action)<br />
when a change is made without reloading the entire web<br />
application in the servlet container<br />
» struts.url.http.port = 8080 – sets the port that the server<br />
is run on (so that generated URLs are created correctly)
16 | STARTING STRUTS2<br />
The struts.xml File<br />
The “struts.xml” file contains the configuration information that<br />
you will be modifying as actions are developed, and we will talk<br />
in more detail about specific elements in the remaining sections<br />
in this chapter. For now, let’s review the structure that won’t<br />
change.<br />
Depending on the functionality of your application, it is possible<br />
to remove the “struts.xml” file from your application<br />
completely. The configurations that we will talk about in this<br />
chapter can be handled by alternative methods that include<br />
annotations, “web.xml” startup parameters, and alternate URL<br />
mapping schemes.<br />
The only configurations that still need the “struts.xml” file are<br />
global results, exception handling, and custom interceptor<br />
stacks.<br />
This is an XML file, so the first element is the XML versioning<br />
and encoding information. Next is the document type definition<br />
(or DTD) for the XML. The DTD provides information on the<br />
structure the elements in the file should have, and is ultimately<br />
used by XML parsers and editor.<br />
<br />
<br />
<br />
<br />
<br />
…<br />
CORE COMPONENTS | 17<br />
We now get to the tag. This is the outermost tag for<br />
the <strong>Struts2</strong> specific configuration. All other tags will be<br />
contained within this one.<br />
The Include Tag:<br />
The tag is used to modularize a <strong>Struts2</strong><br />
application by including other configuration files and is always a<br />
child of the tag. It contains only one attribute “file”<br />
that provides the name of the file to be included – which is a file<br />
that has exactly the same structure as the “struts.xml”<br />
configuration file. For example, if you wanted to break the<br />
configuration of a billing application, you might choose to group<br />
together the billing, admin and report configurations into<br />
separate files:<br />
<br />
<br />
<br />
<br />
…<br />
<br />
When including files, order is important. The information from<br />
the included file will be available from the point that the include<br />
tag is placed in the file. Hence, to use a tag that is configured in<br />
another file, the include configuration must occur before it is<br />
referenced.<br />
As well as the files that you explicitly include, there are some<br />
that are included automatically. These are the “strutsdefault.xml”<br />
and the “struts-plugin.xml” files. Both contains<br />
default configurations for result types, interceptors, interceptor<br />
stacks, packages as well as configuration information for the<br />
web application execution environment (which can also
18 | STARTING STRUTS2<br />
configured in the “struts.properties” file). The difference is that<br />
“struts-default.xml” provides the core configuration for <strong>Struts2</strong>,<br />
where “struts-plugin.xml” provides configurations for a<br />
particular plug-in. Each plug-in JAR file should contain a<br />
“struts-plugin.xml” file, all of which are loaded during startup.<br />
The Package Tag:<br />
The tag is used to group together configurations<br />
that share common attributes such as interceptor stacks or URL<br />
namespaces. Usually this consists of action configurations, but<br />
it may include any type of configuration information. It may<br />
also be useful to organizationally separate functions, which may<br />
be further separated into different configuration files.<br />
The attributes for this tag are:<br />
� name – a developer provided unique name for this<br />
package<br />
� extends – the name of a package that this package will<br />
extend; all configuration information (including action<br />
configurations) from the extended package will be<br />
available in the new package, under the new namespace<br />
� namespace – the namespace provides a mapping from<br />
the URL to the package. i.e. for two different packages,<br />
with namespace attributes defined as “package1” and<br />
“package2”, the URLs would be something like<br />
“/myWebApp/package1/my.action” and<br />
“/myWebApp/package2/my.action”<br />
� abstract – if this attribute value is “true” the package is<br />
truly configuration grouping, and actions configured will<br />
not be accessible via the package name<br />
It is important to make sure you are extending the correct parent<br />
package so that the necessary pre-configured features will be<br />
available to you. In most cases this will be the “struts-default”<br />
package from the “struts-default.xml” configuration file.<br />
However, when you are utilizing plug-ins it will be different. In
CORE COMPONENTS | 19<br />
this case, you will need to verify the needed parent package<br />
name with the plug-ins documentation.<br />
Configuration information that belongs within the package tag<br />
will be discussed as it comes up in the remaining sections of this<br />
chapter.<br />
There are two additional configuration elements that can be used<br />
within the tag. These are the and<br />
tags. These tags provide advanced ways to reconfigure<br />
the framework. We will talk about the usage and<br />
configuration of these tags in the next chapter when we talk<br />
about plug-ins.<br />
Actions<br />
Actions are a fundamental concept in most web application<br />
frameworks, and they are the most basic unit of work that can be<br />
associated with a HTTP request coming from a user.<br />
In <strong>Struts2</strong> an action can be used in a couple of different ways.<br />
Single Result<br />
The first, and most basic usage of an action, is to perform work<br />
with a single result always being returned. In this case, the action<br />
would look like this:<br />
class MyAction {<br />
}<br />
public void String execute() throws Exception {<br />
return "success";<br />
}<br />
A few things are worth noting. First, the action class does not<br />
need to extend another class and it does not need to implement<br />
any interfaces. As far as anyone is concerned, this class is a<br />
simple POJO.
20 | STARTING STRUTS2<br />
Second, the class has one method named “execute”. This name<br />
is the one used by convention. If you wanted to call it<br />
something other than “execute”, the only change needed would<br />
be in the actions configuration file. Whatever the name of the<br />
method is, it will be expected to return a String result code.<br />
The actions configuration will match the result code the action<br />
returned to a specific result that will be rendered to the user. If<br />
needed, the method can also throw an exception.<br />
The simplest configuration for the action looks like this:<br />
<br />
view.jsp<br />
<br />
The attribute “name” provides the URL information to execute<br />
the action, in this case a URL of “/my.action”. The extension<br />
“.action” is configured in the “struts.properties” iv configuration<br />
file. The attribute “class” provides the full package and class<br />
name of the action to be executed.<br />
Multiple Results<br />
The next, slightly more complicated use is when the action can<br />
return different results depending on the outcome of the logic.<br />
The class looks similar to the previous use:<br />
class MyAction {<br />
}<br />
public void String execute() throws Exception {<br />
if( myLogicWorked() ) {<br />
return "success";<br />
} else {<br />
return "error";<br />
}<br />
}
CORE COMPONENTS | 21<br />
Since there are now two different results that can be returned, we<br />
need to configure what is to be rendered back to the user for<br />
each case. Hence, the configuration will become:<br />
<br />
view.jsp<br />
error.jsp<br />
<br />
This introduces a new “name” attribute of the result node. In<br />
fact, it has always been there. The value (as in the first result<br />
configuration) defaults to a value of “success” if not provided by<br />
the developer.
22 | STARTING STRUTS2<br />
In the above sections we have seen the most common way<br />
to determine the result for an action. There are, however,<br />
four additional options available to you:<br />
1. The action method returns a String – the String<br />
returned matches an action configuration in the<br />
“struts.xml” configure file. This is shown in the<br />
example.<br />
2. The code behind plug-in is utilized – when the code<br />
behind plug-in is used, view templates are found by<br />
concatenating the action name with the result string<br />
returned from the action. For example, if the URL was<br />
“/adduser.action” and the action returned “success”, then<br />
“/adduser-success.jsp” would be rendered. More<br />
information on the code behind plug-in can be found at<br />
http://struts.apache.org/2.x/docs/codebehind-plugin.html.<br />
3. The @Result annotation is used – the action class can be<br />
annotated with a number of different results using the<br />
@Results and @Result annotations. The String<br />
returned from the action needs to match one of the<br />
configured annotated results.<br />
4. The action returns a Result class instance – the action<br />
does not need to return a String, instead it can return an<br />
instance of the Result class that is configured and ready<br />
to use.<br />
Result Types<br />
The results that are generated, and returned to the user from an<br />
action for different result values, do not all need to be the same<br />
type. The result “success” may render a JSP page, but the result<br />
“error” may need to send a HTTP header back to the browser.<br />
The type of the result (which will be discussed in more detail<br />
later in this chapter) is configured using the “type” attribute on<br />
the result node. Like the “name” attribute, there is a default<br />
value for this attribute – “dispatcher” – which will render JSPs.
CORE COMPONENTS | 23<br />
Most of the time you will use provided result types, but it is<br />
possible to provide custom implementations.<br />
Request and Form Data<br />
In order to make decisions about how the action should work,<br />
and to provide data for database persistent objects, the action<br />
may need to access values from the request string as well as the<br />
form data.<br />
<strong>Struts2</strong> follows the JavaBean paradigm – if you want access to<br />
data, you provide a getter and/or setter for the field. Providing<br />
access to the request string and form values is no different. Each<br />
request string or form value is a simple name value pair, so to<br />
assign the value for a particular name, a setter is created on the<br />
action. For example, if a JSP makes a call<br />
“/home.action?framework=struts&version=2” the action would<br />
need to provide a setter “setFramework( String frameworkName<br />
)” as well as a setter “setVersion( int version )”.<br />
Notice in this example that the setter does not always need to be<br />
a String value. By default, <strong>Struts2</strong> will convert from a String to<br />
the type on the action. This is done for all primitive types and<br />
basic object types, and can be configured for your own custom<br />
classes. <strong>Struts2</strong> will also handle the navigation of the value into<br />
more complex object graphs, i.e. for a name on a form element<br />
name of “person.address.home.postcode” and a value of “2”,<br />
<strong>Struts2</strong> will make the equivalent call<br />
“getPerson().getAddress().getHome().setPostcode(2)”.<br />
Accessing Business Services<br />
Up until now we have been concerned with the actions<br />
configuration, and how to control the rendering of a result back<br />
to the user for different result codes. This is an important part of<br />
what actions do but, before they return a result, some processing<br />
needs to be performed. For this, they need access to a variety of<br />
different objects – business objects, data access objects or other<br />
resources.
24 | STARTING STRUTS2<br />
To provide a loosely coupled system, <strong>Struts2</strong> uses a technique<br />
called dependency injection, or inversion of control v .<br />
Dependency injection can be implemented by constructor<br />
injection, interface injection and setter injection. <strong>Struts2</strong> uses<br />
setter injection. This means that to have objects available to the<br />
action, you need only to provide a setter. The preferred<br />
dependency injection framework is the Spring Framework,<br />
which is configured via a plugin. Another option is Plexus, or if<br />
you prefer you can supply your own implementation.<br />
There are also objects that are not managed by the spring<br />
framework, such as the HttpServletRequest. These are<br />
handled by using a combination of setter injection and interface<br />
injection. For each of the non-business objects there is a<br />
corresponding interface (known as an “aware” interface) that the<br />
action is required to implement.<br />
WebWork originally had its own dependency injection<br />
framework. It was in the 2.2 release that this feature was<br />
removed and replaced by the Spring Framework. The original<br />
component framework was based on interfaces, so for each<br />
component an interface and implementation class of the<br />
interface needed to be provided.<br />
In addition, each component had an “Aware” interface, which<br />
provided a setter for the component. If the interface was<br />
“UserDAO” the aware interface would be called<br />
“UserDAOAware” (by convention) and have one method – a<br />
setter “void setUserDAO( UserDAO dao );”.<br />
With the necessary interfaces and setters in place, interceptors<br />
will manage the injection of the necessary objects.
CORE COMPONENTS | 25<br />
Accessing Data from the Action<br />
At some point there will be a need to view objects that have been<br />
modified by the action. There are several techniques that can be<br />
used.<br />
A familiar technique for most web developers is to place the<br />
object that needs to be accessed in the HttpServletRequest or<br />
the HttpSession. This can be achieved by implementing the<br />
“aware” interface (letting the dependency injection to do its<br />
work) and then setting the object to be accessed under the<br />
required name.<br />
If you intend to use the built-in tag libraries or the included<br />
JSTL support, accessing the data is much easier. Both of these<br />
are able to directly access the action via the Value Stack. The<br />
only additional work for developers is to provide getters on the<br />
action that allows access to the objects that need to be accessed.<br />
We will talk more about the Value Stack in a later section.<br />
Interceptors<br />
Many of the features provided in the <strong>Struts2</strong> framework are<br />
implemented using interceptors; examples include exception<br />
handling, file uploading, lifecycle callbacks and validation.<br />
Interceptors are conceptually the same as servlet filters or the<br />
JDKs Proxy class. They provide a way to supply pre-processing<br />
and post-processing around the action. Similar to servlet filters,<br />
interceptors can be layered and ordered. They have access to the<br />
action being executed, as well as all environmental variables and<br />
execution properties.<br />
Let’s start our discussion of interceptors with dependency<br />
injection. Injecting dependencies into the action, as we have<br />
already seen, can happen in a couple of different ways. Here are<br />
the implementing interceptors for those we have already<br />
mentioned:<br />
� Spring Framework – the<br />
ActionAutowiringInterceptor interceptor.
26 | STARTING STRUTS2<br />
� Request String and Form Values – the<br />
ParametersInterceptor interceptor.<br />
� Servlet-based objects – the ServletConfigInterceptor<br />
interceptor.<br />
The first two interceptors work independently, with no<br />
requirements from the action, but the last interceptor is different.<br />
It works with the assistance of the following interfaces:<br />
� SessionAware – to provide access to all the session<br />
attributes via a Map<br />
� ServletRequestAware – to provide access to the<br />
HttpServletRequest object<br />
� RequestAware – to provide access to all the request<br />
attributes via a Map<br />
� ApplicationAware – to provide access to all the<br />
application attributes via a Map<br />
� ServletResponseAware – to provide access to the<br />
HttpServletResponse object<br />
� ParameterAware – to provide access to all the request<br />
string and form values attributes via a Map<br />
� PrincipalAware – to provide access to the<br />
PrincipleProxy object; this object implements the<br />
principle and role methods of the HttpServletRequest<br />
object in implementation, but by providing a proxy,<br />
allows for implementation independence in the action<br />
� ServletContextAware – to provide access to the<br />
ServletContext object<br />
For the correct data to be injected into an action, it will need to<br />
implement the necessary interface.<br />
Configuration<br />
If we want to enable dependency injection (or any other type of<br />
functionality provided by an interceptor) on our action we need<br />
to provide configuration. Like other elements, many<br />
interceptors have been preconfigured for you. Just make sure
CORE COMPONENTS | 27<br />
that the package your actions are in extends the “struts-default”<br />
package.<br />
To configure a new interceptor, we first need to define the<br />
interceptor. The and tags are placed directly under the tag. For the<br />
above mentioned Spring Framework interceptor, the<br />
configuration is as follows:<br />
<br />
…<br />
<br />
<br />
We also need to ensure that the interceptor is applied to the<br />
action that requires it. This can be achieved in two ways. The<br />
first is to assign the interceptor to each action individually:<br />
<br />
view.jsp<br />
<br />
<br />
Using this configuration there is no limitation on the number of<br />
interceptors you can apply to an action. What is required, is that<br />
the interceptors are listed in the order that they are to be<br />
executed.<br />
The second way is to assign a default interceptor for the current<br />
package:<br />
<br />
This declaration is made directly under the tag,<br />
and only one interceptor can be assigned as the default.<br />
Now that the interceptor has been configured for a particular<br />
action mapping, it will be executed on each and every request to<br />
the mapped URL. But this is very limiting, as most of the time<br />
we require more than one interceptor to be assigned to an action.
28 | STARTING STRUTS2<br />
In fact, as <strong>Struts2</strong> bases much of its functionality on interceptors,<br />
it is not unlikely to have 7 or 8 interceptors assigned per action.<br />
As you can imagine, having to configure every interceptor for<br />
each action would quickly become extremely unmanageable.<br />
For this reason, interceptors are managed with interceptor stacks.<br />
Here is an example, directly from the struts-default.xml file:<br />
<br />
<br />
<br />
<br />
<br />
<br />
<br />
<br />
This configuration node is placed under the <br />
node. Each tag references either an<br />
interceptor or an interceptor stack that has been configured<br />
before the current interceptor stack.<br />
We have already seen how to apply interceptor to the action,<br />
applying interceptor stacks is no different. In fact, we use<br />
exactly the same tag:<br />
<br />
view.jsp<br />
<br />
<br />
The same holds true for the configuration of the default<br />
interceptor – simply use an interceptor stack configuration name<br />
rather than an individual interceptor name.<br />
<br />
It is therefore very important to ensure that the name is unique<br />
across all interceptor and interceptor stack configurations when<br />
configuring the initial interceptors and interceptor stacks.
CORE COMPONENTS | 29<br />
Implementing Interceptors<br />
Using custom interceptors in your application is an elegant way<br />
to provide cross-cutting application features. The interface that<br />
needs implementing is simple, and comes from the XWork<br />
framework. It has only 3 methods:<br />
public interface Interceptor extends Serializable {<br />
}<br />
void destroy();<br />
void init();<br />
String intercept(ActionInvocation invocation)<br />
throws Exception;<br />
In fact, if there is no initialization or cleanup required, there is an<br />
AbstractInterceptor class that can be extended instead. This<br />
class provides a default no-op implementation of both the<br />
“destroy” and “init” methods.<br />
The ActionInvocation object provides access to the runtime<br />
environment. It allows access to the action itself; the context<br />
(which for a web application includes the request parameters,<br />
session parameters, the users locale, etc.); the result of the<br />
actions execution; and methods to invoke the action and<br />
determine whether the action has already been invoked.<br />
We have already seen how to configure interceptors, and<br />
configuring custom interceptors is exactly the same. If you do<br />
create your own interceptors, you will also want to consider<br />
creating custom interceptor stacks. In this manner you will<br />
ensure consistent application of the new interceptor across all<br />
actions that require it.<br />
Value Stack / OGNL<br />
This section covers two ideas that are closely related. The value<br />
stack is exactly what it says it is – a stack of objects. OGNL<br />
stands for Object Graph Navigational Language, and provides<br />
the unified way to access objects within the value stack.
30 | STARTING STRUTS2<br />
The value stack consists of the following objects in the provided<br />
order:<br />
1. Temporary Objects – during execution temporary objects<br />
are created and placed onto the value stack; an example<br />
of this would be the current iteration value for a<br />
collection being looped over in a JSP tag<br />
2. The Model Object – if model objects are being used, the<br />
current model object is placed before the action on the<br />
value stack<br />
3. The Action Object – the action being executed<br />
4. Named Objects – these objects include #application,<br />
#session, #request, #attr and #parameters and refer<br />
to the corresponding servlet scopes<br />
Accessing the value stack can be achieved in many different<br />
ways. The most common way is via the tags provided for JSP,<br />
Velocity and Freemarker. HTML tags are commonly used to<br />
access properties of objects from the value stack; control tags<br />
(such as if, elseif and iterator) are used with expressions; and<br />
data tags are available to manipulate the stack itself (via set and<br />
push).<br />
When using the value stack there is no need to keep track of<br />
which scope the target object is in. If you want the attribute<br />
“name”, then you query the value stack for this attribute. Each<br />
stack element, in the provided order, is asked whether it has the<br />
property. If it does, then the value is returned and we are done.<br />
If not, then the next element down is queried. This continues<br />
until the end of the stack is reached. This is a great feature, as<br />
you don’t care where the value is – the action, the model, or the<br />
HTTP request – you just know that if the value exists it will be<br />
returned.<br />
There is a downside. If the property is common (for example<br />
“id”) and you want the value from a specific object (say the<br />
action) that is not the first object encountered with this property
CORE COMPONENTS | 31<br />
on the value stack, the value returned may not be what you<br />
expect. What will be returned is an “id” value, but it may be<br />
from a JSP tag, interim object, or a value from the model object.<br />
OGNL is more than just a means to access the properties of<br />
objects, and we can use this to our advantage here. If we know<br />
the depth in the stack of the action, we could use “[2].id” instead<br />
of an expression of “id”,<br />
In fact, OGNL is a fully featured expression language. As well<br />
as using dot notation to navigate object graphs (i.e. using<br />
“person.address” instead of “getPerson().getAddress()” as the<br />
expression), OGNL supports features such as type conversion,<br />
calling methods, collection manipulation and generation,<br />
projection across collections, expression evaluation and lambda<br />
expressions . The complete language guide can be found at<br />
http://www.ognl.org/2.6.9/Documentation/html/LanguageGuide/<br />
index.html.<br />
Result Types<br />
So far we have shown action configurations that result in a JSP<br />
being rendered to the user. This is one case, but not the only<br />
one. In fact, <strong>Struts2</strong> supports many types of results. These can<br />
be visual, or they can be interactions with the environment.<br />
To configure an action to execute a result of a specific type, the<br />
“type” attribute is used. If the attribute is not supplied, the<br />
default type “dispatcher” is used – this will render a JSP result.<br />
Here’s what the action configuration looks like:<br />
<br />
view.jsp<br />
<br />
Configuration<br />
Result types are configured within the tag. The<br />
configuration is similar to interceptor configuration. A “name”<br />
attribute provides a unique identifier for the result type, and the
32 | STARTING STRUTS2<br />
“class” attribute provides the implementation class. There is a<br />
third attribute “default” – this allows the default result type to be<br />
modified. If a web application was to be based on Velocity<br />
rather than JSP, modifying the default would save time when<br />
entering configuration information.<br />
<br />
<br />
<br />
…<br />
<br />
Implementing Result Types<br />
Similar to interceptors, it is possible to create your own result<br />
types and configure them in your web application. Many<br />
common result types already exist so, before creating your own,<br />
you should check to see if the type you want already exists.<br />
To create a new result type, implement the Result interface.<br />
public interface Result extends Serializable {<br />
}<br />
public void execute(ActionInvocation invocation)<br />
throws Exception;<br />
The ActionInvocation object provides access to the runtime<br />
environment, allowing the new result type to access information<br />
from the action that was just executed, as well as the context in<br />
which the action was executed. The context includes the<br />
HttpServletRequest object, which provides access to the<br />
output stream for the current request.
CORE COMPONENTS | 33<br />
Results / View Technologies<br />
In all the examples given so far, there has been an assumption<br />
that Java Server Pages (JSPs) are being rendered as the view<br />
technology. Although it may be the most common, it is not the<br />
only way to render results.<br />
The result type is closely linked to the view technology used. In<br />
the previous section, we saw that if the “type” attribute is absent<br />
or if the value is “dispatcher”, then the JSPs are rendered. There<br />
are three other technologies that can replace JSPs in a <strong>Struts2</strong><br />
application:<br />
� Velocity Templates<br />
� Freemarker Templates<br />
� XSLT Transformations<br />
Remember, too, that you can implement a new result type for<br />
any view technology that exists. Then you will have additional<br />
results available.<br />
Apart from individual language syntax differences, Freemarker<br />
and Velocity are very similar to JSP. All the properties of the<br />
action (via the getter methods) are available to the template, as<br />
well as the JSP tag libraries and the use of OGNL within the tag<br />
libraries. The name of the JSP template is simply replaced with<br />
the name of either the Velocity or Freemarker template in the<br />
actions configuration. This is how a Freemarker result would be<br />
configured to be returned instead of a JSP:<br />
<br />
view.ftl<br />
<br />
The XSLT result is a little different. Instead of replacing the<br />
template name with the stylesheet name, additional parameters<br />
are used. The parameter “stylesheetLocation” provides the name<br />
of the stylesheet to use in rendering the XML. If this parameter<br />
is not present, the untransformed XML will be returned to the<br />
user.
34 | STARTING STRUTS2<br />
The “exposedValue” property provides the property of the<br />
action, or an OGNL expression to be exposed as XML. If this<br />
parameter is not specified, the action itself will be exposed as<br />
XML.<br />
<br />
render.xslt<br />
model.address<br />
<br />
There is also a “struts.properties” configuration property that is<br />
available when using XSLT as the result. The name of the<br />
property is “struts.xslt.nocache” and it determines whether the<br />
stylesheet is cached. During development you would want to<br />
remove any caching to allow for faster development cycles,<br />
however, when the application is deployed into production a<br />
cached stylesheet will increase performance during rendering.<br />
Tag Libraries<br />
Tag libraries are generally used to define a feature exclusive to<br />
JSPs that provide reusability. Freemarker and Velocity don’t<br />
have the same concept; instead they provide a model or context<br />
to the rendering engine and the template being rendered has<br />
access to all those objects. When we speak of tag libraries in the<br />
<strong>Struts2</strong> world, we are talking about objects that provide the same<br />
functionality as JSP tag libraries that are accessible to all view<br />
technologies – JSP, Velocity and Freemarker.<br />
There is more formality around defining the tag libraries, but the<br />
underlying functionality is the same – to provide access to<br />
methods on objects. This improves maintainability by keeping<br />
the logic encapsulated, and reducing the temptation of cutting<br />
and pasting code.<br />
JSP tag libraries have another characteristic that seems outdated<br />
in today’s web development environment – to place the text to<br />
be rendered inside the Java code of the tag library itself. <strong>Struts2</strong><br />
has turned this idea around, creating a secondary MVC pattern
CORE COMPONENTS | 35<br />
exclusively for tags. Logic is provided inside Java classes, but<br />
the rendering is placed in Freemarker templates (this is a<br />
default). The entire architecture looks like this:<br />
The core of the architecture is a set of component objects. The<br />
component object represents each tag in its most basic form, and<br />
provides any necessary logic as well as managing and rendering<br />
the templates. Each different result / view technology then<br />
provides a wrapper around the component. The wrapper<br />
provides the translation of what the specific view technology<br />
requires in order to use the tag within the original page.<br />
When using the tag libraries with Freemarker template<br />
rendering, there is an additional configuration requirement. An<br />
additional servlet needs to be configured in the “web.xml” file so<br />
that Freemarker can obtain the information it needs for<br />
rendering:<br />
<br />
jspSupportServlet<br />
<br />
….action2.views.JspSupportServlet.JspSupportServlet<br />
<br />
10<br />
36 | STARTING STRUTS2<br />
Each component also has templates associated with it. If the<br />
original tag contains other tags (i.e. a form tag), there will be an<br />
opening template and a closing template. If the original tag is<br />
self contained (i.e. a checkbox tag), there will be only a closing<br />
template. As well as providing a separation between text and<br />
logic within the UI architecture, using templates for tags<br />
provides an additional benefit – it allows the developer to mix<br />
and match different templates for the same tag, using a feature<br />
called “themes”.<br />
There are currently three themes vi : “simple”, “xhtml” and<br />
“css_xhtml.” The “simple” theme provides the tag output<br />
without any formatting. The “xhtml” theme takes formatting a<br />
step further; for HTML form tags, this theme provides twocolumn<br />
formatting using HTML tables. For CSS purists, there is<br />
the “css_chtml” theme. Similar to the “xhtml” theme this theme<br />
also provides formatting; however instead of using HTML tables<br />
it uses a CSS DIV. The additional formatting is provided to the<br />
developer without the additional clutter of HTML.<br />
The “xhtml” and “css_xhtml” themes are good examples of what<br />
developers can do for themselves – implement a theme to<br />
provide specific formatting for HTML. Themes can be mixed<br />
and matched on the same page, and the theme for the current tag<br />
is defined using the “theme” attribute. If you are consistently<br />
using one theme, it can be set as the default using the<br />
“struts.ui.theme” property of the “struts.properties”<br />
configuration file.<br />
Themes are provided for all tag categories (control tags, data<br />
tags, form tags and non-form UI tags); however, creating new<br />
themes is only beneficial for the visual form tags.
Free Online Version.<br />
Support this work, buy the print copy:<br />
http://infoq.com/minibooks/startingstruts2<br />
4<br />
Architectural Goals<br />
For a particular code base, the architectural goals can be difficult<br />
to determine. There are the goals that were documented before<br />
development starts; these are idealistic, and as development<br />
starts, the code usually evolves in a different direction. Then<br />
there are the true characteristics of the code base; these are<br />
harder to find, can be inconsistent across different packages or<br />
features, and are a product of evolution rather than planning.<br />
In this chapter we will talk about five such characteristics of the<br />
<strong>Struts2</strong> code base. Architectural elements that are still present<br />
after the evolution of the code base since 2002 – from the<br />
original WebWork, through the splitting of WebWork into<br />
WebWork2 and XWork, and the final transition into <strong>Struts2</strong>.<br />
Separation of Concerns<br />
As a web application developer, there are many levels of<br />
functionality that need to be addressed:<br />
� There is the specific per-action logic that is the core of<br />
what needs to be achieved during the request/response<br />
cycle<br />
� There is accessing or obtaining the business objects that<br />
are needed to perform the action’s logic and access<br />
resources<br />
� There is translation, mapping and conversions that need<br />
to occur in order to take a string-based value in the<br />
HTML into primitives or types and to convert view<br />
objects to business objects or database table<br />
representations<br />
37
38 | STARTING STRUTS2<br />
� There are cross-cutting concerns that provide<br />
functionality for groups of action, or for all actions in the<br />
application.<br />
Within the architecture of <strong>Struts2</strong>, each of these concerns is<br />
separate. Functionality and logic no longer needs to be placed<br />
exclusively within the action. Let’s take a look at of the<br />
concerns mentioned above and see how they are handled:<br />
� Per-Action Logic – this is the simplest concern; each<br />
action is responsible for the logic or functionality it needs<br />
to provide<br />
� Accessing/Obtaining Business Objects – <strong>Struts2</strong> takes<br />
advantage of dependency injection, and hence the objects<br />
that are required to complete the logic in the action are<br />
supplied to the action<br />
� Translation/Mapping/Conversions – each of these are<br />
slightly different concerns, but they share the common<br />
trait of being ancillary to the core actions logic.<br />
Translation and conversion of types is handled by the<br />
framework itself. String values from HTML are<br />
converted to base types and injected into the action<br />
before processing of the action starts – everything needed<br />
is already there. Mapping is handled by a specific<br />
interceptor. By configuring an action in a way that<br />
determines it to have a domain model, and specifying the<br />
fields in the HTML correctly, the framework will map<br />
the UI to the domain model. It will even traverse into an<br />
object graph.<br />
� Cross-cutting Concerns – interceptors are the main<br />
feature for providing for cross-cutting functionality.<br />
Developers can implement interceptors, and then apply<br />
them across all actions, across all actions in a specific<br />
package, or pick and choose which actions that they are<br />
applied to. Another cross-cutting concern is the user<br />
interface layout. <strong>Struts2</strong> can also help here with a feature<br />
of the supplied tags called “themes”. Different themes<br />
can be developed to provide different layout options, and
ARCHITECTURAL GOALS | 39<br />
then applied to individual tags, or for the entire<br />
application (by assigning it as the default).<br />
Loose Coupling<br />
One of the early goals of WebWork was to provide a loosely<br />
coupled framework. The 2.0 release of WebWork reinforced<br />
this, splitting the code into two projects: XWork – a generic<br />
command framework; and WebWork – the web-specific<br />
interface to XWork. This fundamental change in the architecture<br />
of WebWork created a symbiotic relationship. What was once<br />
known as “WebWork” is now essentially a combination of<br />
WebWork and XWork.<br />
XWork, being an independent project, could now be utilized as a<br />
part of other projects – and it was. Swingwork vii was one such<br />
project. It was a Swing-based MVC framework that used<br />
XWork under the covers. Another example would be a JMS<br />
front end, executing or sharing XWork actions with a web UI.<br />
These provide great examples of a very high level loose<br />
coupling. <strong>Struts2</strong> is yet another consumer of XWork.<br />
The ideology of loose coupling is taken much further, having<br />
been integrated throughout the framework – from the very first<br />
step in processing an action to the very last. In fact, there is very<br />
little in <strong>Struts2</strong> that cannot be configured – I believe this to be<br />
one of <strong>Struts2</strong>’s greatest strengths, as well as one of its greatest<br />
weaknesses.<br />
Common examples of loosely coupled configuration include:<br />
� Mapping URLs to actions<br />
� Mapping different outcomes of an action to pages that<br />
are rendered<br />
� Mapping exceptions that occur during processing to an<br />
exception page being rendered<br />
Less common and <strong>Struts2</strong> specific example include:
40 | STARTING STRUTS2<br />
� Configuring the business object factory if you don’t want<br />
to use Spring<br />
� Changing the way the URL is mapped to an action class<br />
� Adding new result types for action outcomes<br />
� Adding plug-ins for new framework functionality<br />
� Configuring the framework level functionality via<br />
interceptors<br />
The benefit of loosely coupled systems is well known and<br />
understood – increasing testability, extending framework<br />
features is easier, etc. But there is a downside. Because of the<br />
level of configurability, especially with respect to interceptors,<br />
the processing path of a specific action may not be understood<br />
by developers. This becomes apparent when debugging. An<br />
uninformed developer will not be able to debug quickly or<br />
efficiently due to not understanding what is happening. This<br />
problem could be as simple as an incorrectly configured<br />
interceptor, or even the order of interceptors causing issues. By<br />
understanding each piece in the processing path, solutions will<br />
come more quickly.<br />
Testability<br />
Unit testing has become a de facto standard in software<br />
development over the last few years. Not only does testing<br />
ensure consistency in the logic of classes but, by implementing<br />
the unit tests during (or even better, before) the development of<br />
the class under test, a less complicated and more robust design<br />
will emerge.<br />
The predecessor of <strong>Struts2</strong>, WebWork, was built in such an<br />
environment. With loose coupling of the framework elements,<br />
testing becomes easy. The actions, interceptors, results, object<br />
factories, and other components that are developed in web<br />
application development, can be tested independently of the<br />
framework.
ARCHITECTURAL GOALS | 41<br />
As actions and interceptors are the most common, we’ll take a<br />
closer look at these.<br />
Actions<br />
Actions are invoked within the framework by convention by<br />
calling the “execute()” method, or by configuration by calling<br />
any method that returns a String value. From a testability<br />
standpoint, this couldn’t be much easier.<br />
Let’s take a look at an example. Here is an action class that<br />
increments a number:<br />
public class MyAction {<br />
}<br />
private int number;<br />
public int getnumber() { return number; }<br />
public void setNumber( int n ) { number = n; }<br />
public String execute() {<br />
number += 10;<br />
return “success”;<br />
}<br />
As the actions are POJOs unit tests need only to instantiate the<br />
action, call the method, and then assert that the result is that<br />
which is expected. All data and resources are provided to the<br />
action via setter methods. Therefore, any data the action may<br />
need can be directly set on the action.<br />
In our example we need two assertions – one for the outcome of<br />
the “execute” method, and the other to verify that the state of the<br />
action is what we are expecting. The unit test would then be:<br />
public class myActionTest extends TestCase {<br />
…<br />
public void testExecute() {<br />
MyAction action = new MyAction();<br />
Action.setNumber(5);
42 | STARTING STRUTS2<br />
}<br />
}<br />
assertEquals("success", action.execute());<br />
assertEquals(15,action.getNumber());<br />
Resources are only slightly more complex. Libraries such as<br />
jMock viii can be used to provide mock implementations of the<br />
resources, testing that interactions between the action and the<br />
resource are correct.<br />
Although the example was written using JUnit, TestNG or any<br />
other framework could have been used.<br />
Interceptors<br />
When you are building interceptors, testing will be slightly more<br />
complex. However, there is additional help available. There are<br />
two scenarios when working with interceptors.<br />
The first is when you have an interceptor that, when called,<br />
interacts with the ActionInvocation object. After execution,<br />
you are able to verify the logic by asserting the state of the<br />
interceptor itself. For this scenario you can test the interceptor<br />
in exactly the same way as actions. Instantiate the interceptor;<br />
create a mock implementation of the ActionInvocation object<br />
with values that will be used in testing the interceptor; call the<br />
intercept method; then assert that the changes are what is<br />
expected. These could be on the interceptor itself, the result<br />
from the method being called, or an exception that may have<br />
been thrown.<br />
The second scenario is when the interceptor interacts with its<br />
environment or other interceptors in the interceptor stack. In this<br />
case, the test will need to interact with the action via the<br />
ActionProxy class, and assertions will need to access other<br />
environmental objects that the interceptor, by itself, does not<br />
have access to.
ARCHITECTURAL GOALS | 43<br />
The XWork library helps here by providing the XWorkTestCase<br />
for JUnit tests, and the TestNGStrutsTestCase and<br />
TestNGXWorkTestCase classes for TestNG tests. These provide<br />
a test implementation for the ConfigurationManager,<br />
Configuration, Container and ActionProxyFactory class<br />
instances. Several other classes are involved, including<br />
XWorkTestCaseHelper and MockConfiguration.<br />
Now that we have the infrastructure of setting up the<br />
environment, the test itself becomes easy - following the same<br />
steps outlined in the first scenario. The only difference being<br />
that, instead of calling the intercept() method on the<br />
interceptor, the execute method of the ActionProxy needs to be<br />
called. The following code will do this:<br />
ActionProxy proxy =<br />
actionProxyFactory.createActionProxy(NAMESPACE,NAME,null);<br />
assertEquals("success", proxy.execute());<br />
In this scenario, tests will be asserting an expected value of the<br />
action result, values of the action, or values from the value stack.<br />
The action being executed can be obtained before or after<br />
execution by the call with:<br />
MyAction action=(MyAction)proxy.getInvocation().getAction();<br />
The value stack can be obtained with:<br />
proxy.getInvocation().getStack()
44 | STARTING STRUTS2<br />
Modularization<br />
Being able to split web applications into modules becomes<br />
important as applications become large. It allows functionality<br />
or new framework features developed on one project to be<br />
packaged independently, and then re-used across other projects.<br />
<strong>Struts2</strong> has adopted modularization as a fundamental part of the<br />
architecture, allowing developers to work independently and<br />
build upon each other’s work.<br />
There are a few ways that applications can be modularized:<br />
� Configuration information can be split into multiple files<br />
– this does not affect the packaging of the application,<br />
but makes the development easier as configuration<br />
information is easier to find and logically separated along<br />
functional boundaries<br />
� Self-contained application modules can be created as<br />
plug-ins – everything that is needed to provide a<br />
particular feature can be packaged together and<br />
independently distributed as a plug-in; this includes<br />
actions, interceptors, interceptor stacks, view templates<br />
(except JSPs), etc. An example is the config browser<br />
plug-in ix , this plug-in provides a complete module that,<br />
when added to your application, provides a web interface<br />
to view configuration information<br />
� New framework feature plug-ins can be created – new<br />
functionality that is non-application specific can be<br />
bundled as a plug-in and used across many difference<br />
applications<br />
Technically speaking, all of these ways to modularize an<br />
application are the same – they have the same configuration<br />
elements (except the name might be different; “strutsplugin.xml”<br />
is the configuration file that is automatically loaded<br />
for plug-ins), the same directory structure, and they can contain<br />
the same framework and application elements.
ARCHITECTURAL GOALS | 45<br />
The only difference between the two types of plug-ins is how<br />
you conceptually think of them, and which elements and<br />
configurations are put in the distribution package.<br />
Additional Configuration Elements<br />
Because plug-ins can provide alternate implementations for<br />
internal framework functionality, there are additional<br />
configuration elements. Although these elements can be used in<br />
the “struts.xml” configuration file, and are used in the “strutsdefault.xml”<br />
file, they are used more common in configuring<br />
plug-ins.<br />
For plug-ins, configuration of alternate implementations happens<br />
in two steps:<br />
1. The alternate interface implementation is provided using<br />
the tag, along with a unique key that<br />
identifies it<br />
2. One of possibly many configured interface<br />
implementations is selected using the <br />
tag<br />
Let’s take a look at each of these steps in more detail.<br />
The tag allows plug-ins to supply implementation<br />
information for extension points. Below is an example that<br />
shows the configuration of an object factory from the “strutsdefault.xml”<br />
configuration file:<br />
<br />
Attributes provide everything that is needed to create and utilize<br />
an alternate object implementation within <strong>Struts2</strong>. The attributes<br />
that can be used are:<br />
� class – this provides the full name of the class<br />
� type – this is the interface the class implements<br />
� name – a short name that is unique per type
46 | STARTING STRUTS2<br />
� static – whether to inject static class methods into the<br />
class instance<br />
� scope – the scope that an instance is utilized in, this can<br />
be “default”, “request”, “session”, “singleton” or<br />
“thread”<br />
� optional – if “true” loading will continue even if there<br />
was an error creating an instance of the class<br />
Next, the tag allows the developer to select<br />
which configuration is used. There are only two attributes – a<br />
property name that provides the name of the extension point that<br />
your new implementation is changing, and the value which is the<br />
unique name configured using a tag.<br />
<br />
The tag is one way to apply a new value to a<br />
known property, but it is not the only way. The value can also<br />
be modified using an “init-param” in the “web.xml”<br />
configuration file, or as a name-value pair in the<br />
“struts.properties” configuration file.<br />
If you are not developing a plug-in, but instead using these<br />
techniques in a regular “struts.xml” configuration file, there is a<br />
shortcut. In the tag, use the class value that<br />
you would normally place in the tag – this avoids<br />
the need for the tag altogether.<br />
This table lists the interfaces and the property names for the<br />
configurable extension points.<br />
Interface Property Name Scope Description<br />
com.opensymphony.<br />
xwork2.<br />
ObjectFactory<br />
struts.object<br />
Factory<br />
singleton Creates objects<br />
used in the<br />
framework -<br />
actions, results,<br />
interceptors,<br />
business, objects.
com.opensymphony.<br />
xwork2.<br />
ActionProxyFactory<br />
com.opensymphony.<br />
xwork2.util.<br />
ObjectType<br />
Determiner<br />
org.apache.struts2.<br />
dispatcher.mapper.<br />
ActionMapper<br />
org.apache.struts2.<br />
dispatcher.multipart.<br />
MultiPartRequest<br />
org.apache.struts2.<br />
views.freemarker.<br />
FreemarkerManager<br />
org.apache.struts2.<br />
views.velocity.<br />
VelocityManager<br />
struts.<br />
actionProxyFactory<br />
struts.<br />
objectTypeDeterminer<br />
ARCHITECTURAL GOALS | 47<br />
singleton Creates the<br />
ActionProxy<br />
singleton Determines what<br />
the key and the<br />
element class of<br />
a map or<br />
collection are<br />
struts.mapper.class singleton Determines the<br />
ActionMapping<br />
from a request<br />
and a URI<br />
from an Action<br />
struts.multipart.<br />
parser<br />
struts.freemarker.<br />
manager.classname<br />
struts.velocity.<br />
manager.classname<br />
per<br />
request<br />
Mapping<br />
Parses a<br />
multipart<br />
Request (file<br />
upload)<br />
singleton Loads and<br />
processes<br />
Freemarker<br />
templates<br />
singleton Loads and<br />
processes<br />
Velocity<br />
templates<br />
The tag and “init-param” in the “web.xml”<br />
configuration file is not limited to only extension point<br />
properties. Any property from the “struts.properties”<br />
configuration file can be modified using the same technique.<br />
Convention over Configuration<br />
Convention over configuration is a concept that Rails has<br />
brought to main stream application development. Rather than<br />
providing configuration files, which were very similar between<br />
applications, an assumption was made that under most<br />
circumstances developers would follow a particular pattern. The<br />
pattern being followed was considered generic enough to be<br />
deemed a convention and, rather than having to provide the<br />
configuration for each new application, it was provided by the
48 | STARTING STRUTS2<br />
framework as the default. As the default, developers no longer<br />
needed to provide the configuration information. However, if<br />
there was a need to deviate from the convention configuration<br />
information, it could be provided to override the defaults.<br />
<strong>Struts2</strong> has adopted this concept. Loose coupling has provided<br />
an opportunity for <strong>Struts2</strong> to be extremely flexible, but it also<br />
means that the framework can be extremely difficult to<br />
configure. Conventions balance out these two opposing forces,<br />
allowing for a simpler and more productive developer<br />
experience.<br />
Examples of convention over configuration in <strong>Struts2</strong> include:<br />
� Implicit Configuration File Loading – rather than<br />
explicitly configuring the “struts-default.xml” file and<br />
“struts-plugin.xml” file (for each plug-in), they are<br />
loaded automatically during startup<br />
� Code Behind Plug-in – when utilizing the code behind<br />
plug-in, the result template is automatically searched for<br />
using a combination of the action name and result string,<br />
so that for an action “/user/add.action” the result template<br />
“/user/add-success.jsp” will be returned for a “success”<br />
result, and the result template “/user/add-error.jsp” would<br />
be returned for an “error” result<br />
� Default Result & Result Type – when configuring actions<br />
there is no need to specify the result and the type when<br />
using the default of “success” and JSP<br />
� Wiring of Spring Business Service – with the Spring<br />
framework plug-in installed, it is not necessary to<br />
configure each Spring-provide business service that each<br />
action requires; instead, the business service is wired into<br />
the action automatically<br />
In previous chapters we have seen several default settings, as<br />
well as how to override the values and provide new defaults via<br />
configuration. More configuration options, as well as more<br />
conventions will be explored in the upcoming chapter on<br />
productivity features.
Free Online Version.<br />
Support this work, buy the print copy:<br />
http://infoq.com/minibooks/startingstruts2<br />
49<br />
5<br />
Productivity Tips<br />
This chapter contains a list of tips, techniques, features and<br />
things to keep in mind to be as productive as possible when<br />
developing web applications using <strong>Struts2</strong>. Some tips may be as<br />
simple as listing default values, and some as complex as<br />
showing the interface that needs to be implemented to create<br />
custom declarative validations.<br />
The information provided in this section is intended only as an<br />
introduction – if a tip looks interesting, dig a little deeper. Go to<br />
the <strong>Struts2</strong> documentation at<br />
http://struts.apache.org/2.x/docs/guides.html or do a search to<br />
see what other developers think and how they have used it.<br />
Finally, as you read each section think about how this tip may<br />
interact with other tips; think about how this tip may be different<br />
from other tips; and think about how you can utilize the tip in<br />
your web development. Take your understanding to the next<br />
level.<br />
Having a plug-in architecture allows <strong>Struts2</strong> to continuously<br />
evolve. Regular visits to the <strong>Struts2</strong> plug-in registry page will<br />
keep you up to date on the latest developments. This page is the<br />
source for all plug-in related announcements, and it can be found<br />
at http://cwiki.apache.org/S2PLUGINS/home.html. It already<br />
contains several 3rd party plug-ins for JSON, GWT and Spring<br />
WebFlow functionality.
50 | STARTING STRUTS2<br />
Re-Using Action Configurations<br />
We have talked about configuring actions into packages, and<br />
about how packages can extend other packages - but the benefit<br />
of this may not be clear. Let’s take a look at a concrete example.<br />
The example is an application that provides information to<br />
visitors of zoos. There will be a portal page for each continent<br />
providing information including animals, maps, etc.<br />
One way to handle this feature request is to provide one action<br />
that the user can invoke with a URL something like<br />
“www.myzoo.com/home.action?continent=asia”. This<br />
consolidates the application logic and makes it easy to determine<br />
which continent is being requested. However, depending on<br />
how the information to be rendered to the user is defined,<br />
flexibility could be lost as hard coded path information is added<br />
to the action or view.<br />
A more flexible solution is to provide a URL such as<br />
“www.myzoo.com/asia/home.action”. Using this scheme, a base<br />
action would be provided and configured in the default package.<br />
Each inheriting package then has access to the same action. So<br />
“www.myzoo.com/home.action” calls exactly the same class as<br />
“www.myzoo.com/asia/home.action” – without any additional<br />
configuration.<br />
Furthermore, the views can also be also customized without any<br />
additional configuration. If the configuration of the action (in<br />
the default package) is<br />
<br />
portal.jsp<br />
<br />
then the JSP that is rendered by <strong>Struts2</strong> will depend on the users<br />
calling namespace, as provided by the URL. Hence, if the URL<br />
is “www.myzoo.com/home.action” the “/portal.jsp” will be<br />
rendered, but if the URL is “www.myzoo.com/asia/home.action”<br />
is called, the JSP “/asia/portal.jsp” will be rendered. Once again,<br />
this functionality is provided without any additional
PRODUCTIVITY TIPS | 51<br />
configuration – because the configuration provides a relative JSP<br />
location rather than a specific one.<br />
Use Pattern Matching Wildcards in<br />
Configurations<br />
Action configuration files are somehow able to grow to<br />
extremely large at incredible speeds. On way to combat this<br />
phenomenon is to use pattern matching. Pattern matching works<br />
by defining one or more patterns that URLs will conform to.<br />
An example will be an easy way to see how things work. Let’s<br />
say that the URLs in your web application always follows the<br />
pattern “/{module}/{entity}/{action}.action”. This is a common<br />
pattern; examples would be the URL’s<br />
“/admin/User/edit.action”, “/admin/User/list.action” and<br />
“/admin/User/add.action”.<br />
The class configuration is such that there is a <strong>Struts2</strong> action class<br />
with the name “{entity}Action”, and each {action} is method on<br />
the action class. All the results from invoking the action’s<br />
methods will result in either the update page for the entity being<br />
displayed, or a list of all the entities being displayed.<br />
For our example, the “struts.xml” configuration will look like<br />
this:<br />
<br />
/{1}/update{2}.jsp<br />
/{1}/list.jsp<br />
<br />
Each asterisk in the actions name is a wildcard. In the example,<br />
only asterisks are used – but this need not be the case. For<br />
example, say you wish to map all entity view actions together.<br />
Something like ‘name=”/*/View*”’ would do the trick. Token<br />
identifiers, {1}, {2}, etc., are then used to obtain the text values<br />
harvested from the wildcards (where the numeric value
52 | STARTING STRUTS2<br />
correlating to the position of the asterisk, ascending from left to<br />
right).<br />
In the “struts.properties” configuration file (or using the constant<br />
tag in the “struts.xml” configuration file) you need to ensure the<br />
following property is correctly set:<br />
struts.enable.SlashesInActionNames = true<br />
This property allows slashes in the name of the action. <strong>Struts2</strong>’s<br />
default configuration is to not have slashes in the action name,<br />
instead using packages for namespace separation.<br />
Finally, there is no shortcut if you are providing validation and<br />
conversion property files rather than using annotations. We’ll<br />
talk about this more in following sections. Each needs to<br />
contain the full name of the action, along with the necessary<br />
extension: i.e. “edit-validation.xml” and “edit-conversion.xml”<br />
for the original example, in the “com.infoq.actions.admin”<br />
package.<br />
Utilize Alternate URI Mapping Schemes<br />
A different approach than using wildcards in the configuration,<br />
is to provide a custom mapping from the URI to the action and<br />
method being invoked. Using this technique there will be less<br />
configuration, and the mapping will be applied consistently<br />
across the entire application. You can utilize URI patterns<br />
combined with session information, or any other information<br />
you can imagine, to determine the action to be called.<br />
The interface that needs to be implemented is the<br />
ActionMapper, and it has two methods to implement: the<br />
getMapping() method that converts a URI into a known<br />
configuration; and the getUriFromActionMapping() method<br />
that converts an action configuration into a URI.
public interface ActionMapper {<br />
}<br />
ActionMapping getMapping(<br />
HttpServletRequest request,<br />
ConfigurationManager configManager);<br />
String getUriFromActionMapping(<br />
ActionMapping mapping);<br />
PRODUCTIVITY TIPS | 53<br />
The ActionMapping class provides the resulting actions<br />
namespace, name, method, result and parameters. And the<br />
ConfigurationManager provides access to configuration<br />
providers (which in turn allow for further customization).<br />
To install the action mapper, the current action mapper needs to<br />
be replaced in the “struts.xml” configuration file. The name and<br />
the type are always the same - the difference is that the class<br />
value is that of the custom ActionMapper type that has been<br />
implemented.<br />
<br />
The good news is that you don’t need to go through the effort of<br />
implementing an ActionMapper to take advantage of this<br />
feature. <strong>Struts2</strong> has implemented several different types.<br />
The Restful2ActionMapper class provides an implementation<br />
of a ReST-style interface, and was inspired by the easy-to-use<br />
URIs of Ruby on Rails. Something to keep in mind is that this<br />
implementation is marked as experimental in the <strong>Struts2</strong><br />
documentation.<br />
The first thing that the Restful2ActionMapper does is<br />
determine the namespace and action that is to be used. This is<br />
achieved as you would expect – the last element in the URL is<br />
the name of the action, with the values before the action<br />
becoming the namespace. The exception to this is that attributes
54 | STARTING STRUTS2<br />
may also be passed in the URL, with the pattern used to map the<br />
action name and the attribute name and values to the URI being:<br />
http://HOST/PACKAGE/ACTION/PARAM_NAME1/PARAM_VALUE1/PARAM<br />
_NAME2/PARAM_VALUE2<br />
There is no limit to the number of “PARAM_NAME/PARAM_VALUE”<br />
pairs that you can have in the URI, and if the PARAM_NAME1 is<br />
“id” the URI can be shortened to:<br />
http://HOST/PACKAGE/ACTION/PARAM_VALUE1/PARAM_NAME2/PARAM<br />
_VALUE2<br />
Once the action is known, the next step is to find the method to<br />
invoke on the action. The HTTP method is used for this<br />
determination. As HTML doesn’t support PUT and DELETE<br />
methods, an additional request attribute “__http_method”<br />
provides the method information.<br />
Here’s what happens for HTTP method and URL combinations:<br />
� GET: “/user” – when the action is used alone the “index”<br />
method is invoked<br />
� GET: “/user/23” – when the action is used with<br />
parameter name/value pairs the “view” method is<br />
invoked, in this case the “id” attribute is set to a value of<br />
“23”<br />
� POST: “/user/23” – when the method is POST rather<br />
than GET, the “create” method is invoked; the “id” (or<br />
other identifying values) may be contained in the URL,<br />
and the name-value pairs containing information to<br />
update will be in the POST data<br />
� PUT: “/user” – the “update” method is invoked; similar<br />
to the POST scenario, the name-values pairs containing<br />
data will be in POST data rather than the URL<br />
� DELTE: “/user/23” – the “remove” method is invoked,<br />
with the unique identifier (in this case the “id” attribute<br />
having a value of “23”) supplied in the URL
PRODUCTIVITY TIPS | 55<br />
� GET: “/user/23!edit” – the “!” is used to supply the<br />
method name to use, so in this case the “edit” method<br />
will be invoked<br />
� GET: “/user/new” – the “new” suffix indicates that the<br />
“editNew” method is to be invoked<br />
There is also a CompositeActionMapper class. This<br />
implementation allows you to chain different individual<br />
ActionMapper implementations together. Each is checked in the<br />
listed sequence to determine if it can resolve the URI. If the<br />
URI can be resolved, the result is returned. If not, the next<br />
implementation in sequence will be checked; if no match is<br />
found a null result is returned.<br />
As well as the normal ActionMapper configuration, the<br />
configuration for the CompositeActionMapper includes a<br />
constant that lists the class names of the ActionMapper<br />
implementations that are to be chained together.<br />
<br />
<br />
Know Interceptor Functionality<br />
Interceptors play a vital role in providing functionality to the<br />
<strong>Struts2</strong> framework. By knowing the available interceptors you<br />
will understand what processing is happening during each step<br />
of the processing of an action.<br />
Another side benefit is with debugging actions. There will be<br />
times that the action does not contain the data that is expected.<br />
In these circumstances it is more often than not a problem with<br />
either an interceptor not being applied when it should have, or<br />
interceptors being applied in an incorrect order. By
56 | STARTING STRUTS2<br />
understanding what each interceptor does, zeroing in on the<br />
problem and correcting it will be easy.<br />
Here is a list of the interceptors that are provided out of the box,<br />
as well a description of the functionality that each provides.<br />
Interceptor<br />
Name<br />
Description<br />
alias Converts similar parameters that may be<br />
named differently between requests.<br />
chain Makes the previous Action's properties<br />
available to the current Action. Commonly<br />
used together with (in the previous Action).<br />
conversionError Adds conversion errors from the<br />
ActionContext to the Action's field errors<br />
createSession Create an HttpSession automatically,<br />
useful with certain Interceptors that require<br />
a HttpSession to work properly (like the<br />
TokenInterceptor)<br />
debugging Provides several different debugging<br />
screens to provide insight into the data<br />
behind the page.<br />
execAndWait Executes the action in the background and<br />
then sends the user off to an intermediate<br />
waiting page.<br />
exception Maps exceptions to a result.<br />
fileUpload An interceptor that adds easy access to file<br />
upload support.<br />
I18n Remembers the locale selected for a user's<br />
session.<br />
logger Outputs the name of the action.<br />
model-driven If the Action implements ModelDriven,<br />
pushes the getModel Result onto the Value<br />
scoped-modeldriven<br />
Stack.<br />
If the action implements
PRODUCTIVITY TIPS | 57<br />
ScopedModelDriven, the interceptor<br />
retrieves and stores the model from a scope<br />
and sets it on the action calling<br />
setModel().<br />
params Sets the request parameters onto the<br />
Action.<br />
static-params Sets the “struts.xml” defined parameters<br />
onto the action. These are the tags that are direct children of the<br />
tag.<br />
scope Simple mechanism for storing action state<br />
in the session or application scope.<br />
servlet-config Provide access to Maps representing<br />
HttpServletRequest and<br />
HttpServletResponse.<br />
timer Outputs how long the action takes to<br />
execute (including nested Interceptors and<br />
View)<br />
token Checks for valid token presence in action,<br />
prevents duplicate form submission.<br />
token-session Same as token interceptor, but stores the<br />
submitted data in session when handed an<br />
invalid token<br />
validation Performs validation using the validators<br />
defined in action-validation.xml<br />
workflow Calls the validate method in your action<br />
class. If action errors are created then it<br />
returns the INPUT view.<br />
store Store and retrieve action messages / errors /<br />
field errors for action that implements<br />
ValidationAware interface into session.<br />
checkbox Adds automatic checkbox handling code<br />
that detect an unchecked checkbox and add<br />
it as a parameter with a default (usually<br />
'false') value. Uses a specially named<br />
hidden field to detect unsubmitted<br />
checkboxes. The default unchecked value
58 | STARTING STRUTS2<br />
is overridable for non-boolean valued<br />
checkboxes.<br />
profiling Activate profiling through parameter<br />
roles Action will only be executed if the user has<br />
the correct JAAS role.<br />
prepare If the action implements Preparable, calls<br />
it’s prepare() method.<br />
Use Provided Interceptor Stacks<br />
Interceptor stacks provide functional groupings of interceptors to<br />
apply to different action categories. Stacks can be constructed<br />
for CRUD operations, for validation of action inputs or for<br />
anything else you may need. But before you start creating your<br />
own stacks, take a look at what <strong>Struts2</strong> provides out of the box.<br />
Many standard configurations have already been constructed and<br />
are ready to use. Additionally, each plug-in can provide its own<br />
interceptor stack, which should be used if utilizing the<br />
functionality.<br />
There are two ways to utilize the provided interceptor stacks –<br />
either place you actions in the package that provides the<br />
interceptor stack (using the zero configuration annotation or<br />
“struts.properties” constant), or have new packages that you<br />
define (that includes your action) extend the package that<br />
provides the interceptor stack:<br />
PRODUCTIVITY TIPS | 59<br />
Stack Name Description<br />
basicStack The most basic stack provided by<br />
<strong>Struts2</strong>. Provides exception<br />
handling, HTTP objects and<br />
request/form parameters are injected<br />
into the action, and conversion<br />
errors handled.<br />
Validation Adds validation and workflow to the<br />
WorkflowStack basic stack.<br />
fileUploadStack Adds automatic file uploading<br />
support to the basic stack.<br />
modelDrivenStack Adds support for model driven<br />
actions to the basic stack.<br />
chainStack Adds action chaining support to the<br />
basic stack.<br />
i18nStack Adds internationalization to the<br />
paramsPrepare<br />
ParamsStack<br />
basic stack.<br />
This is the most complex stack<br />
provided. It is used when request<br />
parameters are to be applied to an<br />
action to load data (or perform other<br />
task) when the prepare() method is<br />
called, and then the request<br />
parameters re-applied to override<br />
some of the loaded values. A good<br />
example of using this stack is for an<br />
object update. The id is used to load<br />
the object out of the database, and<br />
then the data from the request is<br />
used to override some of the data<br />
loaded.<br />
defaultStack This is the default stack. For most<br />
scenarios it provides all the<br />
functionality that is required. In<br />
fact, it includes nearly all the<br />
interceptors available in the core
60 | STARTING STRUTS2<br />
distribution.<br />
completeStack This stack provides backward<br />
compatibility for WebWork<br />
applications by providing an alias to<br />
executeAnd<br />
WaitStack<br />
the “defaultStack”.<br />
Adds asynchronous execution of<br />
actions to the default stack.<br />
Take Advantage of Result Types<br />
Result types allow the developer to mix and match how elements<br />
are rendered back to the user of the web application. In fact, one<br />
action could have multiple results and each can be configured<br />
with different result types.<br />
Another important thing to keep in mind when developing, is<br />
that results can be visual as well as non-visual. For example,<br />
returning HTTP headers.<br />
Here is the list of the pre-configured result types, and a brief<br />
explanation of what they do. All of these are available when you<br />
place you action within, or extend the “struts-default” package in<br />
your application:<br />
Name Description<br />
chain Chains from the execution of one action to<br />
another configured action. Copies all<br />
property values with getter methods from<br />
the initial action to corresponding setter<br />
methods on the target action.<br />
dispatcher Renders Java server pages. This is the<br />
default result type, and is used if no result<br />
type is configured in the action<br />
configuration.<br />
freemarker Renders Freemarker templates.<br />
httpheader Returns HTTP headers with user defined<br />
values.
PRODUCTIVITY TIPS | 61<br />
redirect Redirects to any arbitrary URL.<br />
redirect-action Redirect to a configured action. Can be<br />
used to provide redirect after post<br />
functionality.<br />
stream Streams data back to the browser. Used to<br />
stream PDF, Microsoft Word, images, or<br />
other data.<br />
velocity Renders Velocity templates.<br />
xslt Uses an XSLT to format the properties<br />
from the action that has been previously<br />
executed.<br />
Utilize Data Conversion<br />
A common task for web development is converting the string<br />
based form data to the correct types for the model, or for<br />
business service methods. Usually this is a code- intensive<br />
manual process. <strong>Struts2</strong> expedites the process by providing data<br />
conversion for you. The built in conversion will convert a<br />
String to any of the following:<br />
� String<br />
� Boolean or boolean<br />
� Character or char<br />
� Integer or int<br />
� Float or float<br />
� Long or long<br />
� Double or double<br />
� Date – using the locale associated with the current<br />
request<br />
The setter provided on the action can then change from<br />
“setId(String id)” to “setId(int id)”. We no longer need to do<br />
conversions for each value, and can simply use the value with<br />
the correct type that has been set on the action.<br />
For custom type conversions you can implement the class<br />
StrutsTypeConverter. There are two methods that need to be
62 | STARTING STRUTS2<br />
implemented; one to convert from a string to a new type class,<br />
and the other to convert from the new type back to a string.<br />
public class MyTypeConverter extends StrutsTypeConverter{<br />
}<br />
public Object convertFromString(<br />
Map context, String[] values, Class toClass) {<br />
…<br />
}<br />
public String convertToString(Map context, Object o){<br />
…<br />
}<br />
If there is a problem during the conversion, a<br />
TypeConversonException should be thrown to indicate to the<br />
framework that the conversion could not be completed.<br />
To use the new converter in your action class you need to<br />
configure it. This can be achieved using annotation (discussed<br />
in a later section) or by using a separate “*conversion.properties”<br />
file. If the action class that is using the<br />
conversion is called “MyAction”, then you would create a file in<br />
the same package called “MyAction-conversion.properties”.<br />
The file contents would be:<br />
typeVal = MyTypeConverter<br />
The left hand side value “typeVal” is the name of the request or<br />
form value that needs to be converted, and on the right is the full<br />
path and class name of the converter.<br />
If you are using the conversion for multiple actions, you can<br />
avoid configuring each individually and instead use the global<br />
configuration file “xwork-conversion.properties”. This file is<br />
placed in the classpath root of your application. The contents of<br />
the file would be:<br />
MyType = MyTypeConverter
PRODUCTIVITY TIPS | 63<br />
Both values need to be the full path and name of the type class<br />
and the converter class. Notice here that the class name of the<br />
type rather than the name of the request or form value is used.<br />
Hence, the setter on the action would be “setTypeValue(<br />
MyType type)”.<br />
Utilize Tabular Data Entry Support<br />
<strong>Struts2</strong> provides support for using lists to transfer tabulated data<br />
easily between the HTML user interface and actions. Let’s take a<br />
look at an example. Here is a class for Person; each attribute has<br />
a getter and setter (not shown):<br />
public class Person {<br />
int id;<br />
String name;<br />
int age;<br />
float height;<br />
}<br />
Our action would then use the person class in a list:<br />
public class MyAction {<br />
}<br />
public List getPeopleList() { … }<br />
public void setPeopleList( List peopleList ) { … }<br />
…<br />
Before we can use the Person class as an element in MyAction,<br />
we need to add configuration information. This is achieved with<br />
the “MyAction-conversion.properties” file, which is created in<br />
the same package as MyAction. The name follows the same<br />
convention as for validation, the name of the action followed by<br />
a “*-conversion.properties” suffix. The file contents are:<br />
Element_peopleList=Person<br />
The prefix “Element_” is constant, with the last part of the lefthand<br />
value being the name of the list property in the action class.
64 | STARTING STRUTS2<br />
The right-hand side value is the full class name (including<br />
package) of the class that is placed into the list.<br />
To finish the example we need to render the list to the user:<br />
<br />
<br />
<br />
<br />
<br />
<br />
Lists are indexed, so we use the index property of the iterators<br />
status object to reference the element being displayed. This is<br />
not the most efficient way of achieving this particular result, as<br />
the value of the tags could have been simply<br />
“id”, “name”, “age” and “height” respectively. What it does<br />
show is a clean form of what is needed for an editable form.<br />
For a tabular editable form using the same objects, the JSP is:<br />
<br />
<br />
<br />
<br />
<br />
<br />
<br />
<br />
<br />
PRODUCTIVITY TIPS | 65<br />
Notice that the “name” and “value” attribute of this code is<br />
similar to the “value” attribute above. The difference being in<br />
the “name” we need to provide the actual index by surrounding<br />
“#stat.index” with the correct token to obtain a value, and the<br />
“value” attribute has the entire expression surrounded. Using<br />
this code, <strong>Struts2</strong> will create an ArrayList with populated<br />
People objects, and set the list on the action using the<br />
setPeopleList() method.<br />
To allow <strong>Struts2</strong> to create new objects in the list (perhaps you<br />
are dynamically creating elements in the user interface), add the<br />
following line to “MyAction-conversion.properties”<br />
configuration file:<br />
CreateIfNull_peopleList = true<br />
Expose Domain Models in the Action<br />
With both data conversion and collections, we have started to<br />
introduce a trend. Rather than using String values for HTML<br />
form field, proper types can be used. We have also seen that<br />
request attributes and form field values are set directly on the<br />
action via property setter methods.<br />
We can take this a step further. <strong>Struts2</strong> introduces the notion of<br />
a “model-driven action,” reducing the code that is needed to map<br />
the field from the user interface to those of domain objects or<br />
value objects that are used when calling business services.<br />
For an action to be model-driven, it needs to implement the<br />
ModelDriven interface. This has one method that is to return<br />
the object that the action has designated as the model.<br />
public interface ModelDriven {<br />
}<br />
java.lang.Object getModel();
66 | STARTING STRUTS2<br />
The interceptor stack that is used for processing the action also<br />
needs to contain the “model-driven” interceptor. Stacks that<br />
include this interceptor are “modelDriven”, “defaultStack”,<br />
“paramsPrepareParamsStack” and “completeStack”. This<br />
interceptor obtains the model object from the action, and places<br />
it on the value stack ahead of the action so that request or form<br />
values are set on the model instead of the action. Similarly, in<br />
reverse, the values being used and displayed in the JSP will be<br />
obtained from the model.<br />
This is not an “all or nothing” scenario. If there are request or<br />
form values that do not have a corresponding setter on the<br />
model, they will be passed through and be set on the action.<br />
And if the JSP doesn’t find a value on the model, it will continue<br />
down the value stack to obtain the information from the action.<br />
These techniques together allow you to set or retrieve values on<br />
either the model or action, without needing to explicitly specify<br />
the target.<br />
Use Declarative Validation Where Possible<br />
There are two possible ways to provide validation in the <strong>Struts2</strong><br />
application – programmatically and declaratively.<br />
To provide validation programmatically, an action needs to<br />
implement the Validateable interface. This has one method,<br />
which should contain the validations:<br />
void validate();<br />
To report validation problems back to the user, your action needs<br />
to implement the ValidationAware interface. This is a more<br />
complex interface, providing methods to add validation errors,<br />
determine whether there are currently validation errors, etc.<br />
If possible, your action can extend the ActionSupport class,<br />
which provides a default implementation for both these
PRODUCTIVITY TIPS | 67<br />
interfaces. Programmatic validations should only be used when<br />
the validations are extremely complex. A better solution for<br />
validation is to provide them declaratively.<br />
Each action that requires declarative validations will need either<br />
annotations (which will be discussed in a later section) on the<br />
action class, or a corresponding XML file. For the action<br />
MyAction, the file would be named “MyAction-validation.xml”,<br />
and be in the same package as the action. The interceptor stack<br />
that processes the action will also need to include the<br />
“validation” (responsible for performing the validation) and<br />
“workflow” (responsible for redirecting the user back to the<br />
“input” result if a validation failure occurred) interceptors.<br />
Stacks that contain these interceptors are the<br />
“validationWorkflowStack”, paramsPrepareParamsStack ,<br />
“defaultStack” and “completeStack”.<br />
Here is an example of the validation file:<br />
<br />
<br />
<br />
<br />
1<br />
100<br />
<br />
Value must be between ${min} and${max}<br />
<br />
<br />
<br />
<br />
<br />
You must enter a name.<br />
<br />
<br />
<br />
<br />
email.equals(email2)<br />
<br />
Email not the same as email2<br />
<br />
68 | STARTING STRUTS2<br />
A couple of things to note from this example:<br />
� Each field can have one or more “field-validator” nodes<br />
� Each fields validators are executed in the order they are<br />
defined<br />
� Each field validator has a “short-circuit” attribute; if this<br />
is true and the validation fails, all further validations are<br />
skipped and a failed result returned for the field<br />
� The message node can include a “key” attribute which<br />
looks up the message to display to the user from a<br />
message bundle; the value of the node is then used if no<br />
message bundle key exists<br />
� Validator configuration information (such as min and<br />
max) as well as values from the value stack can be used<br />
in the validation message by placing the value between<br />
the tokens “${“ and “}”<br />
� Validators can have a scope of either “field” or<br />
“expression”; expression validators can work across<br />
multiple fields<br />
Below is the full list of validator types along with their<br />
descriptions. More information, including configurations, can<br />
be found at http://struts.apache.org/2.x/docs/validation.html.<br />
Name Description<br />
required Ensures that the property is not null<br />
requiredstring Ensures that a String property is not null<br />
and not empty<br />
stringlength Checks whether a String is within a<br />
specific length range<br />
int Checks whether an int property is within<br />
a specific range<br />
double Checks whether a double property is<br />
within a specific range<br />
date Checks whether a date property is within<br />
a specific range<br />
expression Evaluates an ONGL expression (which
PRODUCTIVITY TIPS | 69<br />
must return a boolean) using the value<br />
stack<br />
fieldexpression Validates a field using an OGNL<br />
expression<br />
email Ensures the property is a valid email<br />
address<br />
url Ensures that the property is a valid URL<br />
conversion Checks whether the there was a<br />
conversion error for the property<br />
regex Checks whether the property value<br />
matches the regular expression<br />
visitor The visitor validator defers the validation<br />
of a field to another validation file specific<br />
to the class of the field.<br />
For example, you are using a model<br />
driven actions and each has a property<br />
called “person” which is a class Person.<br />
If this same model is used across many<br />
actions you will want to extract the<br />
validation information and re-use it. The<br />
visitor validation type allows this<br />
functionality.<br />
In addition to those validators provided by <strong>Struts2</strong>, you can write<br />
your own. Your custom validator would need to implement the<br />
Validator interface (for expression validations) or the<br />
FieldValidator interface (for field validations).<br />
The new validator would need to be registered in a<br />
“validators.xml” file, which is placed in the classpath root<br />
directory. Usually this file is accessed from the distribution JAR<br />
file, but when one is provided the distribution file is ignored. So<br />
if you intend to add any new validators you will need to copy it<br />
from the <strong>Struts2</strong> JAR into the root of the classpath directory, so<br />
that all the current validators are included in your application,<br />
and then add your new validators. Like other configuration it is
70 | STARTING STRUTS2<br />
relatively easy, consisting of a chosen unique name and the class<br />
name of the validator.<br />
<br />
<br />
…<br />
<br />
Move CRUD Operations into the same Action<br />
By combining a model-driven action with the “preparable”<br />
interceptor/interface, wildcards in the action configuration,<br />
validation and workflow you can simplify CRUD operations into<br />
a single action. This approach provides similar functionality to<br />
using the Restful2ActionMapper.<br />
The URL pattern we are using is “/{model}/{method}.action”.<br />
For example, we want “/User/add.action” to call the “add”<br />
method on the UserAction class. We also need to ensure that<br />
there are several result mappings – for “success” (the default),<br />
“input” (for validation problems) and a “home” or default page.<br />
Each of these pages will be specific to the model. The “success”<br />
mapping redirects to an action, following the redirect-after-post<br />
pattern.<br />
The “struts.xml” configuration to manage this is:<br />
<br />
/{1}/view.action<br />
/{1}/view.jsp<br />
/{1}/edit.jsp<br />
/{1}/home.jsp<br />
<br />
The action will need to extend the ActionSupport class<br />
(providing validation and error message handling<br />
implementations) and implement the ModelDriven and
PRODUCTIVITY TIPS | 71<br />
Preparable interfaces. The interceptor stack along with the two<br />
interfaces is the key to making the implementation easy, so let’s<br />
take a look at those in more detail.<br />
The ModelDriven interface provides one method, getModel()<br />
which, in conjunction with the “model-driven” interceptor,<br />
places the model from the action on the value stack ahead of the<br />
action. When request parameters are being set, they are applied<br />
to the model rather than the action. This is what we are after –<br />
setting the values on the model and not the action – as we can<br />
then just update the action. But what if there are data values<br />
already on the model that we do not wish to override?<br />
This is where the “paramsPrepareParamsStack” interceptor stack<br />
comes into play. The steps that we want performed, and the<br />
interceptors within the stack that performs them are:<br />
1. Set the id on the action – the “params” interceptor<br />
2. Allow the action to perform some logic to either create a<br />
new model, or obtain an existing model from a service or<br />
the database – the “prepare” interceptor calling the<br />
prepare() method from the Preparable interface<br />
3. Now that the model exists, set the request attributes onto<br />
the model – the “model-driven” interceptor, followed by<br />
the “params” interceptor again<br />
4. Check the model for validation problems and redirect<br />
back to the input page if necessary – the “validation”<br />
and “workflow” interceptors<br />
5. Execute the logic for the method being invoked - normal<br />
action processing<br />
By following these conventions, every model or entity object in<br />
your web application can be managed with the “struts.xml”<br />
configuration above. What will change is the action<br />
implementation. Following our User example, this is what the<br />
UserAction class will look like:<br />
public class UserAction<br />
extends ActionSupport<br />
implements ModelDriven, Preparable{<br />
private User user;
72 | STARTING STRUTS2<br />
}<br />
private int id;<br />
private UserService service; // user business service<br />
…<br />
public void setId(int id) {<br />
this.id = id;<br />
}<br />
/** create a new user if none exists, otherwise<br />
load the user with the specified id */<br />
public void prepare() throws Exception {<br />
if( id==0 ) {<br />
user = new User();<br />
} else {<br />
user = service.findUserById(id);<br />
}<br />
}<br />
public Object getModel() {<br />
return user;<br />
}<br />
/** create or update the user and then<br />
view the created user */<br />
public String update() {<br />
if( id==0 ) {<br />
service.create(user);<br />
} else {<br />
service.update(user);<br />
}<br />
return “redirect”;<br />
}<br />
/** delete the user and go to a default home page */<br />
public String delete() {<br />
service.deleteById(id);<br />
return “home”;<br />
}<br />
/** show the page allowing the user to<br />
view the existing data */<br />
public String view() {<br />
return “view”;<br />
}<br />
/** show the page allowing the user to view<br />
the existing data and change the values */<br />
public String edit() {<br />
return “input”;<br />
}
PRODUCTIVITY TIPS | 73<br />
The edit() method is invoked by the user when they want to<br />
create a new user or edit an exiting user. This method is simple,<br />
returning ”input”, which returns a page with a HTML form on it.<br />
The form action target URL that is mapped to the update()<br />
method. The update() method could have been split into two<br />
separate methods, but this would complicate the HTML form<br />
and makes little sense as it is easy to determine whether the<br />
object exists by using a unique key field.<br />
Finally, the view() method is a simple pass-through method,<br />
forwarding to a page that displays the user, and the delete()<br />
method removed the user with the specified id and returns to the<br />
user’s default home page.<br />
All of these methods have little or no logic within them, and<br />
could easily be mistaken for doing nothing. In fact, there is<br />
functionality, but it is a cross-cutting concern and as such has<br />
been refactored into the prepare() method. For each of the<br />
edit(), update() and view() methods – if there is a model<br />
that exists it needs to be retrieved, and if there is no model then<br />
one needs to be created.<br />
The action is still relatively simple, and could be easily<br />
parameterized allowing it to be generated for different model<br />
classes and services. With this infrastructure in place, the most<br />
complex piece of developing a CRUD application is creating the<br />
page templates.<br />
Use Annotation Where Possible<br />
<strong>Struts2</strong> was developed for JDK 5, and as such is able to utilize<br />
annotations for configuration. Annotations manifest themselves<br />
in a couple of ways. More information, on annotations,<br />
including code samples, can be found at<br />
http://struts.apache.org/2.x/docs/annotations.html.
74 | STARTING STRUTS2<br />
Zero Configuration<br />
Zero Configuration provides annotation support to avoid the<br />
“action” XML configuration, and if you are always extending<br />
from existing packages the “struts.xml” configuration file can be<br />
avoided all together. It consists of four class-level annotations,<br />
these are:<br />
Annotation Description<br />
Namespace A string value of the desired namespace<br />
(defined in the “struts.xml” configuration<br />
file)<br />
ParentPackage A string value of the desired parent package<br />
Results A list of the “Result” annotations<br />
Result Provides the mapping to the results for the<br />
action, there are four attributes:<br />
� name – the string result from the<br />
action method to configure<br />
� type – the class to<br />
� value – any value that the result type<br />
is expecting, this would be an action<br />
name for redirect result type and a<br />
JSP for the dispatcher result type<br />
� parameters – an array of string<br />
parameters<br />
In addition to using these annotations, there is additional<br />
configuration that is required. In the filter configuration in<br />
web.xml, the packages that are being configured via annotations<br />
need to be specified. This is achieved using an “init-param”<br />
called “actionPackages”, the value being a comma delimited list<br />
of packages.<br />
<br />
struts<br />
<br />
org.apache.struts2.dispatcher.FilterDispatcher<br />
<br />
<br />
actionPackages
user.actions,other.actions<br />
<br />
<br />
<br />
PRODUCTIVITY TIPS | 75<br />
Each of these packages, as well as all their sub-packages, will be<br />
scanned for classes that implement Action or whose name ends<br />
in “Action”, and the annotation configuration is added to the<br />
runtime configuration. If no namespace annotation is used, the<br />
namespace is generated from the package name. This is done by<br />
dropping the part of the package name used in the<br />
“actionPackages” configuration value. In other words, if<br />
“actions” was the “actionPackages” value, and the action being<br />
configured is “actions.admin.user.AddAction”, then the<br />
namespace would be “/admin/user”.<br />
Using these annotations doesn’t avoid the XML altogether - but<br />
it is a great start. Package information such as default<br />
interceptor stacks still needs to be configured, as well as package<br />
hierarchies.<br />
Lifecycle Callbacks<br />
There are three method-level lifecycle callback annotations, each<br />
invoked at a specific time during the processing of an action.<br />
The lifecycle callbacks are different from interceptors and action<br />
proxies, as they are specific to the action class being invoked<br />
instead of a single class that is utilized across many action<br />
classes.<br />
Annotation Description<br />
Before The method annotated will be invoked<br />
before the method that performs the logic<br />
for the action.<br />
BeforeResult The method annotated will be invoked after<br />
the method that performs the logic for the<br />
action, but before the result is invoked.<br />
After The method annotated will be invoked after<br />
result is invoked, but before the result is<br />
returned to the user.
76 | STARTING STRUTS2<br />
Validation<br />
For each of the XML configured validators, there is a<br />
corresponding annotation. Each annotation will have properties<br />
similar to those configured via XML. There are also annotations<br />
for defining a class as using annotation based validation,<br />
configuring custom validators, and to group validations for a<br />
property or class.<br />
Annotation Name XML Description<br />
Equivalent<br />
RequiredFieldValidator required Ensures that<br />
the property is<br />
not null.<br />
RequiredStringValidator requiredstring Ensures that a<br />
String<br />
property is not<br />
null and not<br />
empty.<br />
StringLengthFieldValidator stringlength Checks<br />
whether a<br />
String is<br />
within a<br />
specific<br />
length range.<br />
IntRangeFieldValidator int Checks<br />
whether an<br />
int property<br />
is within a<br />
specific range.<br />
DoubleRangeFieldValidator double Checks<br />
whether a<br />
double<br />
property is<br />
within a<br />
specific range.<br />
DateRangeFieldValidator date Checks<br />
whether a<br />
date property
PRODUCTIVITY TIPS | 77<br />
is within a<br />
specific range.<br />
ExpressionValidator expression Evaluates an<br />
ONGL<br />
expression<br />
(which must<br />
return a<br />
boolean)<br />
using the<br />
FieldExpressionValidator fieldexpressio<br />
n<br />
value stack.<br />
Validates a<br />
field using an<br />
OGNL<br />
expression.<br />
EmailValidator email Ensures the<br />
property is a<br />
valid email<br />
address.<br />
UrlValidator url Ensures that<br />
the property is<br />
ConversionError<br />
FieldValidator<br />
a valid URL.<br />
conversion Checks<br />
whether the<br />
there was a<br />
conversion<br />
error for the<br />
property.<br />
RegexFieldValidator regex Checks<br />
whether the<br />
property value<br />
matches the<br />
regular<br />
VisitorFieldValidator<br />
expression.<br />
visitor The visitor<br />
validator<br />
defers the<br />
validation of a<br />
field to
78 | STARTING STRUTS2<br />
another<br />
validation file<br />
specific to the<br />
class of the<br />
field.<br />
StringRegexValidator n/a Checks<br />
whether the<br />
string<br />
property value<br />
matches the<br />
regular<br />
expression.<br />
CustomValidator n/a Used to<br />
signify that a<br />
custom<br />
validator is<br />
being used.<br />
ValidationParameter n/a Used as a<br />
parameter<br />
within the<br />
CustomValida<br />
tor annotation.<br />
Validation n/a Used to<br />
signify that<br />
the class is<br />
using<br />
annotation<br />
based<br />
validation –<br />
can be used<br />
on interfaces<br />
or classes.<br />
Validations n/a Used to group<br />
together<br />
multiple<br />
validations for<br />
a property or<br />
class.
PRODUCTIVITY TIPS | 79<br />
Conversion and Collections<br />
Like the validation annotations, the conversion and collection<br />
annotation provide a corresponding annotation for each option<br />
that is configured via the “*-conversion.properties” file.<br />
Annotation Name Description<br />
KeyProperty Used to specify the property that is to be<br />
used as the key.<br />
Key The class to use for the key of the map.<br />
Element The class to use for the value/element of<br />
the collection, list or map.<br />
CreateIfNull Determines if the new element should be<br />
created if it currently does not exist in the<br />
list or map.<br />
Conversion Used to signify that the class is using<br />
annotation based conversion – can be<br />
used on interfaces or classes.<br />
TypeConversion Determine the converter class to use. If<br />
used on a collection, a rule of<br />
PROPERTY, MAP, KEY,<br />
KEY_PROPERTY or ELEMENT can be<br />
used to specific exactly which part is to<br />
be converted.<br />
Options for View Technologies<br />
As we saw when talking about the core elements, the tag<br />
libraries are not only accessible using JSPs, but they can also be<br />
used in Velocity and Freemarker templates or extended for other<br />
view technologies. As Velocity and Freemarker are first-class<br />
citizens with full tag library support, the developer can choose<br />
the best view technology for the project.<br />
As an example of the similarities and differences, let’s take a<br />
look at how the text field tag would be rendered in each view<br />
technology. The text field tag is a common form tag – rendering<br />
a HTML form element that allows the user to enter text. There
80 | STARTING STRUTS2<br />
are many attributes to this element, but just two will be shown<br />
here – the name attribute, which is the name used to reference<br />
this element (both in the HTML and the action attribute); and the<br />
label attribute, which is used to display a label in front of the text<br />
input box.<br />
For JSPs, the tag library needs to be defined before any tags are<br />
used. This occurs once at the start of each JSP page, after which<br />
the prefix (in this case “s”) can be used to reference the tag<br />
libraries.<br />
<br />
<br />
In Freemarker and Velocity there is less structure than with JSP,<br />
as there is no concept of tag libraries. Instead, any object that is<br />
added into the templates context will be accessible to the page<br />
template. The JSP tag libraries are such objects. The HTTP<br />
servlet request and response, value stack and the action just<br />
executed are also placed in the templates context to be used.<br />
Similarly to JSPs, Freemarker templates use the “s” prefix to<br />
reference the JSP tag libraries. Other attributes of the templates<br />
are also very similar to HTML – they start with an””, and the attributes are the same. The one difference<br />
is that an “@” symbol is used after the initial angled bracket.<br />
<br />
More information on Freemarker can be found at<br />
http://freemarker.sourceforge.net/.<br />
Velocity is much less HTML-like syntax than Freemarker. Each<br />
JSP tag name is prefixed with “#s”, and the name-value pairs are<br />
delimited by double quotes within parenthesis.<br />
#stextfield ("label=Name" "name=person.name")
PRODUCTIVITY TIPS | 81<br />
More information on Velocity can be found at<br />
http://velocity.apache.org/.<br />
As well as JSP, Velocity and Freemarker, XML can be rendered<br />
either directly from the action, or via an XSL transformation<br />
using the XSLT result type. There is also some interesting work<br />
going on that would allow <strong>Struts2</strong> to accept form or request<br />
input in JSON format, and render output results as JSON format<br />
– making <strong>Struts2</strong> a flexible server for any type of view<br />
technology, or even a combination of view technologies for the<br />
same action in the same project.<br />
Know the Provided Tag Libraries and their<br />
Features<br />
To provide integration from the user interface back into the<br />
action, and to manipulate this information, <strong>Struts2</strong> provides<br />
various tag libraries that are accessible to JSP, Velocity and<br />
Freemarker views.<br />
By default, the value attribute of the form tags and many of the<br />
attributes of the other tags accept OGNL expressions. If the<br />
attribute you are interested in does not do this by default – for<br />
example the “label” attribute – there is a high probability that<br />
you can execute expressions by surrounding the expression with<br />
the tokens “%{“ and “}”.<br />
Being able to execute OGNL expressions is a powerful feature,<br />
especially since the tag libraries also have access to the value<br />
stack with which you can:<br />
� Access named HTTP objects for the application scope,<br />
session scope, request scope as well as the attributes and<br />
parameters of the request<br />
� Access the action that has just been executed<br />
� Access the model from the action that has just been<br />
executed
82 | STARTING STRUTS2<br />
� Access temporary object – for example the object<br />
representing the current loop of the iteration, or perhaps<br />
an object that you have placed on the value stack<br />
� Store temporary objects<br />
� Obtain validation issues from the last action executed<br />
� Obtain internationalization text for provided keys<br />
� Make calls to methods of static objects and obtain values<br />
of static properties<br />
Up-to-date information regarding the tag libraries can be found<br />
at http://struts.apache.org/2.x/docs/tag-reference.html. To get<br />
you started, here are the tags from all four categories along with<br />
descriptions. Individual attributes of each tag, as well as more<br />
detailed usage information, can be found by following the link<br />
above.<br />
Those tags marked with an asterisk (*) are either Ajax-based<br />
tags, or are able to operate in either an Ajax or non-Ajax mode.<br />
Control Tags<br />
Name Description<br />
if, elseif & else These three tags provide flow control<br />
logic with the page. The “if” and “elseif”<br />
provide a “test” attribute which must<br />
contain an OGNL expression that<br />
evaluates to a boolean result.<br />
append Used to append multiple iterators together<br />
into a single iterator. Each iterator is<br />
specified using a contained “param” tag.<br />
All elements from each iterator are added<br />
to the resulting iterator in the order<br />
specified.<br />
generator Generates an iterator from a delimited list<br />
within a string value. The delimiter<br />
character, as well as custom converters
PRODUCTIVITY TIPS | 83<br />
can be specified.<br />
iterator Iterate over a collection. Accessing an<br />
iterator status object (to provide<br />
information about the current loop<br />
position) as well as being able to specify<br />
the id of the current loop object is<br />
possible.<br />
merge Used to merge multiple iterators together<br />
into a single iterator. Each iterator is<br />
specified using a contained “param” tag.<br />
The resulting iterator has all the first<br />
elements, then all the second elements,<br />
etc. from each iterator, in turn, in the<br />
resulting iterator (in the order specified).<br />
sort Sorts a collection by a specific<br />
comparator. The resulting collection can<br />
then be iterated over from within this tag.<br />
subset Selects a subset of the collection. This<br />
can be decided by range, or by providing<br />
a custom decider object. The resulting<br />
collection can then be iterated over from<br />
within this tag.<br />
Data Tags<br />
Name Description<br />
a* Renders a HTML link element.<br />
action Calls an action from within a page, and<br />
can be configured to render the results.<br />
This tag can be used as a dynamic include,<br />
to call a common action to obtain data<br />
without rendering a result, or in place of<br />
calling actions before the page template.<br />
bean Instantiates a bean of the specified class<br />
and places it on the value stack. Using the<br />
contained “param” tag you can set<br />
properties on the newly created object.
84 | STARTING STRUTS2<br />
date Formats a Date object.<br />
debug Renders information about the value stack<br />
for debugging.<br />
i18n Places additional resource bundles on the<br />
stack to use for internationalization text.<br />
include Makes a call and dynamically includes the<br />
result in the current page. Request<br />
parameters can be specified using a<br />
contained “param” tag.<br />
param A generic tag used to specify name value<br />
pairs, where the value can be static text or<br />
specified as an expression obtained via the<br />
value stack. This tag is not used by itself,<br />
but rather contained as a sub-tag of other<br />
tags.<br />
push Pushes a value on to the value stack.<br />
set Takes a value from the value stack and<br />
sets it as an attribute under a specific<br />
HTTP scope (application, session, request,<br />
page or action).<br />
text Retrieves a text value from a resource<br />
bundle for a specified key. The “param”<br />
tag can be used to specify additional<br />
variables from within the resulting text.<br />
url Generates a valid URL (including the<br />
servlet context or any portlet information)<br />
assigning it to an id in the value stack.<br />
property Obtains the value of a property from the<br />
value stack. This may be a complex path,<br />
and a default value can be specified if the<br />
value has not been assigned.
PRODUCTIVITY TIPS | 85<br />
Form Tags<br />
Name Description<br />
checkbox Renders a single HTML checkbox<br />
element.<br />
checkboxlist Renders a series of HTML checkbox<br />
elements by using a list of objects as the<br />
input data.<br />
combobox Provides combo-box functionality by<br />
placing a text HTML input and select<br />
HTML input elements together. The<br />
user can then either select from the list<br />
or enter a new value.<br />
datetimepicker Renders a HTML drop-down widget<br />
that allows the user to select a date /<br />
time.<br />
doubleselect Renders two HTML select elements.<br />
Selecting a value from the first list will<br />
change the options in the second list.<br />
head Renders HTML header information,<br />
specifically used to include CSS and<br />
JavaScript files used in themes.<br />
file Renders a HTML file input element.<br />
form* Renders a HTML form element.<br />
hidden Renders a HTML hidden element.<br />
label Renders a HTML label, allowing for<br />
optiontransfer<br />
select<br />
consistent UI treatments.<br />
Renders two HTML select elements<br />
with HTML buttons between them. The<br />
buttons allowing the user to transfer<br />
values between the lists.<br />
optgroup Creates an option select group with a<br />
HTML select element.<br />
password Renders a HTML password element.<br />
reset Renders a reset button as either a HTML<br />
button or HTML input field.<br />
select Renders a HTML select element.
86 | STARTING STRUTS2<br />
submit* Renders a HTML submit button or link<br />
– could be a HTML input element, and<br />
image element or a button element.<br />
When using the default ActionMapper<br />
there are four special “name” attribute<br />
prefixes for the submit tag that alter the<br />
URL, action or method that the form<br />
would normally invoke. These are:<br />
“method:”, “action:”, “redirect:” and<br />
“redirect-action”. Place the method,<br />
URL or action to be invoked after the<br />
colon in the name. More information<br />
can be found at<br />
http://struts.apache.org/2.x/docs/actionm<br />
apper.html.<br />
textarea Renders a HTML text area element.<br />
textfield Renders a HTML text field element.<br />
token Renders a token that stops the double<br />
submission of forms by the user. Works<br />
in conjunction with the “token” or<br />
“token-session” interceptors.<br />
updownselect Renders a HTML select element along<br />
with HTML buttons that move the<br />
selected item in the list up or down.<br />
When submitted, the list elements will<br />
remain in the order that they are<br />
arranged.<br />
Non-Form UI Tags<br />
Name Description<br />
actionerror Renders any errors from the action that<br />
has just executed.<br />
actionmessage Renders any messages from the action<br />
that has just executed.<br />
component Renders a custom UI widget.
PRODUCTIVITY TIPS | 87<br />
Code that is being copied into multiple<br />
templates can be extracted into a custom<br />
component. The custom component is<br />
placed into the target template before<br />
rendering starts. Each component can<br />
be further customized via “param” tags<br />
from each template it is being included<br />
from.<br />
div* Renders a HTML DIV element.<br />
fielderror Renders any field level errors from the<br />
action that has just executed.<br />
tabbedpanel* Renders a HTML tabbed panel widget.<br />
tree & treenode Renders a HTML tree widget.<br />
Customize UI Themes<br />
As part of the tag library architecture, each tag has classes that<br />
manage the model and the logic, as well as one or more<br />
Freemarker templates that control how the element is rendered in<br />
HTML. The templates can be utilitarian, providing just the<br />
necessary HTML elements or, in the case of the form and nonform<br />
UI tag categories, it can provide rich formatting, including<br />
data for the form element as well as message and error<br />
information.<br />
For the most basic user interface needs, the default layouts may<br />
suffice. However, it is more likely that there are more complex<br />
requirements that need to be incorporated. With the new layouts<br />
you have two options – the HTML can be incorporated into each<br />
and every page in the application, or the default theme templates<br />
can be modified to provide new themes for the necessary<br />
changes. Like extracting visual formatting information into CSS<br />
files, creating new themes provides significant maintenance<br />
benefits (especially as the number of pages in the application<br />
grows).
88 | STARTING STRUTS2<br />
Creating or modifying a theme is easy. Create a directory called<br />
“template” in the root web application directory. Now you have<br />
some options.<br />
If you want to create a new theme, create a new directory with<br />
the name for the new theme in the “template” directory – for<br />
example let’s call it “modified”. From here, you can start<br />
building templates from scratch, or you can copy the templates<br />
from the <strong>Struts2</strong> distribution and modify them as needed. When<br />
you want the tag to use the new “modified” theme rather than<br />
the default “xhtml” theme, you will need to change the theme<br />
attribute on each and every tag to “modified”.<br />
<br />
If you only wish to change certain templates, you can override<br />
specific templates only. Create a directory called “xhtml” (this<br />
is the default theme in <strong>Struts2</strong>) in the “template” directory<br />
created above. Next, create new templates or modify template<br />
from the <strong>Struts2</strong> distribution. It is very important to keep the<br />
names the same as they are in the <strong>Struts2</strong> distribution. As the<br />
template is the same name, we are using the same theme as the<br />
default, and the web applications “template” directory is<br />
searched before the <strong>Struts2</strong> JAR file – the modified templates<br />
will be used without any further intervention from us.<br />
If you wish to completely replace a theme, modify the<br />
“struts.properties” file. In our case, we want the change the<br />
“struts.ui.theme” property to our new “modified” theme. There<br />
is also an option to change the directory that the theme templates<br />
reside in.<br />
struts.ui.theme=modified<br />
struts.ui.templateDir=template
PRODUCTIVITY TIPS | 89<br />
Use Global Results for Common Outcomes<br />
Results are configured for the outcomes of specific actions, but<br />
they can also be defined globally for a package scope.<br />
Refactoring out common action results, such as “error” or<br />
“logon”, as application results allows each action configuration<br />
to be streamlined and deal only with those results that are<br />
specific to the logic being executed.<br />
The tag used in the global results has exactly the<br />
same form as that used in the action results – with a unique user<br />
provided “name” attribute and a “type” attribute to allow for<br />
different rendering options. The difference is that the global<br />
results tags are placed in a tag under<br />
the root tag.<br />
<br />
<br />
/logon.jsp<br />
/error.jsp<br />
…<br />
<br />
…<br />
<br />
Once defined in the “struts.xml” configuration file, any action in<br />
the application can utilize the result.<br />
Manage Exception Handling Declaratively<br />
When developing web applications, there are several different<br />
categories of exceptions that need to be handled. There are<br />
those exceptions that are specific to the service or business<br />
object being called – these cannot be handled declaratively, and<br />
will need to be handled programmatically as normal.<br />
But there are also exceptions that:<br />
� Cannot be handled and need the user to be directed to an<br />
error page until the problem is rectified. This is
90 | STARTING STRUTS2<br />
generally a system level or resource level problem, and<br />
not related to the web application logic. An example<br />
would be a network problem causing issues connecting<br />
to the database.<br />
� Are not logic related problems, but do require the user to<br />
be redirected to perform additional tasks. An example<br />
would be a security exception being thrown because the<br />
user has tried to access a web page without logging on.<br />
Once the user has logged on to the system, they can<br />
continue without problems.<br />
� Are logic related problems and can be recovered from by<br />
modifying the user workflow. This category is usually<br />
resource related and would include exceptions related to<br />
unique constraint violations, concurrent modification of<br />
data or locking problems.<br />
All these exception categories can be handled declaratively<br />
without the need to modify actions.<br />
When the exception can be thrown by any action in the web<br />
application, it should be defined as a global exception. Global<br />
exceptions are placed in a <br />
tag under the tag in the “struts.xml”<br />
configuration file.<br />
<br />
<br />
<br />
<br />
Under the tag there can<br />
be any number of tags. Each<br />
mapping has two attributes – an “exception” attribute that<br />
defines the package and name of the class of the exception, and<br />
the “result” attribute that defines the result to be redirected to.<br />
Each exception mapping is checked in the order that it is<br />
configured. Once a matching exception (or a sub-class) is
PRODUCTIVITY TIPS | 91<br />
found, processing stops and the request is forwarded to the<br />
configured and previously mapped result. Otherwise, the next<br />
exception configured is processed for a match.<br />
If the exception is limited to the scope of an action, the same<br />
tag can be configured within the<br />
tag.<br />
<br />
view.jsp<br />
<br />
<br />
<br />
The attributes of the tag are exactly the same as the global<br />
definition. If no matching exception is found for an action level<br />
exception mapping, the global mappings are processed for a<br />
match.<br />
You will also need to ensure that the “exception” interceptor is<br />
in the interceptor stack configured for actions that require<br />
declarative exception handling. By default, the “exception”<br />
interceptor is included in all interceptor stacks provided in<br />
<strong>Struts2</strong>.<br />
As well as modifying the result that is processed when an<br />
exception is thrown, the “exception” interceptor adds two<br />
elements to the value stack to provide information about the<br />
exception.<br />
Name Description<br />
exception The exception object that was thrown.<br />
exceptionStack The string value of the stack trace.<br />
These values can be used to display the exception stack trace to<br />
the user, to display a friendly user message, or even to re-arrange<br />
the page layout to allow for additional data entry and then resubmission<br />
of a form.
92 | STARTING STRUTS2<br />
Internationalization<br />
<strong>Struts2</strong> provides extensive internationalization support through<br />
resource bundles, interceptors and tag libraries. The core<br />
functionality is provided via resource bundles, so we’ll start our<br />
discussion there.<br />
Resource Bundles<br />
<strong>Struts2</strong> uses resource bundles to provide multiple language and<br />
locale options to the users of the web application. There is no<br />
requirement to provide a single monolithic file with all the text<br />
from the entire application (although this option is supported by<br />
using only a properties file for a common action base). Instead,<br />
the properties files for the application can be broken down into<br />
manageable sizes.<br />
Properties files named corresponding to the action class (base<br />
classes and interfaces) and package scopes, or as arbitrary file<br />
names. To find a keys value, the properties files are searched in<br />
the following order until the key is found:<br />
1. The properties file for the action class – i.e.<br />
MyAction.properties<br />
2. The properties file for each base class in the action<br />
hierarchy, all the way up to Object.properties<br />
3. A properties file for each interface and sub-interface<br />
4. If the action is model-driven, a properties file for the<br />
model objects class (and each base class, interface and<br />
sub-interface for the model class)<br />
5. A properties file called “package.properties” in each<br />
package from the action back up to the root package<br />
6. Properties files configured in “struts.properties” under<br />
the “struts.custom.i18n.resources” configuration key.<br />
This provides a lot of flexibility.
PRODUCTIVITY TIPS | 93<br />
Interceptors and Determining the Locale<br />
By default, <strong>Struts2</strong> will set the users locale for the session from<br />
the HttpServletRequest object. This comes directly from the<br />
web browser, and is based on the Accept-Language HTTP<br />
header.<br />
When a web application needs to present content in multiple<br />
languages that are not dependant on the locale of the web<br />
browser, the “i18n” interceptor can be used. This interceptor<br />
checks for a request parameter called “request_locale”, and<br />
saves this information to the user session. Then, until it is<br />
changed by the request parameter again, the specified locale will<br />
remain as the locale for the remained of the user’s session.<br />
Tag Libraries<br />
Tag libraries are the final piece in the puzzle. All tags support<br />
internationalization via locales when it makes sense. For<br />
example, the “date” tag uses the users locale to determine the<br />
correct formatting for the date; the “actionerror” and “fielderror”<br />
tags use the provided keys from the declarative validation<br />
configuration to obtain message text to render; as does the<br />
“actionmessage” tag. There are a few tags that deserve more<br />
detailed attention.<br />
There are two way to programmatically obtain internationalized<br />
text for a page, both require the action to extend ActionSupport<br />
so that the necessary internationalization methods are available.<br />
The first is by using the “text” tag, which searches for text for<br />
the key provided by the “name” attribute:<br />
<br />
<br />
Mr Smith<br />
94 | STARTING STRUTS2<br />
Additional information can be provided in the resource bundle<br />
values using tokens. The examples above would correspond to<br />
the following properties file entries:<br />
label.greeting=Hello there!<br />
label.greeting2=Hello there {0}!<br />
The second way of obtaining the text values is by using OGNL<br />
methods and the “property” tag. The difference between this<br />
technique and the previous one is the stylistic choice of the<br />
developer x . Being a method call, the OGNL expression can be<br />
used in any tag that evaluates expressions. Using the same<br />
example from above, the JSP would be:<br />
<br />
<br />
Mr Smith<br />
<br />
Because the “label” attribute is not by default an OGNL<br />
expression, we need to use the “%{“ and “}” token to force<br />
<strong>Struts2</strong> to interpret it as an expression.<br />
<br />
If there is a need for large sections of text, OGNL expressions<br />
can be used in the “include” tag to specify special language<br />
directories. Just make sure that each action extends a base class<br />
that exposes a method to determine the locale directory. In this<br />
case we have a getLocaleDirectory() method:<br />
<br />
The i18n tag provides a way to provide additional resource<br />
bundles to the value stack of the page being rendered, the<br />
“name” attribute providing the name of the resource bundle.<br />
Any tag contained within the “i18n” tag will then have access to<br />
the new resource bundle text.
The value for abc in myCustomBundle<br />
is <br />
<br />
PRODUCTIVITY TIPS | 95
Free Online Version.<br />
Support this work, buy the print copy:<br />
http://infoq.com/minibooks/startingstruts2<br />
6<br />
Integrating with Other Technologies<br />
In previous chapters we have covered the techniques for<br />
integrating external technologies with <strong>Struts2</strong>. To recap, here<br />
are the techniques:<br />
� Interceptors – can change the user’s workflow, modified<br />
the result and inject objects into the action<br />
� Result Types – allows post-processing, and additional<br />
result-based processing or rendering of information<br />
returned by the action<br />
� Plug-in packages – new interceptors, result types, results<br />
and actions can be packaged together into a plug-in that<br />
can be re-used across many projects<br />
� Plug-in extensions points – allows new implementations<br />
of the core framework classes to be substituted in to<br />
<strong>Struts2</strong>, thus changing the way the framework behaves<br />
The goal of this chapter is not to describe every and each of the<br />
integration options in detail, but rather to provide a brief<br />
overview to what types of integrations are possible, how the<br />
integration is achieved, some basic configuration information<br />
and where to find more information. This chapter is also not<br />
intended to provide information on how to use the library used<br />
for integration, but assumes that the reader understands the<br />
functionality already.<br />
Up-to-date information regarding all integrations (Apache and<br />
3 rd party) can be found on the <strong>Struts2</strong> wiki at<br />
http://cwiki.apache.org/S2PLUGINS/home.html. New projects<br />
are constantly being added. If you don’t see what you need now,<br />
check back in a few months because it might have been added.<br />
And if you’re adding a new integration to your own web
98 | STARTING STRUTS2<br />
application, consider implementing it as a plug-in and sharing it<br />
with others.<br />
Page Decoration and Layout<br />
Developing web applications usually means there is going to be<br />
a standard page layout that is used for the entire application, as<br />
well as a selection of additional layouts to be used for various<br />
modules, pages and wizards. Depending on whether your<br />
preference is to specify the layout, or to let the URL specify the<br />
layout, you will most likely choose either Struts Tiles xi or<br />
SiteMesh xii . <strong>Struts2</strong> provides integrations for both these layout<br />
technologies.<br />
SiteMesh<br />
SiteMesh is installed by adding the plug-in xiii into your web<br />
applications “/WEB-INF/lib” directory or by adding a<br />
dependency to your Maven2 “pom.xml” build file:<br />
<br />
org.apache.struts<br />
struts2-sitemesh-plugin<br />
2.0.6<br />
<br />
A servlet filter also needs to be configured. This filter enables<br />
access to the value stack from the SiteMesh decorators, and<br />
ensures that the ActionContext is cleaned up when the<br />
decorator has finished (and not before).<br />
<br />
struts-cleanup<br />
<br />
org.apache.struts2.dispatcher.ActionContextCleanUp<br />
<br />
<br />
If you are using Freemarker or Velocity for page rendering, you<br />
will need to add one of these additional filters:
INTEGRATING WITH OTHER TECHNOLOGIES| 99<br />
<br />
sitemesh<br />
<br />
org.apache.struts2.sitemesh.FreeMarkerPageFilter<br />
<br />
<br />
<br />
sitemesh<br />
<br />
org.apache.struts2.sitemesh.VelocityPageFilter<br />
<br />
<br />
Finally, the order of the filter mappings is important. Both the<br />
“struts-cleanup” and the “sitemesh” (if used) filter need to be<br />
configured before the “struts” (FilterDispatcher) filter:<br />
<br />
struts-cleanup<br />
/*<br />
<br />
<br />
sitemesh<br />
/*<br />
<br />
…<br />
<br />
struts<br />
/*<br />
<br />
The specific decorator files for the web application can now be<br />
developed, and configured to match specific URL patterns or<br />
metadata in “decorators.xml”.<br />
Tiles<br />
Apache Tiles, just like SiteMesh, is installed by adding the plugin<br />
xiv into your web applications “/WEB-INF/lib” directory or by<br />
adding a dependency to your Maven2 “pom.xml” build file:<br />
<br />
org.apache.struts<br />
struts2-tiles-plugin<br />
2.0.6<br />
100 | STARTING STRUTS2<br />
In order to load the tiles configuration, a servlet listener needs to<br />
be configured:<br />
<br />
<br />
org.apache.struts2.tiles.StrutsTilesListener<br />
<br />
<br />
The listener loads the “tiles.xml” configuration file, which<br />
defines each tile for your application, from the “WEB-INF”<br />
directory. Unlike SiteMesh, Tiles are implemented as a new<br />
result type. Each action result that wishes to use a Tiles layout<br />
needs to provide the attribute “type” with value “tiles” (or<br />
alternately set the Tiles result to be the default), and provide the<br />
name of the tile to use. The Tile name needs to be defined in the<br />
configuration file “tiles.xml”.<br />
<br />
myaction.layout<br />
<br />
Version 2 of Tiles is used in <strong>Struts2</strong>. This version has not yet<br />
had a stable release and could undergo further change. For this<br />
reason Tiles support is currently marked as experimental in<br />
<strong>Struts2</strong>.<br />
Business Services / Dependency Injection<br />
The Spring Framework plug-in is the preferred dependency<br />
injection (DI) or inversion of control (IoC) container for <strong>Struts2</strong>,<br />
and as such is responsible for providing fully configured<br />
business service instances to actions.<br />
There are several options available, each at different levels of<br />
stability:<br />
� The Plexus xv plug-in is a new addition to the code base,<br />
and it is currently marked as experimental. By using a<br />
Plexus id, rather than the class name in any of the<br />
“struts.xml” configuration file entries, Plexus will create<br />
the class instance and inject all dependencies it is aware
INTEGRATING WITH OTHER TECHNOLOGIES| 101<br />
of. More information of the plug-in can be found at<br />
http://cwiki.apache.org/S2PLUGINS/plexus-plugin.html.<br />
� PicoContainer xvi is another option for an IoC container<br />
and although WebWork provided support, a <strong>Struts2</strong> plugin<br />
does not currently exist.<br />
� EJB3, although not an IoC container, is another<br />
technology that can be used to provide business services<br />
to your actions. EJB3 is currently not supported via<br />
plug-ins; however the implementation would be simple.<br />
There are three options available – implement a custom<br />
ObjectFactory to obtain EJB references for actions and<br />
install the new factory in your web application using the<br />
“struts.objectFactory” property in the “struts.properties”<br />
configuration file; create a new interceptor that<br />
interrogates each actions and injects an EJB reference as<br />
required; or use the Spring framework plug-in to access<br />
either JPA or EJBs; a tutorial is provide at<br />
http://cwiki.apache.org/S2WIKI/struts-2-spring-jpaajax.html.<br />
As the Spring Framework is the preferred library, we are going<br />
to focus on it.<br />
Spring Framework<br />
Installing Spring support involves downloading and copying the<br />
Spring plug-in xvii into your web applications “/WEB-INF/lib”<br />
directory or adding the Spring plug-in as a dependency to your<br />
Maven2 “pom.xml” build file:<br />
<br />
org.apache.struts<br />
struts2-spring-plugin<br />
2.0.6<br />
<br />
To the “web.xml” configuration file you will need to add two<br />
blocks of code. The first registers a listener that enables Spring<br />
integration for application objects:
102 | STARTING STRUTS2<br />
<br />
<br />
org.springframework.web.context.ContextLoaderListener<br />
<br />
<br />
And then the location of the Spring configuration file needs to be<br />
specific. In this case, any XML file starting with<br />
“applicationContext” will be loaded:<br />
<br />
contextConfigLocation<br />
<br />
classpath*:applicationContext*.xml<br />
<br />
<br />
You are now ready to go with Spring support. Any object that<br />
needs to be created will be delegated to the Spring object<br />
factory. If it knows how to create the object instance it will,<br />
otherwise the responsibility will fall back to the framework to<br />
create the instance.<br />
For all objects created, whether by the Spring object factory or<br />
by <strong>Struts2</strong>, Spring will be consulted to determine whether it<br />
manages any dependant objects. As the default DI container, it<br />
will obtain an instance of any dependant objects and set them on<br />
the target object instance as necessary. This is especially<br />
important for the action class, as the action itself will most likely<br />
be created by <strong>Struts2</strong> but it will need to have its business<br />
services injected by Spring.<br />
Another important factor is how the dependency wiring is<br />
determined. For the following class, should Spring inject the<br />
bean with an id value of “service” or class type “MyService”?
public class MyAction {<br />
}<br />
INTEGRATING WITH OTHER TECHNOLOGIES| 103<br />
private MyService myService;<br />
public void setService( MyService service ) {<br />
myService = service;<br />
}<br />
public String execute() {<br />
…<br />
}<br />
The answer is the id with value “service”, but this can be<br />
configured. The property in the “struts.properties” file that need<br />
to be modified is “struts.objectFactory.spring.autoWire” – by<br />
default this value is “name” but there are four options:<br />
Value Description<br />
name Spring uses the name / id value in the<br />
bean definition to auto-wire the bean.<br />
type Spring uses the class name in the bean<br />
definition to auto-wire the bean.<br />
auto Spring will determine the best method<br />
of wiring the bean.<br />
constructor Spring will auto-wire via the beans<br />
constructor.<br />
There is also a way to have the action completely managed by<br />
Spring. This is a more complex configuration, and those that are<br />
interested can refer to the Spring plug-in documentation.<br />
Databases<br />
There is nothing special that enables database integration in<br />
<strong>Struts2</strong>, however, there are different ways that database access<br />
can be employed:<br />
� Via Tag Libraries – since you are using an action based<br />
framework this is probably not the best option, but it is<br />
possible; data can be accessed directly from JSPs via tag<br />
libraries (JSTL or custom libraries) that then format the<br />
information
104 | STARTING STRUTS2<br />
� Custom DAOs via Dependency Injection – if you are<br />
using dependency inject, you can take advantage of the<br />
library to inject in your custom data access objects<br />
(DAO) that are required in the action; once the action has<br />
a reference to the DAO, it can call the methods as if it<br />
had created the instance itself<br />
� DAO / ORM via Dependency Injection – if you are taking<br />
advantage of advanced DAO or ORM libraries (such as<br />
iBatis or Hibernate) you should invest in utilizing a fullyfeatures<br />
dependency injection framework such as Spring;<br />
Spring provides everything necessary to configure and<br />
initialize many different DAO and ORM libraries,<br />
requiring very little from the actions; when the action is<br />
ready for the business logic to be executed, all the<br />
necessary data access object instances are ready to go<br />
� Accessed Indirectly via Business Services – instead of<br />
accessing the data access object directly, the calls are<br />
made indirectly via business services; the business<br />
service, like the previous options, are injected into the<br />
action by the dependency injection framework<br />
As a side note, if you are thinking about utilizing Hibernate as an<br />
ORM technology on your project, investigate the<br />
“OpenSessionInView” filter or interceptor. Having the<br />
Hibernate session open until the rendering of the JSP is complete<br />
allows Hibernate to perform lazy-loading fetches to the database<br />
successfully. Otherwise, the action or business service or DAO<br />
would need to pre-fetch all the collections that the JSP needs<br />
ahead of time.<br />
Security<br />
Like database integration, there is nothing special that provides<br />
security integration in <strong>Struts2</strong>. It is up to the application<br />
architect or developer to decide at which layers in the<br />
infrastructure or application authorization and authentication<br />
occur.
INTEGRATING WITH OTHER TECHNOLOGIES| 105<br />
Authentication can occur:<br />
� External to the application – an example would be a<br />
single sign-on (SSO) server or authentication modules<br />
provided by the application server<br />
� Within the application – via a HTML form or another<br />
type of challenge-response mechanism<br />
Authorization can occur:<br />
� At the URI level – each URI that is requested is matched<br />
against the user credentials (that made the request) to see<br />
if they are allowed access<br />
� At the sub-page level – there may be certain sections of a<br />
page can only be viewed, modified or have action<br />
performed for particular access levels<br />
� At the action level – each action may be required to<br />
determine access levels before performing business<br />
operations or logic<br />
� At the business service level – each method on a business<br />
service may be required to determine access levels before<br />
performing logic<br />
� At the domain object or database level – for a generic<br />
method call to obtain data or domain objects, different<br />
results could be returned depending on the callers’ access<br />
level<br />
From the perspective of a <strong>Struts2</strong> web application, the user is<br />
authenticated to access the URL or not. Once the user is allowed<br />
to access the application, there are a couple of options.<br />
The first is that an external solution provides the users’<br />
credentials via the HttpServletRequest object. From here, the<br />
username and as well the users role information can be accessed<br />
at the action level (by implementing the PrincipalAware<br />
interface and configuring the “servlet-config” on the interceptor<br />
stack) and exposed from the action to the page being rendered.<br />
Existing <strong>Struts2</strong> tags can then be used to limit access depending<br />
on roles.
106 | STARTING STRUTS2<br />
Next, is that the users’ credentials to the HttpServletRequest<br />
haven’t been populated. In this case an interceptor needs to be<br />
developed to authenticate and obtain the necessary role<br />
information, and to populate the information. This may be as<br />
complex as developing the logon form, logon and logoff code,<br />
authentication logic, etc., or it may be as simple as obtaining the<br />
information from an exposed API and setting it on the action.<br />
The last case is when a 3 rd party solution does everything for<br />
you. An example would be the acegi project. Acegi provides<br />
everything that is needed to secure a web application –servlet<br />
filters, custom tag libraries, and integration into Spring for<br />
securing business objects as well as domain objects – and all<br />
completely external to the <strong>Struts2</strong> web application. Integration<br />
would only be necessary if the authorization information is<br />
required during the processing of the action. In this case, an<br />
interceptor could be paired with an action interface to supply the<br />
Authz instance to the action. More details on this approach can<br />
be found at http://struts.apache.org/2.x/docs/can-we-use-acegisecurity-with-the-framework.html.<br />
Although not related to 3 rd party security integration, one<br />
security concern in using <strong>Struts2</strong> is that any action has access to<br />
any object within the Value Stack. This assumption may not<br />
always be correct. To designate specific Value Stack objects<br />
that are allowed or blocked from an action, you can configure<br />
and utilize the com.opensymphony.xwork2.interceptor.<br />
ParameterFilterInterceptor interceptor (this interceptor is<br />
not currently configured like the others that were discussed in<br />
the previous chapter). More information on the configuration is<br />
contained in the JavaDoc for the interceptor.
INTEGRATING WITH OTHER TECHNOLOGIES| 107<br />
Ajax<br />
The Ajax support in <strong>Struts2</strong> has been a little tumultuous of late.<br />
There is a lot going on, and it’s going to take a while for the dust<br />
to settle.<br />
At the most basic level, any action can perform as a data server.<br />
A request made to a URI can result in a HTML fragment (to be<br />
rendered directly in to a DIV), an XML document (via the XSLT<br />
result type) or a JSON document (by tweaking the JSP to JSON<br />
rather than HTML) that are then processed by JavaScript at the<br />
web browser. This is by far the most solid from an<br />
implementation standpoint, and is of production quality.<br />
Following this same concept there are three projects to keep and<br />
eye on. These are all fairly new, and will take time to mature.<br />
� To automate some of the work needed to provide JSON<br />
results, there is the JSON plug-in project – this is a 3 rd<br />
party plug-in and can be found at<br />
http://cwiki.apache.org/S2PLUGINS/2007/01/11/jsonplugin.html<br />
� Providing interoperability between the Google Web<br />
Toolkit (GWT) and <strong>Struts2</strong> as a back end data source is<br />
the GWT plug-in project –<br />
http://cwiki.apache.org/S2PLUGINS/2007/01/10/gwtplugin.html<br />
� Direct web remoting (DWR) has recently added support<br />
for remote WebWork2 action invocation using their<br />
framework; WebWork2 is the predecessor of <strong>Struts2</strong>, so<br />
all the techniques should be applicable; more information<br />
can be found at<br />
http://getahead.ltd.uk/dwr/server/webwork<br />
<strong>Struts2</strong> also provides tag libraries with Ajax functionality, these<br />
are:<br />
� a / link tag – make a remote call to the server using Ajax<br />
� form – provides Ajax-based validation for the form fields<br />
(using DWR), and provides the ability to submit the form<br />
remotely via Ajax
108 | STARTING STRUTS2<br />
� submit – used in conjunction with a Ajax based form<br />
submit<br />
� div – obtain the content for a DIV via an Ajax remote<br />
call<br />
� tabbedpanel – the content for each panel of the tabbed<br />
panel is obtained via a Ajax remote call<br />
The underlying implementations of the tags use the dojo library,<br />
and some of the tags are making the move from a combination<br />
custom JavaScript and dojo implantation to a pure dojo<br />
implementation. In the near future, the Ajax tags will be moving<br />
into a plug-in. This will allow for different implementation<br />
based on different Ajax libraries, which has been requested for<br />
some time now.<br />
For all these reasons, the Ajax tag libraries are currently marked<br />
as experimental.
About the Author<br />
<strong>Ian</strong> <strong>Roughley</strong> is a speaker, writer and independent consultant<br />
based out of Boston, MA. For over 10 years he has been<br />
providing architecture, development, process improvement and<br />
mentoring services to clients ranging in size from fortune 10<br />
companies to start-ups. His professional background includes<br />
work in the financial, insurance, pharmaceutical, retail, elearning,<br />
hospitality and supply-chain industries.<br />
Focused on a pragmatic and results-based approach, he is a<br />
proponent for open source, as well as process and quality<br />
improvements through agile development techniques. <strong>Ian</strong> is a<br />
committer to the WebWork project; member of the Apache<br />
Struts PMC; and speaker at No Fluff Just Stuff Symposiums. He<br />
is also a Sun Certified Java Programmer and J2EE Enterprise<br />
Architect; and an IBM Certified Solutions Architect.<br />
109
110
111<br />
End Notes<br />
i.<br />
http://struts.apache.org/2.x<br />
ii.<br />
Don Brown, the lead on the Struts Ti project, has more information on the<br />
history at<br />
http://www.oreillynet.com/onjava/blog/2006/10/my_history_of_struts_2.html<br />
iii.<br />
A list of different open source web frameworks can be found at<br />
http://www.java-source.net/open-source/web-frameworks.<br />
iv.<br />
Specifically the property to change this value is “struts.action.extension”.<br />
v.<br />
Martin Fowler has a thorough explanation of dependency injection at<br />
http://www.martinfowler.com/articles/injection.html<br />
vi.<br />
Technically there are four themes – with the fourth being the “ajax” theme.<br />
It has been decided to remove the Ajax functionality from the core <strong>Struts2</strong><br />
framework into a plug-in in the next version, and for this reason it will not be<br />
discussed in this section<br />
vii.<br />
Swingwork can be found at https://swingwork.dev.java.net/. There is no<br />
longer active development on the project.<br />
viii.<br />
For more information see http://www.jmock.org<br />
ix.<br />
Documentation for the config browser plug-in can be found at<br />
http://struts.apache.org/2.x/docs/config-browser-plugin.html<br />
x.<br />
This is generally true however, using the property tag, the developer would<br />
be able to access the Value Stack and obtain the internationalized text for a<br />
key name that is not known at development time.<br />
xi.<br />
http://tiles.apache.org<br />
xii.<br />
http://www.opensymphony.com/sitemesh<br />
xiii.<br />
http://cwiki.apache.org/S2PLUGINS/sitemesh-plugin.html<br />
xiv.<br />
http://cwiki.apache.org/S2PLUGINS/tiles-plugin.html<br />
xv.<br />
http://plexus.codehaus.org<br />
xvi.<br />
http://picocontainer.codehaus.org<br />
xvii.<br />
http://cwiki.apache.org/S2PLUGINS/spring-plugin.html