Download Instructions (.pdf - 1398 KB) - Silberbauer
Download Instructions (.pdf - 1398 KB) - Silberbauer
Download Instructions (.pdf - 1398 KB) - Silberbauer

Create successful ePaper yourself
Turn your PDF publications into a flip-book with our unique Google optimized e-Paper software.
Index:<br />
Page:<br />
Admitted assessory: ........................................................................................................0<br />
1. Compact - Laser system CL: Views...........................................................................1<br />
1.1. Laser, Version with Quick-charging-station and 2 Accus:.............................1<br />
1.3. Special accessory.........................................................................................2<br />
2.1. Alignement Laser Spectacles (Therapist�s Spectacles):.................................4<br />
2.2. Laser Protection Spectacles (Patient�s Spectacles): ......................................4<br />
2.3. Contra-indications and secondary-effects .....................................................5<br />
3. Types of CL-lasers.....................................................................................................6<br />
4. Starting......................................................................................................................7<br />
5. Application of Compact - Lasers ................................................................................8<br />
5.1. Mains Adapter or battery .............................................................................8<br />
5.2. Charge of ����������� high-power alternating batteries .............................................8<br />
5.3. Service of laser ............................................................................................9<br />
5.4. Laser-point and distance of irradiation........................................................10<br />
5.5. Irradiation Angle........................................................................................11<br />
5.6. Irradiation period and Absorption Doses....................................................11<br />
5.6.1 Formulae:.....................................................................................11<br />
5.6.2 Measuring units:...........................................................................11<br />
5.6.3 Calculation of the correct dosage for treatment of areas................12<br />
5.7. Acupuncture point search with the Compact-Laser.....................................14<br />
5.7.1. Assembly preparation ..................................................................14<br />
5.7.2. Acupuncture point detection on the body.....................................14<br />
5.7.3. Acupressure point detection of the ear and cranium .....................14<br />
5.8. Laser Power Monitoring ............................................................................15<br />
5.9. Possible Dysfunctions of the laser ..............................................................15<br />
5.10. Cleaning and maintenance ..........................................................................16<br />
5.10. Waste management of laser and accessory..................................................16<br />
5.12. Laser Inspection.........................................................................................17<br />
5.12.1. Scope of inspection: ....................................................................17<br />
5.12.2. Inspection Certificate...................................................................18<br />
5.13. Laser Dispatch...........................................................................................18<br />
6. Warning advices and Labels: ....................................................................................19<br />
8. Technical data:.........................................................................................................20<br />
Cl_bed18e_India September 24, 2007
Admitted assessory:<br />
Point detector PS3 + Connecting cable<br />
Lightning cable bent (Dental top)<br />
Power reducing tip<br />
Soft-Caps Laser goggles (=glasses for the patient)<br />
Mini-Soft-Caps Laser goggles for children<br />
Comfort Laser goggles (=glasses for the patient)<br />
Comfort Laser adjust glasses (=glasses for the therapist)<br />
Comfort Laser goggles for children<br />
NiCd � high capacity battery 3.6V / 120mAh f. CL-Laser<br />
Quick charging station for <strong>Silberbauer</strong> Laser<br />
Special Medical Mains- Adapter for CL- Laser
1. Compact - Laser system CL: Views<br />
1.1. Laser, Version with Quick-charging-station and 2 Accus:<br />
1 2 3 4<br />
9<br />
Spare Battery = Key<br />
10<br />
<strong>Silberbauer</strong><br />
Ni-Cd-Hochleistungs-Akku<br />
3,6 V / 110 mAh für CL-Laser<br />
8<br />
Ser.Nr.:<br />
xxxx / 97<br />
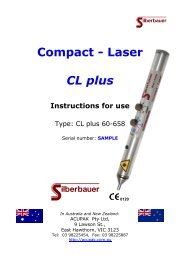
Compact - Laser<br />
1 Laser point 7 Socket for point detector<br />
2 Light-diode yellow 8 Type plate of battery<br />
3 Push-button 9 Laser-warning plate<br />
4 Body 10 Standby-ready-switch<br />
5 Type plate and details CL � Laser<br />
6 Mains adapter or battery<br />
7<br />
CL-xx<br />
5 6<br />
The� - Compact � Laser of series CL consists of the basic instrument as represented above<br />
with the following accessories:<br />
2 batteries,<br />
1 quick-charging-station,<br />
1 laser casket.<br />
As optional accessories are proffered optic fibre and power-reducing-tips, see chapter 1.3.<br />
7
1.2. Charging station<br />
1.3. Special accessory<br />
Optic Fibre, bent:<br />
Power loss with optic fibre: 25 % almost!<br />
Power-reducing-tip:<br />
Transmission 50%: e.g.: for CL50 � Output Power approx 25 mW<br />
Mains Adaptor for PL- and CL- Laser:<br />
Insert adaptor instead of battery.<br />
(Enlarged illustration)
2. Safety precautions to be observed during the use of<br />
therapy-laser<br />
�The appropriate legal security precautions are to be observed!<br />
�Attention! The use of the operating facilities or installation contingencies in any methods<br />
other than mentioned in these user instructions can lead to dangerous irradiation!<br />
�Required to follow:<br />
�All therapy-lasers must be used and stored within the following temperature-range:<br />
Case Temperature: CL 24-635: 10 to 35 o C !<br />
all other models operating 10 to 40 o C, Storage 5 to 50 o C!<br />
Being the maximum temperature of the crystal, it is required!<br />
Caution is recommended during its transport by car in the summer!<br />
Permissible humidity: 30 till 95 % rel ,<br />
The humidity should not condense on the case/body (no dew-drops)!<br />
�Direct irradiation of the opened eye should be avoided at any cost!<br />
�With a power of over 10 mW even the closed eye should not be irradiated!<br />
�The model CL 80 � 808 is a class 3B laser; here the battery and the mains adapter are a<br />
safety key, however they may not be stored together with the laser for safety reasons,<br />
otherwise an unauthorized start-up of the laser cannot be shut off!<br />
� For third persons is the observance of following security measures in terms of distance is<br />
required (NOHD). The safety-distance parameter for the eye also depends on the time of<br />
viewing.<br />
Power of laser Eye / 15 s Eye / 60 s Skin<br />
22 mW 65,4 mm 78,3 mm 0,93 mm<br />
24 mW 68,4 mm 82 mm 1,14 mm<br />
36 mW 84,7 mm 101,2 mm 2,23 mm<br />
50 mW 100,5 mm 120 mm 3,3 mm<br />
80 mW IR 128,1 mm 152,7 mm 3,2 mm<br />
90 mW 136 mm 162,2 mm 5,7 mm<br />
�Eyes should remain closed at all times during irradiation to the face.<br />
� Laser therapy should be conducted by trained personnel only!<br />
� The use of inflammable anaesthetic gases or oxidized gases like nitrogen (N 2 O) and oxygen<br />
should be avoided. Some materials like cotton, that are saturated with oxygen, could be<br />
set on fire at these high temperatures, created at the disposition of the laser�s direction.<br />
Before the laser is put into operation, there should be a specific period for evaporation of<br />
solvents in adhesives and inflammable solvents, which are used for cleaning and<br />
disinfection. Attention should be drawn to the fact that the body�s gases too can set on<br />
fire.<br />
It is further recommended that:<br />
The danger sign of the laser must be displayed at the entrance of the treatment room.<br />
Therapy duration for babies being treated at the cranial region should be short!
2.1. Alignement Laser Spectacles (Therapist�s Spectacles):<br />
At the use of lasers of the laser-protection-class 2M the therapist should wear the laser adjust<br />
spectacles as in accordance with the current edition of international standard EN208, for<br />
class 3B lasers he MUST wear these glasses!<br />
Specifications of laser-protection-spectacles corresponding to EN208:<br />
a) Wave-length, at which the goggles give protection: due to CL-type:<br />
635 nm or 660 nm or 808 nm<br />
b) Protection Level: For laser over 10 mW to 100 mW output power R2<br />
c) Laser Control Mode: D (continuous operation)<br />
laser alignement spectacles offer only protection against accidental<br />
� � The<br />
irradiation through laser up to these levels!<br />
� They are NOT ALLOWED to be used for the deliberated view of beam!<br />
� They are only protection against casual irradiation, when the eye lid closure reflex is not<br />
suppressed or slowed down (medical treatment, illness ...); and thus repeated irradiations<br />
of the eye have to be reduced.<br />
�Attention! Colour identification is disturbed by the glasses!<br />
� Clean glasses only with a glasses-cleaning-cloth or cloth and windows-detergent.<br />
2.2. Laser Protection Spectacles (Patient�s Spectacles):<br />
The patient should wear laser-goggles if a class 2M laser is used; for 3B lasers he MUST wear<br />
these glasses. As per the international standard EN 207 in its current edition.<br />
Specification of laser protection spectacles correspond to EN 207:<br />
a) Wave-length, at which the spectacles provide protection: due to CL-type:<br />
635nm or 660nm or 808 nm<br />
b) Protection Level: L3<br />
c) Laser Control Mode:<br />
laser protection<br />
D (continuous operation)<br />
spectacles offer only protection against accidental<br />
� � The<br />
irradiation through laser up to these powers!<br />
� They are NOT ALLOWED to be used for the deliberated view into the beam!<br />
� They protect only then against casual irradiation, when the eye lid closure reflex is not<br />
suppressed or slowed down (medical treatment, illness ...); and thus repeated irradiations<br />
of the eye have to be reduced.<br />
�Attention! Colour identification is disturbed by the glasses!<br />
� Clean glasses only with a glasses-cleaning-cloth or cloth and windows-detergent.
2.3. Contra-indications and secondary-effects<br />
� Direct irradiation of the opened eye must be completely avoided!<br />
�In the region of open fontanel�s or open skullcaps treatment with rays is not<br />
permitted.<br />
�Very long therapy-durations will not result in better outcomes but will not<br />
lead to any dangerous side effects either. Exceptions would be irradiations in<br />
the cranial region (more minutes), which can lead to headaches.
3. Types of CL-lasers<br />
Presently we distinguish with 3 different wave-lengths of laser radiation at therapy-lasers:<br />
635 nm, consequently red laser-light, which corresponds quite exactly to the wave-length of the He-<br />
Ne-laser (632,8 nm). This wave-length is used in medicine, e.g. acceleration of wound-healing, for<br />
more than 30 years successfully. Not available in India!<br />
660 nm, consequently dark-red laser-light. With equal effectivity for acupuncture, but a little lesser than<br />
635 nm for other applications with the same power. But with that wavelength higher power is<br />
available at a low price too.<br />
808 nm, that is unvisible Infrared light. Goes better into the depth of tissue, but poorer biological<br />
effects; used for large joints, Orthopedics, large animals.<br />
Accordingly you have as well to regard for the qualities of the described wave-lengths for the<br />
different applications and at the therapy-times.<br />
Power (mW)<br />
250 PL 250-660<br />
100 CL 90-660<br />
50 CL 50-660<br />
36 CL 36-660<br />
Laser Class 2M 24 CL 24-635 CL 22-660<br />
CL 80-808<br />
0 635 660 808<br />
Wave-length (nm)<br />
(visible red) (infrared)<br />
The � - lasers are lasers of the classe 2M.
4. Starting<br />
� After each therapy execution the standby-ready-switch should be turned into<br />
the "Standby" mode again and the mains-adapter or the battery must be<br />
taken out to be kept safely away from unauthorised hands!<br />
The first starting, Version with Quick-charging-station and 2 Accus :<br />
The� Compact - Laser is delivered together with a� loading unit which has to<br />
be connected to a socket with the power-plug and it should stay connected permanently.<br />
Charging (for this see chapter 5.2.):<br />
First insert the high-power battery with the charging-socket at into the loading unit. The<br />
monitoring circuit in the loading unit determines the battery plugged in and initiates charging<br />
accordingly: initially the battery is recharged, and then the unit switches over to a trickle charge<br />
mode, thereby leaving a completely charged high-power battery at your disposal.<br />
For usage take the battery out of the loading unit and insert it into your laser. Do not press<br />
the laser button during this. As soon as the battery is inserted completely, the laser is ready for use<br />
after 3 seconds delay.<br />
Point Search (see chapter 5.7.!):<br />
For a point search with the laser tip affix the connecting cable at the end of the battery and<br />
place the other end of the cable into the plug of the� point-searcher PS 3 instead of the tip.<br />
Place the point-searcher in the hand of the patient and detect the acupuncture points with the CL-tip<br />
in the same way as with the PS3.<br />
Attention: If you use the mains adapter or the power reducing tip or the lightning cable bent<br />
you cannot use the laser tip for point detection!
5. Application of Compact - Lasers<br />
5.1. Mains Adapter or battery<br />
The high-power interchangeable batteries utilise special cells with the latest technology. These have<br />
next to no memory-effect, even when they are not completely discharged. They also have the<br />
capacity to charge quickly. Depending upon the laser model the attainable therapy period for each<br />
battery charge is different, see chapter 8 for additional technical data!<br />
5.2. Charge of ����������� high-power alternating batteries<br />
Charging is only possible with the given loading unit. This is to be connected to mains and<br />
should stay connected permanently, thereby allowing the battery to be monitored and can be<br />
recharged in its state of disposition.<br />
The battery must be charged from the loading unit. Therefore insert the battery with its<br />
charging socket first into the loading unit.<br />
The loading unit will detect the insertion of the<br />
battery will begin with an advanced loading process.<br />
LED "CHARGE" shines besides the LED "NET", that<br />
always glows so long as the system voltage exists<br />
After a while it goes out only to be followed by<br />
"READY", signifying that the process has now changed<br />
to the disposition charging mode.<br />
However, the battery can be removed and put<br />
into use at anytime!<br />
Normally the battery remains in the loading unit, for e.g. over the weekend, since the recharging is<br />
controlled automatically and is optimized. Therefore overloading the battery is effectively prevented.<br />
The system voltage can however be switched of overnight or over the weekend as well. When<br />
switched on again an automatic recharge takes place.<br />
When to be put into function remove the battery out of the loading unit and insert it into the laser.<br />
If you have more CL-batteries, they can be alternatingly charged in the loading unit thereby<br />
enabling the capacity of a completely charged battery.
5.3. Service of laser<br />
�Remove the battery from the loading unit and insert it with the charging socket into the laser first<br />
till it reaches its limit, or insert the adapter part of the mains adapter. (Attention! Do not press<br />
the laser button (3) while inserting!)<br />
�In case the need arises place the bent light conductor or the power-reducing-tip onto the laserpoint<br />
until a limit is reached. (See picture).<br />
�Turn the rotary switch (10) from standby to one of two ready-positions. You can choose<br />
between times for irradiation of 15 seconds or 60 seconds. This would require about 3 seconds<br />
before the laser can be initiated with the press of a button (3).<br />
�Place the laser perpendicular to the area to be irradiated (see chapter 6 "Possibilities for use of<br />
Compact-Laser"),<br />
�Press the button (3) on the laser and keep it pressed.<br />
� At the end of every therapy session the standby-ready-switch (10) must be switched back to the<br />
�Standby�mode. The mains adapter or the battery must be removed from the laser and kept<br />
in a safe place, where unauthorised personnel are prohibited to enter.<br />
The integrated timer sends a short buzzer signal once pressed, the controlling LED glows<br />
yellow and indicates that the output power of the laser is all right. The timer stops the laser<br />
automatically after the chosen time for therapy, by which the LED goes out and a permanent buzzer<br />
signal arises until the button (3) is released.<br />
Shorter times of irradiation as the shortest adjustable time of 15 seconds:<br />
Release the push-button simply and the laser stops immediately.<br />
Longer times of irradiation as the longest adjustable time of 60 seconds: After arising of<br />
the permanent buzzer signal at the end of the therapy time, release the laser button (3) and start the<br />
therapy after 1 second by pressing it again.
5.4. Laser-point and distance of irradiation<br />
Direction of the<br />
Laser Beam<br />
The point of the� - CL-Laser is created in the shape of a small<br />
tube that stands out of a cone. The point is easily found through it � the point, where the laserradiation<br />
radiated on the skin. Normally nearly inaccessible points, like behind the ear are easily<br />
radiated with no problems.<br />
A short light conductor is fit into the tip. This light conductor serves among other things as<br />
mechanical protection for the heart of your therapy equipment, the laser diode. The impact point or<br />
the areas of operation are specified by this laser point. With all models the light emerges, whereby<br />
the size of points can be changed according to requirements through the choice of the distance from<br />
the skin.<br />
The irradiation distance can be selected at will! Therefore the� laser is allowed to<br />
be set on the skin's surface. The skin can also be pressed in with smooth pressure by the laser-point,<br />
to reduce the distance between deeper-set areas required to be irradiated (e.g. area of abdomen).<br />
Apart from this the laser-point is conductive and is connected with the socket at the rear end<br />
of the laser battery. The � point-searcher PS3 can be connected to this socket with a<br />
connecting cable. Herewith the laser-point can be used at the same time as searching point-peak for<br />
acupuncture points, see chapter 4.
5.5. Irradiation Angle<br />
To obtain optimal success during treatment, the laser must be positioned perpendicular to the<br />
skin's surface.<br />
Low reflection, wide reflection,<br />
Optimal penetration depth lower penetration depth<br />
= optimal success = less success<br />
5.6. Irradiation period and Absorption Doses<br />
The times for irradiations and absorption-doses indicated in the content can either be reduced<br />
distinctly by choice to the correct wave-length of laser (635 nm) or by combination with laseracupuncture!<br />
Literature: e.g. Baxter: Therapeutic Lasers � Theory and Practice<br />
Bahn/Küblböck: Laserstrahlen in der Akupunktur<br />
Danhof: Laser in der Zahnheilkunde,<br />
Iliev: Laser in der Dermatologie<br />
Pöntinen/Pothmann: Laser in der Akupunktur,<br />
Tunér/Hode: Laser Therapy � Clinical Practice and Scientific Background<br />
5.6.1 Formulae:<br />
Energy = laser power x irradiation period<br />
Irradiation dose = Energy / unit area<br />
5.6.2 Measuring units:<br />
Energy: in Joules = Watt-seconds (Ws)<br />
Power: in milli-watt (mW) 1 mW = 0,001 W<br />
Time: in seconds (s)<br />
Unit area: in cm²<br />
Irradiation-doses: in J / cm²
5.6.3 Calculation of the correct dosage for treatment of areas<br />
with the card:<br />
Place the card close to the wound and check which circle has the same area like the wound<br />
(e.g. 4x1,33J).<br />
At this circle you find the number how often this dose has to be applied at once (e.g. 4x)<br />
and the dose setting of your laser (e.g. 1,33J).<br />
Set your laser to this dose setting. Place the laser tip close to the rim of the wound, press<br />
the start button and remain pressing until you hear the permanent warn tone and the laser<br />
switches off.<br />
Now release the button and press it again. Repeat this corresponding to the number.<br />
Example card for model CL 22 � 660<br />
The card is made for a dose of 1 J/cm 2 . For higher or lower doses the showed number of<br />
how often you have to press the button has to be multiplicated or divided proportionate.<br />
In the literature we find recommended values between 0,54 and 3 J/cm 2 .<br />
Precalibrated dosage in Joule for different��models:<br />
Model: at 15 Sec: at 1 Min:<br />
CL 22 - 660 0,33 J 1,32 J<br />
CL 24 - 635 0,36 J 1,44 J<br />
CL 36 - 660 0,54 J 2,16 J<br />
CL 50 - 660 0,75 J 3,0 J<br />
CL 80 - 808 1,2 J 4,8 J<br />
CL 90 - 660 1,35 J 5,4 J<br />
Comparison: the Profi � Laser has<br />
PL 250 - 660 3,75 J 15 J<br />
Comparison of different output power:
Or:<br />
for penetration of this small wound (1cm 2 ) wirh 1 J/cm 2 (common dose) you<br />
need the following time:<br />
Model: Sec:<br />
CL 22 - 660 45,4<br />
CL 24 - 635 41,7<br />
CL 36 - 660 27,8<br />
CL 50 - 660 20<br />
CL 80 - 808 12,5<br />
CL 90 - 660 11,1<br />
PL 250 - 660 4<br />
per minute you can penetrate the following area:<br />
CL 22 CL 36 CL 50 CL 90 PL 250
5.7. Acupuncture point search with the Compact-Laser<br />
5.7.1. Assembly preparation<br />
Apart from the� Compact - Laser a� point searcher PS3 and a connecting cable is also<br />
required.<br />
Place a high-power battery into the � Compact � Laser, put the black connecting cable plug<br />
into its rear socket. The other cable plug is required to be inserted into the golden socket of the<br />
<strong>Silberbauer</strong> PS3 instead of the point-search-tip.<br />
The point searcher� PS3 must now be handed over into the hand of the patient. The<br />
laser-tip can serve now as the point search.<br />
5.7.2. Acupuncture point detection on the body<br />
The� point-searcher PS3 indicates the electric conductivity of the skin both optically<br />
(with more or less quick light-frequency in the installed light-diode) and acoustically (with a varying<br />
tone pitch). The latter can be heard by the doctor while focussing his eyes on the acupuncture point.<br />
Hence the laser tip is positioned slightly diagonally above the acupuncture point, which<br />
should be localized on the skin�s surface. The area assumed to be an acupuncture point is sought out;<br />
you then search the area, where you suppose the acupuncture point, without lifting the tip from the<br />
skin. The pressure of the tip should be light and of consistent pressure while searching.<br />
Continue the search in the direction of a higher tone or a quicker signal. The tone pitch<br />
reaches its maximum light and tone frequency at the centre of the acupuncture.<br />
The push-button must be pressed on the laser above the acupuncture point thus beginning the<br />
irradiation. The time of therapy programmed in the� Compact-Laser is optimised for this kind<br />
of application required in every model. See chapter 6.1.3. Acupuncture!<br />
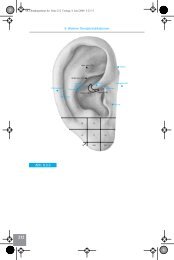
5.7.3. Acupressure point detection of the ear and cranium<br />
The acupuncture points at the cranial zone because of Yamamoto and at the ear are �silent�in<br />
contrast to acupuncture points on the rest of the body. This indicates that the electrical<br />
conductivity of the skin is very low here. However if a disturbance in the organism is reflected in the<br />
projected zones the electric conductivity of the skin changes on the according acupuncture points<br />
and zones and these points can be located like with the body�s acupuncture. Very high tones appear<br />
at points with strong disturbances which should be irradiated.
5.8. Laser Power Monitoring<br />
The� Compact - Laser has 2 mechanisms each independent from another control for<br />
laser radiation.<br />
1. The yellow lighting LED on the laser glows when the laser works with almost 90 % of its<br />
rated power at least, and<br />
2. One sensor in the loading unit that switches on the LED "Sensor Power" during laserradiation.<br />
5.9. Possible Dysfunctions of the laser<br />
Attention must be paid to the existing danger involved in meddling with a damaged<br />
instrument and being exposed to dangerous laser-radiations.<br />
In case the yellow lighting LED does not glow once the start-button is pressed, then<br />
please leave the button and observe whether<br />
�A few seconds have passed after the standby-ready-switch was switched on?<br />
(It takes about 3 seconds till the laser is turned on again)<br />
�Could the battery be empty?<br />
�Has the loading unit been turned on?<br />
�When was the battery been put onto the loading unit last?<br />
It is enough to recharge the empty battery for a few minutes and irradiation can begin for a<br />
short time! However the batteries should normally be fully charged, otherwise they could be strained.<br />
If the laser does not work in spite of a correct battery or fully charged battery, please<br />
do not make any further attempts, but send or bring the laser together with the battery for<br />
monitoring purposes to our service!<br />
Do not under any circumstance turn or pull the mains adapter or the battery out of the laser<br />
while it is switched on! In case of the tiniest loss of contact � possible after a dropped battery or<br />
laser � the laser-diode could be badly damaged!
5.10. Cleaning and maintenance<br />
To avoid any danger of infection the laser point must be disinfected before and after<br />
each treatment (and the power-reducing-tip and the bent light conductor).<br />
The laser, its loading unit and plug can be cleaned carefully with a cloth moistened with<br />
alcohol or surgical disinfection. During this process the loading unit must be disconnected from the<br />
network! No liquid should be allowed to enter the openings.<br />
The laser point itself can be cleaned with a pad or cloth moistened with alcohol.<br />
The drill of the �power-reducing-tip�can be cleaned with a toothpick and thereafter be<br />
washed with alcohol. For this, the power-reducing-tip must be pulled out of the laser anyhow.<br />
The "bent light conductor" can be cleaned like the laser top. The rear surface is well<br />
protected with a black hull made out of synthetic material. If this surface does get soiled the hull<br />
must be taken off. The lighting cable can then be proceeded to be cleaned, see laser-point. Ensuing<br />
which the hull must remain attached to the lighting cable again, in such a way that the lighting cable<br />
just touches the front-surface of the laser point after the hull is pulled up, whereby the hull has to<br />
loom until the end of the cylindrical area of the laser point.<br />
Additional maintenance by the user is not required.<br />
5.10. Waste management of laser and accessory<br />
For waste management please regard the valid legal regulations of each country/region!<br />
The high-power-batteries are NiCd-batteries! They have to be brought to the next receiving<br />
office for special waste disposal.
5.12. Laser Inspection<br />
The CL-Laser must be inspected periodically every year.<br />
5.12.1. Scope of inspection:<br />
1. Examination of Output Power:<br />
Measuring Equipment required:<br />
Measuring device for the laser output with a Si-photo-diode is well suited for the<br />
measurement of every monitoring phase of the laser output and the wave-length of the CL-Laser.<br />
Specification:<br />
Measuring accuracy: +/- 5%<br />
Measuring Process: The output power is measured when that the laser is turned on and the sensor<br />
is at an angle of 45 ° and the button depicted above (see picture), on the laser must be turned on.<br />
Range of tolerance of the measured power: Nominal Power +/- 5%<br />
If the measured power is out of the mentioned range of tolerance, the laser must be calibrated or<br />
repaired.<br />
2. Examination of controlling elements<br />
Due to danger of mechanical abrasion or wave description, the laser-button (3) must be checked as<br />
the standby-ready-switch (10).<br />
Scope of examination:<br />
a) Control of strokes of standby-ready-switch: The switch must be turned to its 3 intended positions.<br />
In case the switch could be turned further with acceptable torque, you have the indication of a<br />
defect and the instrument has to be repaired.<br />
b) Procedure for monitoring function of the standby-ready-switch (10) and laser-button (3):<br />
Turn the standby-ready-switch into its standby position.
Attach the mains-adapter or the charged battery.<br />
Press the laser-button.<br />
No laser-radiation has to emerge out of the instrument.<br />
Turn the standby-ready-switch to 15 s.<br />
Press the laser-button.<br />
The instrument has to give laser-radiation for 15 s (control of time).<br />
Turn the standby-ready-switch into the position of 60 s.<br />
Press the laser-button.<br />
The instrument must radiate for 60 s (control of time).<br />
3. Examination of the labels<br />
All labels have to be readable without any problems.<br />
4. Examination of all assessories<br />
Examination of the assessory in breaking, signs of wear, examination of glasses also in scratches<br />
which disturb the sight.<br />
5.12.2. Inspection Certificate<br />
To confirm the accurate functioning of the instrument the owner will receive an inspection certificate<br />
including its measured power. The results are mentioned in the instruments book.<br />
5.13. Laser Dispatch<br />
The laser is delivered in its original packing, devoid of any defects by post as bulk goods. Pull<br />
the battery out of the laser during transport!<br />
Attention, also for transport! The battery is also "key", which must not be stored with the<br />
laser for precautionary reasons, as an unauthorised use of the laser cannot be stopped!<br />
Storage temperature must not exceed 35 ° C (model CL24-635) and 50 ° C (all other<br />
models)!
6. Warning advices and Labels:<br />
There are different quality indications on the loading plug, the inscription of which is advised by the quality board.<br />
The following warning labels are valid for lasers of types mentioned below:<br />
e.g. for the model CL50:<br />
EN 60825-1<br />
+A1 +A2:2003<br />
LASER RADIATION<br />
DO NOT STARE INTO BEAM OR VIEW<br />
DIRECTLY WITH OPTICAL INSTRUMENTS!<br />
CLASS 2M LASER PRODUCT<br />
Output Power: 50mW / 660nm<br />
Aperture / Direction of Laser Beam<br />
The other laser models have the same labels with according values for power and wavelength.<br />
Attention! Laser radiation!<br />
Application part type BF<br />
Year of production: coded at the end of the serial number:<br />
Letter A for 2001, B for 2002, etc.<br />
! Attention! The attached documents are to be noted!<br />
Don�t dispose with the normal rubbish!<br />
The manufacturer is only considered responsible to bearing on security, reliability and capacity of the instrument,<br />
when<br />
A. changes or repairs are made by personnel authorized by him,<br />
B. the electrical installation of the room is according to the regulations of ÖVE-EN 7,<br />
C. the instrument is used in accordance with the directions of use.<br />
The instrument must not to be used with volatile gases or fumes during narcosis. This could cause sparks in<br />
the button or at the contacts. Apart from the given valid regulations the �<strong>Instructions</strong> to avoid explosive dangers in<br />
operational equipment�of BM for social administration Zl. V-88015-17 are to be considered in the advisory statement<br />
made by the medical experts from 03.02.1968 and ÖVE-EN 7 regarding the use of the instrument in an atmosphere<br />
enriched with oxygen.
8. Technical data:<br />
Laser-instrument, series Compact - Laser CL xx - xxx:<br />
Manufacturer and distributor: Prof. Dipl.Ing. Gerhard <strong>Silberbauer</strong> �0120<br />
Medizinische und physikalische Elektronik<br />
Hießgasse 15, A- 1030 Wien, Austria, EU<br />
Assembled at <strong>Silberbauer</strong> India<br />
Application as directed: Laser radiation of skin, mucous membrande and dental applications<br />
Quality Mark: VA f.Radiotechnik am TGM, Wien, Protokoll Nr. 713 / 4 / 95,<br />
Examination of type at testing institute for medical technique, P.Z.Nr. 97274 / 172<br />
Accessory: See directions for use, page 2<br />
Internal power source: Accu able to be put on, with 3 pieces NiCd-cells SAFT VRE 1/3AA L3P or<br />
mains adapter Friwo Type FW7333M/05<br />
Classification -Protection against electrical shock: Internal electrical power source<br />
-Protection level against electr. shock: Part of application type BF<br />
- Protection level against harmful water invasion:Common instrument<br />
- Protection level during application together with explosive mixtures of anaethesias with air<br />
or with oxygen or laughing-gas:<br />
Instrument is not to be used in an explosive atmosphere or with explosive mixtures from<br />
naesthesias with oxygen to laughing-gas<br />
-Kind of operation: Permanent operation<br />
-due to EU - direction 93 / 42 / EWG: II A<br />
Laser Classe: 2M (CL80-808: 3B)<br />
Divergence of ray: 0,8 rad +/- 10%<br />
Therapy Period: 15s or 60s (adjustable by user)+/-10%<br />
Input of current from battery: max. 0,15 A<br />
Weight: without accu: 74 g, accu: 36 g<br />
Measures: with accu: 20,2 x 233 mm (D x L)<br />
Model: CL 22-660 CL 24-635 CL 36-660 CL 50-660 CL 90-660 CL 80-808<br />
Nominal power +/-10% (mW): 22 24 36 50 90 80<br />
Wave-length (nm): 660 635 660 660 660 660<br />
Diameter of ray-output (mm) 3,0 3,0 3,0 3,0 3,0 3,0<br />
Admitted temperature of case: 10 bis 40 o C 10 bis 35 o C 10 bis 40 o C 10 bis 40 o C 10 bis 40 o C 10 bis 40 o C<br />
Time of therapy per chargement (min.): 110 60 90 60 35 45<br />
Charging plug:<br />
Manufacturer: Ansmann ��<br />
Assamstadt, Germany, EU<br />
Type: AP 312<br />
System voltage: 230 V, 50 to 60 Hz<br />
Output: 12 V, 300 mA<br />
Weight / Measures: 238 g / 75 x 43 x 52 mm (L x W x H)
Loading unit:<br />
Manufacturer: Prof. Dipl.Ing. Gerhard <strong>Silberbauer</strong> �<br />
Medizinische und physikalische Elektronik<br />
Hießgasse 15, 1030 Vienna, Austria, EU<br />
Assembled in India at <strong>Silberbauer</strong> India Pvt. Ltd., Pune (MS)<br />
Released Voltage: max. 12 V<br />
Released Current: max. 460 mA<br />
Laser-monitor: glows at 2 mW almost<br />
Weight / Measures: 615 g / 85 x 150 x 47 mm (W x D x H)<br />
Charging period for discharged battery: 24 Minutes<br />
Mains adapter for PL- and CL- Laser:<br />
Manufacturer: FRIWO Gerätebau GmbH, �<br />
Von-Liebig-Str. 11, 48346 Ostbevern, Germany, EU<br />
Mains voltage: 100 - 240 V, 50 bis 60 Hz, 200 mA<br />
Output voltage: 5 V (at the plug: 4,3V)<br />
Output current: max. 1300 mA<br />
Standards: meets class II SELV<br />
for application parts type BF according to IEC 660601-1, UL 2601, VDE, �����<br />
Weight / Measures: 120 g incl. adapter u. cable / 29 x 74 x 79,3 mm (L x W x H)<br />
Operating temp: 0 o C to +40 o C<br />
Storage temp: - 40 o C to +70 o C<br />
Rights for technical changes reserved!<br />
Cl_bed18e_India
Certificate of Calibration<br />
Instrument: Compact - Laser<br />
Model: CL.......................<br />
Serial number/Year of manufacture: ................/..........<br />
It is hereby confirmed that the instrument mentioned above, has been<br />
examined and calibrated at its time of manufacturing.<br />
Measured output-capacity: _ _ , _ mW<br />
The date of revisory examination of the output power of the laser is<br />
planned at intervals of 1 year.<br />
The test badge on the instrument serves as a recollection of this test.<br />
Vienna, on the................. _______________________<br />
Technical examiner