

10" Band Saw Model 3104 - Manual & Guides
10" Band Saw Model 3104 - Manual & Guides
10" Band Saw Model 3104 - Manual & Guides

Create successful ePaper yourself
Turn your PDF publications into a flip-book with our unique Google optimized e-Paper software.
-Double Insulated Tools<br />
Double Insulated Tools With Two-Prong Plugs<br />
Your new SKIL tool is equipped with a two wire cord<br />
and two prong plug which can be used in standard<br />
120 Volt A.C . outlets .<br />
No grounding of the tool is necessary. The housing is<br />
AWARNING<br />
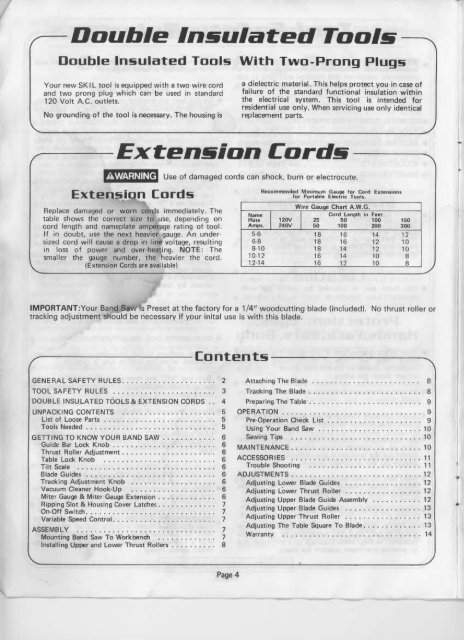
Replace damaged or worn cords immediately . The<br />
table shows the correct size to use, depending on<br />
cord length and nameplate amperage rating of tool .<br />
It in doubt, use the next heavier gauge . An under<br />
sized cord will cause a drop in line voltage, resulting<br />
in loss of power and over-heating. NOTE : The<br />
smaller the gauge number, the heavier the cord .<br />
(Extension Cords are available)<br />
Contents<br />
Page 4<br />
a dielectric material . This helps protect you in case of<br />
failure of the standard functional insulation within<br />
the electrical system . This tool is intended for<br />
residential use only . When servicing use only identical<br />
replacement parts .<br />
Extension Cords<br />
Use of damaged cords can shock, burn or electrocute .<br />
Recommended Minimum Gauge for Cord Extensions<br />
Extension Cords for Portable Electric Tools.<br />
IMPORTANT:Your <strong>Band</strong> <strong>Saw</strong>'s Preset at the factory for a 1/4" woodcutting blade (included) . No thrust roller or<br />
tracking adjustment should be necessary if your inital use is with this blade .<br />
GENERAL SAFETY RULES . . . . . . . . . . . . . . . . . . . . . 2 Attaching The Blade . . . . . . . . . . . . . . . . . . . . . . . . 8<br />
TOOL SAFETY RULES . . . . . . . . . . . . . . . . . . . . . . . 3 Tracking The Blade . . . . . . . . . . . . . . . . . . . . . . . . . 8<br />
DOUBLE INSULATED TOOLS& EXTENSION CORDS . . 4 Preparing The Table . . . . . . . . . . . . . . . . . . . . . . . . . 9<br />
UNPACKING CONTENTS . . . . . . . . . . . . . . . . . . . . . 5 OPERATION . . . . . . . . . . . . . . . . . . . . . . . . . . . . . . . 9<br />
List of Loose Parts<br />
Tools Needed . . . .<br />
. . . . . . . . . . . . . . . . . . . . . . . . .<br />
. . . . . . . . . . . . . . . . . . . . . . . . .<br />
5<br />
5<br />
Pre-Operation Check List<br />
Using Your <strong>Band</strong> <strong>Saw</strong> . .<br />
. . . . . . . . . . . . . . .<br />
. . . . . . . . . . . . . . .<br />
. . . . . .<br />
. . . . . .<br />
9<br />
10<br />
GETTING TO KNOW YOUR BAND SAW . . . . . . . . . . . . 6 <strong>Saw</strong>ing Tips . . . . . . . . . . . . . . . . . . . . . . . . . . . . . 10<br />
Guide Bar Lock Knob . . . . . . . . . . . . . . . . . . . . . . .<br />
Thrust Roller Adjustment . . . . . . . . . . . . . . . . . . . . .<br />
Table Lock Knob . . . . . . . . . . . . . . . . . . . . . . . . .<br />
6<br />
6<br />
6<br />
MAINTENANCE . . . . . . . .<br />
ACCESSORIES . . . . . . . .<br />
. . .<br />
. . .<br />
. . .<br />
. . .<br />
. .<br />
. .<br />
.<br />
.<br />
.<br />
.<br />
.<br />
.<br />
.<br />
.<br />
.<br />
.<br />
.<br />
.<br />
.<br />
.<br />
. . .<br />
. . .<br />
. .<br />
. .<br />
.<br />
.<br />
10<br />
11<br />
Tilt Scale . . . . . . . . . . . . . . . . . . . . . . . . . . . . . .<br />
6 Trouble Shooting . . . . . . . . . . . . . . . . . . . . . . . . . 11<br />
Blade <strong>Guides</strong> . . . . . . . . . . . . . . . . . . . . . . . . . . . . . 6 ADJUSTMENTS . . . . . . . . . . . . . . . . . . . . . . . . . . . . . 12<br />
Tracking Adjustment Knob . . . . . . . . . . . . . . . . . . .<br />
Vacuum Cleaner Hook-Up . . . . . . . . . . . . . . . . . . .<br />
Miter Gauge & Miter Gauge Extension . . . . . . . . . . . . .<br />
6<br />
6<br />
6<br />
Adjusting Lower Blade <strong>Guides</strong> . . . . . .<br />
Adjusting Lower Thrust Roller . . . . . .<br />
Adjusting Upper Blade Guide Assembly<br />
.<br />
.<br />
.<br />
.<br />
.<br />
.<br />
.<br />
.<br />
.<br />
.<br />
.<br />
.<br />
.<br />
.<br />
.<br />
.<br />
.<br />
.<br />
. . .<br />
. . .<br />
. . .<br />
.<br />
.<br />
.<br />
.<br />
.<br />
.<br />
12<br />
12<br />
12<br />
Ripping Slot & Housing Cover Latches . . . . . . . . . . . . . 7<br />
On-Off Switch . . . . . . . . . . . . . . . . . . . . . . . . . . . . . 7<br />
Variable Speed Control . . . . . . . . . . . . . . . . . . . . . . . 7<br />
ASSEMBLY . . . . . . . . . . . . . . . . . . . . . . . . . . . . . . . 7<br />
Mounting <strong>Band</strong> <strong>Saw</strong> To Workbench . . . . . . . . . . . . . 7<br />
Installing Upper and Lower Thrust Rollers . . . . . . . . . . 8<br />
Wire Gauge Chart A.W .G<br />
Rams Cord Length in Feet<br />
plate 120V 25 50 100 150<br />
Amps. 240V 50 100 200 300<br />
5-6 18 16 14 12<br />
68<br />
8-10<br />
10-12<br />
18<br />
18<br />
16<br />
16<br />
14<br />
14<br />
12<br />
12<br />
10<br />
10<br />
10<br />
8<br />
12-14 16 12 10 8<br />
Adjusting Upper Blade <strong>Guides</strong> . . . . . . . . . . . . . . . . . 13<br />
Adjusting Upper Thrust Roller . . . . . . . . . . . . . . . . . 13<br />
Adjusting The Table Square To Blade . . . . . . . . . . . . . 13<br />
Warranty . . . . . . . . . . . . . . . . . . . . . . . . . . . . . . . 14