

NEWS & TRENDS IN ORTHODONTICS - iAOI - International ...
NEWS & TRENDS IN ORTHODONTICS - iAOI - International ...
NEWS & TRENDS IN ORTHODONTICS - iAOI - International ...

You also want an ePaper? Increase the reach of your titles
YUMPU automatically turns print PDFs into web optimized ePapers that Google loves.
<strong>NEWS</strong> & <strong>TRENDS</strong> <strong>IN</strong> <strong>ORTHODONTICS</strong><br />
Using the Damon System to Treat Crossbite with Root Resorption in<br />
Pseudo Cl III Patient<br />
Dr. John Lin<br />
The Secrets of Excellent Finishing<br />
Tips from Dr. Tom Pitts<br />
ABO Case Report: Anterior Open Bite<br />
Dr. Eugene W. Roberts<br />
Apr. 1 Vol. 14 2009<br />
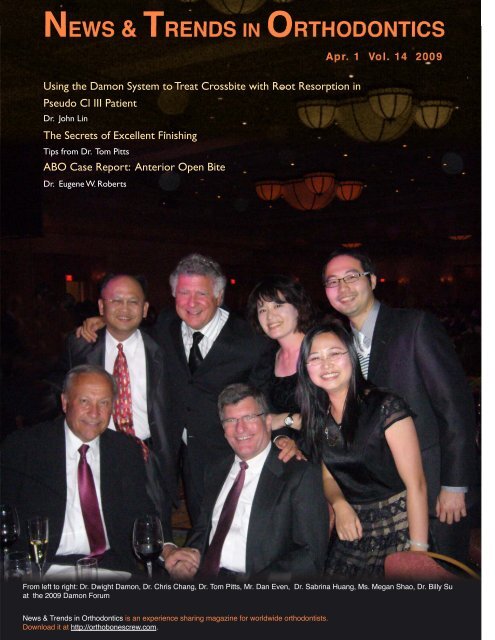
From left to right: Dr. Dwight Damon, Dr. Chris Chang, Dr. Tom Pitts, Mr. Dan Even, Dr. Sabrina Huang, Ms. Megan Shao, Dr. Billy Su<br />
at the 2009 Damon Forum<br />
News & Trends in Orthodontics is an experience sharing magazine for worldwide orthodontists.<br />
Download it at http://orthobonescrew.com.
“Treat Every Case to Meet the Board’s Standards”<br />
It was Dr. Tom Pitts’ farewell message in the 2009 Damon<br />
Forum. One month earlier, Dr. Roberto Justus, president of World<br />
Federal of Orthodontists, made the same statement in his keynote<br />
address at the annual conference for Taiwan Association of<br />
Orthodontists. That message was echoed by Dr. Vincent Kokich on<br />
March 6, 2009 for his three-day course in Taipei. With regards to<br />
excellent finishing, these three masters think the same: “Treat every<br />
case to meet the Board’s standards!”<br />
What makes this goal so difficult to achieve? What are the<br />
Board’s standards? Back in 1993, nine orthodontic giants started to<br />
put together an Objective Grading System for orthodontists to<br />
evaluate their finishing work. After 15 years of field tests, this OGS<br />
has become the standards of the American Board of Orthodontics.<br />
The “deduction” score should be below 26 to claim a satisfactory<br />
result. To reach this score is not particularly hard for a specially<br />
selected case. However, treating every case to meet these standards<br />
is indeed a huge challenge. First, you need to know exactly how to get<br />
there. Then, you have to establish a system in your office to execute<br />
the procedures. Finally, you are required to re-evaluate every case on<br />
a regular basis. Once you go through these three steps, you have<br />
already raised your standard of care. In order to make our readers<br />
familiar with this system, we have invited Dr. Eugene W. Roberts, a<br />
true master in the ABO grading system, to edit two ABO case<br />
reports in this issue. It’s a basic tutorial on the ABO case study, all in<br />
one lesson.<br />
One should never stop learning and adapting in this everchanging<br />
world. If you limit yourself to what you know and what you<br />
are comfortable with, you will grow increasingly frustrated with your<br />
surrounding as you age. Right now this system may be new to you,<br />
but with practice you will soon become one of those experts who<br />
are really familiar with the system. You have nothing to lose. Let’s take<br />
this journey to excellence together and strive to treat every case to<br />
meet the Board’s standards.<br />
Chris HN Chang, DDS, PhD, Publisher<br />
Contributors (from left to right) :<br />
Yi Yang Su, Shih Jaw Tsai, Chih Yuan Wu, Hao Yi Hsiao, Michael<br />
Ho, Tom Pitts, Chris HN Chang, Yu Lin Hsu, Chuan Wei Su,<br />
Chiung Hua Huang, Ksiao Long Wang, Shu Fen Kao, Yu Lung<br />
Lee, Chien Kang Chen, Shou Xin Kuang<br />
03 Editorial<br />
Please send your articles to beeth.oven@msa.hinet.net<br />
LIVE FROM THE MASTER<br />
04 Using the Damon System to Treat Crossbite with Root<br />
Resorption in Pseudo Cl III Patient<br />
FEATURE<br />
06 Dr. Tom Pitts’ Secrets of Excellent Finishing<br />
24 Orthodontic Treatment of a High-Angle Case with<br />
Gummy Smile<br />
30 Dr. Vincent Kokich on Excellent Finishing<br />
34 Dr. Vincent Kokich on Impacted Maxillary Canines<br />
38 Dr. Charles Burstone on Biomechanics of TAD<br />
ABO CASE REPORT<br />
42 Impinging Overbite and Large Overjet<br />
50 Treating Anterior Open Bite Case with Early Light Short<br />
Elastics<br />
PERSPECTIVES<br />
58 Dr. Roberto Justus on Finishing-The Standard of American<br />
Board of Orthodontics<br />
VOICES FROM THE ORTHODONTIC WORLD<br />
60 Feedback on Keynote Workshop<br />
Consultant<br />
Dr. Eugene W. Roberts<br />
Consultant<br />
Dr. Larry White<br />
Guest Editor<br />
Dr. Rungsi Thavarungkul<br />
Contributors (from left to right) :<br />
Dr. Hong Po Chang, Consultant<br />
Dr. Ming Guey Tseng, Consultant<br />
Dr. John Lin, Consultant<br />
Dr. Frank Chang, Consultant<br />
Dr. Johnny Liao, Consultant<br />
Dr. Chris Chang, Publisher<br />
Editors (from left to right) :<br />
Tzu Han Huang, Associate Editor<br />
Grace Chiu, Associate Editor<br />
Dennis Hsiao, Chief Editor<br />
Billy Su, Associate Editor<br />
03
04<br />
Clinically, root resorption happens when orthodontic<br />
treatment takes too long, or using heavy force, and<br />
sometimes traumatic injury, idiopathic pattern and heredity<br />
factor play important roles. Whenever it happens during<br />
orthodontic treatment, it bothers orthodontist a lot, can we<br />
treat the root resorbed malocclusion, how is the prognosis?<br />
Hopefully through the discussion of the following two<br />
cases we can have some new ideas about prognosis and<br />
treatment plan of malocclusion with root resorption.<br />
Case 1<br />
A 14y7m female patient presented with short upper<br />
incisor roots. The roots of left upper central and lateral<br />
incisors were severely resorbed by the compression of the<br />
ectopically erupted left upper canine. Esthetically and<br />
functionally the patient felt no problem, so no any<br />
orthodontic treatment was done.<br />
When at 20y4m (5 years and 9 months later), the<br />
patient came back for check up again, the resorbed condition<br />
of left upper central and lateral incisors roots remained the<br />
same as the first visit.<br />
Case 1<br />
Using the Damon System to Treat Crossbite<br />
with Root Resorption in Pseudo CI III Patient<br />
Case 2<br />
A 28y11m female patient had severe anterior crossbite<br />
and Class I buccal segment was diagnosed as Pseudo Class<br />
III malocclusion. She suffered mild periodontitis, and was<br />
referred to periodontist for conservative scaling and root<br />
planing treatment. After 8 months periodontal treatment, the<br />
orthodontic treatment started at age 29y7m.<br />
At initial bonding, the .013” CuNiTi wire was engaged<br />
into the Damon brackets of all the teeth, including the severe<br />
crossbite teeth of upper incisors at age 29y7m. About 7<br />
months later at age 30y2m, the anterior crossbite and severe<br />
crowding were all corrected with good alignment of the teeth<br />
and enough overbite and overjet without using Class III<br />
elastics and open coil spring. The anterior crossbite was<br />
purely corrected by the advancement and expansion of the<br />
upper dentition.<br />
At age 30y9m, stripping of lower anterior teeth to<br />
reduce the black triangle were done, and powerchain under<br />
the brackets was used to close the extra spaces, which was<br />
created after stripping of the proximal surface of lower<br />
anterior teeth.<br />
The x-ray of apical and panorex showed no further<br />
resorption of the upper incisors, even though the severe<br />
crossbite and crowded anterior teeth were corrected to almost<br />
normal anterior occlusion.<br />
What we can learn from these cases:<br />
1. Severe root resorption situation may be looks terrible, but<br />
if without any additional traumatic force, the severely<br />
resorbed roots can be retained in the mouth for a long<br />
time. (Left upper incisors of case 1).<br />
2. Damon system using the very small diameter CuNiTi wire<br />
in the large lumen bracket, offers the wire a lot of space to<br />
play, which creates very light and gentle continuous force<br />
and it is possible to correct the severe anterior crossbite<br />
and severely root resorbed right upper central incisor
(Case 2) without further root resorption. For<br />
conventional edgewise, the crossbite will be very<br />
difficult to correct without using heavy force and open<br />
coil spring. For sure, this kind of heavy force will make<br />
the root resorption more severe, and even cause lost of<br />
the teeth.<br />
3. Glass ionomer build-up on the molar teeth can<br />
disocclude the anterior teeth very efficiently and help<br />
correction of the anterior crossbite.<br />
Conclusions:<br />
1. Severe root resorption of upper incisors in case 1 is due<br />
to ectopic eruption of upper canine. Severe root<br />
resorption of upper lateral incisors in case 2 is an<br />
idiopathic situation or due to traumatic injury without<br />
any treatment before. Front teeth, even with severe root<br />
resorption and extremely short roots, can still maintain<br />
in the mouth for a long time.<br />
Case 2<br />
���������������<br />
������������������������<br />
�����������������<br />
������������������������������<br />
�������������������������������<br />
2. The Damon light force system is a very useful system<br />
for correcting anterior crossbite and severe crowding<br />
without using open coil spring or Class III elastics in<br />
Pseudo Class III case.<br />
3. The Damon light force system can correct the severe<br />
root-resorbed teeth without further resorption, which is<br />
due to its very light and continuous force application.<br />
05
6<br />
Dr. Tom Pitts� Secrets of Excellent Finishing<br />
We were delighted to have Dr. Tom Pitts back to Taiwan again on November 15, 2008. In last year’s Damon<br />
Forum Dr. Pitts had surprised us with many wonders. This year he has brought more secrets to share with<br />
Taiwan’s audiences. Below is an executive summary of his lecture.<br />
C ontemporary orthodontic treatment has been changed.<br />
Dr. Pitts stressed “Contemporary” because we are now<br />
doing things what we cannot imagine years ago. We<br />
never thought that we would be creating spaces, creating arch<br />
width, making the beautiful smile without extractions. We<br />
really have been so fortunate to witness such innovations in<br />
orthodontics, particularly with Damon system that has evolved<br />
in the last ten years. Now with the Damon system we can do so<br />
much more !<br />
Today, we are going to cover the followings�<br />
•<br />
New Esthetic Model<br />
Getting The Best Esthetics possible from Passive Self-<br />
•<br />
Ligation<br />
The Art of Arch Development, Proper Torque, and Smile<br />
•<br />
Arc Protection<br />
A Close look at Bracket Placement, Working Arch Wires<br />
•<br />
and “Finishing”<br />
•<br />
Revolutionary Early Elastics<br />
Case Reports<br />
• Retention<br />
• New Esthetic Model<br />
In Asia and America, facial standards have been changed<br />
over the last twenty years. In a study done by Dr. Turley in<br />
UCLA shows that the ideal male profile has changed<br />
significantly with time. And there was a trend of increasing<br />
lip projection, lip curl and vermilion display. That's a big<br />
thing ! Actually, in Asian Americans, there is also a more<br />
progress to a full lip than there was years ago (Fig 1).<br />
Dr. Sarver developed a classification of appearance and<br />
esthetics, and divided into three parts : Macroesthetics — the<br />
face, Miniesthetics— the mouth, particularly the smile<br />
framework, and Microesthetics — the teeth and gingival<br />
tissue (Fig 2). He developed this classification to be able to<br />
get the highest and best facial esthetics in orthodontics<br />
combined with orthognathic surgery. Dr. Sarver had about<br />
60% of cases underwent orthognathic surgery, but we can use<br />
this classification to assess our cases using Damon system.<br />
With this classification, we can assess how we can enhance<br />
the facial profile, how we can predictably increase the incisor<br />
display, how we can eliminate the gummy smile, and how we<br />
can increase the transverse smile with either RPE or with<br />
Fig 1. Facial standards have changed Fig 2. Sarver’s classification
surgical assisted RPE. But now, what we can do with the<br />
transverse is amazing !! It is not just bigger widths, but also<br />
change of the arch forms and shapes. Most importantly, for<br />
many years we were guilty of flattening the smile arc rather<br />
than follow the lower lip. Now, we know how to change our<br />
bonding position to enhance the smile arc. As for<br />
Microesthetic, we can look at the gingival shape and contour,<br />
the proportionality of width and height of incisors, and look<br />
at all the details we need to finish cases.<br />
Here is a huge paradigm shift now, not because of<br />
surgery, but the Damon system ! We not only pursue<br />
beautiful esthetic functioning occlusion, we are also looking<br />
for enhanced facial esthetics — the highest and the best !!<br />
Thus, there is more to finishing than occlusion, function, and<br />
marginal ridges, even though they are critically important !!<br />
In the past we compromised esthetics for functional<br />
occlusion. Today, we don't want to compromise either one<br />
for the other, and we don't have to. Now, let's see how to put<br />
it all together — to enhance the beauty of the smile and the<br />
face and still obtain a beautiful finished occlusion with<br />
Damon appliance.<br />
Fig 3. The smile left sided is not a good esthetic response.<br />
Because the incisors are so flat to become a “Smile line”<br />
rather than a “Smile arc” (right sided).<br />
������������������<br />
����������������������������<br />
������������������������������������������������������������<br />
��������������������������<br />
����������������������������������������<br />
• Best Esthetics Possible<br />
How can we achieve“ Best Esthetics Possible ”�What<br />
Dr. Pitts attempts to do in his clinic is to “keep the profile as<br />
full as possible”. He never wants to sacrifice the upper lip and<br />
move the upper lip back to the chin or vice versa. Lip fullness<br />
and vermillion curl are very important. That's why he loves<br />
Asian profiles in general. Because their lips are so nicely<br />
shaped, and there are a nice vermillion curl and vermillion<br />
display. Whenever he treats Asian Americans, he wants to<br />
enhance that and always can get most beautiful results.<br />
Vertical proportion is also very important. Because through<br />
vertical control, we can maintain smile arc and enamel<br />
display (Fig 3). We can even increase enamel display by<br />
changing the vertical dimension.<br />
In the past we usually sacrificed beautiful faces by<br />
setting up Class II mechanics to ensure maximum<br />
anchorage to retract upper anterior teeth to treat Class II<br />
malocclusion. In Caucasian, increasing dento-skeletal<br />
volume could be the best face lift !! So what we are trying<br />
to do is not to compromise the nasolabial angle, but to<br />
keep it and maintain the lip curl . Don't sacrifice the face<br />
to the occlusion !! Extracting bicuspids in a Class II<br />
Fig 4. With the retroclined canine�about -9°�, the arch<br />
width will not be able to develop. This will lead to<br />
unattractive buccal corridors (left).<br />
The ideal canine torque should be uprighted. The best<br />
position would be canine axis perpendicular to the incisal<br />
plane (right).<br />
7
8<br />
FH line<br />
Fig. 5<br />
malocclusion will devastate the face. Maintain or enhance<br />
incisor display, transverse smile dimension (arch form and<br />
arch width), resting lip support and smile arc is very<br />
important. One of the most important things in<br />
miniesthetics is “torquing”. Incisor torque is important to<br />
smile arc. People hate procumbent incisors. If we overtorqued<br />
the incisors, the smile arc will become flat. Canine<br />
torque is also very important. Keep canine upright will<br />
make the transition to premolar more gentle (Fig 4). Don't<br />
over-torque the upper incisors. If we wish to analyze the<br />
most esthetic looking incisors in the frontal view, we should<br />
use a lateral head film. According to a study done by Dr.<br />
Eastham, if we draw a line tangent to labial surface of<br />
incisor crown, it will be perpendicular to the FH plane (Fig<br />
5). Originally, the definition of FH plane is the line<br />
connected by Po-Or. Since “porion” is hard to define on<br />
the lateral head film, Dr. Pitts uses top of the condyle as a<br />
substitution. Remember, don't procline the upper incisors as<br />
well as canines !!<br />
Again, speaking of Asian Americans, use this passive<br />
self-ligating brackets without extractions can achieve more<br />
full profile and good lip support. Today, the new concepts<br />
of orthodontics in Asia would be�<br />
1. Also, a big push for beauty with the Damon system.<br />
2. More full profile is desirable for Asian Americans today<br />
than just a few years ago.<br />
3. Wider arches, smile arc, enamel display are becoming more<br />
important.<br />
4. Less extractions because of arch development.<br />
5. More OrthoBoneScrews used in Taiwan and Korea can also<br />
save the bicuspids to ensure full profile .<br />
On deep bite issues we can do a lot more today by<br />
increasing the lower facial height, using proper torque<br />
brackets of upper incisors, increasing the enamel display,<br />
and making smile arc consonant with the lower lip. These<br />
make a huge difference in the beauty of the cases. So, it is<br />
not just the Damon brackets but how you use it !!
•Arch Development, Proper Torque, and Smile Arc<br />
Protection<br />
Arch development is a major factor to more impressive<br />
mid-facial beauty and non-extraction. Here, Dr. Pitts shared<br />
with us a case of bilateral lingual cross-bite (Fig 6). This<br />
patient suffered from bilateral X-bite because of low tongue<br />
position. Dr. Pitts decided to treat this patient with Damon<br />
appliance rather than RPE. He bonded every teeth and put<br />
bite turbos on to disarticulate the lingually displaced upper<br />
lateral incisors and started with .013 NiTi. In the third<br />
appointment, Dr. Pitts progressed into .016 NiTi to upper 1st molars (not 2nd molars), and went to 16x25 NiTi to the 2nd molars in the lower arch. And then, the patient disappeared<br />
for 3 years !! When the patient came back 3 years later, even<br />
without wire going through the 2nd molar, lingual X-bite on<br />
the left side was corrected including the 2nd molar. X-bite<br />
over right side was not totally corrected because the patient<br />
usually sleeps over that side. So, in order to let the system<br />
“work”, we need to change our way of thinking !! Force<br />
level is extremely important to arch development, and with<br />
very light forces, tongue seems to come to a higher posture<br />
naturally.<br />
Dr. Hisham Badawi developed a test machine to test the<br />
force levels and force vectors of each tooth in active selfligating<br />
/ active tie-in system and passive self-ligating<br />
Fig 6. Note: the lingual crossbite of #15 has<br />
been corrected without archwires.<br />
system. In crowded lower anterior area, if we aligned the<br />
teeth by active self-ligating system, even with only .014<br />
Copper NiTi, the force vectors were all forward on the<br />
anteriors. That's why we have to extract!! But with passive<br />
self-ligating system, we can see a buccal displaced force<br />
vector on 1st premolar area. That allowed us to have lateral<br />
development rather than incisor flaring with the very first<br />
wire in the Damon system (Fig. 7).<br />
• Mastery of Damon Finishing<br />
When talking to Damon and contemporary finishing,<br />
Dr. Pitts develops it into 4 steps.<br />
1.Learning how to use the appliance to fit the teeth together<br />
beautifully.<br />
2.Learning how to create results with enhanced (Highest and<br />
Best) Facial and Smile esthetics.<br />
3.Adding efficiency to the process without diminishing the<br />
quality. Including the followings :<br />
� Appliance placement / custom torque<br />
� Letting the system work<br />
� Early light short elastics<br />
� Finishing elastics<br />
� Cuspal contouring<br />
�� Learning how to retain the results.<br />
Fig 7. Dr. Hisham Badawi’s force study<br />
9
10<br />
Excellence is a “process”. Dr. Pitts is treating cases better<br />
than just he was a couple years ago. Some orthodontists can fit<br />
the teeth together, but not maximize the esthetics. Some get<br />
the beautiful faces but their inclination, marginal ridges, and<br />
occlusion are not excellent. What we have to do is to treat<br />
patients with not only esthetic functional occlusion, but also<br />
with esthetic facial balance.<br />
Dr. Pitts stressed that “vertical” is important to esthetics.<br />
The 2nd step in mastering the highest and best Facial and Smile<br />
Esthetics involves control of vertical dimension. We have to<br />
learn how to intrude and extrude the posterior teeth without<br />
causing harm to the smile arc. We should know how to deal<br />
with the lower facial height and the power of “disarticulation<br />
” (Bite turbos).<br />
• Bracket Placement, Working Arch Wires and “<br />
Finishing ”<br />
Bracket position is the 1st key to finishing. The ideal<br />
position criterion involves�(Fig 8, 9)<br />
�Smile Arc<br />
�Mutually Protected Occlusion<br />
�Marginal Ridges and Contacts<br />
�Symmetry<br />
�Transition from the Anteriors to the Buccal Segments/<br />
Occlusion of Buccal Cusps<br />
�Torque Control<br />
Dr. Pitts have been direct bonding for 40 years. “ Bonding<br />
can make us or Break us�” Dr. Pitts evaluated many of his<br />
cases and realized that the most beautiful cases were the ones<br />
of which the occlusal edge of bracket pads reached the level<br />
of contact points. Thus, he has developed the gingival<br />
bracketing position. If you use indirect bonding, you still need<br />
to study “positioning”. The more we study bracket positioning,<br />
the better and quicker our finishing is. We also need to excel<br />
“repositioning” brackets during treatment. Here we list the<br />
steps of “Precision bonding”�<br />
1. Incisal plane is quite important! The frontal smile<br />
photograph may not be so accurate. Before bonding, have<br />
the patient stand up and smile, look at the patient directly.<br />
Observe if there is any occlusal plane canting, arch width<br />
and shape, and most importantly the smile arc.<br />
2. Use pencil to draw the contact point line of posterior teeth<br />
on the models. Observe the crown morphology and axis<br />
carefully. When Dr. Pitts starts bonding, he always has<br />
Pano, photos (esp. frontal smile photo) and models by the<br />
chairside.<br />
3. Have two assistants prepare prior to bonding. Preload<br />
molar tubes with resin. Apply bonding agent on tube base<br />
(tube only), air dry, then apply resin. Covered the tubes<br />
(with resin) with metal cups to protect resin from curing by<br />
Fig 8. Bonding position of lower canine and bicuspids : occlusal pad of the brackets should be “below” the contact point line.<br />
1 st molar should be right on the contact point line with the 2 nd molar a little bit “gingival” than the 1 st molar.<br />
Bonding position of upper canine and bicuspids : occlusal pad of the brackets should be “right on” the contact point line. The<br />
end molar should be a little bit “occlusal” than the 1st molar.
ambient light. No antisialogogue, no cheek retractors,<br />
only use long (7 inches) cotton rolls. Use a large front<br />
surface mirror plus magnifying loupes.<br />
4. Reshape teeth with football diamond bur, polish with<br />
white stone, then black rubber point. Dr. Pitts reshapes<br />
99% of Canines prior to bonding. This is particularly true<br />
among Asians because the Asians have many variations<br />
on their teeth, such as lingual ridges of upper incisors,<br />
uneven labial surfaces of upper lateral incisors which<br />
often need to be reshaped. Dr. Pitts does tell the patients<br />
and the parents that there is no way he can straighten their<br />
teeth and do a great job without recontouring enamel !!<br />
5. Start with lower arch, and then go to upper arch.<br />
6. Use rubber cup with pumice powder to clean the teeth.<br />
Once we clean the teeth up, don't let the cheeks touch the<br />
teeth again. Use long cotton roll to isolate the teeth from<br />
cheek, and half the cotton roll to isolate the tongue. Start<br />
with the R't lower 2nd molar. Bond the occlusal pad of<br />
bracket just below the contact point (buccal segment).<br />
Use large front mirror to observe the tooth long axis. End<br />
up R't side on canine then shift to L't side. When we look<br />
at the long axis of the lower incisors form side of the<br />
patient, it will appear more mesial than if seen from the<br />
labial. So, bond the lateral incisors as well as canines<br />
Fig 9. Bonding position<br />
• Use football diamond bur to recontour the unweared cuspid<br />
tips or irregular attrition<br />
• Place upper anteriors followed by Smile arc. Canine and<br />
lateral incisors will be at the same height, and place the central<br />
incisors a little bit gingivally.<br />
• Place lateral incisors and canines “mesial” to crown long axis.<br />
mesial to the long axis. Press the bracket base firmly and<br />
curing. When you want to overcome the deep bite, bond<br />
the lower incisors relatively incisal.<br />
7. Before we start bonding upper arch, put utility wax over<br />
labio-gingival surfaces of lower anterior brackets to<br />
protect the lower lip. Dr. Pitts puts the 2nd molar more<br />
occlusal than the 1st molar. Use a small mirror to observe<br />
the buccal groove from occlusal view. Bond 1st molar and<br />
premolars with occlusal edges of bracket pads right on the<br />
contact point. Use a large mirror with loupes to observe<br />
the central grooves and long axis of premolars (Fig 10).<br />
With the incisors, put the mesial surface of bracket to<br />
parallel the mesial surface of the incisor. As for central<br />
incisors, not only have to make sure they are on the same<br />
height, we also have to make sure that they are in the<br />
same distance to the crown mesial side. Canines also have<br />
to be on the same height to prevent cant of the occlusal<br />
plane. Keep as symmetrical as possible!! Finally, add bite<br />
turbos on palatal side of the centrals (or posteriors) and do<br />
some occlusal adjustment. Then insert the wire.<br />
Let's talk about Working wire principles�<br />
• Every working wire has adjustments at the very first<br />
appointment they are inserted including 1 st , 2 nd , and 3 rd<br />
orders.<br />
Fig 10. Common bonding errors of upper arch :<br />
• Too distal on canines<br />
• Too mesial on 1 st premolar<br />
(Particularly the left side)<br />
11
12<br />
• Use stainless steel or TMA.<br />
• Every working wire has Posts or Loops distal to the<br />
laterals on either steel or TMA wires . With the posts /<br />
loops, you'll never lose your way. You can always know<br />
which side of the arch wire is up and easy to coordinate<br />
and gain symmetry.<br />
• They must be perfectly symmetrical and coordinated.<br />
Coordination means that curvature of Maxillary and<br />
Mandibular 3-3 is in the same. If we need more posterior<br />
width, we can expand the SS wires posteriorly.<br />
As for when to use what working wires ? Dr. Pitts uses<br />
19X25 SS on upper and 16X25 SS on lower mostly. In open<br />
bite or Class III cases, he uses 19X25 TMA or 17X25 TMA.<br />
In Class II or extraction cases, always use SS as working<br />
wire. Again, don't over torque the upper anteriors. Dr. Pitts<br />
does adjust his working wires before first insertion. (Why<br />
wasting 10 to 11 weeks?) To prevent opening unwanted<br />
spaces during arch development, use K modules or .008<br />
ligature wire to tie back.<br />
• Early Light Short Elastics<br />
The advantages of early light short elastics are as<br />
following� (Fig. 10A-10H)<br />
• Controlling vertical dimension in either deep bite or open<br />
bite cases in early stage of treatment.<br />
• Controlling AP correction in either Class II or Class III<br />
cases in early stage of treatment by using 2 oz early light<br />
short elastics. Keep it short to reduce the side effect of<br />
horizontal pull.<br />
• Influencing higher tongue posture.<br />
• Enhancing increased arch width earlier with light cross<br />
elastics. And with such a gentle force, we don't get too<br />
much tipping.<br />
• Increased efficiency.<br />
• Doesn't hurt the patient because of the light force.<br />
By simply combining early light short elastics and bite<br />
turbos, we can selectively intrude or extrude certain teeth to<br />
control the vertical dimension without harming the smile arc.<br />
Such results will never come out with reversed curve wires.<br />
That's why Dr. Pitts never uses a reversed curve wire on<br />
upper, because he doesn’t have to.<br />
Always consider vertical and AP problems<br />
simultaneously!!In deep bite cases, add bite turbos anteriorly<br />
and use elastics to extrude the posteriors. In open bite cases,<br />
add bite turbos posteriorly and use elastics to erupt the<br />
anteriors. To make the early elastics more efficient, always<br />
think about “disarticulation”!<br />
Remember, in deep bite or Class II cases, “Keep the<br />
elastics distally” to facilitate posterior extrusion. As for open<br />
bite or Class III cases, “Keep the elastics anteriorly” to<br />
facilitate anterior extrusion. And to maintain the treatment<br />
results, we have to “overcorrect” the Open bite cases into a<br />
little bit deep bite. For deep bite cases, we have to<br />
“overcorrect” the bite shallower. For Class II cases, we have<br />
to “overcorrect” to an edge-to-edge position, and Class III<br />
cases to deeper bite and a little bit Class II relationship.<br />
Patients usually get disarticulated buccal segments in<br />
contact in 8 weeks when wearing initial elastics (Quail) . The<br />
most difficult time will be the initial two weeks. They will<br />
need to maintain a diet of soft foods until touching back<br />
teeth. They must eat more slowly and cut up the foods into<br />
small bites. We have to let patients know that if they wear<br />
rubber bands “Full time” (24 hours), it will save them up to<br />
12 months of treatment time or more and get a more beautiful<br />
result. And because the rubber bands will break fairly easily,<br />
they must take plenty and carry them everywhere they go.
Fig 10A<br />
Dr. Tom Pitts� Protocol of Elastics and Bite Turbos<br />
Wire Elastics Direction Duration Bite Turbo<br />
Class I Deep Bite or Class II, End-on, Non-Extraction<br />
.014 NiTi �<br />
(.013 PRN)<br />
.018 NiTi<br />
(PRN)<br />
.014 x .025<br />
NiTi<br />
.018 x .025<br />
NiTi<br />
Quail<br />
3/16 2 oz.<br />
Quail<br />
3/16 2 oz.<br />
Kangaroo<br />
3/16 4.5 oz.<br />
Kangaroo<br />
3/16 4.5 oz.<br />
.019 x .025 SS Kangaroo<br />
3/16 4.5 oz.<br />
or<br />
Impala<br />
3/16 6 oz.<br />
Shorty CL II U4-L6 Full Time U Anterior<br />
Shorty CL II U4-L6 Full Time U Anterior<br />
Shorty CL II U4-L6 Full Time U Anterior<br />
Shorty CL II U4-L6 Full Time until<br />
Overcorrected<br />
then Nights<br />
Full CL II U hook to L6 Full Time until<br />
Overcorrected<br />
then Nights<br />
� Keep it short to reduce the horizontal vector ! Patients will be uncomfortable for couple days because the posteriors are<br />
out of occlusion. Try soft diet and cut food into pieces until the posteriors are in contact.<br />
--<br />
--<br />
13
14<br />
Fig 10B<br />
Wire Elastics Direction Duration Bite Turbo<br />
Class III Deep Bite<br />
.014 NiTi Quail<br />
3/16 2 oz.<br />
.014 x .025 NiTi Kangaroo<br />
3/16 4.5 oz.<br />
.018 x .025 NiTi Kangaroo<br />
3/16 4.5 oz.<br />
.019 x .025 SS � Kangaroo<br />
3/16 4.5 oz.<br />
or<br />
Impala<br />
3/16 6 oz.<br />
� Cut wire distal to the U6s if still Cl III<br />
Shorty CL III L3-U5 or Full CL III L4-U6 Full Time L Anterior 1�s<br />
Shorty CL III L3-U5 or Full CL III L4-U6 Full Time L Anterior 1�s<br />
Shorty CL III L3-U5 or Full CL III L4-U6 Full Time until<br />
Overcorrected<br />
then Nights<br />
Full Cl III L hook to U6 Full Time until<br />
Overcorrected<br />
then Nights<br />
--<br />
--
Fig 10C<br />
Wire Elastics Direction Duration Bite Turbo<br />
Class I Open Bite, Non-Extraction<br />
.014 NiTi��<br />
(.013 PRN)<br />
Parrot<br />
5/16 2 oz.<br />
.018 NiTi Parrot<br />
5/16 2 oz.<br />
.014 x .025 NiTi<br />
or<br />
.018 x .025 NiTi<br />
U : .019 x .025<br />
SS / TMA<br />
L : .016 x .025<br />
SS<br />
Zebra<br />
5/16 4.5 oz.<br />
Moose<br />
5/16 6 0z.<br />
Triangle U3-L3 or L4 Full Time L Molar<br />
Triangle U3-L3 or L4 Full Time L Molar<br />
Triangle U3-L3 or L4 Full Time --<br />
Tent L4-U3-L3 Full Time --<br />
� Begin squeeze exercise at the first day. Put fingers on post. fiber of temporalis muscle area to feel the muscle contraction<br />
whenever bites on. 50 times as a cycle, do 6 cycles a day to accelerate molar intrusion.<br />
15
16<br />
Fig 10D<br />
Wire Elastics Direction Duration Bite Turbo<br />
Class II Open BBite,<br />
Average Severity<br />
.014 NiTi Quail<br />
3/16 2 oz.<br />
.014 x .025 NiTi<br />
or<br />
.016 x .025 NiTi<br />
Kangaroo<br />
3/16 4.5 oz.<br />
.018 x .025 NiTi Kangaroo<br />
3/16 4.5 oz.<br />
U : .019 x .025<br />
SS<br />
L : .016 x .025<br />
SS �<br />
Kangaroo<br />
3/16 4.5 oz.<br />
or<br />
Impala<br />
3/16 6 oz.<br />
� Cut wire distal to the L6s if still CL II<br />
� 10% of time finish in .019 x .025 SS<br />
Shorty CL II U3-L5 Full Time Posterior<br />
Shorty CL II U3-L5 Full Time Posterior<br />
Shorty CL II U3-L5 Full Time --<br />
Full CL II U hook-L6 Full Time until<br />
Overcorrected<br />
then Nights<br />
--
Fig 10E<br />
Wire Elastics Direction Duration Bite Turbo<br />
Class II Open BBite,<br />
Severe<br />
.014 NiTi Parrot<br />
5/16 2 oz.<br />
.014 x .025 NiTi<br />
or<br />
.016 x .025 NiTi<br />
Dolphin<br />
5/16 3 oz.<br />
.018 x .025 NiTi Dolphin<br />
5/16 3 oz.<br />
U : .019 x .025<br />
SS<br />
L : .016 x .025<br />
SS �<br />
Zebra<br />
5/16 4.5 oz.<br />
� Cut wire distal to the L6s if still CL II<br />
� 10% of time finish in .019 x .025 SS<br />
Triangle L6-U3-L4 Full Time Posterior<br />
Triangle L6-U3-L4 Full Time Posterior<br />
Triangle L6-U3-L4 Full Time --<br />
Triangle L6-U3-L4 Full Time<br />
(Double at night<br />
PRN) until<br />
Overcorrected<br />
then Nights<br />
--<br />
17
18<br />
Fig 10F<br />
Wire Elastics Direction Duration Bite Turbo<br />
Class III Open Bite, Average Severity<br />
.014 NiTi Quail<br />
3/16 2 oz.<br />
.014 x .025 NiTi<br />
or<br />
.016 x .025 NiTi<br />
Kangaroo<br />
3/16 4.5 oz.<br />
.018 x .025 NiTi Kangaroo<br />
3/16 4.5 oz.<br />
U : .019 x .025<br />
SS / TMA<br />
L : .016 x .025<br />
SS �<br />
Impala<br />
3/16 6 oz.<br />
� Cut SS wire distal to the U6s if still CL III<br />
Shorty CL III L3-U5 Full Time Posterior<br />
Shorty CL III L3-U5 Full Time Posterior<br />
Shorty CL III L3-U5 Full Time --<br />
Full CL III L hook-U6 Full Time until<br />
Overcorrected<br />
then Nights<br />
--
Fig 10G<br />
Wire Elastics Direction Duration Bite Turbo<br />
Class III Open Bite, Severe<br />
.014 NiTi Parrot<br />
5/16 2 oz.<br />
.014 x .025 NiTi<br />
or<br />
.016 x .025 NiTi<br />
Dolphin<br />
5/16 3 oz.<br />
.018 x .025 NiTi Zebra<br />
5/16 4.5 oz.<br />
U : .019 x .025<br />
SS<br />
L : .016 x .025<br />
SS �<br />
Zebra<br />
5/16 4.5 oz.<br />
or<br />
Moose<br />
5/16 6 oz.<br />
� Cut SS wire distal to the U6s if still CL III<br />
Triangle U6-L3-U4 Full Time Posterior<br />
Triangle U6-L3-U4 Full Time Posterior<br />
Triangle U6-L3-U4 Full Time --<br />
Triangle U6-L3-U4 Full Time<br />
(Double at night<br />
PRN) until<br />
Overcorrected<br />
then Nights<br />
As for Class III Severe Open bite with post. crossbite cases, we can use<br />
cross bite elastics, Class III elastics plus Ant. up & down elastic. Started<br />
with Quail, then switch to Dolphin. When progress to .018 x .025 NiTi,<br />
switch the elastic to Zebra.<br />
--<br />
19
20<br />
Fig 10H<br />
Wire Elastics Direction Duration Bite Turbo<br />
Cross Bite<br />
.014 NiTi � Parrot<br />
5/16 2 oz.<br />
.018 NiTi Dolphin<br />
5/16 3 oz.<br />
.014 x .025 NiTi<br />
or<br />
.016 x .025 NiTi<br />
U : .019 x .025<br />
SS<br />
• L : .016 x .025<br />
SS �<br />
Dolphin<br />
5/16 3 oz.<br />
or<br />
Zebra<br />
5/16 4.5 oz.<br />
Zebra<br />
5/16 4.5 oz.<br />
or<br />
Moose<br />
5/16 6 oz.<br />
Posterior Cross Bite U5/6 Lingual-L5/6<br />
Buccal<br />
Posterior Cross Bite U5/6 Lingual-L5/6<br />
Buccal<br />
Posterior Cross Bite U5/6 Lingual-L5/6<br />
Buccal<br />
Posterior Cross Bite U5/6 Lingual-L5/6<br />
Buccal<br />
Full Time Depends on<br />
whether open or<br />
deep bite.<br />
Usually posterior<br />
Full Time Depends on<br />
whether open or<br />
deep bite.<br />
Usually posterior<br />
Full Time until<br />
overcorrected<br />
then Nights<br />
Full Time until<br />
overcorrected<br />
then Nights<br />
� Bond Kaplan hooks on palatal surfaces of upper 2 nd premolar & 1 st molar. Add bite turbos on lower molar<br />
cusps to disarticulate if needed.<br />
� Cut SS wire distal to the point where the buccal occlusion is ideal. CL I & II, cut the upper wire. CL III, cut the<br />
lower wire.<br />
--<br />
--
• Extraction mechanics<br />
Remember,“ Only Extract for the face , not for the<br />
space ”�Dr. Pitts rarely treats patients with extractions<br />
unless the profile is unattractive. The very first reason Dr.<br />
Pitts will extract is “Bimaxillary protrusion with Lip<br />
incompetence”. And the second reason is “Crowding with<br />
protrusion and very wide arches”. But this is very rare.<br />
Because when patients have crowding with protrusion,<br />
usually the arches are fairly narrow. Dr. Pitts trains patients<br />
with lip incompetence to practice “lip seal exercise”to keep<br />
the mouth close even when they are treated with<br />
extractions.<br />
Remember the more we widen the arches with the<br />
proper torque on the incisors, the less we need to consider<br />
extraction. Try to treat patients with flat lips non-extracted.<br />
Dr. Pitts always treats these patients 10 to 12 months before<br />
he makes a decision whether extract or not.<br />
When treating extraction cases, be aware to use High<br />
torque�+7°�on cuspids to keep the root away from the<br />
buccal plate. If you have difficulty in closing spaces, add an<br />
additional 20° lingual root torque from canine posteriorly to<br />
keep the roots away from the buccal plates to facilitate<br />
space closure.<br />
In extraction cases, first level and align teeth including<br />
second molars. Once we progress to 14x25 NiTi (or 18x25<br />
NiTi) and the spaces between cuspids to cuspids are<br />
consolidated, lace 3-3 with .008 ligature wire. Use Stainless<br />
steel wire to close spaces to prevented unwanted dumping<br />
of anteriors. Mostly the 19 X 25 SS with wire passes<br />
through only to the 1st molars.<br />
Attach posts or loops distal to the laterals. Dr. Pitts<br />
uses medium �iTi coil spring �activate about 9 mm or<br />
about 4 ~ 6 ozs�from distal wire of the 1st molar to the<br />
archwire hooks (not directly to the canines) so force is more<br />
evenly distributed over the whole arch wire. He bends the<br />
end of coil to a 90 degree angle before hooking the spring<br />
on the end of the wire. Space closure with coil springs<br />
provides more consistent long term pressure than with<br />
elastomeric modules, chain elastics, or Class I elastics. He<br />
activates coils every 11 weeks so he doesn't have to see<br />
patients very often. He closes upper and lower spaces<br />
simultaneously. With proper activation, one should expect<br />
about 1.2 mm closure per month (Fig 11).<br />
If midline is off, we can only activate one side of<br />
which space was not totally closed in combination with<br />
unilateral Class I or Class III elastics. If the space is not<br />
closed one sided, Dr. Pitts will have patients chew small<br />
pieces of gum on the affected side or add lingual root torque<br />
on buccal segment. So the spaces will close more quickly.<br />
Never go back to the 2nd molars when closing spaces<br />
because it will slow down the closure. With the low friction<br />
passive self-ligating brackets provided, we don't have to<br />
worry about “anchorage”. The more we widen the arches,<br />
the more the anterior teeth will distalize !! Keep arch wide<br />
Fig 11. With proper activation, one should<br />
expect about 1.2 mm closure per month.<br />
21
22<br />
on extraction cases can also prevent unattractive buccal<br />
corridor.<br />
Once we close the space, ligate the adjacent teeth to the<br />
extraction site with .010 ligature wire figure eight, and go<br />
back to 18 X 25 NiTi to 2nd molars for 8 to 10 weeks leveling<br />
and alignment. Then go to 16 X 25 SS or TMA on lower, 19<br />
X 25 SS or 16 X 25 SS on upper for detailing and finishing.<br />
Using 19 X 25 SS for major mechanics!! It is an excellent<br />
wire to maintain integrity of arch during AP correction and<br />
space closure. It's also an ideal tool for maintaining the<br />
anterior vertical.<br />
Dr. Pitts will tell the patients that extraction treatment<br />
will cost 6 to 8 months longer than non-extraction. Usually it<br />
takes 18 months for non-extraction treatment, and 24 months<br />
for extraction one.<br />
• Retention<br />
In order to maintain good results, we have to check CR<br />
position each visit and this must be recorded in every visit<br />
during treatment. Be sure not to have Dual bite or CO - CR<br />
sliding after completion of the treatment to sustain the<br />
results. Always strive for a “centric relation” !! One reason to<br />
use early light short elastics is to correct A-P discrepancy<br />
during early stage of treatment. This helps the neuromuscular<br />
system to adapt well and balance earlier. During the finishing<br />
stage, we not only use finishing elastics, but also have to do<br />
occlusal adjustment to remove any interferences. 99% of Dr.<br />
Pitts' occlusal adjustments were on “lingual” cusps. Once<br />
there is premature contact on the lingual side, the buccal<br />
occlusion will not fit well even with finishing elastics. It is<br />
important to fit every tooth together in finishing stage. If we<br />
asked Dr. Pitts that when dose he lets teeth “settle” ? The<br />
answer would be “Never” !! Never let the teeth settle after<br />
the braces are off !!<br />
Always “over-treat” the Class II's (to an edge-to-edge<br />
position), Class III's, deep bites and open bites!! Particularly<br />
in deep bite cases, they tend to relapse to deep bite. Dr. Pitts<br />
started using lingual fixed retainer on upper arch just a few<br />
years ago. This is because he observed that out of those<br />
beautifully finished cases that wore only removable retainers,<br />
50% of their lateral incisors moved gingivally. This is not<br />
very esthetic. Thus, Dr. Pitts decided to bond upper 2-2 with<br />
fixed retainer. Usually, Dr. Pitts finished his cases in shallow<br />
bites, except for the Class III and anterior openbite cases<br />
which need to be overcorrected. So, there is always enough<br />
space for the upper fixed retainer. He uses Ortho Flex Tech<br />
for an upper fixed retainer, and .027 TMA or .0175 / .0195<br />
twisted wire for lower 3-3 combined with clear retainer (.040<br />
inch clear sheet). Patients have to wear upper and lower clear<br />
retainers full time for 4 weeks after debonding, and then<br />
switch to night time only. The upper fixed retainer should be<br />
placed for more than 3 years, and the lowers’ should be<br />
placed for a life time. Patients should also wear clear<br />
retainers for a life time.<br />
We can make the removable thermoplastic retainers to<br />
either horseshoe shape for the maxillary arch to resemble the<br />
mandibular arch, or to increase their palatal coverage for<br />
extra strength to minimize lateral relapse. Usually, Dr. Pitts<br />
prefers the horseshoe shape, but with the narrow arch, in<br />
order to keep the arch wide, the retainer should have<br />
sufficient palatal coverage.<br />
Dr. Pitts prefers the muscle training splint (Damon<br />
splint) mostly (Fig 12). However, he doesn't go to the splint<br />
right after debonding. He would instruct the patients to wear<br />
clear retainers for 3 months and then take final records for<br />
the splint. Dr. Pitts has started to use this splint since 1977.<br />
At first it was for the patients with TMD problems. Dr. Pitts<br />
used this splint to move the mandible forward to release the
condyle while Dr. Damon used this splint mainly for open<br />
bites. Now the indications of Damon splints are�1. Herbst<br />
retention�2. Severe posterior crossbite�3. Lat. tongue<br />
thruster�4. CL�’s corrected with elastics or Herbst with<br />
springs�5. Class � malocclusion�6. Deep overbite<br />
cases � 7. Anterior open bite�8. Any patient with severe<br />
muscle dysfunction�9. Tongue trainer�10. TMJ - bruxing /<br />
clenching�11. Sleep Apnea. The splint is made of materials<br />
which have a soft inner liner with a hard outer liner. Dr. Pitts<br />
would block out the models first because he doesn't want the<br />
splint to have much retention. For Class II patients, make the<br />
bite in edge-to-edge position, open the anterior for about 5 ~ 6<br />
mm. In apnea patients, we can make the bite more forward<br />
and more open. For Class III patients, take the bite to centric<br />
relation and make it forward about 1 mm.<br />
Finally, what does greatness mean to you ? It should be<br />
more than just “straightening teeth”!! We have been fortunate<br />
have benefited from the advancement of orthodontic tools.<br />
Having armed with the Damon Light Force System and the<br />
knowledge of precise bonding, proper torque selection, how<br />
and where to add bite turbos, and the applications of early<br />
light short elastics, we can maximize the power of the Damon<br />
system. ecause of Damon orthodontics has become more fun<br />
and easier than ever and our treatment far more effective and<br />
efficient !!<br />
Fig 12. Muscle training<br />
splint (Damon splint)<br />
�����������������������������������������<br />
��������������������������������������������������������������������������������������������������������������������������������<br />
������������������������������������������<br />
������������������������������������������������������������������������<br />
�� ��������������������������������������������������������������������������������������������������������������<br />
�� ����������������������������������������������������������������������������������������������������������<br />
�����������������������������������������������������������������������������������������������������������������������������������������<br />
��������������������������������������������������������������������������<br />
���������������������������������������������������������������������������������������������������������������������������������������������������<br />
����������������������������������������������<br />
����������������������������������������������������������������������������������������������������������������������������������������<br />
�����������������������������������������������������������������������������������������������������������������������������������������<br />
�������������������������������������������������������������������������������������������������������������������������������������<br />
������������������������������������������������������������������������������������������������������������������������������������������������<br />
���������������������������������<br />
���������������������������������������������������������������������������������������������������������������������������������������������������<br />
������������������������������������������������������������������������������������������������������������������������������������������������<br />
������������<br />
23
24<br />
Orthodontic Treatment of a High-Angle<br />
Introduction<br />
The importance of vertical control in high-angle<br />
patients has been well discussed. Because the molars of high<br />
angle cases tend to become mesial tipped and extruded<br />
during the course of orthodontic treatment, the mandibles<br />
rotate backward and worsen the facial profile. In addition,<br />
treating high-angle class II patients with deep overbite<br />
problems by the intrusion archwire systems such as a utility<br />
arch or an intrusion arch could potentially create a force to<br />
extrude the molars. Therefore, it is recommended that<br />
extraoral appliances like the high-pull headgear should be<br />
used for better vertical control. It is undoubted that the<br />
patients’ cooperation would be critical to the final<br />
achievement.<br />
Recently, what has revolutionized orthodontic<br />
Fig 1. Pretreatment facial and intraoral photographs. Gummy<br />
smile was noted.<br />
Case with Gummy Smile<br />
anchorage is orthodontic mini-implant. These devices not<br />
only provide maximal and stable anchorage in various type<br />
of tooth movement1-9 but also work without the need of<br />
patients’ cooperation. This case demonstrates the successful<br />
use of orthodontic miniscrews as anchorage to retract and<br />
intrude incisors and control the posterior teeth vertically in a<br />
patient who exhibited a deep overbite, Class II malocclusion<br />
with a high mandibular plane angle and a gummy smile.<br />
Case report<br />
This 29-year-old female patient had lip protrusion,<br />
gummy smile, mentalis strain and chin retrognathism (Fig 1).<br />
Intraoral examination revealed a bilateral class II canine and<br />
molar relationship, and a 5.0 mm overjet and 4.5 mm<br />
overbite (Fig 1). The patient had severe skeletal discrepancies<br />
with an 9.5° ANB angle and a high mandibular plane angle<br />
Fig 2. Pretreatment panoramic radiograph<br />
Fig 3. Pretreatment lateral cephalometric radiograph.
���������������<br />
����������������������������������<br />
(Table 1). In addition, the arch length discrepancies in<br />
maxillary and mandibular arches were zero and 6 mm. The<br />
treatment plans were to extract the maxillary first and<br />
mandibular second premolars, and use miniscrew implants as<br />
the anchorage control in posterior teeth region. Moreover, the<br />
miniscrew implants were implanted in the alveolar bone below<br />
the anterior nasal spine of the maxilla and below the root<br />
apices of mandibular central incisors for upper and lower<br />
incisors intrusion.<br />
Treatment progress<br />
The orthodontic appliances (Alexander miniwick: 0.022<br />
inch slot in posterior teeth and 0.018 inch slot in six anterior<br />
teeth) were placed for leveling with 0.016-inch Nitinol<br />
archwire. One week after initial leveling, miniscrew implants<br />
(2 mm in diameter, 10 mm in length, Bio-Ray A-1, J type)<br />
were placed bilaterally in the alveolar bone between the<br />
maxillary and mandibular first molars and second molars (Fig<br />
4). Two months later, these miniscrew implants which used for<br />
anterior teeth intrusion were placed below the anterior nasal<br />
spine and below the lower anterior teeth root apices (Fig 5).<br />
Furthermore, an orthodontic ligature wire was tied in the head<br />
Fig 4. Bilateral miniscrew implants in the alveolar bone<br />
Fig 5. Anterior miniscrew implants in the alveolar bone<br />
�������������������������<br />
����������������������������������<br />
of the miniscrew implants. During treatment appointments, a<br />
light elastic chain was tied from the ligature wire to the main<br />
archwire and renewed throughout treatment. A 0.017x0.025 SS<br />
archwire was inserted and an elastic chain was applied<br />
between anterior teeth and miniscrew implants to retract<br />
anterior teeth (Fig 6).<br />
Treatment results<br />
The treatment was finished after 25 months with class I<br />
canine and molar relationship. The posttreatment facial<br />
photographs showed improvement of the facial profile and the<br />
gummy smile in a posed smile (Fig 7). There was no abnormal<br />
root resorption noted in the posttreatment panoramic<br />
radiograph (Fig 8). The cephalometric superimposition<br />
revealed that the maxillary anterior teeth were retracted 8 mm<br />
with 3.1 mm intrusion and the mandibular anterior teeth were<br />
retracted and intruded. Meanwhile, the maxillary posterior<br />
teeth showed uprighting, intruding and a slight distal<br />
movement, and the mandibular posterior teeth were uprighted.<br />
Accordingly, this was followed by closure of the mandibular<br />
plane angle and an increase in the SNB angle (Fig 10).<br />
Therefore, the facial profile was much more harmonious by<br />
resolving the hyperactive muscle strain of the circumoral and<br />
mentalis musculature after retraction of the anterior teeth and<br />
vertical control of the mandibular posterior teeth during space<br />
closure. The deep overbite and the gummy smile could be<br />
corrected efficiently by the miniscrew anchorage.<br />
Fig 6. The elastic thread was applied between anterior teeth<br />
and miniscrew implants to retract anterior teeth.<br />
25
26<br />
Discussion<br />
While treating high-angle cases, proper vertical control<br />
of posterior dentoalveolar height could either enhance<br />
mandible forward rotation or maintain mandibular plane<br />
angle. It is suggested that the control of posterior tooth<br />
eruption would be the most manageable factor available for<br />
the overall control of anterior vertical dimension of lower<br />
face. 10 It is reported that a 1-mm posterior teeth extrusion<br />
could result in a movement of up to 3 mm at gnathion. Much<br />
emphasis has been focused on reduction of maxillary<br />
posterior alveolar heights. Furthermore, some authors stated<br />
that the vertical control of mandibular posterior teeth had<br />
been considered a contributing factor for the mandible<br />
rotation in counterclockwise direction with improvement of<br />
the facial profile. 11,12 However, the intrusion of molars in one<br />
jaw was not enough to improve the facial profile because<br />
unwanted extrusion of molars occurred in the opposite jaw.<br />
13,14 It is better to intrude the molars of two jaws to obtain<br />
proper vertical control.<br />
Prior to treating a deep bite and gummy smile case, it is<br />
Fig 7. Posttreatment facial and intraoral photographs.<br />
necessary to determine its etiologic factors. Deep bite occurs<br />
due to a reduced lower facial height and lack of eruption of<br />
posterior teeth or overeruption of anterior teeth15 . Gummy<br />
smiles can be divided into several categories 16-18 , including<br />
lip length and activity19 , gingival hyperplasia with short<br />
clinical crown length 20 , dentoalveolar extrusion, vertical<br />
maxillary excess21 or combination of these factors. In our<br />
case, the Me to PP length was within the normal range;<br />
however, the mandibular plane angle (SN-MP), the L1 to MP<br />
length and the U1 to PP length were greater than the<br />
normative mean. It was assumed that this deep bite and<br />
gummy smile was caused by dentoalveolar extrusion and<br />
vertical maxillary excess. The Class II malocclusion case with<br />
vertical maxillary excess and dentoalveolar extrusion might<br />
be treated with orthodontic treatment and orthognathic<br />
surgery, which is considered the optimal overall solution to<br />
the involved dental, skeletal, and soft tissue problems. Based<br />
on the decision made by the patient, an orthodontic-only<br />
treatment was selected.<br />
While treating deep bite by extrusion of posterior teeth,<br />
it is difficult to maintain mandibular angle in nongrowing<br />
patients22 . In addition, Proffit and Fields15 suggested that it<br />
Fig 8. Posttreatment panoramic radiograph<br />
Fig 9. Posttreatment lateral cephalometric radiograph
would be better to intrude incisors to obtain proper gingival<br />
exposure. The J-hook headgear is used for incisor intrusion,<br />
while it requires patient’s excellent cooperation23 . Furthermore,<br />
utility arch 24 or intrusion arch18 are also used for incisor<br />
intrusion, however it is very likely to extrude the molars at the<br />
same time15,25 . According to Creekmore and Eklund1 , miniscrew<br />
implants had been used to intrude incisors and to correct a deep<br />
overbite. They inserted a bone screw just below the anterior<br />
nasal spine and intruded the maxillary central incisors<br />
approximately 6 mm after 1 year of orthodontic treatment. In<br />
1997, Kanomi 2 proposed using a screw of 6 mm in length and<br />
1.2 mm in diameter to intrude mandibular anterior teeth in a<br />
patient with a deep overbite. Ohnishi et al. 9 also reported a<br />
patient with deep overbite, which was corrected by intruding the<br />
maxillary incisors by using a miniscrew implant as orthodontic<br />
anchorage; furthermore, this could improve the gummy smile.<br />
Comparing the result, intruding maxillary incisors by using a<br />
miniscrew implant as anchorage with a segmented wire 26 or a<br />
continuous archwire9 could correct the gummy smile efficiently<br />
both without elongation of the molars.<br />
In our case, miniscrew implants placed between the first<br />
and second molars in the maxillary arch provided anchorage for<br />
anterior teeth retraction and posterior teeth intrusion.<br />
Meanwhile, mandibular miniscrew implants placed between the<br />
first and second molars provided an anchorage for retracting the<br />
anterior teeth and uprighting the molars during space closure.<br />
Skeletal Horizontal Dental<br />
However, the intruding force for posterior teeth was not applied<br />
directly from the microscrew implants to the main archwire. We<br />
believe that en masse retraction of the six anterior teeth against<br />
the miniscrews implants would rotate the maxillary occlusal<br />
plane in clockwise direction and the mandibular occlusal plane<br />
in counterclockwise direction. Since the resultant force is not<br />
Fig 10. Cephalometric superimposition (A) on the S-N plane;<br />
(B) on the palatal plane; (C) and on the mandibular plane at the<br />
pretreatment (black line)<br />
SNA 81.4° (81.5°±3.5) U1-SN 100.1�92.5° (108.2°±5.4)<br />
SNB 71.9�72.2° (77.7°±3.2) U1-L1 109.0�126.2° (119.9°±8.5)<br />
ANB 9.5�9.2° (4.0°±1.8) L1-OP 50.9�62.0° (61.8°±5.4)<br />
A-Nv 2.07mm (0±2mm) L1-MP 97.0�88.0° (93.7°±6.3)<br />
Pg-Nv -19.7�-19.0mm (-5±8mm) U1-NP 25.7�14.6mm (6.4±2.7mm)<br />
NAP 5�3.5° (5.1°±3.8) U1 to PP 35.9�32.8 (27.9±1.7mm)<br />
Skeletal Vertical L1 to MP 50.5�45.3 (38.1±1.9 mm)<br />
SN-FH 10.0° (5.7°±3.0) Liner<br />
SN-OP 21.8�22.3° (16°±2) Me to PP 68.5�67.6 (68.6±3.7mm)<br />
SN-MP 53.9�53.3° (33.0°±1.8) Upper lip length 25.3 21.0±1.9 mm<br />
UFH 44.2�44.8% 45% Lower lip 54.7 46.9±2.3 mm<br />
LFH 55.8�55.2% 55%<br />
Table 1<br />
27
28<br />
passing through the center of resistance, it rotates the occlusal<br />
plane which induces the molars intruding and the bite closing. The<br />
maxillary incisors were intruded 2.3 mm and the mandibular<br />
incisors were intruded 1.5 mm by applying an elastic thread from<br />
the main archwire to an orthodontic ligature wire which tied in the<br />
head of the miniscrew implants. There was no extrusion of molars<br />
giving clockwise rotation of the mandible. Therefore, the<br />
Fig 11. Pretreatment and posttreatment of a periodontal<br />
surgery after orthodontic treatment<br />
References:<br />
miniscrew implants anchorage demonstrates correction of the deep<br />
overbite and the gummy smile efficiently without the patient’s<br />
cooperation. The final esthetic improvement of short upper anterior<br />
teeth crown length was achieved by using a periodontal procedure<br />
after orthodontic treatment (Fig 11, 12).<br />
The post-treatment panoramic radiograph showed that no root<br />
resorption occurred in the retracted and intruded incisors region<br />
(Fig.8). For one thing, Edwards 27 found that the alveolar bone at<br />
the mid-root level and alveolar margin but not the apical zone was<br />
remodeled with tooth movement. Handelman 28 also reported that<br />
if the teeth are moved beyond the cortical plates of the alveolus at<br />
the level of the incisor apex, root resorption and dehiscence could<br />
be expected to occur. Sarikaya et al. 29 claimed that bone<br />
remodeling-to-tooth movement was not 1:1 and much greater<br />
reduction in the alveolar bone was at coronal and mid-root levels<br />
than at apical level. Regarding these studies, the entire alveolar<br />
1. Creekmore TM, Eklund MK. The possibility of skeletal anchorage. J Clin Orthod 1983; 17:266-9.<br />
2. Kanomi R. Mini-implant for orthodontic anchorage. J Clin Orthod 1997; 31:763-7.<br />
3. Costa A, Raffaini M, Melsen B. Miniscrews as orthodontic anchorage: a preliminary report. Int J Adult Orthod Orthognath Surg. 1998;<br />
3:201–209.<br />
4. Maino BG, Bednar J, Pagin P, Mura P. The spider screw for skeletal anchorage. J Clin Orthod 2003: 37: 90–97.<br />
5. Kyung SH, Choi JH, Park YC. Miniscrew anchorage used to protract lower second molars into first molar extraction sites. J Clin Orthod<br />
2003: 37: 575–579.<br />
6. Park HS, Kwon DG, Sung JH. Nonextraction treatment with microscrew implant. Angle Orthod. 2004; 74:539–549.<br />
7. Lee JS, Kim DH, Park YC, Kyung SH, Kim TK. The efficient use of midpalatal miniscrew implants. Angle Orthod 2004:74: 711–714.<br />
8. Carano A, Velo S, Leone P, Siciliani G. Clinical applications of the Miniscrew Anchorage System. J Clin Orthod 2005: 39: 9–24 quiz<br />
29-30.<br />
9. Ohnishi H, Yagi T, Yasuda Y, Takada K. A mini-implant for orthodontic anchorage in a deep overbite case. Angle Orthod 2005;<br />
75:444-52.<br />
10. Kuhn, Robert J.: Control of anterior vertical dimension and proper selection of extraoral anchorage, Angle Orthod 38:340-349, 1968.<br />
11. Klontz HA. Facial balance and harmony: an attainable objective for the patient with a high mandibular plane angle. Am J Orthod<br />
Dentofacial Orthop. 1998; 114:176–188.<br />
12. Gebeck TR. Analysis-concepts and values, Part 1. J Tweed Found. 1989; 17:19–48.<br />
13. Umemori M, Sugawara J, Mitani H, Nagasaka H, Kawamura H. Skeletal anchorage system for open-bite correction. Am J Orthod<br />
Dentofacial Orthop. 1999; 115:166–174.<br />
14. Sherwood KH, Burch JG, Thompson WJ. Closing anterior open bites by intruding molars with titanium miniplate anchorage. Am J<br />
Orthod Dentofacial Orthop. 2002; 122:593–600.<br />
15. Proffit WR, Fields HW. Contemporary Orthodontics. 3rd ed. St. Louis, Mo: Mosby Year Book Inc; 2000.<br />
16. Monaco A, Streni O, Marci MC, Marzo G, Gatto R, Giannoni M. Gummy smile: clinical parameters useful for diagnosis and
housing should be considered when retracting the anterior teeth.<br />
For another, applying light forces (15–25 gm) during orthodontic<br />
treatment produce appropriate pressure within the periodontal<br />
ligament15,30 and avoid the risk of root resorption. In our case,<br />
the retraction of anterior teeth which were accompanied with<br />
intrusion could make the anterior teeth stay in the alveolar<br />
housing, and an elastic thread could produce this optimal light<br />
force from mini-implant anchorage.<br />
Conclusion<br />
To achieve excellent improvement of facial profile by<br />
maximal anchorage, the anterior teeth could be retracted against<br />
the miniscrew implants without anchorage loss and patient’s<br />
cooperation. Moreover, miniscrew implants can be used to<br />
control the posterior teeth vertically and correct the gummy<br />
smile and the deep bite efficiently by intruding anterior teeth.<br />
Fig 12. Posed smile before and after orthodontic treatment<br />
therapeutical approach. J Clin Pediatr Dent 2004; 29:19-25.<br />
17. Robbins J. Differential diagnosis and treatment of excess gingival display. Pract Periodontics Aesthet Dent 1999; 11:265-72.<br />
18. Burstone CR. Deep overbite correction by intrusion. Am J Orthod 1977; 72:1-22.<br />
19. Miskinyar SA. A new method for correcting a gummy smile. Plast Reconstr Surg 1983; 72:397-400.<br />
20. Redlich M, Mazor Z, Brezniak N. Severe high Angle Class II Division 1 malocclusion with vertical maxillary excess and gummy<br />
smile: a case report. Am J Orthod Dentofacial Orthop 1999; 116:317-20.<br />
21. Ataoglu H, Uckan S, Karaman AI, Uyar Y. Bimaxillary orthognathic surgery in a patient with long face: a case report. Int J Adult<br />
Orthod Orthognath Surg 1999; 14:304-9.<br />
22. McDowell EH, Baker IM. The skeletodental adaptations in deep bite correction. Am J Orthod. 1991; 100:370–375.<br />
23. Melsen B, Agerbaek N, Markenstam G. Intrusion of incisors in adult patients with marginal bone loss. Am J Orthod<br />
DentofacialOrthop. 1989; 96:232–241.<br />
24. Ricketts RM, Bench RW, Gugino CF, Hilgers JJ, Schulhof RJ. Bioprogressive Therapy. Denver, Co: Rocky Mountain<br />
Orthodontics; 1979:111–126.<br />
25. Southard TE, Buckley MJ, Spivey JD, Krizan KE, Casko JS. Intrusion anchorage potential of teeth versus rigid endosseous<br />
implants: a clinical and radiographic evaluation. Am J Orthod Dentofacial Orthop. 1995;107:115–120.<br />
26. Kim TW, Kim H, Lee SJ. Correction of deep overbite and gummy smile by using a mini-implant with a segmented wire in a<br />
growing Class II Division 2 patient.Am J Orthod Dentofacial Orthop. 2006 Nov; 130(5):676-85.<br />
27. Edwards JG. A study of the anterior portion of the palate as it relates to orthodontic therapy. Am J Orthod. 1976; 69:249–273.<br />
28. Handelman CS. The anterior alveolus: its importance in limiting orthodontic treatment and its influence on the occurrence of<br />
iatrogenic sequelae. Angle Orthod. 1996; 66(2):95-109; discussion 109-10.<br />
29. Sarikaya S, Haydar B, Ci�er S, Ariyürek M. Changes in alveolar bone thickness due to retraction of anterior teeth. Am J Orthod<br />
Dentofacial Orthop. 2002 Jul; 122(1):15-26.<br />
30. Dermaut LR, DeMunck A. Apical root resorption of upper incisors caused by intrusive tooth movement. A radiographic study.<br />
Am J Orthod. 1986; 90:321–329.<br />
29
30<br />
Orthodontic Finishing : Art or Science ?<br />
— Summary of Dr. Kokich�s farewell lecture in Taiwan —<br />
���� ������� ���������� ���������� ��������� �����<br />
�������������������������������������������<br />
����������������������������<br />
ABO Criterion Art Science<br />
1. Alignment � �<br />
2. Marginal Ridges � �<br />
3. Buccolingual Inclination � �<br />
4. Occlusal Relationships �<br />
5. Occlusal Contacts � �<br />
6. Overjet �<br />
7. Root Angulation �<br />
� ABO Criterion<br />
1. Overbite �<br />
�������������������������������������<br />
����������������������������������<br />
��������������������������������<br />
1. Alignment<br />
������������ ������� ��������� ��������<br />
���������������� ���������������� �����������<br />
������������������ ����������������<br />
������������������������������������� ���������������������������������<br />
��������������������������<br />
������������������������<br />
��� ���������� ����������������<br />
�������������������������������������� ����������������� ��������� ���������<br />
������������� ��������������� ����������������� �����<br />
������������������������<br />
�������������������������<br />
������� ���������� �������������<br />
����������������� ������������������������<br />
���������<br />
2. Marginal Ridges<br />
�������������������� ������ �������<br />
������������������� ���������������� ������<br />
������������ ������ ����������� ���������� ��<br />
����� ������ ����������� ����������� ���<br />
������������������������������������������<br />
Fig. 1 Fig. 2 Fig. 3
���������������������������������������<br />
������������������� ������������<br />
������� �� ����� �� ����� ��������� ������������ ������� ��<br />
����������� �������������������<br />
�����������������������������������������<br />
������ �����������������<br />
��������������� �� �����������������<br />
������ ��������� �����������������������<br />
������ ������ ���� ��������� ������ ���� ������ ����<br />
����������������������������<br />
3. Buccolingual Inclination<br />
������������������ ����������������������������<br />
������� �������� ��� ��������� ���������� ������� �� �����<br />
�� ���������������� ��� ������� ����� ��������<br />
�� �������� ������������������� �������� ����<br />
������������������������<br />
����������������������� ���������� ����<br />
�������������������������������������<br />
�������������������������������<br />
������������������������<br />
��������� ��������������� ���������� ����������<br />
���������� ������� ����������������������������<br />
������ ���������������������<br />
Fig. 4<br />
������<br />
������<br />
���������<br />
�������������� �������� �������<br />
�����������������������������������������������<br />
4. Overbite<br />
�����������������������������������<br />
�������� ����������� ��������� ���� �����������<br />
��������������� ��������� ������ ��<br />
����� ������� ������� ������������ ����<br />
���� ��������� ����������� ��������� ����<br />
�����������������������<br />
5. Overjet<br />
���������� ������������������ ���������������� ����� ��������� ��� ��<br />
����������������������������������������������������<br />
��� ����������� ����� ������������������� ����<br />
�����������������������<br />
6. Occlusal Contacts<br />
��������������� ����������������� �<br />
������ ���� �������� �������� ���������<br />
�������� �����������������������������<br />
��������� �����������������������<br />
���� ��������� ��������� �������������<br />
Fig. 5 ���������������<br />
������������������<br />
����������������������<br />
31
32<br />
����������� ���� �� ����������� ����<br />
����������������������������������������������<br />
7. Occlusal Relationships<br />
��������� ������� ���� ������� ���������<br />
�������� ������ ��������� ��������������<br />
�������������������������������������������������<br />
������������� �������������������������� ������<br />
���� ��������� ���� ����������� ���<br />
������������� �� ���� ������������� �����<br />
������������������������������������������������ ���� �������� ���� ��������� ��������������������� ��<br />
����������� �� ������������ ���������<br />
������� ��������� ������������� ���� �������<br />
��������� ������������� ��������� ������� �������<br />
�������������������������������� ���������������<br />
�����������������������<br />
8. Root Angulation<br />
��������� �������� �����������<br />
����� ���������� ������� �������������� ������ ���<br />
������������������������������������<br />
����������������������<br />
������������������� ������� �����<br />
������������������������������<br />
�������������������� ����������<br />
������������������������<br />
������������������������<br />
�������� ������������ ������� ���������<br />
������������� ����������� ������������<br />
��������������� �������<br />
����������������������������� ������ ��<br />
�������� ���������������� �����<br />
����������� ������������������������<br />
���������������������������������<br />
Acknowledgements<br />
���������������������<br />
��<br />
References<br />
1. Traebert & Peres. Do malocclusions affect the individuals oral<br />
health-related quality of life? Oral Health Prev Dent 5:3-12, 2007<br />
2. Ngom, et al. Intraarch and Interarch Relationship of the Anterior<br />
Teeth and Periodontal Conditions. Angle Orthod 76:236-242, 2006<br />
3. Tal H. Prevalence and Distribution of Periodontal Defects in Dry<br />
Mandibles. J Periodontal 55:149-154, 1984<br />
4. Ferrario VF. Three-dimensional dental arch curvature in human<br />
adolescents and adults. Am J Orthod Dentofacial Orthop<br />
115:401-495, 1999<br />
5. Glaros A et al. Impact of overbite on Indicators of<br />
Temporomandibular Joint Dysfunction. Cranio 10:277-281,1992<br />
6. Hirsch C et al. Relationship Between Overbite/Overjet and Clicking<br />
or Crepitus of the Temporomandibular Joint. J Orofac Pain<br />
19:218-225, 2005<br />
7. Ciancaglini R et al. Unilateral temporomandibular disorder and<br />
asymmetry of occlusal contacts. J Prosthet Dent 89:180-185, 2003<br />
8. Gesch D et al. Association of Malocclusion and Functional<br />
Occlusion with Subjective Symptoms of TMD in Adults : Results<br />
of the Study of Health in Pomerania (SHIP). Angle Orthod<br />
75:183-190. 2005<br />
9. Gesch D et al. Association of Malocclusion and Functional<br />
Occlusion with TMD and Adults : A Systemic Reviews of<br />
Population-Based Studies. Quintessence Int 35:211-221, 2005<br />
10. Artun J et al. Long-Term Effect of Root Proximity on Periodontal<br />
Health after Orthodontic Treatment. Am J Orthod Dentofac Orthop<br />
Fig. 6
OrthoBoneScrew<br />
Beethoven Orthodontic Center<br />
0M<br />
4M<br />
4M<br />
4.5M<br />
��������������� ������ ��������������������� �����������������<br />
��� ���� ����������� ������ ��� ������������ ������������������������<br />
���� ��� ������������ ����������� ����� ����� ����� ��� ��� ���<br />
��������������������������������������������<br />
A case report of mesially displaced impacted maxillary canines:<br />
Demonstration of OBS application<br />
������������������<br />
���������������������������������������������������<br />
������������������������������������������������������<br />
������������������������������������������������������<br />
���� ������������ ��� ������������������� ��������� ���<br />
��������������� ������� ���� ����������� ��� ���� ������ ��<br />
������������� ������ ����������� ���� �������������������<br />
����� ��������� �� �������� �������� ��������� ��� ����<br />
�����������������������������������������������������<br />
��� ������ ������ ��������� ����� ���� ����� ����� ������ ���<br />
������ ��� ������������ ��� ���� ������ ��� ���� ����������<br />
�������������������������������������������������������<br />
��������������� ���������������� ���������������������<br />
������� ���� ������������� ������ ����������� ���������<br />
����������������������������������������������<br />
OrthoBoneScrew<br />
Corporate Headquarters<br />
2F, No. 25, Jian-Jhong First Road, Hsinchu, Taiwan<br />
300<br />
Tel: +886 3 5735676<br />
Fax: +886 3 5736777<br />
Web: http://orthobonescrew.com<br />
http://newtonsa.com.tw<br />
0M<br />
4M<br />
4M<br />
4.5M
34<br />
Surgical and Orthodontic Management of<br />
Impacted Maxillary Canines<br />
Impacted maxillary canines is the common situation<br />
orthodontists encounter during treatment. Dr. Kokich had<br />
published many articles explaining in details about how to<br />
manage the impacted maxillary canines1,2 . We had a great<br />
opportunity to listen Dr.Kokich himself lecturing this topic<br />
and had learned a lot from him. Followings, we summarized<br />
some important notes from his lecture and shared them with<br />
you.<br />
Labial impaction<br />
~Notes from Dr. Kokich�s farewell lecture in Taiwan<br />
There are three techniques we can use for uncovering a<br />
labially impacted maxillary canine: 1. Excisional<br />
uncovering, 2. Apically positioned flap, 3. Closed eruption<br />
technique. How should we choose the appropriate technique<br />
to uncover the impaction? There are four criteria we need to<br />
evaluate:<br />
1. Faciolingual position:<br />
When impacted tooth is out to the facial side, we can use<br />
any one of three techniques, since there is little or no<br />
bone covering the tooth. However, when the tooth is<br />
impacted in the mid-alveolus, the excisional uncovering<br />
is not appropriate, because it’s hard to know how much<br />
bone we need to remove to expose the tooth through this<br />
technique.<br />
Fig 1. Mucosa lines on mesial and distal<br />
side of canine<br />
2. Vertical position of the tooth relative to the<br />
mucogingival junction (MGJ):<br />
When most of the tooth is below the MGJ, any of three<br />
techniques could be used; in contrast, when most of<br />
tooth is above MGJ, excisional uncovering is not<br />
recommended. Because when the tooth uncovering with<br />
simple excision in the mucosa and moves to the final<br />
position, it usually presents with a thicker “roll margin”<br />
and left two “mucosal lines” (Fig 1). These mucosal<br />
lines may hold the tooth backup and cause the uneven<br />
incisal edge postion.<br />
3. The amount of gingiva in the area of impacted<br />
canine:<br />
When canine erupted, eventually the crown margin will<br />
be at the same level as central incisor. Therefore, we can<br />
draw a line extended from gingival margin of the central<br />
incisor (Fig 2). From this line to the MGJ, we would like<br />
to have at least 2-3 mm gingiva, which can give the<br />
erupted canine enough epithelial and connective tissue<br />
attachment. If there is no enough gingiva present from<br />
this line to the MGJ, we should use apically positioned<br />
flap technique and produce more gingiva for the canine.<br />
4. The mesiodistal position of the canine crown: When<br />
the impacted canine is in position, any of three<br />
techniques could be used. However, when the impacted<br />
Fig 2. CEJ line to MGJ: 2-3 mm attached<br />
gingiva
�������������������������������������������������������������������<br />
����������������������������������������������������������������<br />
���������������������������������������������������������������<br />
canine is displaced mesially or distally (Fig 3), apically<br />
positioned flap is recommended.<br />
** How to perform an apically positioned flap?<br />
First, we need to do two vertical incisions and one<br />
horizontal incision on the area of impacted canine. Reflect a<br />
“ split thickness flap” and then transmit to “full thickness<br />
flap” to expose the covering bone. Remove the covering<br />
bone down to the CEJ of the impacted canine (Fig 4).<br />
Cover the area with the periodontal dressing (Barricade).<br />
When the tissue heals, pull the crown out to the facial side<br />
first, then pull the tooth down to the position. With this<br />
method, the crown have already been pulled out to the facial<br />
and the “root”, not the crown, moves through the bone. The<br />
root resorbs the bone efficiently and makes the tooth<br />
movement possible. On the contrary, if we use the close<br />
eruption technique in this mesially displaced impaction and<br />
cover the flap back, the “crown” of the tooth, instead of the<br />
“root”, need to move through the bone. However, the<br />
enamel don’t resorb bone, it only causes “pressure<br />
necrosis”, which can cause the tooth movement very slow<br />
and hardly move the impacted canine to the position.<br />
Therefore, when impacted canine is displaced mesially or<br />
distally, the most appropriate method for uncovering is<br />
apically positioned flap.<br />
**When is the close eruption technique appropriate?<br />
Actually, close eruption technique is the most often<br />
used uncovering method for the labially impacted maxillary<br />
canine. When comparing the apically positioned flap to the<br />
closed eruption technique, apically positioned flap (APF)<br />
has more unesthetic results3 . It usually presents with a<br />
longer tooth and thicker gingiva. Beisdes, when using the<br />
APF technique, the gingiva tissue is healed first in the<br />
mucosa then pulled downward. It usually leaves two<br />
mucosal lines (Fig 1). These mucosal lines could pull the<br />
crown apically and cause undesirable results. Therefore,<br />
when the mucosal lines were present, we should perform<br />
gingivoplasty (with diamond bur or laser to remove the<br />
mucosal lines down to the connective tissue layer and leave<br />
them secondary healing) to eliminate mucosal lines and<br />
have more favorable results.<br />
In conclusions, Dr. Kokich recommended: We should<br />
uncover labially impacted maxillary canine with “close<br />
eruption technique”, unless: (1) They are below the MGJ<br />
and have adequate gingiva. Then “excisional uncovering” is<br />
the choice. or (2) They are displaced mesiodistally or have<br />
inadequate gingiva. Then APF is the most appropriate<br />
method to use.<br />
Fig 3. Mesially displaced impacted canine Fig 4. Apically positioned flap<br />
35
36<br />
Palatal impaction<br />
Palatally impacted canine is twice as common as<br />
labially impacted canine. Is there any preventive method for<br />
avoiding palatal impaction? Ericson and Kurol4 did a study<br />
about early treatment of palatally impacted canines by<br />
extraction of the primary canines. They found out that “<br />
removal of the primary canine before the age of 11 years<br />
will normalize the position of the ectopically erupting<br />
permanent canine in 91% of the case, if the canine crown is<br />
distal to the midline of the lateral incisor on the radiograph.<br />
The success rate of self correction is 64%, if the canine<br />
crown is mesial to the midline of the maxillary lateral<br />
incisor. However, if the permanent canine is beyond the<br />
mesial surface of the lateral incisor, self correction does not<br />
occur and it is the case must be treated orthodontically.<br />
When uncovering the palatally impacted canine, Dr.<br />
Kokich recommended following procedures: First, uncover<br />
the canine and let it erupt on its own (Fig 5). Then start to<br />
align the teeth. Once the canine have already erupted to the<br />
occlusal plane and space have been created, pull the canine<br />
to the position. Finish the treatment. Through these<br />
procedures, canine crown erupts first and “root” instead of<br />
the crown moves through the bone. When root moves<br />
through bone, it lays down bone behind and cause no<br />
destruction. On the contrary, if we don’t let the tooth erupt<br />
but pull it inside the bone, the enamel of the crown instead<br />
of root moves through the bone. When enamel moves<br />
through bone, it destroys bone and lays down nothing<br />
behind. It can cause the severe periodontal destruction on<br />
the adjacent tooth. Therefore, Dr. Kokich recommended: “<br />
Routinely uncover palatal impaction early ( in the mixed<br />
dentition) before the beginning orthodontic treatment! “<br />
With this method, the overall treatment time could be<br />
reduced and the results could be more favorable<br />
periodontally and esthetically.<br />
References:<br />
1. Kokich VG. Surgical and orthodontic management of impacted<br />
maxillary canines. Am J Orthod Dentofacial Orthop<br />
2004;126:278-83.<br />
2. Schmidt A, Kokich VG. Periodontal response to early uncovering,<br />
autonomous eruption, and orthodontic alignment of palatally<br />
impacted maxillary canines. Am J Orthod Dentofacial Orthop<br />
2006;131:449-55.<br />
3. Vermette M, Kokich V, Kennedy D. Uncovering labially impacted<br />
teeth: close eruption and apically positioned flap techniques. Angle<br />
Orthod 1995;65:23-32<br />
4. Ericson S, Kurol J. Early treatment of palatally erupting maxillary<br />
canines by extraction of the primary canines. Eur J Orthod<br />
1988;10:283-95<br />
Fig 5. Uncover the canine and let it erupt<br />
on its own.
iPod touch<br />
iPod touch ������������� �����������������<br />
�E�<br />
A. ����������� :<br />
���: ������������ ���: �������������<br />
���: ������� ���: ��������� (1)<br />
���: ��������� ���: ��������� (2)<br />
���: �������� ���: ��������� (3)<br />
���: Damon ������� ����: ��������� (4)<br />
���: ���������<br />
B. ������������:<br />
C. ���������� :<br />
���: ��Damon�� / �� ���: �� / ��������<br />
���10,000�<br />
���2,000�<br />
���5,000�<br />
���: ���� / ���� / X-ray ��������/Damon Morph/��Keynote<br />
��� : Bond ����� / �� Damon � / Damon ��<br />
Q & A ���������������������<br />
�����(03)5735676 ���<br />
Beethoven Orthodontic Mobile Learning Program<br />
�����������<br />
�������������� ���7000 �<br />
������www.newtonsa.com.tw
38<br />
Dr. Charles J. Burstone on Biomechanics of TAD<br />
���������������������<br />
����������������������������������<br />
��������������������<br />
��������������������<br />
��������������������<br />
���������<br />
Fig. 1<br />
�<br />
�������������������������<br />
�������������������������<br />
������� ���������� ���������� ���������� ������<br />
��������� ���������� �������������������������������<br />
���������������� ������ ������������������<br />
����������������������������<br />
��������������������������������������<br />
��������������������������������������<br />
�����������������<br />
��������������������������<br />
�� ������������������<br />
���������������������������<br />
���������������������������<br />
���������� ����� �������������������������� ���<br />
���������������� ��������� ������� ����<br />
���������������������������������<br />
�� �����������<br />
���������������������������<br />
���������������������������������������������<br />
������������������<br />
�� �����������<br />
���������������������������<br />
����������<br />
�� ���������������������<br />
���� ����������� ����� ����������� ����� �����<br />
=<br />
Fig. 2
������ ������������������� ��������������<br />
���<br />
•Fine Tuning Anterior Retraction<br />
��������������������������������������������<br />
������������� ��������� �������� ����<br />
���������������������������������������������������<br />
���� ����������������� �������� ���������<br />
������� ������� ��� ����������� �����������<br />
������������ ��������� �� ����� �� �����������<br />
�������������������������������������<br />
�������������������������<br />
�����������<br />
������������ ���������� ���� ��������� ��<br />
����������� ����� �����������������<br />
���������������������������� �������������<br />
����������� ����� ����� �� ������ ����������<br />
������������������ ���������� �������� ��������������<br />
����������������������� ��������������<br />
������������� ����� �����������������<br />
�����������������������������������<br />
�������������������������������������������������������<br />
������������� ����� ���������<br />
�������������������������������������������������<br />
�������������������������<br />
���������������������� �������������� ������<br />
�������������������������� ������� �����������<br />
����������� ����� ���������������� ��������� �� �������<br />
����������<br />
���� ��������� ���� �� ����������� ����� ������� ����<br />
������<br />
���������<br />
Fig. 3<br />
Fig. 4<br />
Fig. 5<br />
Fig. 6<br />
�<br />
�<br />
39
40<br />
���� �� ������� ���������� ����������������<br />
����������������������������������������������<br />
�������������������������������<br />
• Fine Tuning Molar Distalization<br />
��������������� ������ �������� �������������������<br />
������� �������� ������� �������� ���� �������������� ������ ��<br />
����������������������������������������������������������������<br />
������� ������� �������� ����� ��������� �� ����� �����<br />
����� ����� ����� ������ ���������������� ����<br />
����������� ������������ ������ �������<br />
��� ���������� ������ ������ ������������ �� ����� ��� �� ������<br />
��������� ������� ������ ����������� ��������������<br />
��������������������������������������<br />
������������������������������������������<br />
���������������������������������������������<br />
���������������� ����� �� ���� �����<br />
�������������������������<br />
������������������������<br />
���������� ����������������������<br />
���������������������������������������<br />
• Fine Tuning Posterior Intrusion<br />
��� ��������� �������� ����������� �������������<br />
�������� ��� ����� ������ ����������������<br />
�������������������������������������������������<br />
����������������������������������������������<br />
�������� ������ ��� ������� ������� ������� ���<br />
����������� ����������������������<br />
������ �� ���������� ���������� ����� ���������� �������<br />
����� ���� �� ����� ��� ������������������<br />
����������������������������������������������<br />
�������������������� �������<br />
Fig. 7 Fig. 8<br />
Fig. 9 Fig. 10<br />
Fig. 11<br />
Fig. 12
�������� ��������������� ������������������� ������<br />
�� ������ ����������������������� �������� ��<br />
���������������� �������������������� ������<br />
������������������������� �����������������������<br />
���������� ������ ���� ������� �������� �����<br />
�������������� ���� �� ���������� ��������<br />
�������������������<br />
• Fine Tuning Posterior Protraction<br />
� �� �� �� �����������������������������������<br />
������������������������ ����������������<br />
������������������������������������<br />
������������ �������������� �����������������<br />
�������������������� ��������� ������� ���������<br />
���� �������� ��������������� �����<br />
��������<br />
�� ��� ������ �� ����������������������<br />
�����������������������������������<br />
�� ����������� ����� �� ����������������<br />
��������������������������<br />
����������������������������������<br />
�� ����������� ����� ���������� ���� �������������<br />
�<br />
Fig. 13<br />
��������� ����� ���������������� �������� ��<br />
������� ���������������� ������<br />
�����������������������������������<br />
• Fine Tuning Incisor Intrusion<br />
���� �������������������������������������<br />
��� ���� ����������� ���� �����<br />
���������� ����������������������������������<br />
���������������������������<br />
•��Fine Tuning Indirect Anchorage<br />
�������������� �������������������� ���<br />
��������������������������������������<br />
�������������������������<br />
• Conclusion<br />
“ TAD doesn’t simplify anything” !! Dr. Burstone ��<br />
�����������������������<br />
�����������������������<br />
����������������������<br />
•��Acknowledgements ����������������������<br />
������������<br />
Fig. 14<br />
41
42<br />
HISTORY AND ETIOLOGY<br />
A 25-year-and-9-month-old male was referred by his<br />
dentist. His chief concern was an impinging overbite. The<br />
patient was in good general health and was eager to receive<br />
treatment. Tetracycline stain was noticed throughout the entire<br />
dentition. He presented with a deep impinging overbite and 11<br />
mm overjet due to a severe flaring of maxillary incisors.<br />
Diastema and the buccal crossbite of #2 were observed. The<br />
patient reported no known habits that may have contributed to<br />
the malocclusion. However, the clinical examination suggested<br />
that the etiology was related to a “lower lip trap” defined as<br />
habitual posturing of the lower lip between the maxillary and<br />
mandibular incisors .<br />
DIAGNOSIS<br />
Skeletal: Skeletal Class I ( SNA 84°, SNB 82°, ANB 2° ), lower<br />
mandibular plane angle ( SN-MP 22.5°, FMA 17° )<br />
Dental: Bilateral Class I molar relationship, 11 mm anterior<br />
overjet, 100% deep impinging overbite, protrusive<br />
upper, proclined lower incisors, constricted maxillary<br />
arch with buccal crossbite of #2, and spacing of the<br />
upper anterior teeth.<br />
Facial: Straight profile.<br />
Impinging Overbite and Large Overjet<br />
SPECIFIC OBJECTIVES OF TREATMENT<br />
Maxilla ( all three planes ):<br />
• A - P: Maintain.<br />
• Vertical: Maintain.<br />
• Transverse: Maintain.<br />
Mandible ( all three planes ):<br />
• A - P: Maintain.<br />
• Vertical: Maintain.<br />
• Transverse: Maintain.<br />
Maxillary Dentition<br />
• A - P: Maintain a Class I molar relationship and reduce<br />
dentoalveolar protrusion.<br />
• Vertical: Maintain.<br />
Fig. 1 Pretreatment facial photographs<br />
Fig. 2 Pretreatment intraoral photograph<br />
Fig. 3 Pretreatment study models
�������������������������������������������������������������������<br />
�������������������������������������������������������������<br />
���������������������������������� News and Trends in Orthodontics (right)<br />
Fig. 4 Posttreatment facial photographs<br />
Fig. 5 Posttreatment intraoral photographs<br />
Fig. 6 Posttreatment study models<br />
• Inter-molar Width: Increase.<br />
Mandibular Dentition<br />
• A - P: Maintain a Class I molar relationship and<br />
prevent incisor flaring.<br />
• Vertical: Maintain.<br />
• Inter-molar / Inter-canine Width: Increase first molar<br />
width and correct #2 buccal crossbite.<br />
Facial Esthetics: Maintain.<br />
TREATMENT PLAN<br />
Non-extraction treatment was pursued by bonding fixed<br />
appliances on both arches and placing occlusal posterior bite<br />
turbos on lower 1st molars bilaterally. The buccal crossbite of<br />
#2 was corrected with cross elastics. Treatment included early<br />
light short elastics (2 oz) and anterior bite turbos to achieve a<br />
favorable jaw position and to intrude the incisors. Class II<br />
elastics were used to resolve the sagittal discrepancy and<br />
detailing bends produced the final occlusion. Fixed appliances<br />
were removed and the corrected dentition was retained with<br />
an upper Hawley retainer and a lower fixed retainer from 4 -<br />
4.<br />
APPLIANCES AND TREATMENT PROGRESS<br />
0.022-in Damon D3MX brackets ( Ormco ) were used.<br />
Both arches were bonded and occlusal bite turbos ( Glass<br />
Ionomer Cement ) were placed on both lower 1st molars, and<br />
a lingual button was placed on the lower right 2nd molar. Full<br />
time cross elastics ( 3.5 oz ) were applied to the right 2nd<br />
molars to correct the crossbite.<br />
Six months after the treatment, the posterior bite turbos<br />
were removed and the anterior bite turbos ( molded composite<br />
resin ) were placed. The wire sequences in this case were as<br />
follows: .014 copper NiTi, .014X25 copper NiTi, .017X25<br />
TMA and .019X25 SS. The Class II elastics were upgraded<br />
gradually from 2 oz, 3.5 oz, 4.5 oz to 6 oz respectively. Upper<br />
spaces were closed by power chains on a .019X25 SS wire.<br />
In the 10th month of the treatment, a panoramic film<br />
was taken to further examine the bonding positions. Two<br />
43
44<br />
Fig. 7 Pretreatment pano and ceph radiographs<br />
miniscrews ( 2X12 mm, stainless steel ) were implanted on<br />
both sides of the infrazygomatic crests to retract the upper<br />
posterior segment to a Class I relationship in the 15th month.<br />
The upper archwire was sectioned behind the cuspids one<br />
month prior to the completion of treatment. Light up and down<br />
elastics ( 2 oz ) were further used for final detailing.<br />
Appliances were removed and retainers were delivered. Tooth<br />
#30 had a distal marginal chip and was restored with<br />
composite resin by the patient’s family dentist.<br />
RESULTS ACHIEVED<br />
Maxilla ( all three planes ):<br />
• A - P: Maintained.<br />
• Vertical: Maintained.<br />
• Transverse: Maintained.<br />
Mandible ( all three planes ):<br />
• A - P: Maintained.<br />
• Vertical: Maintained.<br />
• Transverse: Maintained.<br />
Maxillary Dentition<br />
• A - P: Retracted upper incisors.<br />
• Vertical: Slightly intruded upper incisors.<br />
Fig. 8 Posttreatment pano and ceph radiographs<br />
�����������������<br />
���������������<br />
������ ������� �����<br />
���� ��� ��� ��<br />
���� ��� ��� ��<br />
���� �� �� ��<br />
������ ����� ����� ��<br />
���� ��� ��� ��<br />
���������������<br />
����������� ������� ���� ������<br />
��������� ���� ���� ���<br />
����������� ���� ���� ����<br />
��������� ���� ���� ��<br />
���������������<br />
������ ���� ���� ���<br />
Table. �Cephalometric summary
4A+B<br />
• Inter-molar Width: Increased 3 mm and #2 buccal<br />
crossbite corrected.<br />
Mandibular Dentition<br />
• A - P: Flaring.<br />
• Vertical: Intruded lower incisors.<br />
• Inter-molar / Inter-canine Width: Increased 1.5<br />
mm / Increased 1 mm.<br />
Facial Esthetics: Improved lip profile.<br />
RETENTION<br />
An upper Hawley retainer was delivered. The patient<br />
was instructed to wear it full time for the first 6 months<br />
and nights only thereafter. The lower fixed 4-4 retainer<br />
was bonded on every tooth. The patient was instructed<br />
relative to home care and maintenance of the retainers.<br />
F<strong>IN</strong>AL EVALUATION OF TREATMENT<br />
Retraction of upper incisors helped improve the<br />
facial balance significantly. The excessive overjet and<br />
impinging overbite were reduced but remained slightly<br />
greater than ideal. Wearing elastics as instructed was the<br />
key to success for this case. Posterior and anterior bite<br />
turbos also played important roles.<br />
The buccal cross-bite and anterior overjet were<br />
corrected by extensive application of elastics and by the<br />
more proclined position of lower incisors. The proclined<br />
Fig. 9 Superimposed tracings<br />
position of lower incisors could be avoided by using<br />
mandibular miniscrews on the buccal shelf to retract the<br />
lower incisors and to hook the Class II elastics or by<br />
choosing the low torque anterior brackets at the beginning.<br />
The inter-molar width increased more than expected.<br />
The increased inter-molar width and proclined lower<br />
incisors will be a challenge for long term stability and the<br />
patient will be in close follow up. Overall, there was<br />
significant improvement in both dentition and esthetics.<br />
The results were acceptable and the patient was satisfied<br />
with the treatment.<br />
DISCUSSION<br />
Correction of deep bite and large overjet is difficult<br />
in adult patients. There are several considerations needed<br />
to be made in order to decide whether to extract premolars<br />
or not in these cases. They include facial profile, skeletal<br />
pattern, lip protrusion, and growth potential. In this case<br />
we chose non-extraction treatment due to a low<br />
mandibular angle and straight profile.<br />
Patients with large overjet are usually treated by<br />
retraction of upper incisors with headgears, orthodontic<br />
bone screws, or elastics. In these patients torque control of<br />
upper incisors is often a challenge for orthodontists. In this<br />
case Damon’s anterior high torque brackets and early light<br />
short elastics were used to overcome this problem.<br />
45
46<br />
Fig 10. Posterior bite turbos for<br />
correction of #2 buccal crossbite<br />
Fig 13. Posterior bite turbos<br />
Fig 11. 4.5 oz Bear ( 10 th month )<br />
Fig 14. Anterior bite turbos<br />
According to Burden’s study1 , when using fixed appliances<br />
on patients with very large overjet, an excellent outcome can<br />
be expected if the upper incisors are quite proclined, which<br />
is found in this case.<br />
Correction of deep bite can be achieved by molar<br />
extrusion , incisor intrusion or both. However, it is often<br />
unstable to use molar extrusion for correcting deep bite in<br />
adult patients, because muscles tend to maintain their<br />
original length contributing to relapse of the deepbite2-3 .<br />
Therefore, intrusion of anterior incisors is a better choice of<br />
treatment for adult patients. There are several useful tools to<br />
intrude anterior teeth, such as utility arches, lever arms<br />
combined with orthodontic bone screws, and interradicular<br />
orthodontic bone screws in the anterior area. Different tools<br />
are chosen based on individual situations. Besides tool<br />
selection, we should also pay attention to root resorption.<br />
According to Burstone’s study4 , 20gm of force is<br />
recommended for intrusion of anterior teeth to decrease root<br />
resorption. In this case the lower incisors were intruded by<br />
anterior bite turbos successfully, and root resorption was not<br />
apparent.<br />
REFERENCES<br />
Fig 12. 6 oz Moose ( 13 th month )<br />
Fig 15. Miniscrews in 15 th month<br />
Proclination of lower anterior teeth is often seen in the<br />
treatment of correcting deep bite and excessive overjet.<br />
According to Mills’ study5 , the average amount of “stable”<br />
proclination of lower incisors is 1 to 2 mm, and a fixed<br />
retainer is also needed. In this case the proclination of lower<br />
incisors was 1mm, and we used a lower fixed retainer for<br />
long-term stability.<br />
In brief, btie turbos were used with early light short<br />
elastics and pre-torqued Damon brackets for correcting<br />
impinging overbite and large overjet. The result was<br />
satisfactory and the treatment completed in 17 months . The<br />
mechanics were relatively simple and efficient. Therefore,<br />
we recommend this method for correcting deep bite and<br />
large overjet in non-extraction cases. It is important to<br />
correct the etiology of the malocclusion by instructing the<br />
patient to overlap the upper incisors when closing the lips.<br />
Lip trap posture ( lower lip between the incisors ) must be<br />
avoided.<br />
Acknowledgements: Thank Tzu Han Huang and Dr. Grace<br />
Chiu to proofread this article.<br />
1. Donald J. Burden et al: Predictors of outcome among patients with Class II Division 1 malocclusion treated with fixed appliances in the<br />
permanent dentition. Am J Orthod Dentofacial Orthop 1999;116:452-9<br />
2. Yi-Jane Chen et al: Nonsurgical correction of skeletal deep overbite and Class II Division 2 malocclusion in an adult patient. Am J Orthod<br />
Dentofacial Orthop 2004;126:371-8<br />
3. Cheol-Ho Paik et al: Correction of Class II deep overbite and dental and skeletal asymmetry with 2 types of palatal miniscrews. Am J<br />
Orthod Dentofacial Orthop 2007;131:00<br />
4. Burstone CR: Deep overbite correction by intrusion. Am J Orthod 1977;72:1-22<br />
5. Mills JR: The stability of the lower labial segment: a cephalometric survey. Dent Pract Dent Rec 1968;18:293-306
DISCREPANCY <strong>IN</strong>DEX WORKSHEET<br />
CASE # 1 PATIENT (Rev. 9/22/08) � CHAO-YUEN CHIU�<br />
TOTAL D.I. SCORE 25<br />
OVERJET<br />
0 mm. (edge-to-edge) = 1 pt.<br />
1 – 3 mm. = 0 pts.<br />
3.1 – 5 mm. = 2 pts.<br />
5.1 – 7 mm. = 3 pts.<br />
7.1 – 9 mm. = 4 pts.<br />
> 9 mm. = 5 pts.<br />
Negative OJ (x-bite) 1 pt. per mm. per tooth =<br />
OVERBITE<br />
Total = 5<br />
0 – 3 mm. = 0 pts.<br />
3.1 – 5 mm. = 2 pts.<br />
5.1 – 7 mm. = 3 pts.<br />
Impinging (100%) = 5 pts.<br />
Total = 5<br />
ANTERIOR OPEN BITE<br />
0 mm. (edge-to-edge), 1 pt. per tooth<br />
then 1 pt. per additional full mm. per tooth<br />
Total = 0<br />
LATERAL OPEN BITE<br />
2 pts. per mm. per tooth<br />
Total = 0<br />
CROWD<strong>IN</strong>G (only one arch)<br />
1 – 3 mm. = 1 pt.<br />
3.1 – 5 mm. = 2 pts.<br />
5.1 – 7 mm. = 4 pts.<br />
> 7 mm. = 7 pts.<br />
Total = 1<br />
OCCLUSION<br />
Class I to end on = 0 pts.<br />
End on Class II or III = 2 pts. per side ����� pts.<br />
Full Class II or III = 4 pts. per side ����� pts.<br />
Beyond Class II or III = 1 pt. per mm. ����� pts.<br />
additional<br />
Total = 0<br />
EXAM YEAR 2009<br />
ABO ID# 96112<br />
L<strong>IN</strong>GUAL POSTERIOR X-BITE<br />
1 pt. per tooth Total = 0<br />
BUCCAL POSTERIOR X-BITE<br />
2 pts. per tooth Total = 2<br />
CEPHALOMETRICS (See Instructions)<br />
ANB � 6° or � -2° = 4 pts.<br />
Each degree < -2° ����� x 1 pt. = �����<br />
Each degree > 6° ����� x 1 pt. = �����<br />
SN-MP<br />
� 38° = 2 pts.<br />
Each degree > 38° x 2 pts. =<br />
� 26° = 1 pt.<br />
Each degree < 26° 4 x 1 pt. = 4<br />
1 to MP � 99° = 1 pt.<br />
Each degree > 99° 2 x 1 pt. = 2<br />
OTHER (See Instructions)<br />
Supernumerary teeth ����� x 1 pt. = �����<br />
Ankylosis of perm. teeth ����� x 2 pts. = �����<br />
Anomalous morphology ����� x 2 pts. = �����<br />
Impaction (except 3 rd molars) x 2 pts. =<br />
Midline discrepancy (�3mm) @ 2 pts. =�����<br />
Missing teeth (except 3 rd molars)����� x 1 pts. =<br />
Missing teeth, congenital ����� x 2 pts. = �����<br />
Spacing (4 or more, per arch) ����� x 2 pts. = 2<br />
Spacing (Mx cent. diastema � 2mm) @ 2 pts. = 2<br />
Tooth transposition ����� x 2 pts. = �����<br />
Skeletal asymmetry (nonsurgical tx) @ 3 pts. =<br />
Addl. treatment complexities ����� x 2 pts. = �����<br />
Identify:<br />
Total = 8<br />
Total = 4<br />
47
48<br />
Exam Year 2009<br />
ABO ID# 96112<br />
Examiners will verify measurements in each parameter.<br />
ABO Cast-Radiograph Evaluation (Rev.6-1-08)<br />
Case # Patient<br />
1<br />
Total Score:<br />
1 1<br />
1<br />
17<br />
Alignment/Rotations<br />
7<br />
Marginal Ridges<br />
3<br />
Chao-Yuen Chiu<br />
Buccolingual Inclination<br />
1<br />
1<br />
Overjet<br />
0<br />
1<br />
2<br />
1<br />
2<br />
1<br />
1<br />
Occlusal Contacts<br />
0<br />
Occlusal Relationships<br />
4<br />
Interproximal Contacts<br />
0<br />
Root Angulation<br />
1<br />
<strong>IN</strong>STRUCTIONS: Place score beside each deficient tooth and enter total score for each parameter<br />
in the white box. Mark extracted teeth with “X”. Second molars should be in occlusion.<br />
1<br />
1<br />
1<br />
2<br />
1<br />
1
50<br />
The patient was a 16-year-old Asian girl<br />
whose chief concern was “ My front teeth do<br />
not touch.’’ Oral soft tissues, frena, and<br />
gingival health were all within normal limits.<br />
Oral hygiene was excellent. Medical and<br />
dental histories were unremarkable.<br />
DIAGNOSIS AND ETIOLOGY<br />
Treating Anterior Open Bite with<br />
Pretreatment facial photographs showed a<br />
straight profile with slightly protrusive lips.<br />
The pretreatment intraoral photographs and<br />
study models revealed bilateral Class I molar<br />
relationships, lower dental midline 2 mm to<br />
the right of the facial midline, 1.5 to 2 mm<br />
anterior open bite from the right to left first<br />
bicuspids, as well as maxillary and<br />
mandibular anterior segment spacing. The<br />
patient had a thumb sucking habit until age<br />
11. Tongue thrust swallowing and interdental<br />
tongue posturing were subsequently noted.<br />
The constant posturing of the tongue between<br />
the incisors appeared to be the primary<br />
etiology of her anterior open bite. The<br />
panoramic radiograph showed 4 impacted<br />
third molars.<br />
Cephalometric analysis shows skeletal<br />
Class I and normal mandibular plane angle<br />
with a 2-mm anterior open bite. The ANB<br />
angle was 4°, and the SN-MP angle was 32°.<br />
The lower incisor to Md plane angle was<br />
excessive, at 106°. The cephalometric values<br />
are summarized in the Table. The total score<br />
American Board of Orthodontics ( ABO ) of<br />
Discrepancy Index was 24, as seen on the DI<br />
worksheet.<br />
Early Light Short Elastics<br />
Fig 1. Pretreatment facial photographs<br />
Fig 2. Pretreatment intraoral photographs<br />
Fig 3. Pretreatment study models
�������������������������������������������������������������������<br />
������������������������������������������������������������<br />
�������������������������������������������������������������������������<br />
Fig 4. Posttreatment facial photographs ( 17 M )<br />
Fig 5. Posttreatment intraoral photographs ( 17 M )<br />
Fig 6. Posttreatment study models ( 17 M )<br />
Many theories explain the possible causes of<br />
anterior open bite malocclusion, including<br />
digital habits, airway obstruction, tongue<br />
posture, unfavorable growth, and inherited<br />
facial form. In this patient the etiology was<br />
believed to be a combination of thumb sucking<br />
habit followed by habitual interdental tongue<br />
posture.<br />
TREATMENT OBJECTIVES<br />
The primary objective of treatment was to<br />
attain Class I molar and canine relationships<br />
with ideal overjet and overbite while retracting<br />
upper and lower lips. Specific treatment<br />
objectives were to :<br />
• Maintain the skeletal position of the maxilla<br />
and the mandible.<br />
• Avoid extrusion of the molars and clockwise<br />
rotation of the mandible during treatment.<br />
• Extrude and retract the maxillary and<br />
mandible incisors.<br />
• Close the anterior open bite, align the<br />
midlines, and provide proper overjet and<br />
overbite in a mutually protected, Class I<br />
occlusion.<br />
• Retract upper and lower lips.<br />
• Correct the tongue posture habit.<br />
TREATMENT ALTERNATIVES<br />
The patient’s chief concerns were the<br />
anterior open bite and her inability to incise<br />
food. Because of the protrusive lips, an<br />
orthognathic surgical treatment option was<br />
discussed, but the patient deemed it too<br />
51
52<br />
�<br />
aggressive. Thus a nonsurgical plan was devised to<br />
close the open bite and alleviate the patient’s chief<br />
complaint. Non-extraction treatment was recommended.<br />
Anterior early light short elastics were used to correct<br />
the anterior open bite. Tongue spurs were used to correct<br />
the tongue posture and associated tongue thrust<br />
swallowing pattern. Squeeze exercise with chewing gum<br />
was recommended to intrude posterior segments. Apply<br />
Class II elastics was used to correct the sagittal<br />
discrepancy and the occlusion was detailed with<br />
finishing bends. Fixed appliances were removed and the<br />
occlusal correction was maintained with upper and<br />
lower fixed retainers in conjunction with an upper<br />
Hawley retainer.<br />
TREATMENT PROGRESS<br />
Fig. 7-8.<br />
Pretreatment<br />
pano and ceph<br />
radiographs<br />
0.022-in Damon D3MX brackets ( Ormco<br />
Corporation ) were used. Both arches, including the<br />
lingual spurs on the lower anterior teeth, were bonded.<br />
Fig. 9-10.<br />
Posttreatment<br />
pano and ceph<br />
radiographs<br />
�����������������<br />
��������������<br />
������ ������� �����<br />
���� ��� ����� ����<br />
���� ��� ����� ����<br />
���� �� �� ��<br />
������ ��� ����� ����<br />
���� ��� ��� ��<br />
���������������<br />
����������� ������ ���� ������<br />
��������� ���� ���� ��<br />
����������� ������ ���� ������<br />
��������� ���� ��� ���<br />
���������������<br />
������ ���� ���� ����<br />
Table. �Cephalometric summary
The patient was instructed to wear anterior vertical ( “up<br />
and down’’ ) elastics ( 2 oz ) full time at the start of active<br />
treatment. One month later, she was trained to lift the<br />
tongue tip to touch the hard palate and practice the<br />
squeeze exercise for 2 hrs / day to correct the low tongue<br />
posture and tongue thrust. She was cooperative and<br />
enjoyed the training. In the 5th month, a .016 x .025<br />
copper NiTi with 20° pretorqued wire was used for the<br />
torque control of upper anterior segment. In the 6th month, a panoramic film was taken to further examine<br />
the root parallelism and repositioned the brackets. The<br />
wire sequences were as follows: .014 copper NiTi, .014<br />
x .025 copper NiTi, .016 x .025 upper 20° pretorqued<br />
copper NiTi wire, .019 x .025 upper 20° pretorqued<br />
copper NiTi wire and .017 x .025 TMA. The Class II<br />
elastics were upgraded gradually from 2 oz, 3.5 oz, 4.5 oz<br />
to 6 oz respectively. The spaces were closed by power<br />
chains on a .017 x .025 TMA. The upper archwire was<br />
sectioned behind cuspids one month prior to the<br />
Fig 11. Superimposed tracings<br />
completion of treatment. Light vertical ( 2 oz ) were used<br />
for final detailing. Appliances were removed and<br />
retainers were delivered.<br />
TREATMENT RESULTS<br />
The overall results were acceptable, thanks in part to<br />
excellent patient cooperation with tongue posture<br />
training, intraoral elastics and optimal oral hygiene.<br />
Facial harmony and lip closure were improved.<br />
Posttreatment intraoral photographs and study casts<br />
showed bilateral Class I molar and canine relationships.<br />
Both dental midlines were aligned with the facial<br />
midline. Ideal overjet and overbite were achieved.<br />
Cephalometric analysis and superimpositions showed<br />
no skeletal changes in the maxilla or the mandible. The<br />
upper incisor to the SN angle was from 110° to 104°. The<br />
lower incisor to the Md plane angle was from 106° to<br />
94°. Critical assessment of this case with current ABO<br />
53
54<br />
�<br />
Fig. 12. 3 M during tx, 1/4 inch 3.5 oz Fox, U1-L3.<br />
Fig. 13. 5 M during tx, 1/4 inch 4.5 oz Bear, U3-L3.<br />
outcome standards showed the following deviations from<br />
ideal:<br />
1. The maxillary right and left second molars exhibit<br />
excessive distal rotation.<br />
2. The marginal ridge discrepancies exist between #3 #4,<br />
#14 #15, and #29 #30 #31.<br />
3. The Mandibular right second premolar exhibits<br />
excessive buccal root torque.<br />
4. The buccal cusps of the maxillary canines, second<br />
premolars are shifted mesially about 1~2 mm relative to<br />
the interproximal embrasures of the mandibular posterior<br />
teeth. The mesiobuccal cusps of the maxillary second<br />
molars shifted mesially about 1.5 mm to the buccal<br />
groove of the mandibular first molars.<br />
5. The mandibular right and left first premolars need<br />
slightly more distal root movement.<br />
Fig. 14. 10 M during tx, 1/4 inch 4.5 oz Bear,<br />
Box U456-L45.<br />
Fig. 15. 15 M during tx, 3/8 inch 3.5 oz<br />
Monkey, L3-U11-L3.<br />
The total score for the cast and panoramic radiograph<br />
grading system was 20, as seen on the Objective Grading<br />
System ( OGS ) worksheet1 . This score is well within the<br />
maximal allowable score of 26.<br />
DISCUSSION<br />
Success with a nonsurgical plan is complicated by the<br />
fact that most orthodontic mechanotherapy extrudes the<br />
teeth, resulting in a clockwise rotation of the mandible<br />
and lengthening of the face2 . The other concern is<br />
stability and retention. Over a third of the cases involving<br />
nonsurgical correction of open bite show significant<br />
postreatment relapse3 . Relapse is most likely in young<br />
patients, who often exhibit postreatment vertical growth<br />
and posterior dental eruption. The patient must be told<br />
that the nonsurgical treatment often requires more time to<br />
complete and is more difficult, especially for stability and<br />
retention. The interdental tongue posture habit must be<br />
maintained by the patient4 .
Fig. 16. 17M during tx, 3/8 inch 3.5 oz<br />
Monkey L6-U4-L3,<br />
Fig. 17. #2 distal rotation, central groove<br />
discrepancy was noted between #2, #3.<br />
Correcting the tongue habit and wearing elastics as<br />
instructed were the keys to correction of the patient’s<br />
anterior open bite. Anterior early elastics must be used<br />
with a light force so that they would not produce a<br />
dumping effect on the anterior segments. The upper 20°<br />
pretorque copper NiTi wire was also helpful in keeping<br />
the upper anterior lingual root torque. Bonded tongue<br />
spurs and muscle exercises played important roles in this<br />
open bite correction. Miniscrews which provided<br />
maximal anchorage were not used to hold or to distalize<br />
the posteriors because lip profile was not her concern.<br />
The patient and her parents were satisfied with the final<br />
results. Long-term stability will be the challenge for this<br />
case. The patient was instructed to continue the tongue<br />
posture training and squeeze exercises. She will be<br />
followed closely with follow-up evaluations.<br />
In conclusion, this case demonstrates that the successful<br />
open bite correction can be attained by simple mechanics<br />
��������<br />
�������������� �������� ��������� ��������<br />
�������<br />
������������<br />
�������������˚����������<br />
������������˚����������<br />
�����������<br />
�����������<br />
���������������<br />
������<br />
��������������<br />
������<br />
����������������<br />
����<br />
����������������<br />
����<br />
����������������<br />
������<br />
��������������<br />
������<br />
����������������<br />
������<br />
����� ����������<br />
����� ����������<br />
����� ����������<br />
���������<br />
���<br />
����������<br />
��������� ����������<br />
�����<br />
��������<br />
Table. �Elastic sequence<br />
����������<br />
and muscle posture exercises to eliminate the etiology of<br />
this special type of malocclusion.<br />
ACKNOWLEDGEMENTS<br />
Special thanks to our associate editors, Tzu Han<br />
Huang, Dr. Grace Chiu and Dr. Sarina Huang for English<br />
revision.<br />
REFERENCES<br />
1. Casko JS, Vaden JL, et al. Objective grading system for<br />
dental casts and panoramic radiographs. Am J Orthod<br />
Dentofacial Orthop 1998;114:589-99.<br />
2. Linder-Aronson S, Woodside D. Excess facial height<br />
malocclusion etiology, diagnosis, and treatment. Chicago:<br />
Quintessence; 2000. p. 1-24.<br />
3. Denison TF, Kokich VG, Shapiro PA. Stability of maxillary<br />
surgery in open bite versus nonopen bite malocclusions. Angle<br />
orthod 1989;59:5-10<br />
4. Hiller ME. Nonsurgical correction of Class III open bite<br />
malocclusion in an adult patient. Am J Orthod Dentofacial<br />
Orthop 2002;122:210-6.<br />
55
56<br />
DISCREPANCY <strong>IN</strong>DEX WORKSHEET<br />
�<br />
OVERJET<br />
(Rev. 9/22/08)<br />
TOTAL D.I. SCORE 24<br />
0 mm. (edge-to-edge) = 1 pt.<br />
1 – 3 mm. = 0 pts.<br />
3.1 – 5 mm. = 2 pts.<br />
5.1 – 7 mm. = 3 pts.<br />
7.1 – 9 mm. = 4 pts.<br />
> 9 mm. = 5 pts.<br />
Negative OJ (x-bite) 1 pt. per mm. per tooth =<br />
OVERBITE<br />
Total = 0<br />
0 – 3 mm. = 0 pts.<br />
3.1 – 5 mm. = 2 pts.<br />
5.1 – 7 mm. = 3 pts.<br />
Impinging (100%) = 5 pts.<br />
Total = 0<br />
ANTERIOR OPEN BITE<br />
0 mm. (edge-to-edge), 1 pt. per tooth<br />
then 1 pt. per additional full mm. per tooth<br />
Total = 16<br />
LATERAL OPEN BITE<br />
2 pts. per mm. per tooth<br />
Total = 0<br />
CROWD<strong>IN</strong>G (only one arch)<br />
1 – 3 mm. = 1 pt.<br />
3.1 – 5 mm. = 2 pts.<br />
5.1 – 7 mm. = 4 pts.<br />
> 7 mm. = 7 pts.<br />
Total = 0<br />
OCCLUSION<br />
Class I to end on = 0 pts.<br />
End on Class II or III = 2 pts. per side ����� pts.<br />
Full Class II or III = 4 pts. per side ����� pts.<br />
Beyond Class II or III = 1 pt. per mm. ����� pts.<br />
additional<br />
Total = 0<br />
L<strong>IN</strong>GUAL POSTERIOR X-BITE<br />
1 pt. per tooth Total = 0<br />
BUCCAL POSTERIOR X-BITE<br />
2 pts. per tooth Total = 0<br />
CEPHALOMETRICS (See Instructions)<br />
ANB � 6° or � -2° = 4 pts.<br />
Each degree < -2° ����� x 1 pt. = �����<br />
Each degree > 6° ����� x 1 pt. = �����<br />
SN-MP<br />
� 38° = 2 pts.<br />
Each degree > 38° ����� x 2 pts. = �����<br />
� 26° = 1 pt.<br />
Each degree < 26° ����� x 1 pt. = �����<br />
1 to MP � 99° = 1 pt.<br />
Each degree > 99° �����<br />
7<br />
x 1 pt. = �����<br />
7<br />
OTHER (See Instructions)<br />
Supernumerary teeth ����� x 1 pt. = �����<br />
Ankylosis of perm. teeth ����� x 2 pts. = �����<br />
Anomalous morphology ����� x 2 pts. = �����<br />
Impaction (except 3 rd molars) ����� x 2 pts. = �����<br />
Midline discrepancy (�3mm) @ 2 pts. =�����<br />
Missing teeth (except 3 rd molars)����� x 1 pts. =<br />
Missing teeth, congenital ����� x 2 pts. = �����<br />
Spacing (4 or more, per arch) ����� x 2 pts. = �����<br />
Spacing (Mx cent. diastema � 2mm) @ 2 pts. =�����<br />
Tooth transposition ����� x 2 pts. = �����<br />
Skeletal asymmetry (nonsurgical tx) @ 3 pts. =<br />
Addl. treatment complexities ����� x 2 pts. = �����<br />
Identify:<br />
Total = 8<br />
Total = 0
Exam Year 2009<br />
ABO ID# 96112<br />
Examiners will verify measurements in each parameter.<br />
ABO Cast-Radiograph Evaluation (Rev.6-1-08)<br />
Case # Patient<br />
2<br />
1<br />
Total Score:<br />
20<br />
Alignment/Rotations<br />
1<br />
1<br />
4<br />
Marginal Ridges<br />
1<br />
5<br />
Ya-Ting Ho<br />
Buccolingual Inclination<br />
1<br />
Overjet<br />
0<br />
2<br />
1<br />
1<br />
Occlusal Contacts<br />
2<br />
Occlusal Relationships<br />
6<br />
1 1 1 1 1 1<br />
Interproximal Contacts<br />
0<br />
Root Angulation<br />
1 1<br />
<strong>IN</strong>STRUCTIONS: Place score beside each deficient tooth and enter total score for each parameter<br />
in the white box. Mark extracted teeth with “X”. Second molars should be in occlusion.<br />
2<br />
2<br />
57
58<br />
Dr. Roberto Justus on Finishing<br />
-The Standard of American Board of Orthodontics<br />
���� �������������������<br />
������������������������<br />
������������������������<br />
�������������������������������������<br />
����������������<br />
• ��������<br />
��������������������� �������<br />
��������������������������<br />
���������������������������������������<br />
�������� ������������� ��������������������� ����������<br />
��������� ������������������������������������ ����������<br />
������������������������������������<br />
��������������������� ����� �� ���<br />
������������������������<br />
���������������� ���������� ��������<br />
���������������������������������������������������<br />
������������������������������� ����<br />
�������������������������������<br />
����������������������� ���������������������<br />
������������������������<br />
������������������������<br />
������������������������<br />
�����<br />
• ������<br />
��� ���� ������� ���������������<br />
������������������������<br />
������������������������<br />
���������������������������<br />
Fig. 1<br />
• ������ (rotation)<br />
�����������������������������������<br />
����������������� �������� �����������������<br />
����������������������������������<br />
�����������������������������������������<br />
���� ����� �������� ����� �������� �����<br />
��������� ������� �����<br />
��������� �� ����� �� ����� ������ Fig. 2<br />
�������� ��������� ������� ��������<br />
������� ���������� ��<br />
�������������<br />
������������ ��<br />
Fig. 3a<br />
�������� �� ������<br />
��������� ������ �����������<br />
���������� ���������<br />
�����������������������<br />
����� ��������������� Fig. 3b<br />
����������������<br />
�������������������� ��������<br />
�������������������<br />
�� ������ ��������<br />
���������������� �� �������<br />
�������������������������������������������������<br />
�����������������<br />
• Circumferential fiberotomy<br />
��������� ������������� �������� ��<br />
������ ���������������� ���� ����������������<br />
����������� ��������������������� ����������� ����<br />
���������������������� �����������������������
��������� ������������ ����������� ��������<br />
���������������������<br />
• Retainer & Stability<br />
��������������������� ���������������������<br />
���������������� ���� ������ ��������� �� ��<br />
���������������������������� �������� ���<br />
����������������������������������<br />
������ ������������� ������ ��������<br />
�������������������������������������������������<br />
��������������������������� �����<br />
����������������������������������� ����������� ��<br />
���� ������������� ������� �������������<br />
����������� ��� �������������<br />
����<br />
• ���������<br />
����������������������<br />
�������� ������������� �����������<br />
��������� � ������� ����������� ����� ����� ������ ���<br />
��������������������������������������<br />
������������������������������������<br />
������������������������������� ������<br />
�������� �������� ���������������<br />
��������������������������������<br />
�������������<br />
�� ��������� �� ��� ����������� �����<br />
������ ��� ������� ��������<br />
��������������������<br />
�������� �����������<br />
�������������������� Fig. 4<br />
• Marginal Ridge ����<br />
Fig. 5<br />
���� ��������� ������� �<br />
������� ��������� �������<br />
�������������<br />
�������������<br />
�������������������� ������ ���������� �<br />
����������������� ������ ���������<br />
�����������������������������������<br />
����� ������ ��������������������� ������ ��<br />
�������<br />
• ��������<br />
����������������������<br />
������������������������<br />
��� ����� ��������������������<br />
������������������ ����� �����<br />
����������������� ������������<br />
������������������������<br />
������������������������<br />
������������������������<br />
������������������������� ������<br />
������������������������<br />
����������<br />
• ��<br />
������<br />
���������<br />
���������<br />
���������������������������������<br />
������������������������<br />
�������������������������<br />
���������� ����������� ������� �������������<br />
������������������������<br />
������������������������<br />
59
60<br />
1 Dr. Chris Chang presented a Keynote Workshop for<br />
members of our Progressive Study Club at the Damon Forum<br />
in January 2009. His workshop consisted of a prepared<br />
Keynote presentation he created to teach all of the basic and<br />
some advanced techniques in creating a Keynote presentation.<br />
I thought his presentation and the method in which he then<br />
taught Keynote was a unique and an effective technique. We<br />
would look at a slide, analyze what he had done to create that<br />
particular slide, then proceeded through the steps to duplicate<br />
the slide and go through the process of learning these<br />
techniques. Chris has a definite philosophy of creating<br />
presentations. He prefers all presentations to be simple and<br />
interesting. He emphasized that creating too many lines of text<br />
is not effective. It is too hard to read and does not get across<br />
his message. From a novice standpoint, this was an excellent<br />
method of teaching. The problem that I saw after completing<br />
this workshop was it was difficult to recreate on my own<br />
without Chris and his capable assistants. I would have loved to<br />
Ps: Teaching assistants include: Sabrina, Billy, Megan, Flore<br />
Feedback on Dr. Chris Chang�s<br />
On Jan 21, Dr. Chris Chang was invited by Dr. Tom Pitts to give a lecture of how to make effective presentation with Keynote.<br />
Billy Su and I were pleased to have the honor to be his assistants to help Dr. Pitts and his members of the Progressive Study club.<br />
We shared a wonderful morning. I invited three of the members to write an essay about their impressions on the Keynote workshop.<br />
Sabrina Huang<br />
see written directions starting from step 1 to finish that I could<br />
refer back to a later time. I did not have a difficult time at the<br />
workshop learning the technique, it was only after the<br />
workshop that I found that I could have used some written<br />
manual.<br />
Overall, I appreciated Dr. Chris Chang, Dr. Sabrina<br />
Huang and Dr. Billy Su guidance to learn Keynote. It was<br />
quite an extensive course in a half day<br />
and it would be quite valuable to<br />
someone who is just learning Keynote<br />
or someone who is really adept at<br />
Windows Power Point. Thank you for<br />
your time and instructions, we will<br />
hopefully make you proud as we<br />
present at different venues.<br />
Dr. Errol Yim, USA
Keynote Workshop in Phoenix<br />
2 I have admired Dr Chang's presentation and educational<br />
style as well as his graphic slides for some time now. I made<br />
a commitment to change from my Windows computer to an<br />
Apple. Knowing that Chris was<br />
going to attend the Forum in<br />
Phoenix, I ask him to give us<br />
instruction on the use of<br />
Keynote for my study group<br />
members.<br />
Needless to say he came with a<br />
very great presentation and<br />
thorough instructions outline.<br />
3 I had the pleasure of meeting Dr. Chris Chang last<br />
summer in Spain at Dr. Tom Pitts’ Progressive Study Club. I<br />
found him to be a unique and engaging fellow, intelligent, and<br />
particularly funny. The fact that he likes golf instantly drew<br />
me to him, because I also enjoy the game. Chris gave a<br />
wonderful presentation at the meeting in Spain, one like I had<br />
never seen before. I had only used PowerPoint to give lectures<br />
before this, and what he amazed me about his presentation<br />
was the degree of sophistication and beauty with which he<br />
gave his. Of course, I am speaking of Apple’s Keynote. Chris<br />
is a master at making presentations with this tool that are clear<br />
and concise and that keep the attention of the audience.<br />
Because of his skill with Keynote, Dr. Pitts asked Chris to<br />
come to the Damon Forum in Phoenix, Arizona in January to<br />
put on a short course in Keynote for anyone interested in<br />
mastering this wonderful tool. Of course, I had to have the<br />
same computer as Chris, so when I got home I bought a<br />
MacBook Air and an iPhone.<br />
On the Wednesday before the Damon Forum began we<br />
met with Chris and several bright and helpful young<br />
orthodontists who came with him to lend their aid to this<br />
teaching experience. This course was merely a long distance<br />
extension of the course he teaches at his Newton’s Apple in<br />
Taiwan. For many of us who have used PowerPoint sparingly,<br />
He also generously brought you, and three other people to<br />
help in this endeavor. I was not only impressed with Dr.<br />
Chang's instruction, but with all of the giving attitudes of the<br />
various instructors.<br />
It was a pleasure to be part of it and to now be using my<br />
new Apple with Keynote. I know all of the attendees are now<br />
using Keynote. I grade the session as an A + .<br />
Thank you Sabrina & Billy for all of your help in this<br />
endeavor and for sending follow-up info via email and<br />
actually putting into slides the methodology for review.<br />
Dr. Tom Pitts,, USA<br />
his team took us through the basics of how to get started with<br />
Keynote and how to navigate the toolbar. Of course, we had to<br />
customize the toolbar, so Chris taught us which Icons to use<br />
and where to place them. Next, we went through shortcuts that<br />
make creating presentations easier. His staff spent individual<br />
time with each of us as we went through the process of<br />
creating, duplicating, masking, moving, and animating. They<br />
were all very patient with us, and spent enough one-on-one<br />
time that we could master the concepts. In one morning,<br />
Keynote opened its doors to us, and giving presentations will<br />
never again be the same.<br />
Chris Chang and his staff are true givers, and I would<br />
advise anyone who has the opportunity to take a course from<br />
him to do so. Keynote is a tool far better<br />
than anything else on the market, and<br />
once you have seen it you will agree. I<br />
want to thank Chris for taking his time to<br />
come so far to teach his new American<br />
friends this wonderful technique.<br />
Dr. J. Michael Steffen, USA<br />
61
Newton’s A<br />
������� 2009������<br />
�� ���� �� ���� ����<br />
����<br />
����<br />
����<br />
����<br />
����<br />
����<br />
����<br />
<strong>International</strong><br />
Mac OS X<br />
��������<br />
iWork���<br />
����������<br />
iLife���<br />
��iPod����<br />
iLife��� ��<br />
������<br />
Keynote ��� series 1<br />
����<br />
Keynote��� series 2<br />
Dr. Kokich�����<br />
Keynote��� series 3<br />
����������<br />
Keynote, OBS & Damon<br />
Workshop<br />
����� ���������<br />
���� ��������<br />
Mac OS X<br />
Keynote<br />
iPod + iTunes<br />
iCal + Address Book<br />
1. Keynote��<br />
2. ������<br />
1. �������<br />
2. ����<br />
1. ����<br />
2. ����<br />
Keynote, Management<br />
OrthoBoneScrew &<br />
Damon<br />
iLife + iWork<br />
����������<br />
1. ������<br />
2.����������<br />
4/4�5/2���<br />
15:00�16:00<br />
4/11�5/9���<br />
15:00�16:00<br />
4/18�5/16���<br />
15:00�16:00<br />
4/25���<br />
15:00�16:00<br />
6 � 11 ����<br />
09:00�17:00<br />
7 � 23 ����<br />
09:00�17:00<br />
4 � 16 ����<br />
09:00�17:00<br />
�����������<br />
�����������<br />
�����������<br />
�����������<br />
������������<br />
������������<br />
������������<br />
6/29 ~ 7/02 <strong>International</strong> Dentists<br />
8.1���~8.2(�) 12-18�������<br />
8.13(�)~8.15��� ����������<br />
������������������������200��<br />
�����������������������2���������25�������������5���<br />
���� ��03-5735676 ��� �������<br />
www.newtoonsa.com.tw
diameter length squared-hole code<br />
2 mm<br />
2 mm<br />
12 mm<br />
12 mm<br />
No<br />
Yes<br />
OBS 2.0<br />
OBS 2.4<br />
OBS �����03-573-5676 ���<br />
������ www.newtonsa.com.tw<br />
all
An excellent instructive and reference text for postdoctoral orthodontic students and<br />
specialist clinical orthodontists. Definitely recommended reading!”<br />
—Alex Jacobson, associate editor of AJODO<br />
2009 Beethoven 4 th <strong>International</strong> OrthoBoneScrew and Damon Workshop