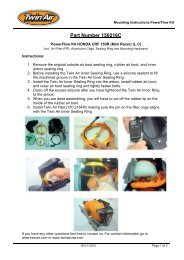
Part Number 152217C - Twin Air
Part Number 152217C - Twin Air
Part Number 152217C - Twin Air

You also want an ePaper? Increase the reach of your titles
YUMPU automatically turns print PDFs into web optimized ePapers that Google loves.
<strong>Twin</strong> <strong>Air</strong> <strong>Air</strong>box<br />
Instructions:<br />
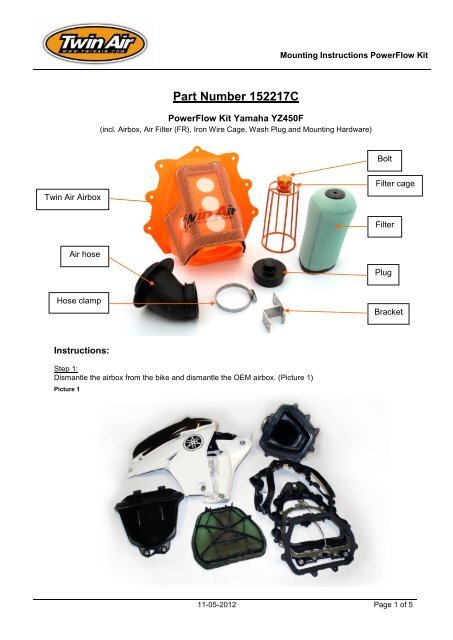
<strong>Part</strong> <strong>Number</strong> <strong>152217C</strong><br />
Mounting Instructions PowerFlow Kit<br />
PowerFlow Kit Yamaha YZ450F<br />
(incl. <strong>Air</strong>box, <strong>Air</strong> Filter (FR), Iron Wire Cage, Wash Plug and Mounting Hardware)<br />
Step 1:<br />
Dismantle the airbox from the bike and dismantle the OEM airbox. (Picture 1)<br />
Picture 1<br />
<strong>Air</strong> hose<br />
Hose clamp<br />
Bolt<br />
Filter cage<br />
Filter<br />
Plug<br />
Bracket<br />
11-05-2012 Page 1 of 5
Mounting Instructions PowerFlow Kit<br />
Step 2:<br />
Insert the <strong>Twin</strong> <strong>Air</strong> airbox over the OEM black housing and notice the area that needs to be trimmed. (see<br />
pictures 2 and 3)<br />
Picture 2 Picture 3<br />
Step 3:<br />
Assemble the <strong>Twin</strong> <strong>Air</strong> bracket to the OEM stainless sealing ring (picture 4) and bend it like picture 5.<br />
Picture 4 Picture 5<br />
Step 4:<br />
Assemble the <strong>Twin</strong> <strong>Air</strong> box into the original Yamaha airbox using the OEM bolts. (Picture 6 and 7)<br />
Picture 6 Picture 7<br />
11-05-2012 Page 2 of 5
Mounting Instructions PowerFlow Kit<br />
The blue connector next to the intake (picture 8) must be disconnected and remounted the other way<br />
around.<br />
Step 5:<br />
First disconnect the blue connector and the sensor. Second, remove the bracket from the bike.<br />
Picture 8 Picture 9<br />
Step 6:<br />
Cut the bracket along the line like in picture 10. Use the cut piece as the screw thread behind the hole like<br />
shown in picture 11.<br />
Picture 10 Picture 11<br />
Step 7:<br />
Replace the electronic sensor bracket to the bike as like in picture 12 and 13. The blue part must point to<br />
the outside of the bike as shown in picture 14 on page 4.<br />
Picture 12 Picture 13<br />
11-05-2012 Page 3 of 5
Picture 14<br />
Step 8:<br />
Assemble the <strong>Twin</strong> <strong>Air</strong> box into the bike using the OEM bolts.<br />
Don’t forget to place the rubber hose into the box and fix the hose clamp like picture 15.<br />
Picture 15<br />
Mounting Instructions PowerFlow Kit<br />
Step 9:<br />
Place the Filter into the <strong>Air</strong>-box like picture 16, 17 and 18. Using the supplied orange <strong>Twin</strong> <strong>Air</strong> filter nut,<br />
tighten the filter assembly to the airbox.<br />
Picture 16 Picture 17<br />
Hose clamp<br />
11-05-2012 Page 4 of 5
Step 10:<br />
Close the air-box with the OEM cover. Place the tank and the plastic back on the bike.<br />
Step 11:<br />
If you want to clean your bike use the plug like picture 18.<br />
Picture 18<br />
Mounting Instructions PowerFlow Kit<br />
If you have any other questions feel free to contact us. For contact information go to<br />
www.twinair.com or www.twinairusa.com.<br />
<strong>Twin</strong> <strong>Air</strong> <strong>Part</strong>s and Accessories<br />
- PowerFlow Replacement <strong>Air</strong> Filter: #152217FR<br />
- Replacement Oil Filter: #140016<br />
- <strong>Air</strong> Box Cleaning Cover: #160104<br />
<strong>Twin</strong> <strong>Air</strong> Cleaning and Oiling Products<br />
- Bio Dirt Remover: #159004<br />
- Liquid Bio Power: #159017<br />
- Bio Pack (Dirt Remover / Liquid Power): #159020<br />
- Bio Spray: #159018M<br />
- <strong>Twin</strong> <strong>Air</strong> Bio System: #159000BIO<br />
For more details or to purchase these or other <strong>Twin</strong> <strong>Air</strong> products go to www.twinair.com,<br />
www.twinairusa.com or visit your local <strong>Twin</strong> <strong>Air</strong> Authorized Dealer.<br />
Plug<br />
11-05-2012 Page 5 of 5