Amy's Voile Sun Glow Quilt - Amy Butler
Amy's Voile Sun Glow Quilt - Amy Butler
Amy's Voile Sun Glow Quilt - Amy Butler

You also want an ePaper? Increase the reach of your titles
YUMPU automatically turns print PDFs into web optimized ePapers that Google loves.
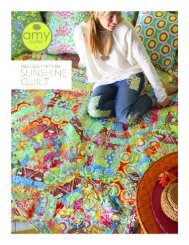
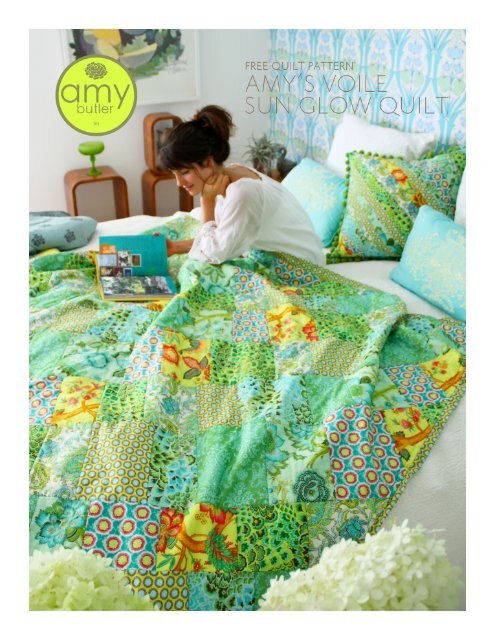
AMY’S VOILE SUN GLOW QUILT<br />
The rich glowing colors in this quilt reminds me of the way the early<br />
fall sunshine feels on your skin. Nothing beats the sensation of the<br />
beautiful honey colored light on your face and the warm and cozy<br />
feeling you get wrapped in the uplifting rays. The prints and sublime<br />
hues in my delicious cotton voile perfectly complement this feeling.<br />
I’m confident this all season quilt will bring you the sweetest dreams.<br />
Enjoy! XO <strong>Amy</strong><br />
SEWING PATTERN INCLUDES:<br />
Instructions and measurements to create your own <strong>Voile</strong> <strong>Sun</strong><br />
<strong>Glow</strong> <strong>Quilt</strong>.<br />
Fabrics designed by <strong>Amy</strong> <strong>Butler</strong> for Rowan.<br />
All prints are from <strong>Amy</strong>’s Soul Blossoms <strong>Voile</strong> Fashion Fabrics collection.<br />
<strong>Quilt</strong> design by <strong>Amy</strong> <strong>Butler</strong><br />
Instructions by Anita Peluso<br />
Construction by Ellen Maxwell<br />
Finished size: 68” wide x 72” long<br />
AMY’S FABRICS USED IN THIS QUILT<br />
For piecing the <strong>Quilt</strong> Top<br />
night tree/cilantro<br />
VOAB03<br />
peacock feathers/<br />
sea green VOAB01<br />
dancing paisley/<br />
limestone VOAB04<br />
For the Flanges<br />
laurel dots/cilantro<br />
VOAB06<br />
buttercups/<br />
spearment VOAB05<br />
night tree/<br />
lime peel VOAB03<br />
laurel dots/<br />
cilantro VOAB06<br />
For the <strong>Quilt</strong> Back<br />
solid mist<br />
V515<br />
english garden/<br />
pine VOAB02<br />
peacock feathers/<br />
turquoise VOAB01<br />
<strong>Amy</strong>’s <strong>Voile</strong> <strong>Sun</strong> <strong>Glow</strong> <strong>Quilt</strong> (Front)<br />
GENERAL NOTES:<br />
~All seam allowances are 1/4” unless otherwise stated.<br />
~Before you get started, please read through all of the instructions.<br />
~Preshrink your fabric by machine wash warm in a normal cycle with<br />
like colors, line dry and press out any wrinkles with a warm iron.<br />
TIP: Make a small diagonal clip in the corners of each of the fabrics<br />
before washing to help prevent fraying and tangling.<br />
~The first time a term is mentioned and followed by an asterisk (*) it is<br />
defined in the “Techniques & Terminology” section on <strong>Amy</strong>’s website at<br />
amybutlerdesign.com.<br />
MATERIALS LIST<br />
NOTE: Allow extra yardage for centering a design on your fabric.<br />
From 54” wide voile fabric:<br />
-3/4 yard each of the 8 different prints for piecing the <strong>Quilt</strong> Front<br />
-5/8 yard of one print for the Flanges<br />
-4 1/4 yards of a solid for the <strong>Quilt</strong> Back<br />
BATTING/NOTIONS NEEDED<br />
-1 pkg of cotton batting (100” x 116”)<br />
<strong>Amy</strong> uses Machine 60/40 Blend® Batting from Fairfield<br />
-2 large spools of coordinating all-purpose thread<br />
<strong>Amy</strong> uses her Premium Threads from Rowan<br />
TOOLS NEEDED<br />
-24” <strong>Quilt</strong>ing ruler -Rotary cutter and mat<br />
-Straight pins -Scissors<br />
-Measuring tape -Hand sewing needle<br />
-Seam ripper -Iron and ironing board<br />
-Safety pins (large size) (approximately 182 needed)<br />
-Turning tool (such as a closed pair of scissors)<br />
1
Step 1.<br />
CUT OUT THE FABRIC PIECES<br />
A. From the 8 Prints for the <strong>Quilt</strong> Front:<br />
-Cut 1 strip from each print - 5” x width of fabric (WOF).<br />
-Cut 1 strip from each print - 6 1/2” x WOF.<br />
-Cut 1 strip from each print - 8” x WOF.<br />
B. From the Flange print:<br />
-Cut 6 strips - 3” wide x WOF.<br />
C. From the Solid fabric for the <strong>Quilt</strong> Back:<br />
-Fold the solid fabric in half across the width matching the cut edges.<br />
Press a crease along the fold and open up the panel. Cut along the<br />
crease.<br />
Step 2.<br />
CONSTRUCT THE QUILT BACK<br />
A. Using your rotary cutter, quilting ruler and cutting mat, cut away the<br />
selvage* from one side of each of the <strong>Quilt</strong> Back panels.<br />
B. Now place both panels RIGHT sides together and pin down the long<br />
cut edge. Stitch a 1/2” seam along the pinned edge and backstitch* at<br />
each end. Press the seam allowances* open.<br />
C. Trim the <strong>Quilt</strong> Back to measure 69” wide x 72” long.<br />
Please set the <strong>Quilt</strong> Back aside while you construct the <strong>Quilt</strong> Top.<br />
Step 3.<br />
CREATE THE STRIP SETS<br />
A. Arrange the strips cut in Step 1A into 3 groups of 8 fabrics. Each<br />
group will consist of one strip of each fabric print in various size strips.<br />
B. Starting with the first group, place 2 strips RIGHT sides together<br />
matching the long edges and pin in place. Stitch a 1/4” seam along the<br />
pinned edge and backstitch at each end.<br />
Continue to sew the next strip to the first 2 strips in the same manner.<br />
When all 8 strips have been sewn together press all the seams flat and<br />
facing the same direction.<br />
NOTE: The quilt top is constructed using strip sets sewn in tubes. This<br />
makes cutting the large strip sets easier and gives you control of the<br />
placement of prints in your quilt top.<br />
C. Next, fold the 1st strip set in half lengthwise with RIGHT sides<br />
together matching the cut edges of the 1st and 8th strip piece and pin<br />
in place. Stitch a 1/4” seam along the pinned edge and backstitch at<br />
each end. Press this seam flat and facing in the same direction as the<br />
rest of the seams. This will create a tube.<br />
D. Repeat Steps 3B & C with each of the 2 remaining groups of 8 strips<br />
to create 2 more tubes.<br />
E. Lay the first tube flat, cutting strips perpendicular to the seams,<br />
leaving you with 6 circular strips.<br />
-Cut 2 strips – 6” x width of the tube (WOT)<br />
-Cut 2 strips – 8” x WOT<br />
-Cut 1 strip – 10” x WOT<br />
-Cut 1 strip – 12” x WOT<br />
F. Repeat Step 3E to cut circular strips from the remaining 2 tubes.<br />
Diagram of a Tube Strip Set<br />
G. Use your seam ripper* to remove one sewn seam in each circular<br />
strip to create long pieced strips. Vary the seams that are removed so<br />
each one starts and ends with different fabric prints.<br />
Step 4.<br />
MAKE THE QUILT TOP<br />
A. Using the diagram of the <strong>Quilt</strong> Top in Step 4D and the row lengths<br />
below as a guide, lay out the pieced strips to create diagonal rows. To<br />
make the longer rows join pieced strips together. Place the short edges<br />
RIGHT sides together, pin and stitch a 1/4” seam along the pinned edge<br />
and backstitch at each end. Press the seam allowance to one side. To<br />
make the smaller rows, remove seams from the pieced strips. Each<br />
row should consist of the same width pieced strips. Alternate the row<br />
widths.<br />
~Make each row approximately the length as listed.<br />
A - 20” E - 74” I - 88” M - 32”<br />
B - 32” F - 88” J - 74” N - 20”<br />
C - 46” G - 103” K - 60”<br />
D - 60” H - 103” L - 46”<br />
B. Starting with Row A, trim each row so that one end is wider than the<br />
other. Vary the amount trimmed to give additional interest. Trim the 6”<br />
rows up to 3/4”, the 8” rows up to 1 1/4” and the 10” and 12” rows up to<br />
2”. At the same time alternate the wide and narrow ends in each row to<br />
create the appearance that each strip is radiating from the edge.<br />
Trim Rows<br />
C. With RIGHT sides together pin Row A to Row B. Stitch a 1/4” seam<br />
along the pinned edges and backstitch at each end. Press the seam to<br />
one side.<br />
Continue sewing the Rows in order until all of the rows have been<br />
used. Press the seams to one side.<br />
2
D. Trim the <strong>Quilt</strong> Top using the <strong>Quilt</strong> Back as a template. Center the<br />
<strong>Quilt</strong> Back on top of the <strong>Quilt</strong> Top, pin every 12” around the edge of the<br />
Back to hold it place. Then trim the <strong>Quilt</strong> Top to measure 69” wide and<br />
72” long.<br />
Step 5.<br />
ATTACH THE FLANGE<br />
Diagram of the <strong>Quilt</strong> Top<br />
A. Trim off the selvage edge from each of the 6 Flange strips. With<br />
RIGHT sides together match the short 3” end of two strips and pin<br />
in place. Sew a 1/4” seam and backstitch at each end. Press the seam<br />
open. Continue sewing each Flange strip to the previous one until all<br />
of the Flange strips are sewn together in one long piece.<br />
B. From the long Flange strip, cut 2 pieces measuring 68 1/2” long and<br />
2 pieces measuring 72 1/2” long.<br />
C. To finish the short edges fold each Flange strip in half lengthwise<br />
with RIGHT sides together matching the long edges. Pin and sew a 1/4”<br />
seam across each short end and backstitch at each end. Then turn the<br />
strips RIGHT side out and press them flat.<br />
D. You will now have 2 strips measuring 1 1/2” wide x 68” long and 2<br />
strips 1 1/2” wide x 72” long.<br />
E. Place the 68” long Flanges on the top and bottom edges of the <strong>Quilt</strong><br />
Top matching the cut edges and centering them so that there is 1/2”<br />
of the quilt top showing on each side of the Flange. Pin them in place.<br />
Baste a 3/8” seam along the pinned edge.<br />
F. Repeat Step 5E to attach the 72” long Flanges to each side of the<br />
<strong>Quilt</strong> Top.<br />
Step 6.<br />
ASSEMBLE THE QUILT<br />
A. Open your batting. Lay it on a large flat surface and smooth out any<br />
wrinkles.<br />
B. Place the <strong>Quilt</strong> Top on top of the batting with the RIGHT side up.<br />
Smooth out the fabric.<br />
C. Then place the <strong>Quilt</strong> Back and <strong>Quilt</strong> Top RIGHT sides together<br />
smoothing out the panels and tucking the Flanges in between. Pin the<br />
layers together around all of the edges.<br />
D. Stitch a 1/2” seam around the pinned edges leaving a 20” opening<br />
centered along one side and backstitch at each end.<br />
E. Cut the batting even with the <strong>Quilt</strong> Top. Trim* all 4 corners in the<br />
seam allowance making sure not to clip your stitching.<br />
F. Turn the quilt RIGHT side out through the opening. Use a turning<br />
tool* to gently push out the corners and pull out the Flanges. Press the<br />
quilt flat.<br />
G. Fold the sides of the opening 1/2” under. Pin and slipstitch* the<br />
edges together with your hand sewing needle.<br />
H. Starting at the center of the <strong>Quilt</strong> Top, use large safety pins and pin<br />
the layers together every 5”, or hand baste* by making a series of long<br />
running stitches through all of the layers.<br />
I. Machine or hand quilt as desired beginning in the center and<br />
working your way to the outside edges. Remove the pins as you<br />
approach them, or basting stitches when the quilting is done. This quilt<br />
was quilted by stitching-in-the-ditch*.<br />
Nice job! Enjoy your beautiful <strong>Voile</strong> <strong>Sun</strong> <strong>Glow</strong> <strong>Quilt</strong> and sweet dreams!<br />
Your quilt is complete. You have made a beautiful keepsake. Be sure<br />
to add a fabric label to the back of the <strong>Quilt</strong>, hand stitching it in place<br />
to document your name, address, date and any information you may<br />
want to include (perhaps a dedication or a name for the <strong>Quilt</strong>). Future<br />
generations will thank you for this.<br />
If you liked this free pattern, please be sure to check out my other<br />
free patterns like “Window to the Soul <strong>Quilt</strong>” and “<strong>Voile</strong> <strong>Sun</strong> <strong>Glow</strong><br />
Pillow”. Happy Sewing! -<strong>Amy</strong><br />
3430 Toringdon Way, Ste 301<br />
Charlotte, NC 28277<br />
Phone: 866-907-3305<br />
Fax: 864-877-3269<br />
Email: fabrics@westminsterfi bers.com<br />
Website: www.westminsterfi bers.com<br />
All designs © 2011 <strong>Amy</strong> <strong>Butler</strong> Ltd<br />
3