Model 139972 Sun Shelter Assembly Instructions - Quik Shade
Model 139972 Sun Shelter Assembly Instructions - Quik Shade
Model 139972 Sun Shelter Assembly Instructions - Quik Shade

Create successful ePaper yourself
Turn your PDF publications into a flip-book with our unique Google optimized e-Paper software.
NO.<br />
1<br />
1A<br />
2<br />
2A<br />
3A<br />
3<br />
4<br />
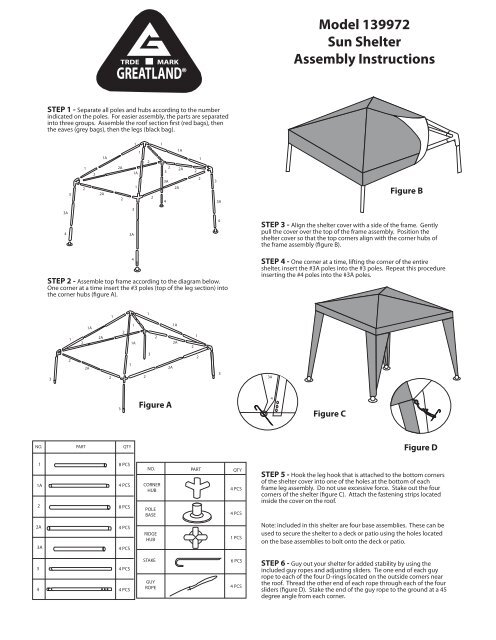
STEP 1 - Separate all poles and hubs according to the number<br />
indicated on the poles. For easier assembly, the parts are separated<br />
into three groups. Assemble the roof section �rst (red bags), then<br />
the eaves (grey bags), then the legs (black bag).<br />
3<br />
3A<br />
4<br />
3<br />
1<br />
2<br />
2<br />
2<br />
1<br />
2A<br />
1A<br />
2<br />
2A<br />
2A<br />
1A<br />
2<br />
1<br />
2A<br />
3<br />
2<br />
2<br />
3A<br />
1<br />
3<br />
4<br />
1<br />
1A<br />
1<br />
STEP 2 - Assemble top frame according to the diagram below.<br />
One corner at a time insert the #3 poles (top of the leg section) into<br />
the corner hubs (�gure A).<br />
PART QTY<br />
8 PCS<br />
4 PCS<br />
8 PCS<br />
4 PCS<br />
4 PCS<br />
4 PCS<br />
4 PCS<br />
1<br />
1A<br />
1<br />
2<br />
2<br />
1<br />
3<br />
2<br />
2<br />
1<br />
2<br />
3<br />
3A<br />
4<br />
2A<br />
Figure A<br />
NO.<br />
CORNER<br />
HUB<br />
POLE<br />
BASE<br />
RIDGE<br />
HUB<br />
STAKE<br />
GUY<br />
ROPE<br />
2A<br />
1A<br />
2A<br />
1A<br />
2A<br />
®<br />
2<br />
2<br />
1<br />
2<br />
1<br />
2<br />
3<br />
3A<br />
PART QTY<br />
4<br />
3<br />
4 PCS<br />
4 PCS<br />
1 PCS<br />
6 PCS<br />
4 PCS<br />
3A<br />
4<br />
<strong>Model</strong> <strong>139972</strong><br />
<strong>Sun</strong> <strong>Shelter</strong><br />
<strong>Assembly</strong> <strong>Instructions</strong><br />
Figure C<br />
Figure B<br />
STEP 3 - Align the shelter cover with a side of the frame. Gently<br />
pull the cover over the top of the frame assembly. Position the<br />
shelter cover so that the top corners align with the corner hubs of<br />
the frame assembly (�gure B).<br />
STEP 4 - One corner at a time, lifting the corner of the entire<br />
shelter, insert the #3A poles into the #3 poles. Repeat this procedure<br />
inserting the #4 poles into the #3A poles.<br />
Figure D<br />
STEP 5 - Hook the leg hook that is attached to the bottom corners<br />
of the shelter cover into one of the holes at the bottom of each<br />
frame leg assembly. Do not use excessive force. Stake out the four<br />
corners of the shelter (�gure C). Attach the fastening strips located<br />
inside the cover on the roof.<br />
Note: included in this shelter are four base assemblies. These can be<br />
used to secure the shelter to a deck or patio using the holes located<br />
on the base assemblies to bolt onto the deck or patio.<br />
STEP 6 - Guy out your shelter for added stability by using the<br />
included guy ropes and adjusting sliders. Tie one end of each guy<br />
rope to each of the four D-rings located on the outside corners near<br />
the roof. Thread the other end of each rope through each of the four<br />
sliders (�gure D). Stake the end of the guy rope to the ground at a 45<br />
degree angle from each corner.
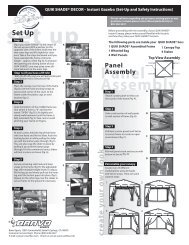
Please read completely before setting up your Gazebo<br />
It is your responsibility to read and save these instructions before attempting to set up your canopy. We would also like to<br />
suggest that you follow these safety precautions, care and maintenance tips when using your canopy:<br />
1. Never set up or continue to use in any rain, wind or storm conditions, especially lightning storms. Damage can occur<br />
to your canopy and put you and others in potential danger.<br />
2. Know your gazebo. Excessive force must not be used on any part of tent or poles during assembly. Set up the gazebo in your yard,<br />
to become familiar with pitching procedure, prior to first use.<br />
3. Clear site of twigs, rocks, and other debris. Pitch gazebo on the ground slightly higher than surrounding area, avoiding<br />
ground depressions where water can collect. You should always stake out your gazebo. Drive stakes into ground at an<br />
angle with head pointing away from the gazebo. Always use the guy ropes provided.<br />
4. Color fading caused by ultraviolet exposure (UV): This fabric is tested for color fastness at the factory. Only fabrics that<br />
display long color fast characteristics are used. Prolonged exposure to sunlight, however, may have a bleaching effect on<br />
any fabric, and causes color fading and fabric degradation. Leaving your gazebo set up for an extended period of time<br />
may cause damage to the fabric due to the sun’s ultraviolet rays, which is not covered under the warranty. “Acts of<br />
god” are also not covered under the warranty.<br />
5. Avoid setting up your canopy on steep inclines.<br />
6. Always use the provided stakes to secure your canopy to the ground unless you set up on concrete or asphalt.<br />
7. Do not use your canopy for permanent shelter. It was designed for temporary use only.<br />
8. Keep your canopy away from heat and flames at all times. Do not barbecue or build fires under you canopy.<br />
9. Never leave your canopy unattended.<br />
10. Hand wash the canopy using only mild soap and water. Never use harsh detergents, abrasives or bleach. Do not<br />
machine wash.<br />
11. Extend product life with good maintenance. Dry throughly before taking down. Do not store gazebo wet. (Even a<br />
small amount of moisture can cause mold and mildew). Store gazebo in a well ventilated dry area. Do not store on<br />
concrete floor, as this encourages mildew. If mildew does appear, wash gazebo with soap and dry in sun.<br />
12. Do not spray with insecticides; This will destroy flame retardant and water repellent properties of the fabric.<br />
Harsh detergents can also damage properties of the fabric.<br />
13. ALWAYS USE COMMON SENSE.<br />
WARNING: KEEP ALL FLAME AND HEAT SOURCES AWAY FROM THIS TENT FABRIC. This tent meets the<br />
flammability requirements of CPAI-84. The fabric will burn if left in continuous contact with any<br />
flame source. The application of any foreign substance to the tent fabric may render the<br />
flame resistant properties ineffective.<br />
DO NOT RETURN YOUR CANOPY TO THE PLACE OF PURCHASE<br />
Please contact Bravo Sports for questions, comments, parts & accessories,<br />
or assistance with any warranty related issues.<br />
Bravo Sports 12801 Carmenita Rd. Santa Fe Springs, CA 90670<br />
quikshade.com<br />
Toll free: (800) 248-5327<br />
®