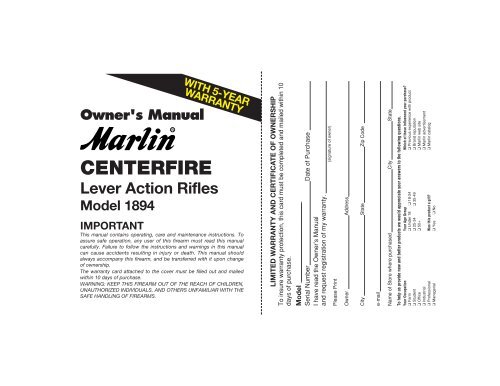
CENTERFIRE Lever Action Rifles Model 1894 - Marlin Firearms
CENTERFIRE Lever Action Rifles Model 1894 - Marlin Firearms
CENTERFIRE Lever Action Rifles Model 1894 - Marlin Firearms

You also want an ePaper? Increase the reach of your titles
YUMPU automatically turns print PDFs into web optimized ePapers that Google loves.
Owner's Manual<br />
WITH 5-YEAR<br />
WARRANTY<br />
<strong>CENTERFIRE</strong><br />
<strong>Lever</strong> <strong>Action</strong> <strong>Rifles</strong><br />
<strong>Model</strong> <strong>1894</strong><br />
IMPORTANT<br />
This manual contains operating, care and maintenance instructions. To<br />
assure safe operation, any user of this firearm must read this manual<br />
carefully. Failure to follow the instructions and warnings in this manual<br />
can cause accidents resulting in injury or death. This manual should<br />
always accompany this firearm, and be transferred with it upon change<br />
of ownership.<br />
The warranty card attached to the cover must be filled out and mailed<br />
within 10 days of purchase.<br />
WARNING: KEEP THIS FIREARM OUT OF THE REACH OF CHILDREN,<br />
UNAUTHORIZED INDIVIDUALS, AND OTHERS UNFAMILIAR WITH THE<br />
SAFE HANDLING OF FIREARMS.<br />
LIMITED WARRANTY AND CERTIFICATE OF OWNERSHIP<br />
To insure warranty protection, this card must be completed and mailed within 10<br />
days of purchase.<br />
<strong>Model</strong> _ Serial Number Date of Purchase<br />
I have read the Owner’s Manual<br />
and request registration of my warranty.<br />
(signature of owner)<br />
Please Print<br />
Owner Address<br />
City State Zip Code<br />
e-mail<br />
Name of Store where purchased City State<br />
To help us provide new and better products we would appreciate your answers to the following questions.<br />
Your Occupation Your Age Group Which of these influenced your purchase?<br />
❑ Farm ❑ Under 18 ❑ 18-24 ❑ Previous experience with product<br />
❑ Student ❑ 25-34 ❑ 35-49 ❑ Brand reputation<br />
❑ Office ❑ 50+ ❑ <strong>Marlin</strong> web site<br />
❑ Industrial ❑ <strong>Marlin</strong> advertisement<br />
❑ Professional Was this product a gift? ❑ <strong>Marlin</strong> catalog<br />
❑ Managerial ❑ Yes ❑ No
MFC<br />
P.O. Box 248<br />
North Haven, CT 06473-0903<br />
PLACE<br />
STAMP<br />
HERE<br />
LIMITED WARRANTY<br />
The <strong>Marlin</strong> <strong>Firearms</strong> Company<br />
FIVE YEAR LIMITED WARRANTY AGAINST<br />
DEFECTS IN MATERIAL & WORKMANSHIP<br />
This firearm warranty is good only to the ORIGINAL OWNER who has registered his ownership<br />
with The <strong>Marlin</strong> <strong>Firearms</strong> Company at 100 Kenna Drive, North Haven, Connecticut.<br />
WARRANTY and CERTIFICATE OF OWNERSHIP card must be completed and mailed<br />
to The <strong>Marlin</strong> <strong>Firearms</strong> Company at the above address WITHIN TEN (10) DAYS of<br />
purchase to insure the protection of the warranty. NOTICE of defect in materials<br />
and/or workmanship must be received by the company WITHIN FIVE (5) YEARS from<br />
the date of purchase.<br />
Normal wear, or damage resulting from neglect, abuse, alteration, or repairs not<br />
made or authorized by The <strong>Marlin</strong> <strong>Firearms</strong> Company or use of non-<strong>Marlin</strong> parts are<br />
not covered by the warranty.<br />
THIS WARRANTY GIVES YOU SPECIFIC LEGAL RIGHTS, AND YOU MAY ALSO HAVE<br />
OTHER RIGHTS WHICH VARY FROM STATE TO STATE.<br />
MARLIN'S PERFORMANCE UNDER<br />
THE ABOVE WARRANTY<br />
1. After notice of defect in material and/or workmanship is received by The <strong>Marlin</strong> <strong>Firearms</strong> Company, <strong>Marlin</strong> shall<br />
send instructions for shipment of the firearm; and repairs will be made and the firearm returned within a<br />
reasonable time after the firearm is received. Cost of shipping, insurance charges, etc. involved in returning the<br />
firearm to the company shall be prepaid by the original owner.<br />
2. Cost of parts and labor performed shall be provided without charge by The <strong>Marlin</strong> <strong>Firearms</strong> Company.<br />
3. If The <strong>Marlin</strong> <strong>Firearms</strong> Company, after receipt of the firearm, determines that the defects in material and/or<br />
workmanship were the result of abuse and/or neglect, or otherwise not covered by the warranty set forth<br />
above, <strong>Marlin</strong> shall notify such owner to that effect and give an estimate for repair. In such cases, repair, return<br />
shipping and insurance charges, etc. shall be paid by such owner.<br />
4. In the event that The <strong>Marlin</strong> <strong>Firearms</strong> Company is unable to make warranty repairs to the firearm, it shall, within<br />
a reasonable time after its receipt, notify the owner to that effect and give him the option either to receive a<br />
replacement of the same model, if then available in its inventory, or to receive a refund, either of which,<br />
if feasible, will be made through the store of purchase.<br />
The <strong>Marlin</strong> <strong>Firearms</strong> Company<br />
100 Kenna Drive, North Haven, CT 06473-0905<br />
www.marlinfirearms.com
Ammunition Note<br />
If your rifle is chambered for 44 Rem.<br />
Magnum, it is designed to handle 44 Rem.<br />
Magnum factory-loaded ammunition<br />
(except wad cutters and shot shells). It will<br />
also function with 44 Special cartridges<br />
that are within the length parameters<br />
shown below. (NOTE: Since 44 Special<br />
cartridges are shorter than 44 Rem.<br />
Magnums, their use can cause a lead<br />
buildup in the forward part of the chamber.<br />
Be sure to thoroughly clean the chamber<br />
with a wire brush after using 44 Specials.)<br />
Minimum overall cartridge length — 1.535"<br />
Maximum overall cartridge length — 1.610"<br />
If your rifle is chambered for 357 Magnum,<br />
it is designed to handle 357 Magnum factory-loaded<br />
ammunition (except wad cutters<br />
and shot shells). It will also function<br />
with 38 Special cartridges that are within<br />
the length parameters shown below.<br />
(NOTE: Since 38 Special cartridges are<br />
shorter than 357 Magnums, their use can<br />
cause a lead buildup in the forward part of<br />
the chamber. Be sure to thoroughly clean<br />
the chamber with a wire brush after using<br />
38 Specials.)<br />
Minimum overall cartridge length — 1.400"<br />
Maximum overall cartridge length — 1.590"<br />
If your rifle is chambered for 38 Special, it<br />
is designed to handle 38 Special factoryloaded<br />
ammunition (except wad cutters<br />
and shot shells). It will function with 38<br />
Special cartridges that are within the<br />
length parameters shown below.<br />
Minimum overall cartridge length — 1.275"<br />
Maximum overall cartridge length — 1.550"<br />
Before You Use This Firearm<br />
It is very important that you read and understand<br />
this manual before using your firearm.<br />
Warnings should be read and heeded carefully.<br />
Also follow “<strong>Marlin</strong>'s Guide to Gun<br />
Safety,” printed in this manual.<br />
•WARNING: <strong>Marlin</strong> firearms are designed<br />
and manufactured to handle standard<br />
factory-loaded ammunition which conforms<br />
to SAAMI (Sporting Arms and<br />
Ammunition Manufacturers’ Institute Inc.)<br />
standards with dependability and safety.<br />
Due to the many bullet and load options<br />
available, the element of judgement<br />
involved, the skill required, and the fact<br />
that serious injuries have resulted from<br />
dangerous handloads, <strong>Marlin</strong> does not<br />
make any recommendations with regard<br />
to handloaded ammunition.<br />
• WARNING: It is a violation of federal law<br />
to alter or deface the serial number of<br />
any firearm.<br />
Use of the Offset Hammer Spur<br />
(All models except the <strong>1894</strong> Cowboy Competition.)<br />
• WARNING: Only use the offset hammer<br />
spur on the gun with which it was<br />
packed. It will not fasten securely on<br />
narrower ( 1 ⁄4") <strong>Marlin</strong> or Glenfield hammers,<br />
or other hammers, and could<br />
cause a dangerous situation.<br />
Because of its solid top, side ejecting<br />
receiver, your rifle is ideally suited for use<br />
with a scope. The receiver is drilled and<br />
tapped for scope mounting. However,<br />
once mounted, most scope and mount<br />
combinations do not allow sufficient clearance<br />
for your thumb between the eyepiece<br />
and hammer for safe operation. In order to<br />
operate the hammer safely, we recommend<br />
that you use the offset hammer spur<br />
packed with your rifle, when using a<br />
scope. A 1 ⁄16" hexagonal wrench for attaching<br />
the spur is also included.<br />
For right hand use, position the offset<br />
hammer spur so that it protrudes from the<br />
right side of the hammer, slide the offset<br />
hammer spur as far forward on the hammer<br />
as it will go, and tighten the set screw.<br />
For left hand use, mount the offset hammer<br />
spur so that it protrudes from the left<br />
side of the hammer, and tighten the set<br />
screw. Be sure the set screw tightens into<br />
1
the small notch on either the right or left<br />
side of the hammer, and check regularly to<br />
be sure that it is tight.<br />
•WARNING: Do not use the rifle with a<br />
scope unless the offset hammer spur is<br />
securely attached in the proper position.<br />
Make periodic checks to be sure the set<br />
screw joining the offset hammer spur to<br />
the hammer is tight.<br />
Safety Features<br />
Your rifle has a two-piece firing pin and a<br />
trigger block, both of which prevent firing<br />
until the lever is completely closed. It is<br />
also equipped with two manual safety<br />
devices, a hammer block safety and a half<br />
cock safety notch, which, when used properly,<br />
provide an added degree of safety.<br />
•WARNING: Before loading your rifle,<br />
become familiar with the operation of the<br />
hammer block safety and the hammer<br />
positions (FULL FORWARD, HALF<br />
COCK and FULL COCK), by practicing<br />
with the rifle unloaded.<br />
•WARNING: Never disassemble the<br />
safety. It has been correctly designed,<br />
fitted and tested and is not reversible.<br />
Any mechanical device can fail, however,<br />
so never rely on the safety to justify careless<br />
handling. Never use a firearm with a<br />
safety that does not function properly.<br />
2<br />
1. How to Operate<br />
the Hammer Block Safety<br />
The Hammer Block Safety mechanism is a<br />
round button located at the rear of the receiver.<br />
To put your rifle on SAFE, first move the<br />
hammer to the Half Cock position (See D).<br />
NOTE: You can only move the safety button<br />
if the hammer is in the Half Cock or Full<br />
Cock position. It will not move if the hammer<br />
is in the Full Forward position, or if the hammer<br />
is resting on the safety in the SAFE<br />
position (slightly forward of Half Cock).<br />
Push the safety button from left to right as far<br />
as it will go (See A). The safety is now on<br />
SAFE and the word SAFE will appear<br />
around the right side of the button. The hammer<br />
should now be in the Half Cock position<br />
and the safety on SAFE. This is the safest<br />
way to carry your rifle when it is loaded. At all<br />
other times the action should be open.<br />
To move the safety button to the FIRE position,<br />
push it from right to left as far as it will<br />
A B<br />
SAFE Position FIRE Position<br />
go (See B). A red ring will appear around<br />
the left side of the button as a warning that<br />
it is in the FIRE position. If the hammer is<br />
pulled all the way back at this point, the rifle<br />
will be cocked and ready to fire.<br />
2. Full Cock and<br />
Half Cock Hammer Positions<br />
Exposed hammer lever actions have, for<br />
over a century, relied on manipulation of<br />
the hammer for both manual cocking of<br />
the rifle as well as the traditional Half Cock<br />
safety position. Your rifle has these traditional<br />
hammer positions as well as the<br />
added benefit of a hammer block safety<br />
button. Use the following hammer positions<br />
in conjunction with the hammer block<br />
safety for the safest possible operation.<br />
A.The Full Cock position of the hammer<br />
is when it is at its furthest point from<br />
the firing pin (See C). If the trigger is<br />
pulled when the hammer is in this position,<br />
and the safety button is in the FIRE<br />
position, the gun will fire.<br />
C D<br />
Full Cock Half Cock
NOTE: If the trigger is pulled when the hammer<br />
is in the Full Cock position, and the rifle<br />
is on SAFE, the hammer will fall, but will be<br />
stopped before it strikes the firing pin.<br />
B.The Half Cock position of the hammer<br />
is between the Full Cock position<br />
and the full forward position (See D).<br />
3. To Move the Hammer<br />
to the Half Cock Position<br />
First put the hammer block safety on<br />
SAFE. The hammer may be moved from<br />
Full Cock to the Half Cock position by firmly<br />
holding the hammer in the Full Cock<br />
position with your thumb. Keep your thumb<br />
on the hammer as you pull the trigger. As<br />
soon as you feel the hammer exerting forward<br />
pressure against your thumb, remove<br />
your finger from the trigger and ease the<br />
hammer slowly forward to the Half Cock<br />
position (See E & F). The hammer is now<br />
in the traditional Half Cock “Safe” position.<br />
Changing hammer position—<br />
E F<br />
Full Cock Half Cock<br />
To resume the Full Cock position, simply<br />
pull the hammer all the way to the rear<br />
(See C).<br />
• WARNING: Any mechanical device can<br />
fail, so never rely on the Half Cock position<br />
or the hammer block safety to justify<br />
careless handling.<br />
• WARNING: Never allow the hammer to<br />
rest on the firing pin (hammer in full forward<br />
position). If the rifle is loaded and<br />
the hammer is inadvertently struck in the<br />
full forward position, the rifle will fire.<br />
• WARNING: Should the hammer inadvertently<br />
be placed in the Full Forward position,<br />
open the bolt, put the hammer<br />
block safety on SAFE, and close the<br />
bolt. The hammer is now in the Full<br />
Cock position. Follow instructions in #3<br />
above to move the hammer to the Half<br />
Cock position.<br />
• WARNING: Become thoroughly familiar<br />
with the hammer positions before loading<br />
the rifle with ammunition. Failure to<br />
follow the instructions in #3 above, may<br />
result in “false half cock”, a condition<br />
that may allow the hammer to fall and<br />
fire the rifle if the hammer block safety<br />
button is in the FIRE position, and the<br />
trigger is pulled.<br />
How to Load<br />
•WARNING: Before loading or firing,<br />
always check the bore and chamber to be<br />
sure they are free of grease, oil, or any<br />
other obstruction. With the action open,<br />
and the hammer block safety button on<br />
SAFE, look through the barrel to see if<br />
there is an obstruction. If there is, it must<br />
be removed before firing. Otherwise, personal<br />
injury or damage could result.<br />
•WARNING: Never attempt to load your<br />
rifle with ammunition that does not meet<br />
the cartridge designation stamped on the<br />
barrel. Use only ammunition suitable for<br />
a tubular magazine rifle. We recommend<br />
clean, dry, factory-loaded ammunition<br />
which conforms to industry standards.<br />
• WARNING: Some pointed and full metal<br />
jacket round nose bullets are on the market<br />
which can chainfire other cartridges in<br />
a tubular magazine during recoil, causing<br />
severe injury and damage. If you are<br />
uncertain about the safety of using a particular<br />
cartridge in your <strong>Marlin</strong>, contact<br />
the ammunition or bullet manufacturer.<br />
• WARNING: Do not use aluminum-cased<br />
ammunition in this rifle, since it may<br />
cause malfunctions.<br />
3
•WARNING: Do not use Blazer brand<br />
ammunition in this rifle. The design is<br />
not compatible with the <strong>Marlin</strong> feeding<br />
system, and may result in live rounds<br />
inadvertently remaining in the magazine.<br />
Loading the Magazine<br />
Be sure the bolt is closed (lever closed), the<br />
hammer block safety button is on SAFE<br />
(See A), the hammer is in the Half Cock<br />
position (See D), and the rifle is pointed in a<br />
safe direction. Insert the cartridges, bullet<br />
end first, into the loading port. As the cartridge<br />
enters the loading port, push it forward<br />
into the magazine tube (See G). Be<br />
sure that the last cartridge is completely<br />
inside the loading port before preparing to<br />
fire, or a jammed action may result.<br />
4<br />
Loading the Magazine of the<br />
<strong>1894</strong>CB-32H&R only.<br />
• WARNING: Never add cartridges to a partially<br />
loaded tubular magazine. This rifle<br />
will not function properly unless the inner<br />
magazine tube is locked securely in place.<br />
Open the bolt by pushing the finger lever all<br />
the way down. Then, with the safety on<br />
SAFE, keeping your fingers away from the<br />
muzzle, and rifle pointed in a safe direction,<br />
turn your rifle upside down and unlock the<br />
inner magazine tube by turning the knurled<br />
Preparing to Fire<br />
With the rifle pointed in a safe direction,<br />
completely open and close the lever one<br />
time. When the hammer block safety button<br />
is moved to the FIRE position, your rifle is<br />
loaded, cocked, and ready to fire.<br />
• WARNING: If you do not want to fire at<br />
this point, return the hammer block safety<br />
Loading the magazine<br />
locking end plug (see G1). Pull the inner tube<br />
out until the loading port is open. Insert the<br />
cartridges, bullet end toward the muzzle (see<br />
G2). When you have loaded up to the magazine<br />
capacity, slide the inner tube back in<br />
place, turning it slightly to ease the passage<br />
G1<br />
Unlocking the tubular magazine<br />
G<br />
button to the SAFE position, and the hammer<br />
to the Half Cock position (See E & F).<br />
Loading a Single Cartridge<br />
With the hammer block safety button on<br />
SAFE, the rifle empty, and the lever open<br />
(bolt open), place a single cartridge with<br />
the bullet forward, in the ejection port, onto<br />
the carrier (See H).<br />
H<br />
Loading a single cartridge<br />
over the loaded rounds. DO NOT FORCE<br />
THE TUBE DOWN. Then rotate the knurled<br />
locking end plug to the locked position. The<br />
inner tube will not lock in place if the number<br />
of cartridges loaded exceeds the stated<br />
magazine capacity.<br />
Loading the tubular magazine<br />
G2
Return the lever to the closed position (bolt<br />
closed). The cartridge will be fed directly<br />
into the chamber and the rifle will be cocked<br />
and ready to fire, when the hammer block<br />
safety button is moved to the FIRE position.<br />
How to Fire<br />
With the hammer in the Full Cock position,<br />
push the hammer block safety button<br />
to the FIRE position and, with the gun<br />
pointed at the target, squeeze the trigger.<br />
The gun will fire. Work the lever fully<br />
open and closed for each repeat shot. If<br />
you do not fire all the cartridges in the<br />
magazine, be sure to put the hammer in<br />
the Half Cock position and the hammer<br />
block safety button on SAFE until you are<br />
ready to shoot again.<br />
•WARNING: Remember, until a visual<br />
check has been made, you must assume<br />
that a live round remains in the chamber.<br />
Whenever the action is closed, assume a<br />
live round is in the chamber.<br />
•WARNING: If your rifle comes with a<br />
ported barrel, the short barrel of this rifle<br />
increases the muzzle blast for you and<br />
those around you. In addition, the ports<br />
in the barrel redirect some gas flow<br />
upward and to the sides. Always wear<br />
ear and eye protection, and be sure<br />
those around you do the same.<br />
What to do if Rifle Fails to Fire<br />
Misfire<br />
If you have squeezed the trigger and the<br />
hammer falls but the cartridge does not<br />
fire, remain in shooting position, pointing<br />
the gun in a safe direction. Count to 10,<br />
then open the action.<br />
Underpowered Shot<br />
A “squib”, or underpowered shot can normally<br />
be detected by the unusually low<br />
report it makes.<br />
•WARNING: Because the bullet may<br />
actually still be in the barrel, you must<br />
unload completely and, with the action<br />
open, use a cleaning rod to see if there<br />
is an obstruction. If there is, it should be<br />
removed by a qualified gunsmith.<br />
Otherwise, personal injury or damage<br />
could result.<br />
How to Unload<br />
Put the hammer in the Half Cock position and<br />
the hammer block safety button on SAFE.<br />
Keeping your fingers away from the trigger,<br />
and with the gun pointed in a safe<br />
direction, manually eject all cartridges by<br />
opening and closing the lever, until you<br />
are sure the chamber and magazine are<br />
empty (See I).<br />
Unloading<br />
The lever must be completely closed and<br />
then fully opened to insure proper feeding<br />
and ejection of all cartridges. Then, with<br />
the lever in the open position (bolt to the<br />
rear), inspect the chamber, carrier and<br />
magazine carefully to be sure there are no<br />
cartridges left in the gun.<br />
•WARNING: During the unloading<br />
process, be sure the hammer block<br />
safety button is on SAFE, because each<br />
time the lever is completely closed (bolt<br />
closed), your rifle is cocked and ready to<br />
fire. Keep your fingers away from the trigger<br />
and be sure the gun is pointed in a<br />
safe direction during unloading.<br />
Sighting<br />
Your rifle has been sighted-in and testfired<br />
at the factory. However, due to individual<br />
shooting characteristics, sighting<br />
should be range verified.<br />
5<br />
I
Vertical Correction (Elevation)<br />
To raise the point of impact, raise the rear<br />
sight by moving the elevator to the rear.<br />
To lower the point of impact, lower the<br />
rear sight by moving the elevator forward.<br />
For Cowboy <strong>Model</strong>s equipped with an<br />
adjustable Marble semi-buckhorn rear sight,<br />
further vertical correction can be made by<br />
loosening the small screw on the rear sight<br />
and adjusting the height of the insert.<br />
Horizontal Correction (Windage)<br />
To move the point of impact to the left, tap<br />
the rear sight base to the left. To move the<br />
point of impact to the right, tap the rear<br />
sight base to the right.<br />
Scope Mounting<br />
All models, with the exception of the <strong>1894</strong><br />
Cowboy Competition, were drilled and<br />
tapped for scope mounts. They are made<br />
by Weaver, among others, and are<br />
available through your local gun<br />
dealer.You may also order directly from<br />
<strong>Marlin</strong> Gun Service. Call 1-800-544-8892<br />
for more information.<br />
• WARNING: Improper mounting or use of a<br />
scope may result in facial injury. Always<br />
allow sufficient space between the scope<br />
and eye to avoid contact from recoil. Be<br />
6<br />
sure to follow the scope manufacturer’s<br />
instructions for correct mounting and use.<br />
Periodically check the scope to ensure it<br />
has not moved during use.<br />
How to Clean Your Rifle<br />
• WARNING: Never attempt to wipe down<br />
or clean a loaded gun.<br />
Caution: Before using any solvent or other<br />
gun cleaning product, read the label carefully<br />
to be sure it will not damage either the<br />
finish, or any parts of this firearm.<br />
NOTE for stainless steel models:<br />
Although stainless steel is corrosion-resistant,<br />
it can rust. If the rifle gets wet, dirty,<br />
or is subject to excessive handling, wipe<br />
down metal parts with oil or rust-inhibitor.<br />
Minor scratches can be “buffed out” of<br />
stainless steel with a “Scotch-Brite TM<br />
Very Fine” pad, available in hardware<br />
and automotive supply stores.<br />
1. Put the hammer block safety button on<br />
SAFE and remove all cartridges from the<br />
action, chamber and magazine before you<br />
begin cleaning or inspecting your rifle.<br />
2. To clean the bore from the breech end<br />
(recommended), open the lever half way,<br />
remove the lever screw (See J) and then<br />
the lever. Then remove the breech bolt<br />
from the receiver (See K). (This will<br />
cause the ejector to be loose inside the<br />
receiver — be careful not to lose it.) Next,<br />
remove the ejector from the slot in the left<br />
side of the receiver (See L).<br />
•WARNING: If you move the hammer<br />
block safety to the FIRE position after<br />
the bolt has been removed, do not pull<br />
the trigger, letting the hammer snap forward,<br />
because the hammer blow will<br />
damage the safety mechanism.<br />
The bore can now be cleaned, using the<br />
proper caliber cleaning rod, cleaning<br />
Removing lever screw<br />
Removing breech bolt<br />
J<br />
K
patches and powder solvent. Clean and oil<br />
the breech bolt before replacing. The barrel<br />
and bore should also be lightly oiled.<br />
3. The action may be cleaned and oiled<br />
while the gun is in the state of disassembly<br />
described above.<br />
4. To reassemble: Reverse the above<br />
steps. Make sure the ejector is positioned<br />
properly prior to alignment and insertion of<br />
the breech bolt. See M for the relationship<br />
of the bolt and ejector for correct alignment.<br />
Push the breech bolt into the receiver<br />
until within approximately 1" of the fully<br />
L<br />
Removing ejector<br />
M<br />
Correct bolt and ejector alignment<br />
closed position (See N). The lever may<br />
now be inserted as shown in O.<br />
Use a thin coat of light oil during below<br />
freezing conditions. Condensation droplets<br />
will form soon after the rifle is brought into a<br />
warm room, or the rifle may become wet<br />
during inclement weather. In any case, all<br />
moisture should be removed. Exterior metal<br />
finishes may be wiped down with a slightly<br />
oiled cloth. For long term storage, lightly oil<br />
the bore, barrel and action with gun oil. Your<br />
rifle should be completely unloaded and<br />
stored in a dry, ventilated area. Do not store<br />
it in a carrying case.<br />
N<br />
Replacing breech bolt (*Keep this screw tight)<br />
O<br />
Replacing lever<br />
Repair Instructions<br />
Your firearm has been designed, engineered<br />
and manufactured in accordance<br />
with <strong>Marlin</strong>'s rigid quality control standards.<br />
However, any mechanical device may occasionally<br />
require adjustment or repair.<br />
Questions regarding the performance and<br />
serviceability of your firearm should be<br />
addressed to <strong>Marlin</strong> Gun Service. You<br />
should include the Serial Number, <strong>Model</strong><br />
Number and a full description of the conditions<br />
and problems involved.<br />
Warranty Repairs<br />
Our Warranty policy covers all our firearms<br />
against defects in workmanship or material<br />
for a period of five years from the date of purchase<br />
to the original owner. See the inside<br />
front cover of this manual for warranty details.<br />
Guns requiring warranty repairs should be<br />
returned to the factory. Be sure to follow<br />
the “Shipping and Handling” instructions<br />
on the following page.<br />
7
Non-Warranty Repairs<br />
Your local gunsmith may be able to repair<br />
your gun. If not, ship it to the factory, following<br />
the “Shipping and Handling” instructions on<br />
this page.<br />
After receiving your firearm, we will send<br />
you an estimate of the repair cost. Repairs<br />
will begin upon receipt of your check or<br />
money order. If repairs are not possible,<br />
your gun will be returned.<br />
Shipping and Handling<br />
When sending your firearm to the factory<br />
please follow these instructions:<br />
1. Prior to mailing, be absolutely certain<br />
that the firearm is completely unloaded<br />
(See “How to Unload” on page 5).<br />
2. Pack your gun carefully. Use ample<br />
cushioning material and a sturdy outer<br />
cardboard box. Do not ship in a special<br />
container which you want returned.<br />
3. Accessories such as scopes, scope<br />
mounts, gun case, quick detach type<br />
swivels, sling straps, etc. should be<br />
removed prior to returning the firearm.<br />
8<br />
4. Inside the box, include the following<br />
information: model number, serial number,<br />
description of damage or problem,<br />
and under what conditions problem occurs.<br />
5. Keep a record of your serial number<br />
when returning a firearm.<br />
6. Clearly mark your return address on<br />
the outside of the box and on your<br />
instruction sheet.<br />
7. Do not ship live ammunition under any<br />
circumstances.<br />
8. Ship your firearm via insured Parcel<br />
Post or U.P.S. Shipment must be prepaid<br />
and addressed to:<br />
MFC INC.<br />
ATTN: SERVICE DEPT.<br />
100 KENNA DRIVE<br />
NORTH HAVEN, CONN. 06473<br />
IMPORTANT<br />
If you have any questions or problems<br />
relating to your new <strong>Marlin</strong>, would like<br />
additional information on safe operation,<br />
or wish to order parts or accessories, just<br />
call our Customer Service Center. A<br />
Service Representative can be reached at<br />
the number listed below, between 8 A.M.<br />
and 4:30 P.M. (Eastern Time), Monday<br />
through Friday.<br />
1-800-544-8892<br />
(Toll Free)<br />
Please record the firearm serial number, date<br />
of purchase and where purchased below.<br />
Serial #: _ _ _ _ _ _ _ _ _ _ _ _ _ _ _ _ _ _ _ _ _ _ _ _ _ _ _ _ _ _ _ _ _ _ _ _ _<br />
Date of Purchase: _ _ _ _ _ _ _ _ _ _ _ _ _ _ _ _ _ _ _ _ _ _ _ _ _ _<br />
Purchased From: _ _ _ _ _ _ _ _ _ _ _ _ _ _ _ _ _ _ _ _ _<br />
_ _ _ _ _ _ _ _ _ _ _ _ _ _ _ _ _ _ _ _ _ _ _ _ _ _ _ _ _ _ _ _ _ _ _ _<br />
In case of loss or theft, supply this<br />
information to the proper authorities.
The Fascinating History of <strong>Marlin</strong><br />
Written by the late William S. Brophy, <strong>Marlin</strong>’s Senior Technical Manager and<br />
Official Company Historian for many years, this prodigious book details the<br />
history of the <strong>Marlin</strong> <strong>Firearms</strong> Co. and its products. The hardbound<br />
volume contains more than 600 pages and over 1000<br />
illustrations. Must reading for anyone interested in all the<br />
models — pistols, rifles and shotguns — made by <strong>Marlin</strong>,<br />
and in the story of more than a century of firearms<br />
production in America.<br />
For more information, write:<br />
<strong>Marlin</strong> <strong>Firearms</strong> Co.<br />
Department OM<br />
100 Kenna Drive<br />
North Haven, CT 06473<br />
Or Call: 1-800-544-8829<br />
9
<strong>Marlin</strong>'s Guide to Gun Safety<br />
1. Handle every gun as you would a cocked and loaded gun.<br />
2. Keep the safety on SAFE until you are ready to shoot.<br />
3. Be sure of your target before you shoot.<br />
4. Before target shooting, be sure you have an adequate backstop. Remember,<br />
all rifle ammunition is dangerous at ranges up to, and in excess of a mile.<br />
5. Control the muzzle, and never point a gun at anything you don’t want to shoot.<br />
6. Always wear protective glasses when shooting, disassembling or cleaning firearms.<br />
7. Wear hearing protectors when target shooting.<br />
8. Do not use modified, damaged or dirty ammunition.<br />
9. Use only ammunition of the correct caliber, size and bullet shape.<br />
10. Cartridges that have been improperly handloaded can damage the gun and<br />
cause personal injury.<br />
11. Avoid ricochets by never shooting at water, or any hard, flat surface.<br />
12. Be sure no one is in path of ejecting shells.<br />
13. Never climb or jump over a fence or other obstacle with a loaded gun.<br />
14. Never climb into or out of a tree, or tree stand with a loaded firearm.<br />
15. Never pull a gun toward you by the muzzle.<br />
16. Avoid alcoholic beverages before and during shooting.<br />
17. Never use a gun that fails to function properly. Do not try to force a jammed action.<br />
18. Be sure to keep the barrel and mechanism free of obstructions.<br />
19. Before cleaning, be sure the chamber, action and magazine are completely<br />
unloaded.<br />
20. Always unload a gun before storing, transporting, or leaving unattended.<br />
21. Never enter a motor vehicle with a loaded gun.<br />
22. Store guns and ammunition separately, locked and beyond the reach of children.<br />
23. Always carry your firearm empty with the action open, except when you intend to shoot.<br />
24. Avoid bumping, dropping or jarring any firearm. Bumping, dropping or jarring has<br />
resulted in certain firearms discharging accidentally under some circumstances.<br />
25. Consult owner’s manual before using any firearm.<br />
26. Never interchange parts between firearms, except where indicated as a safe practice.<br />
27. If your firearm is equipped with a sling, bipod or other accessories, be sure to check<br />
their condition before using. Always follow accessory manufacturer’s instructions.<br />
Failure to follow these rules, or other instructions in this manual,<br />
can result in personal injury.<br />
WARNING<br />
Children are attracted to and can operate firearms<br />
that can cause severe injuries or death.<br />
Prevent child access by always keeping guns locked<br />
away and unloaded when not in use. If you keep a loaded<br />
firearm where a child obtains and improperly uses it, you<br />
may be fined or sent to prison.<br />
ADVERTENCIA<br />
A los niños los atraen las armas de fuego y las pueden<br />
hacer funcionar. Ellos pueden causarses lesiones graves<br />
y la muerte.<br />
Evite que los niños tengan acceso a las armas de fuego<br />
guardándolas siempre con llave y descargadas cuando no<br />
las esté utilizando. Si usted tiene un arma de fuego cargada<br />
en un lugar en que un niño tiene acceso a ella y la usa indebidamente,<br />
le pueden dar una multa o enviarlo a la carcel.<br />
Health Warning: Discharging of firearms in poorly ventilated areas<br />
and handling ammunition may cause exposure to lead and/or lead<br />
compounds. Exposure may cause cancer, birth defects or damage<br />
to the kidney, nervous, blood forming and reproductive systems.<br />
Have adequate ventilation at all times, especially in confined areas.<br />
Wash hands thoroughly after shooting, handling ammunition, or<br />
cleaning a firearm. Do not eat or smoke during these activities.<br />
Safety Warning: <strong>Marlin</strong> strongly recommends that you take a hunter<br />
safety course, taught by a certified instructor, before you use this<br />
firearm. Your State Fish & Game Dept. or a local gun shop can suggest<br />
courses in your area.<br />
Safety Warning: Keep this firearm out of the reach of children,<br />
unauthorized individuals, and others unfamiliar with the safe handling<br />
of firearms.<br />
Printed in U.S.A. 11/05 493002
<strong>CENTERFIRE</strong><br />
<strong>Lever</strong> <strong>Action</strong> <strong>Rifles</strong><br />
<strong>Model</strong> <strong>1894</strong><br />
5<br />
***4<br />
ILL. NO. PART NAME<br />
***3<br />
**1 . . . . . . Barrel<br />
**2 . . . . . . Breech Bolt<br />
***3 . . . . . . Bullseye<br />
***4 . . . . . . Buttplate/Buttpad<br />
5 . . . . . . Buttplate/Buttpad Screw (2)<br />
***6 . . . . . . Buttstock<br />
*7 . . . . . . Carrier Assembly<br />
8 . . . . . . Carrier Screw<br />
9 . . . . . . Ejector w/Spring<br />
10 . . . . . . Ejector Spring<br />
***11 . . . . . . Extractor<br />
12 . . . . . . Extractor Retaining Pin<br />
13 . . . . . . Extractor Spring<br />
***14 . . . . . . Extractor w/Spring<br />
*15 . . . . . . Finger <strong>Lever</strong><br />
***16 . . . . . . Finger <strong>Lever</strong> Plunger<br />
17 . . . . . . Finger <strong>Lever</strong> Plunger Pin<br />
18 . . . . . . Finger <strong>Lever</strong> Plunger Spring<br />
19 . . . . . . Finger <strong>Lever</strong> Screw<br />
20 . . . . . . Firing Pin, Front<br />
21 . . . . . . Firing Pin, Rear<br />
22 . . . . . . Firing Pin Retaining Pin (2)<br />
23 . . . . . . Firing Pin Spring<br />
24 . . . . . . Forearm<br />
25 . . . . . . Forearm Tip<br />
26 . . . . . . Forearm Tip Tenon<br />
23<br />
21<br />
***6<br />
66<br />
20<br />
38<br />
22<br />
67<br />
40<br />
41<br />
39<br />
37<br />
***11<br />
12<br />
13<br />
**2<br />
***16<br />
**62 **63<br />
42<br />
**35<br />
43<br />
74<br />
76<br />
***14<br />
64<br />
18<br />
*46<br />
75<br />
45<br />
73<br />
71<br />
17<br />
PARTS LIST <strong>CENTERFIRE</strong> LEVER ACTION RIFLES<br />
For parts prices, call 1-800-544-8892 (8 A.M. to 4:30 P.M., Eastern Time, Weekdays)<br />
Be sure to mention gun serial number when ordering parts<br />
27 . . . . . . Forearm Tip Tenon Screw (2)<br />
28 . . . . . . Front Band<br />
29 . . . . . . Front Band Screw<br />
30 . . . . . . Front Sight<br />
31 . . . . . . Front Sight Base<br />
32 . . . . . . Front Sight Base Screw (2)<br />
33 . . . . . . Front Sight Hood<br />
34 . . . . . . Front Sight Insert<br />
**35 . . . . . . Hammer<br />
36 . . . . . . Hammer Screw<br />
37 . . . . . . Hammer Spring (Mainspring)<br />
38 . . . . . . Hammer Spring Plate<br />
39 . . . . . . Hammer Spur Complete<br />
(Includes parts 40 and 41)<br />
40 . . . . . . Hammer Spur Screw<br />
41 . . . . . . Hammer Spur Wrench<br />
42 . . . . . . Hammer Strut<br />
43 . . . . . . Hammer Strut Pin<br />
44 . . . . . . Loading Spring<br />
45 . . . . . . Loading Spring Screw<br />
*46 . . . . . . Locking Bolt<br />
47 . . . . . . Magazine Tube<br />
48 . . . . . . Magazine Tube Band<br />
49 . . . . . . Magazine Tube Band Pin<br />
50 . . . . . . Magazine Tube Assembly<br />
51 . . . . . . Magazine Tube Follower<br />
36<br />
*68<br />
60<br />
8<br />
44<br />
10<br />
9<br />
*65<br />
*15<br />
19<br />
*7<br />
**70<br />
72<br />
69<br />
58<br />
61<br />
60<br />
51<br />
* Restricted availability—Part sent to qualified gunsmith only.<br />
** Restricted availability—Parts installed at factory only.<br />
*** Non-restricted availability—Part may require some final fitting<br />
sanding or filing.<br />
ILL. NO. PART NAME ILL. NO. PART NAME<br />
58<br />
59<br />
54<br />
**1<br />
47<br />
24<br />
30<br />
27<br />
47<br />
50<br />
31<br />
34<br />
26<br />
32<br />
52 . . . . . . Magazine Tube Plug<br />
53 . . . . . . Magazine Tube Plug Screw<br />
54 . . . . . . Magazine Tube Spring<br />
55 . . . . . . Magazine Tube Stud<br />
56 . . . . . . Rear Band<br />
57 . . . . . . Rear Band Screw<br />
58 . . . . . . Rear Sight Assembly<br />
59 . . . . . . Rear Sight Base<br />
60 . . . . . . Rear Sight Elevator<br />
61 . . . . . . Rear Sight Folding Leaf<br />
**62 . . . . . . Receiver<br />
**63 . . . . . . Safety Button Assembly<br />
64 . . . . . . Scope Mount Dummy Screw (4)<br />
*65 . . . . . . Sear<br />
66 . . . . . . Swivel Stud, Rear<br />
67 . . . . . . Tang Screw<br />
*68 . . . . . . Trigger<br />
69 . . . . . . Trigger and Sear Pin<br />
**70 . . . . . . Trigger Guard Plate<br />
71 . . . . . . Trigger Guard Plate Latch Pin<br />
72 . . . . . . Trigger Guard Plate Screw<br />
73 . . . . . . Trigger Guard Plate Support Screw<br />
74 . . . . . . Trigger Safety Block<br />
75 . . . . . . Trigger Safety Block Pin<br />
76 . . . . . . Trigger Safety Block Spring<br />
77 . . . . . . 10 Shot Plug<br />
11/05 493003<br />
25<br />
56<br />
27<br />
48<br />
55<br />
52<br />
53<br />
49<br />
57<br />
33<br />
29<br />
28<br />
77
ILL. <strong>1894</strong> <strong>1894</strong>FG <strong>1894</strong>SS <strong>1894</strong>C <strong>1894</strong>CL <strong>1894</strong>CBC (38) <strong>1894</strong>CBC (45) <strong>1894</strong>CB (45) <strong>1894</strong>CB (357) <strong>1894</strong>CB (44) <strong>1894</strong>CB (32H&R)<br />
NO. PART NAME Part No. Part No. Part No. Part No. Part No. Part No. Part No. Part No. Part No. Part No. Part No.<br />
**1 Barrel 114001 114037 114045 114000 114053 114024 114029 114003 114036 114035 114046<br />
**2 Breech Bolt 114486 114586 114021 114386 114043 114386 114272 114272 114386 114486 114300<br />
***3 Bullseye 320101 320101 320101 320101 320101 320101 320101 320101 320101 320101 320101<br />
***4 Buttplate/Buttpad 417002 417002 417002 417002 320402 320402 320402 320402 320402 320402 320402<br />
5 Buttplate/Buttpad Screw (2) 420590 420590 420590 420590 420590 420590 420590 420590 420590 420590 420590<br />
***6 Buttstock 514013 501214 514013 514013 514113 514314 514314 514113 514314 514113 514314<br />
*7 Carrier Assembly 514461 514461 514022 514561 514025 514562 514462 514461 514561 514461 514567<br />
8 Carrier Screw 301190 301190 301001 301190 301190 301190 301190 301190 301190 301190 301190<br />
9 Ejector w/Spring 501168 501168 501028 501168 501168 501100 501100 501168 501168 501168 501101<br />
10 Ejector Spring 401294 401294 401294 401294 401294 401294 401294 401294 401294 401294 201101<br />
***11 Extractor 214569 214569 214469 214569 214569 214569 214569 214569 214569 214569 214569<br />
12 Extractor Retaining Pin 420598 420598 420598 420598 420598 420598 420598 420598 420598 420598 420598<br />
13 Extractor Spring 314695 314695 314695 314695 314695 314695 314695 314695 314695 314695 314695<br />
***14 Extractor w/Spring 514569 514569 514669 514569 514569 514569 514569 514569 514569 514569 514569<br />
*15 Finger <strong>Lever</strong> 514170 514016 514270 514170 514170 514171 514171 514170 514170 514170 514170<br />
***16 Finger <strong>Lever</strong> Plunger 214071 214071 214071 214071 214071 201071 201014 214071 214071 214071 214071<br />
17 Finger <strong>Lever</strong> Plunger Pin 301197 301197 301009 301197 301197 301197 301197 301197 301197 301197 301197<br />
18 Finger <strong>Lever</strong> Plunger Spring 401696 401696 401696 401696 401696 401696 401696 401696 401696 401696 401696<br />
19 Finger <strong>Lever</strong> Screw 301192 301192 301002 301192 301192 301192 301192 301192 301192 301192 301192<br />
20 Firing Pin, Front 414299 414299 414299 414299 414299 414299 414299 414299 414299 414299 414299<br />
21 Firing Pin, Rear 401199 401199 401012 401199 401199 401199 401199 401199 401199 401199 401199<br />
22 Firing Pin Retaining Pin (2) 420299 420299 401016 420299 420299 420299 420299 420299 420299 420299 420299<br />
23 Firing Pin Spring 401295 401295 401295 401295 401295 401295 401295 401295 401295 401295 401295<br />
24 Forearm 101127 101127 101127 114827 114527 114628 114628 114628 114628 114528 114628<br />
25 Forearm Tip 501328 501328 514528 N/A 201128 214128 214128 214128 214128 214128 214128<br />
26 Forearm Tip Tenon 220429 220429 220429 N/A 220429 220429 220429 220429 220429 220429 220429<br />
27 Forearm Tip Tenon Screw (2) 320191 320191 101067 N/A 320191 320191 320191 320191 320191 320191 320191<br />
28 Front Band 301233 301233 301010 314133 N/A N/A N/A N/A N/A N/A 220100<br />
29 Front Band Screw 301291 301291 301011 314190 N/A N/A N/A N/A N/A N/A N/A<br />
30 Front Sight N/A N/A N/A N/A 414144 414144 414144 414144 414144 414144 414144<br />
31 Front Sight Base 221239 221239 221239 221239 N/A N/A N/A N/A N/A N/A N/A<br />
32 Front Sight Base Screw (2) 320991 320991 320991 320991 N/A N/A N/A N/A N/A N/A N/A<br />
33 Front Sight Hood 320245 320245 320245 320245 N/A N/A N/A N/A N/A N/A N/A<br />
34 Front Sight Insert 230744 230744 230744 216344 N/A N/A N/A N/A N/A N/A N/A<br />
**35 Hammer 101273 101273 101038 101273 101273 101200 101200 101273 101273 101273 101273<br />
36 Hammer Screw 301090 301090 301000 301090 301090 301090 301090 301090 301090 301090 301090<br />
37 Hammer Spring (Mainspring) 420294 420294 420294 420294 420294 420009 420009 420294 420294 420294 420294<br />
38 Hammer Spring Plate 320175 320175 320175 320175 320175 320175 320175 320175 320175 320175 320175<br />
39 Hammer Spur Complete 520377 520377 520377 520377 520377 N/A N/A 520377 520377 520377 520377<br />
(Includes parts 40 and 41)<br />
40 Hammer Spur Screw 420193 420193 420193 420193 420193 N/A N/A 420193 420193 420193 420193<br />
41 Hammer Spur Wrench 420204 420204 420204 420204 420204 N/A N/A 420204 420204 420204 420204<br />
42 Hammer Strut 320174 320174 320174 320174 320174 320174 320174 320174 320174 320174 320174<br />
43 Hammer Strut Pin 401397 401397 401397 401397 401397 401397 401397 401397 401397 401397 401397<br />
44 Loading Spring 114594 114594 114694 114594 114594 114594 114594 114594 114594 114594 N/A<br />
45 Loading Spring Screw 301591 301591 301006 301591 301591 301591 301591 301591 301591 301591 N/A<br />
*46 Locking Bolt 114181 114181 114181 114181 114181 114025 114181 114181 114181 114181 114181<br />
47 Magazine Tube 201022 201022 201002 214525 214022 214600 214625 214722 214600 214625 214602<br />
48 Magazine Tube Band N/A N/A N/A N/A N/A N/A N/A N/A N/A N/A 220100<br />
49 Magazine Tube Band Pin N/A N/A N/A N/A N/A N/A N/A N/A N/A N/A 420600<br />
50 Magazine Tube Assembly N/A N/A N/A N/A N/A N/A N/A N/A N/A N/A 514600<br />
51 Magazine Tube Follower 501045 501045 501045 514124 514124 514124 401424 501045 514124 501045 414520<br />
52 Magazine Tube Plug 301225 301225 301004 314325 314025 314025 301425 301425 314025 301425 320100<br />
53 Magazine Tube Plug Screw 301990 301990 301013 214490 301193 301193 301193 301193 301193 301193 N/A<br />
54 Magazine Tube Spring 401395 401395 401395 414295 414595 414595 401395 401395 414595 401395 414595<br />
55 Magazine Tube Stud N/A N/A N/A N/A 214425 214425 201125 201125 214425 201125 N/A<br />
56 Rear Band N/A N/A N/A 501521 N/A N/A N/A N/A N/A N/A N/A<br />
57 Rear Band Screw N/A N/A N/A 301590 N/A N/A N/A N/A N/A N/A N/A<br />
58 Rear Sight Assembly 501342 501342 501342 501342 414000 414000 414000 414242 414000 414000 414000<br />
59 Rear Sight Base 520241 520241 520241 520241 N/A N/A N/A N/A N/A N/A N/A<br />
60 Rear Sight Elevator 320642 320241 320242 230142 N/A 714342 714342 714342 714342 714342 714342<br />
61 Rear Sight Folding Leaf 201342 201342 214142 201342 N/A N/A N/A N/A N/A N/A N/A<br />
**62 Receiver 114460 114460 114862 114360 114360 114500 114031 114760 114564 114760 114563<br />
**63 Safety Button Assembly 599383 599383 599383 599383 599383 599383 599383 599383 599383 599383 599383<br />
64 Scope Mount Dummy Screw (4) 320493 320493 320003 320493 320493 N/A N/A 320493 320493 320493 320493<br />
*65 Sear 201051 201051 201051 201051 201051 201051 201051 201051 201051 201051 201051<br />
66 Swivel Stud, Rear 420793 420793 420002 420793 N/A N/A N/A N/A N/A N/A N/A<br />
67 Tang Screw 314191 320391 320002 320391 320391 320391 320391 320391 320391 320391 320391<br />
*68 Trigger 301643 301643 301743 301643 301643 301643 301643 301643 301643 301643 301643<br />
69 Trigger and Sear Pin 401097 401097 401097 401097 401097 401097 401097 401097 401097 401097 401097<br />
**70 Trigger Guard Plate 514158 514020 514358 514158 514158 514158 514158 514158 514158 514158 514158<br />
71 Trigger Guard Plate Latch Pin 401099 401099 401008 401099 401099 401099 401099 401099 401099 401099 401099<br />
72 Trigger Guard Plate Screw 301790 301790 301007 301790 301790 301790 301790 301790 301790 301790 301790<br />
73 Trigger Guard Plate Support Screw 301490 301490 301005 301490 301490 301490 301490 301490 301490 301490 301490<br />
74 Trigger Safety Block 301859 301859 301008 301859 301859 301859 301859 301859 301859 301859 301859<br />
75 Trigger Safety Block Pin 420397 420397 420397 420397 420397 420397 420397 420397 420397 420397 420397<br />
76 Trigger Safety Block Spring 401596 401596 401596 401596 401596 401596 401596 401596 401596 401596 401596<br />
77 10 Shot Plug N/A N/A N/A N/A N/A 414900 N/A 414824 414901 N/A N/A<br />
11/05 493003