BROKEN VANE REPLACEMENT PROCEDURE
BROKEN VANE REPLACEMENT PROCEDURE
BROKEN VANE REPLACEMENT PROCEDURE

You also want an ePaper? Increase the reach of your titles
YUMPU automatically turns print PDFs into web optimized ePapers that Google loves.
<strong>BROKEN</strong> <strong>VANE</strong> <strong>REPLACEMENT</strong><br />
VT SERIES<br />
VT 3.10 UP TO VT 3.40<br />
VT 4.10 UP TO VT 4.40<br />
VT – VACUUM PUMP<br />
DT – PRESSURE BLOWER
Vacuum Pumps Compressors<br />
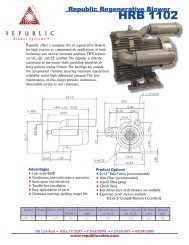
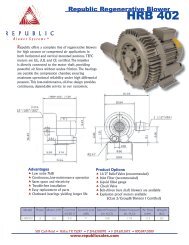
Becker Vacuum Pumps are leaders in their field in dependability and design. The nature of an<br />
oil-free, carbon vane, rotary sliding vane vacuum pump is that the vanes do wear out eventually.<br />
The Becker VT series vacuum pump requires a minimum amount of preventative maintenance<br />
to ensure optimum vane life and volumetric performance. Please do not over maintain this<br />
pump. Maintenance after the initial 500 hour break-in period should be limited to once every 6<br />
months, inspect the vane width.<br />
To remove the risk of broken vanes you may wish to replace them at the minimum width (see<br />
chart). In the event the vanes have chipped severely or broken, it is important to remove all of<br />
the broken pieces to ensure they do not re-enter the pump and break or chip the new set just<br />
installed.<br />
PUMP MODEL <strong>VANE</strong> WIDTH (mm)<br />
NEW MINIMUM<br />
VT 3.10 27.0 21.0<br />
VT 3.16 35.5 27.0<br />
VT 3.25 43.0 34.0<br />
VT 3.40 BECKER globa globally lly 43.0 34.0<br />
BECKER globally Canadian Master Distributor<br />
certified warranty Original MANN FILTER<br />
repair and service. Replacement Cartridges<br />
email: info@remequip.com
<strong>BROKEN</strong> <strong>VANE</strong> <strong>REPLACEMENT</strong> <strong>PROCEDURE</strong><br />
NOTE: Broken vanes will be easily visible during the inspection of both the inlet filter and<br />
exhaust housing. The inlet filter will have a heavy coating of dust on the inside and there will be<br />
broken pieces inside the exhaust housing.<br />
Becker T series pumps<br />
1. Remove the plastic pump cover (A) and the filter housing (B) from the pump.<br />
B<br />
2. Remove inlet filter (c) and any other filters inside the housing and discard. Do not re-use<br />
these filters<br />
3. Remove the endshield (D) to gain access to the pump housing.<br />
D<br />
A<br />
C
4. Remove the broken vanes from the housing (E) and rotor vane slots (F). Remove the<br />
pump housing (G) from the back endshield.<br />
E<br />
F<br />
5. Using compressed air, blow out the filter housing and pump housing while there are<br />
removed from the pump. Blow out the rotor vane slots (H) and the space between the<br />
rotor and back endshield (I). Be sure to spin the rotor. Use a flashlight to check for<br />
broken pieces.<br />
Care should be taken during this step to remove all broken pieces. This will prevent any<br />
particles from working their way back into the pump and breaking a new set of vanes.<br />
6. Bolt the pump housing back on to the pump.<br />
H<br />
I<br />
G
Note: At this point the distance between the rotor and pump housing must be reset (J).<br />
The proper size feeler gauge must be inserted between rotor and housing at top dead<br />
center before tightening down the pump body.<br />
The following chart has the clearance measurements for the various T pumps.<br />
Pump Type Rotor to Housing Clearance<br />
DT, VT, T 3.10/4.10 0.03 – 0.04 mm<br />
DT, VT, T 3.16/4.16 0.03 – 0.05 mm<br />
DT, VT, T 3.25/4.25 0.04 – 0.06 mm<br />
ST, VT, T 3.41/4.40 0.05 – 0.07 mm<br />
Make sure the rotor spins freely. If the rotor makes contact with the housing, reset the<br />
clearance from that high spot on the rotor.<br />
7. Install new vanes. Check to be sure high point in the tapered edge, points in the<br />
direction of rotation. Ensure vanes fit freely into vane slots. Reinstall endshield. Install<br />
NEW filters and bolt filter housing back onto pump. Start pump and check rotation.<br />
The parts required to undertake the replace of the vanes in the T series pumps are in the<br />
attached list.<br />
J
Vane Replacement Parts List<br />
Becker T 4.16 DSK<br />
Vanes (7 Pc) 901347<br />
Mann & Hummel Filters 1 only C 64/3<br />
1 only C 75/2<br />
1 only C 44<br />
Becker T 4.25 DSK<br />
Vanes (7 Pc) 901349<br />
Mann & Hummel Filters 1 only C 75/2<br />
1 only C 44<br />
1 only C 78/6<br />
Becker T 4.40 DSK<br />
Vanes (7 Pc) 901352<br />
Mann & Hummel Filters 1 only C 75/2<br />
1 only C 44<br />
1 only C 78/6<br />
Becker DT 4.10<br />
Vanes (7 Pc) 901327<br />
Mann & Hummel Filter 1 only C 44<br />
Becker DT 4.16<br />
Vanes (7 Pc) 901347<br />
Mann & Hummel Filter 1 only C 64/3<br />
Becker DT 4.25 K<br />
Vanes (7 Pc) 901349<br />
Mann & Hummel Filters 1 only C 44<br />
1 only C 75/2<br />
1 only C 78/6<br />
Becker DT 4.40 K<br />
Vanes (7 Pc) 901352<br />
Mann & Hummel Filters 1 only C 75/2<br />
1 only C 44<br />
1 only C 78/6<br />
Becker VT 4.10<br />
Vanes (7 Pc) 901327<br />
Mann & Hummel Filter 1 only C 44<br />
Becker VT 4.16<br />
Vanes (7 Pc) 901347<br />
Mann & Hummel Filter 1 only C 64/3<br />
Becker VT 4.25<br />
Vanes (7 Pc) 901349<br />
Mann & Hummel Filter 1 only C 75/2<br />
Becker VT 4.40<br />
Vanes (7 Pc) 901352<br />
Mann & Hummel Filters 2 only C 75/2