Raingutter Regatta Tips and Tricks - Caswell District BSA
Raingutter Regatta Tips and Tricks - Caswell District BSA
Raingutter Regatta Tips and Tricks - Caswell District BSA

Create successful ePaper yourself
Turn your PDF publications into a flip-book with our unique Google optimized e-Paper software.
General information on Speed <strong>and</strong> Boat Design<br />
<strong>Raingutter</strong> <strong>Regatta</strong> <strong>Tips</strong> <strong>and</strong><br />
<strong>Tricks</strong><br />
There are many tips <strong>and</strong> tricks on how to build a fast<br />
raingutter regatta. Here are just a few to ensure you<br />
have a fun <strong>and</strong> fast race!<br />
Most <strong>Raingutter</strong> <strong>Regatta</strong> boat builders design their boats to plow THROUGH the<br />
water. The fastest boats described in this booklet move ON TOP of the water covering<br />
ten feet in a couple of seconds.<br />
A boat that pushes water apart as it passes is said to "displace" water. It is a<br />
displacement boat" or a hydroplow. It takes much energy to move the water, creating<br />
waves in its wake. Such a boat cannot move faster than a water wave. This speed limit is<br />
called "hull speed". To reach hull speed, a hydroplow must not wobble in the water. It<br />
must be very stable.<br />
One type of boat uses two pontoons to help make it very stable. It is called a<br />
catamaran. When forced to travel faster than waves, some boats rise to the surface. Many<br />
of these boats slap back down into the water. But a properly designed hull can rise up <strong>and</strong><br />
hydroplane along the surface. Hydroplane boats hold all the speed records!<br />
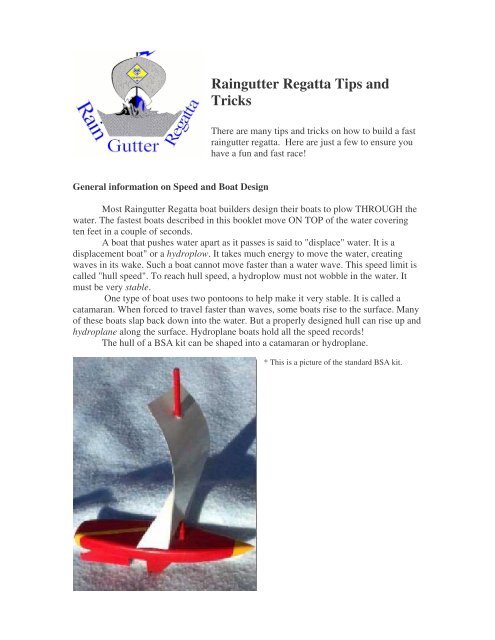
The hull of a <strong>BSA</strong> kit can be shaped into a catamaran or hydroplane.<br />
* This is a picture of the st<strong>and</strong>ard <strong>BSA</strong> kit.
St<strong>and</strong>ard <strong>BSA</strong> kit construction tips:<br />
• Trim the hull to make it symmetrical.<br />
• Lower the sail so that it touches the deck. Glue sail to deck.<br />
• “Cup” sail modifications will be faster than the st<strong>and</strong>ard sail (Appendix B).<br />
• Ensure the rudder is flat. A bent rudder will steer the boat into the raingutter.<br />
• Wax the hull. Use paraffin or ski wax.<br />
• Seal the boat in oil based, acrylic paint or polyurethane coating.<br />
• Attach the metal keel ¾ to 1” further aft (toward the rear) than what the<br />
instruction recommend.<br />
• Add bumpers to the boat to keep it from sticking to the sides of the raingutter<br />
(Appendix C).<br />
• Heavier boats are slower, in general. Ensure deck-o-rations do not add excessive<br />
weight. Do not place too much weight toward the bow of the boat. The boats sail<br />
best with more of the weight toward the aft end of the boat.<br />
• Catamaran (Appendix D) <strong>and</strong> Hydroplane (Appendix E) modifications can<br />
produce faster boat designs than the st<strong>and</strong>ard <strong>BSA</strong> kit boat.<br />
• Attach accessories (such as people, animals, etc.) firmly to the boat using hot<br />
glue.<br />
• Use an acrylic clear coat varnish or seal over decals <strong>and</strong> accessories. Use several<br />
layers to create a deep shine <strong>and</strong> hide the edges of the decals.<br />
• Ensure the boat is waterproof! Paint all exposed areas of wood with acrylic or<br />
oil-based paint (acrylic is water resistant when dried).<br />
• When racing, blow a thin stream of wind, rather than try to blow big puffs of air<br />
toward the boat.
Appendix A – Glossary<br />
Aft – Toward the stern. Many seafaring terms are from Old English; this one means<br />
back”.<br />
Beam – The width of a boat at its widest. From an Old English word for “tree”.<br />
Bow – The forward part of a boat or ship.<br />
Catamaran – A sailboat with twin hulls <strong>and</strong> a deck or platform connecting the hulls.<br />
From Tamil, meaning "to tie tree or wood"; picture a log raft lashed together by rope.<br />
Centerline – The line down the middle of a boat. It’s used as a guide to make boats<br />
symmetrical.<br />
Dry Dock – Area to set aside to modify or repair boats prior to the start of the event.<br />
Harbor Master – Referee or the Official in Charge of the <strong>Regatta</strong>.<br />
Hull – The body of a boat exclusive of deck structures. From an Old English word<br />
meaning "to conceal"; the crew is "hidden" from the water in the hull.<br />
Hydroplane – A boat that skims the surface of the water. Greek: water+place or broad.<br />
The action is similar to a broad stone skipping across water.<br />
Hydroplow – A boat that separates the water to pass through. Greek word for "water"<br />
with Old English word for "plow". The bow of the boat breaks the water like a farm plow<br />
breaks soil.<br />
Keel – Extension of a boat, running the length of the bottom of its hull. Old English word<br />
for "throat, beak of a ship".<br />
Port – The left side of a boat looking forward. Also called "larboard". From Latin "port"<br />
or "harbor". Long ago, it is said, certain major ports were approached so sailors saw them<br />
first from the left side of the ship. Eventually, that side was called the port side.<br />
Port Authority – Pack leadership responsible for race rules <strong>and</strong> operation.<br />
Starboard – The right side of a boat looking forward. Old English: steering oar + ship's<br />
side.<br />
Stern – The rear end of a boat. Old English word meaning "to steer".
Appendix B – Cup Sail Modification<br />
Make a sail that focuses the breath-force <strong>and</strong> reduces tipping <strong>and</strong> drifting. A small, cupshaped<br />
sail placed low on the rear deck keeps the boat from tipping forward. Make it<br />
from the plastic sail that comes in the <strong>BSA</strong> kit. Breath cannot escape until it has delivered<br />
all of its power. The result is more stability, power <strong>and</strong> control.<br />
<strong>BSA</strong> Sail Template<br />
Three separate parts make up the sail (See below).<br />
1. Wall - The back of the sail. "C" shaped when viewed from the top, it rises vertically.<br />
2. Roof - The top part of the sail is flat, sloping down toward the bow.<br />
3. Floor - The bottom of the sail is horizontal. It is hot glued or stapled to the deck.<br />
Assembly<br />
Glue the parts of the sail together with hot melt glue. Plastic<br />
model cement does not stick to the plastic.<br />
1. Using the Sail Template (Appendix F), trace the outline of<br />
the wall, roof <strong>and</strong> floor on the sail material with a ballpoint<br />
pen.<br />
2. Cut out the wall.<br />
3. Cut a small shape from scrap. Glue it over the mast hole in<br />
the sail wall.<br />
4. Cut the edges of the floor <strong>and</strong> roof that have no tabs first.<br />
5. Cut an arc passing the scissors through the tips of the tabs.<br />
6. Cut the left sides of the tab triangles then the right sides.<br />
7. Remove any dangling triangles between tabs that are not<br />
completely cut off. 8. Test bend all tabs back. Then raise<br />
them to make right angles.<br />
9. Beginning with the center tabs of the floor, apply small<br />
dots of hot glue. Immediately, firmly, press each tab to the<br />
center, bottom edge of the wall. Bonding is immediate - a<br />
second chance to line parts up is not likely.<br />
10. Continue to put hot glue on the tabs next to those already bonded to the wall <strong>and</strong><br />
press them firmly in place.<br />
11. Carefully join the roof <strong>and</strong> wall piece in a similar fashion. Press each tab to the wall<br />
firmly. Bond only a few tabs at a time so the hot glue does not cool before it is pressed in<br />
place.
Appendix C – Bumpers<br />
Add bumpers to keep the boat from rubbing <strong>and</strong> sticking to the gutter walls <strong>and</strong> overhanging<br />
lips. Bumpers can save the day when everyone else gets stuck! The two kinds of<br />
rain gutters require two kinds of bumpers. A third kind of bumper is needed to get a<br />
better start.<br />
Problem: You are getting ready to deliver that last directed puff of air to the sail.<br />
Suddenly, you notice the little overhang along the top edge of the gutter has your hull<br />
pinched under it. You blow hard, but the boat only spins a bit hinged between the lip <strong>and</strong><br />
the water. Your boat has just been “Shipwrecked!” Lip bumpers keep the boat off the<br />
lip-edge of the raingutter wall. To keep from getting stuck under it, the bumpers must be<br />
tall enough to clear the lip of the raingutter.<br />
Construction<br />
• A good size for lip bumpers is one inch tall <strong>and</strong> one-half<br />
inch wide. Bumpers should be thin <strong>and</strong> springy if<br />
possible.<br />
• Cut bumpers out of wood, plastic or other waterproof<br />
(or water-proof) materials.<br />
• Round the corners of your bumper so sharp edges don't<br />
catch.<br />
• Glue the bumper to the edge of the hull as far forward as possible. If your bow comes to<br />
a point (like an unaltered <strong>BSA</strong> kit hull), attach bumper pairs to the bow, beam <strong>and</strong> stern.<br />
• Whenever possible, build the bumpers into the hull.<br />
A Better Start<br />
Problem: "Blow!" – the race begins, but your boat just<br />
doesn't pop off the starting line. Something is holding it<br />
back momentarily. Surely, this slows it down. Adhesive<br />
contact can be a problem at the starting line! The boats<br />
are required to start backed up against the raingutter end<br />
cap. When the stern is flat, it contacts the end cap over its<br />
entire width <strong>and</strong> height. When wet, this contact can be<br />
quite forceful, preventing a clean get away. Avoiding<br />
contact is the key to defeating adhesive forces. To do<br />
this, make little bumpers that jut out to the rear, holding<br />
your boat away from the end cap at least 1/8-inch. Better<br />
yet, cut a long notch in the back of your hull so only the outside edges of the stern touch.<br />
Removable Bumpers<br />
Transparency film or other springy plastics can be glued with rubber cement (contact<br />
cement) to the hull after it is finished. Because the glue can be separated from the plastic<br />
<strong>and</strong> wooden hull, bumpers can be removed with no trace when desired. But make sure to<br />
allow the glue to fully dry before testing!
Appendix D – Catamaran Design<br />
A catamaran resists side-to-side tipping. This added stability helps it out pace traditional<br />
<strong>BSA</strong> kit boats. Two pontoons guide it straight without needing a rudder. It does not<br />
hydroplane but has recorded times less than 5 seconds.<br />
Why is this design fast?<br />
Reasons why this catamaran design is fast:<br />
1. The separated pontoons distribute the buoyancy of the boat across the width of the<br />
boat.<br />
2. Curved up pontoon tips keep water under the pontoons.<br />
3. A small sail on the back of the deck reduces forward tipping.<br />
4. Air cannot pass through a sail made from a rigid material.<br />
Construction:<br />
Refer to the catamaran template in Appendix G for the following steps.<br />
1. Trim the hull to make it symmetric.<br />
2. Cut the hull down the centerline<br />
(middle).<br />
The two parts are now pontoons. The cut<br />
edges are the tops of the pontoons.<br />
3. Cut two rods from the sail dowel for<br />
pontoon spanners. Make them as long as<br />
the maximum beam (boat width)<br />
allowed. 2-1/2 inches is a good beam. A<br />
typical raingutter is about 4-inches wide.<br />
4. Cut a notch 1-1/2 inches from the aft<br />
end on top of each pontoon.<br />
5. Fit one spanner into the slots to bridge<br />
the pontoons across the aft. Fit the other<br />
spanner into the halves of the mast hole.<br />
6. Glue them in place. Quickly place the drying or cooling boat upside-down on a lined<br />
piece of paper. Place one pontoon next to one line <strong>and</strong> see that the other pontoon lines up<br />
with a line near its edge. Adjust as needed before the glue dries. Pontoons set this way<br />
won't toe-in or out.<br />
7. Cut up the plastic to make a cup sail.<br />
8. The catamaran hull should be narrow enough for the sail to fit across it. Anchor the<br />
back edges of the sail to the end of each pontoon <strong>and</strong> the bottom of the sail to the rear rod<br />
across the pontoons. Apply hot glue to the wood <strong>and</strong> press the plastic onto it. Staples may<br />
be used to fasten the sail instead.<br />
9. Make bumpers.<br />
10. Don't use the keel or rudder. If required, glue them in front of, or inside the sail flat<br />
on the floor.
Appendix E – Hydroplane Design<br />
Hydroplanes are the fastest type of raingutter regatta boats.<br />
Why is this design fast?<br />
If a breath-powered boat’s bow comes to a point like most boats, it may never be able to<br />
hydroplane. A hydroplane is different!<br />
It is fast because:<br />
1. A flat hull distributes the weight of the boat across the width of the boat.<br />
2. A flat hull turned up in front rides up to the surface of the water.<br />
3. A sail on the back of the deck reduces forward tipping.<br />
4. Air is caught <strong>and</strong> forced to exit backward via a pocket in the sail.<br />
5. A boat tipped upward in the front about ¼ inch prevents water from breaking over the<br />
bow. That can stop a light boat.<br />
Construction:<br />
These steps turn a <strong>BSA</strong> kit hull into a hydroplane.<br />
1. Trim the hull to make it symmetrical.<br />
2. Cut out Template in Appendix H <strong>and</strong> trace the<br />
pattern on both sides of the boat.<br />
3. Cut the boat following the lines drawn:<br />
• Start 1/8 inch under the deck <strong>and</strong> cut aft,<br />
parallel to the deck for 1-1/2 inches.<br />
• Cut up from the bottom to remove this piece.<br />
• Cut from the middle of the hull at a glancing<br />
angle toward the bow on the bottom.<br />
• Increase the slant until the cut joins the thin bow deck.<br />
4. S<strong>and</strong> the bottom flat across its width. The sloping part should be very smooth. A few<br />
coats of s<strong>and</strong>ing sealer (s<strong>and</strong> between coats) will increase smoothness. Wood putty can<br />
be used to fill in any gouges.<br />
5. Cut up the plastic to make a cup sail.<br />
6. Glue the sail as far back on the hull deck as you can while keeping the overall length<br />
under the maximum.<br />
7. Make bumpers.<br />
8. Blow low <strong>and</strong> straight.<br />
9. Don't use the rudder or keel. If required, convert the keel to a rudder by cutting a slot<br />
in the bottom of the hull about 1-1/2 inches from the stern. Sink the keel into the hull so<br />
that most of the keel is hidden. The rudder can be glued to the floor of the sail if required.<br />
10. Practice blowing the boat. Some skill is required to keep the hydroplane sailing<br />
straight.
Appendix F – Cup Sail Template
Appendix G – Catamaran Template
Appendix H – Hydroplane Template