

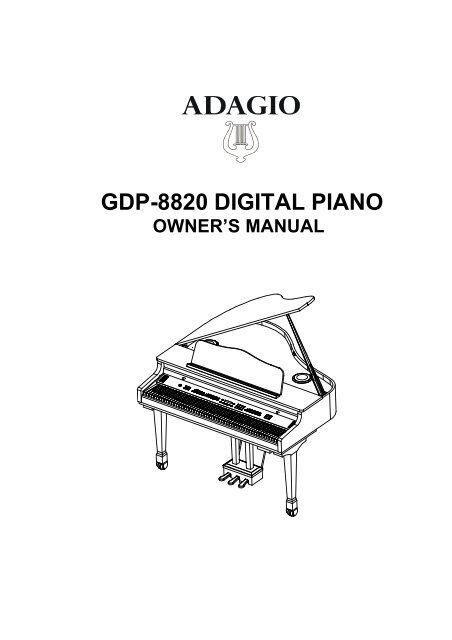
Gdp-8820 digital piano - Adagio Music
Gdp-8820 digital piano - Adagio Music
Gdp-8820 digital piano - Adagio Music

Create successful ePaper yourself
Turn your PDF publications into a flip-book with our unique Google optimized e-Paper software.
GDP-<strong>8820</strong> DIGITAL PIANO<br />
OWNER’S MANUAL
2<br />
IMPORTANT SAFETY INSTRUCTION<br />
CAUTION: Use of controls or adjustments or performance of procedures other than those<br />
specified herein may result in hazards radiation exposure.<br />
Please carefully study this manual and always keep it available. There are, however, some<br />
installation and operation precautions which should be aware of:<br />
1) Read these instructions.<br />
2) Keep these instructions.<br />
3) Heed all warnings.<br />
4) Follow all instructions.<br />
5) Do not use this apparatus near water.<br />
6) Clean only with dry cloth.<br />
7) Do not block any ventilation openings. Install in accordance<br />
with the manufacturer’s instructions.<br />
8) Do not install near any heat sources such as radiators, heat<br />
registers, stoves, or other apparatus (including amplifiers) that<br />
product heat.<br />
9) Do not defeat the purpose of the polarized or grounding-type plug.<br />
A polarized plug has two blades with one wider that the other. A<br />
grounding type plug has two blades and a third grounding prong.<br />
The wide blade or the third prong are provided for your safety.<br />
If the provided plug does not fit into your outlet, consult an<br />
electrician for replacement of the obsolete outlet.<br />
10) Protect the power cord from being walked on or pinched<br />
particularly at plugs, convenience receptacles, and the point<br />
where the exit from the apparatus.<br />
11) Only use the attachments/accessories specified by the<br />
manufacturer.<br />
12) Use only with the cart, stand, tripod, bracket, or table<br />
specified by the manufacturer, or sold with the apparatus. When a<br />
cart is used, use caution when moving the cart/apparatus combination<br />
to avoid injury from tip-over.<br />
S3125A<br />
13) Unplug this apparatus during lightning storms or when unused for<br />
long periods of time.<br />
14) Refer all servicing to qualified service personnel. Servicing is<br />
required when the apparatus has been damaged in any way such as<br />
power supply cord or plug is damaged, liquid has been spilled or<br />
objects have fallen into the apparatus, the apparatus has been<br />
exposed to rain or moisture, does not operate normally, or has<br />
been dropped.<br />
15) Apparatus shall not be exposed to dripping or splashing and no<br />
objects filled with liquids, such as vases, shall be placed on<br />
the apparatus.<br />
16) Warning – To reduce the risk of fire or electric shock, do not<br />
expose this apparatus to rain or moisture.
GENERAL PRECAUTIONS<br />
CAUTION<br />
RISK OF ELECTRIC SHOCK<br />
DO NOT OPEN<br />
CAUTION: TO REDUCE THE RISK OF ELECTRIC SHOCK,<br />
DO NOT REMOVE COVER OR BACK<br />
NO USER-SERVICEABLE PARTS INSIDE<br />
REFER SERVICING TO QUALIFIED SERVICE PERSONNEL<br />
INSTRUCTIONS PERTAINING TO A RISK OF FIRE, ELECTRIC SHOCK OR INJURY:<br />
The lightning symbol inside a triangle is intended to alert the user to the presence of uninsulated or “dangerous<br />
voltage” that could constitute a risk of electric shock.<br />
The exclamation point inside a trinagle is intended to alert the user of important operation and maintenance/<br />
servicing instructions.<br />
CAUTION: Any changes or modifications in construction of this device which are not expressly approved by<br />
the party responsible for compliance could void the warranty and the ability to operate the equipment.<br />
NOTE: This equipment has been tested and found to comply with the limits for a Class B <strong>digital</strong> device,<br />
pursuant to Part 15 of the FCC Rules. These limits are designed to provide reasonable protection against<br />
harmful interference in a residential installation. This equipment generates, uses, and can radiate radio<br />
frequency energy and, if not installed and used in accordance with the instructions, may cause harmful<br />
interference to radio communications. However, there is no guarantee that interference will not occur in a<br />
particular installation. If this equipment does cause harmful interference to radio or television reception, which<br />
can be determined by turning the equipment off and on, the user is encouraged to try to correct the interference<br />
by one or more of the following measures :<br />
- Reorient or relocate the receiving antenna.<br />
- Increase the separation between the equipment and receiver.<br />
- Connect the equipment into an outlet on a circuit different from that to which the receiver is connected.<br />
- Consult the dealer or an experienced radio/TV technician for help.”<br />
THIS DEVICE COMPLIES WITH PART 15 OF THE FCC RULES.<br />
OPERATION IS SUBJECT TO THE FOLLOWING TWO CONDITIONS :<br />
(1)THIS DEVICE MAY NOT CAUSE HARMFUL INTERFERENCE, AND<br />
(2) THIS DEVICE MUST ACCEPT ANY INTERFERENCE RECEIVED, INCLUDING INTERFERENCE<br />
THAT MAY CAUSE UNDESIRED OPERETION.<br />
!<br />
!<br />
3
4<br />
TAKE CARE OF YOUR PIANO<br />
This <strong>digital</strong> <strong>piano</strong> will supply you with years of musical enjoyment if you follow the simple rules listed below.<br />
WARNING<br />
When using electrical products, basic safety<br />
precautions should always be followed,<br />
including the following:<br />
SAFETY<br />
Power Source - The product should always be<br />
connected to a power supply only of the type<br />
described in the operating instructions or as<br />
marked on the product.<br />
Periods of Nonuse - The power-supply cord of<br />
the product should be unplugged from the<br />
outlet when left unused for a long period of<br />
time.<br />
SERVICE AND MODIFICATION<br />
This product should be serviced by qualified<br />
service personnel when,<br />
• the power supply cord or the plug has been<br />
damaged,<br />
• liquid has been spilled into the unit or it has<br />
been exposed to rain,<br />
• the instrument does not appear to operate<br />
normally or exhibits a marked change in<br />
performance.<br />
• the instrument has been dropped or the cabinet<br />
has been damaged.<br />
• Do not attempt to open the <strong>piano</strong> or make any<br />
change in the circuits or parts of the unit.<br />
HANDLING AND TRANSPORT<br />
• Never apply excessive force to the controls,<br />
connectors or other parts of the instrument.<br />
• Always unplug cables by gripping the plug<br />
firmly, not by pulling on the cable.<br />
• Disconnect all cables before moving the<br />
instrument.<br />
• Physical shocks caused by dropping,<br />
bumping, or placing heavy objects on the<br />
instrument can result in scratches and/or more<br />
serious damage.<br />
• Carefully check the amplifier volume control<br />
before starting to play. Excessive volume can<br />
cause permanent hearing loss.<br />
CLEANING<br />
• For the high-polish finishes, clean the cabinet<br />
and panel with a soft nonabrasive dry cloth.<br />
This cloth should be for High Gloss Lacquer<br />
Finish Furniture. A wax based polish specifically<br />
for High Gloss Lacquer Finish Furniture<br />
may be used on the cabinet. Do not use paint<br />
thinner or petrochemical based polishes.<br />
For Veneer Style Wood finish a standard polish<br />
similar to “pledge” is acceptable or use a dry<br />
“antu-static” cloth.<br />
• To maintain the luster of the keys and buttons<br />
wipe with a clean, slightly damp cloth, and then<br />
polish with a soft dry cloth.<br />
LOCATION<br />
Do not expose the instrument to the following<br />
conditions to avoid deformation, discoloration, or<br />
more serious damage:<br />
- direct sunlight (near a window)<br />
- high temperatures (near a heat source, outside,<br />
or near a window)<br />
- rain or excessive humidity<br />
- excessive dust<br />
- strong vibration<br />
• Leave enough space around the <strong>piano</strong> for it to<br />
be properly ventilated.<br />
• This instrument contains <strong>digital</strong> circuitry and<br />
may cause interference if placed too close to<br />
radio or television receivers. If interference<br />
occurs, move the instrument further away from<br />
the affected equipment.<br />
• Avoid placing vinyl objects on top of the<br />
instrument, vinyl can stick to and discolor the<br />
surface.<br />
• The instrument shall not be exposed to dripping<br />
or splashing and no objects filled with liquids,<br />
such as vases, shall be placed on the<br />
instrument.<br />
POWER<br />
• The instrument should be placed where it is<br />
easy to unplug the power plug<br />
• The instrument is unplugged the power plug<br />
during lightning storn, cleaning or not unused<br />
for long periods of time.<br />
• Turn the power switch off when the instrument is<br />
not in use.<br />
• To avoid damage to the instrument and other<br />
devices to which it is connected, turn the power<br />
switches of all related devices off prior to<br />
connection or disconnection of MIDI cables.<br />
• Turn the power off if the main cable is damaged<br />
or the instrument is spattered with liquid.<br />
• Do not switch the unit on and off in quick<br />
succession, this places an undue load on the<br />
electronic components.<br />
• Avoid plugging the AC power cord into the same<br />
AC outlet as appliances with high power<br />
consumption, such as electric heaters or<br />
refrigerators.
TABLE OF CONTENTS<br />
ASSEMBLY ................................................................................ 7<br />
PANEL CONTROLS................................................................ 10<br />
DEMO ....................................................................................... 20<br />
KEYBOARD VOICES............................................................... 21<br />
Voice Selection....................................................................... 21<br />
Layer (dual)............................................................................. 22<br />
Lower (split) ............................................................................ 22<br />
RHYTHM SECTION .................................................................. 24<br />
Rhythm Style Select ............................................................... 24<br />
Adjusting the Tempo ............................................................... 25<br />
Starting and Stopping the Rhythm Style.................................. 26<br />
Variation.................................................................................. 27<br />
Fill-In....................................................................................... 27<br />
Metronome.............................................................................. 27<br />
AUTO ACCOMPANIMENT (AUTO BASE CHORD)................ 28<br />
Single...................................................................................... 28<br />
Fingered.................................................................................. 29<br />
Piano ...................................................................................... 30<br />
Manual Bass Chord ................................................................ 30<br />
Auto Harmony......................................................................... 30<br />
SD CARD................................................................................. 31<br />
Enter the SD Card mode........................................................ 31<br />
Save ....................................................................................... 32<br />
Play all songs ......................................................................... 34<br />
Load........................................................................................ 34<br />
Solo ........................................................................................ 36<br />
Mute........................................................................................ 39<br />
Delete ..................................................................................... 40<br />
FUNCTION ............................................................................... 41<br />
Drum Kit Selecting (Keyboard Percussion)............................. 42<br />
Reverb Level .......................................................................... 42<br />
Chorus Level .......................................................................... 43<br />
Touch Response .................................................................... 43<br />
Split Point for Lower Voice ...................................................... 44<br />
Split Point for Auto Accompaniment ........................................ 44<br />
Auto Harmony Type Selecting ................................................ 45<br />
Master Tune............................................................................ 45<br />
Equalization ............................................................................ 46<br />
Reverb Type........................................................................... 46<br />
Chorus Type........................................................................... 47<br />
Vocal Grading......................................................................... 47<br />
Local........................................................................................47<br />
Factory Setting ....................................................................... 47<br />
5
6<br />
TABLE OF CONTENTS<br />
RECORD .................................................................................. 48<br />
Recording ............................................................................... 48<br />
Playback................................................................................. 49<br />
REGISTRATION MEMORY ...................................................... 51<br />
PLAY ALONG SONGS ............................................................ 52<br />
iPOD DOCK ................................................................................. 54<br />
MIDI ........................................................................................... 55<br />
MIDI IMPLEMENTATION CHART ............................................ 57<br />
VOICE LIST .............................................................................. 58<br />
STYLE LIST .............................................................................. 61<br />
DRUM KIT LIST ........................................................................ 62<br />
PEDALS.................................................................................... 65<br />
SPECIFICATIONS .................................................................... 66
ASSEMBLY<br />
Remove the <strong>piano</strong> body from the packing carton.<br />
Hardware for installation is listed below.<br />
You can find them in the accesory tray<br />
1. Bolt M12X45 8<br />
2. Tapped Screw 4X10 (Brass) 8<br />
3. Wahser Φ12<br />
8<br />
4. Power Chord 1<br />
5. Philips Screw Driver 1<br />
6. Wrench 1<br />
Remove the pedal assembly and <strong>piano</strong> legs<br />
from the packing carton.<br />
Legs<br />
Pedal assembly<br />
Pedal support rods<br />
Accessories<br />
7
8<br />
ASSEMBLY<br />
Install legs to the bottom of the <strong>piano</strong> with bolt and washer. Tighten the bolts using<br />
wrench provided.<br />
Install the pedal assembly pedal with bolt and washer. Tighten the bolts using wrench<br />
provided. Then, install the support rods by tapped screws. Tighten the screws using<br />
screw driver provided.<br />
Power cord receptacle<br />
Pedal cabel socket<br />
Plug pedal cable into the cable socket in the bottom of the <strong>piano</strong>.
ASSEMBLY<br />
The <strong>piano</strong> assembly is finished<br />
Place the <strong>piano</strong> in its final position, on the bottom the pedal assembly is a adjustable knob.<br />
Turn the Knob down to firmly touch the floor.<br />
Locate the Power Cord and plug it into the Receptacle on the bottom of the Piano. Plug the<br />
Power Cord into an appropriate wall socket.<br />
FRONT Holes for Headphone<br />
Hanger Clip to<br />
attach to the<br />
bottom of the <strong>piano</strong><br />
2. Place the <strong>piano</strong> in its final position, on the bottom the pedal board is a<br />
turndownknob. TurnthePedal Brace Knobdowntofirmlytouch the<br />
floor.<br />
3. Locatethe PowerCordandplugit intotheReceptacleonthe bottomof<br />
thePiano. Plugthe Power Cordintoanappropriate wallsocket.<br />
9
10<br />
CONNECTOR PANEL<br />
This connector panel, with its various jacks, is located on the bottom left of the <strong>piano</strong>, under the keybed.<br />
1<br />
MIC<br />
PHONES<br />
AUDIO<br />
IN OUT<br />
L R L R<br />
MIDI<br />
IN OUT<br />
USB<br />
2 3 4 5<br />
1 Microphone - Plug in a microphone to talk/sing through your <strong>piano</strong><br />
speakers.<br />
2. PHONE 1 / PHONE 2 - You can play in total silence, without disturbing<br />
others in the room, by plugging a set of headphones into one of the<br />
appropriate sockets. When headphones are plugged into either of these<br />
jacks the main speaker system is turned off. Two sets of headphones<br />
may be used simultaneously.<br />
3 LINE IN - These stereo audio input jacks will amplify the suppy signal<br />
through the internal sound delivery system. They can be used to hook<br />
up items such as a home stereo, PA system or other stand alone<br />
amplifiers.<br />
LINE OUT - These stereo audio output jacks supplies the <strong>piano</strong>’s output<br />
signal to external amplification, such as a home stereo, PA system or<br />
other stand alone amplifiers.<br />
4 MIDI IN / MIDI OUT - This <strong>piano</strong> contains MIDI in and MIDI output ports.<br />
MIDI jacks allow communication with other products equipped with MIDI<br />
interfaces. Please see the MIDI section of this manual for further details.<br />
5 USB - The USB connector allows you to connect the <strong>piano</strong> directly to your<br />
computer. The <strong>piano</strong> can be connected with computer without driver<br />
installation under the Windows XP environment. The <strong>piano</strong> will be recognized<br />
as an USB Audio device that receives and transmits MIDI<br />
messages.
PANEL CONTROLS<br />
The elegant control panel is divided into several distinct sections. The following is a brief<br />
description of all the features located on the control panel.<br />
1<br />
MIN MAX<br />
2<br />
MASTER VOLUME<br />
MIN MAX<br />
ACCOMP VOLUME<br />
3<br />
SYNCHSTART<br />
4<br />
– TEMPO + HARMONY LAYER LOWER<br />
SINGLE<br />
FINGERED<br />
PIANO<br />
START/STOP INTRO/ENDING FILL IN VARIATION<br />
ACCOMP<br />
1. MASTER VOLUME - Use this sliding control button to adjust the<br />
overall volume of the keyboard.<br />
2. ACCOMP VOLUME - Slide this controller to adjust the volume of<br />
the auto accompaniment, metronome and the left section of the<br />
play along song, the keyboard instrument voice will not be<br />
affected.<br />
3. TEMPO - Press one of the TEMPO buttons, the current tempo<br />
value will appear on the display. You can use the TEMPO +,<br />
TEMPO – buttons, or the +/YES and –/NO buttons to change the<br />
tempo value range from 40 to 240 bpm (beats per minute).<br />
Press the TEMPO + or TEMPO – buttons or the +/YES and<br />
–/NO buttons simultaneously to recall the default tempo setting for<br />
the selected rhythm style. After three seconds the tempo window<br />
will exsit automatically.<br />
There is a four-dot beat indicator above the tempo buttons. It<br />
indicates the tempo and beat for the accompaniment that is<br />
playing.<br />
4. HARMONY - When selected, the single note played in the righthand<br />
section of the keyboard will sound with additional auto<br />
harmony notes. The note played in the upper section of the<br />
<strong>piano</strong> determines the root key of the harmony. It is recommended<br />
that one note be played at a time. If more than one note<br />
is played only the highest note will add harmony.<br />
Auto harmony is only available when the auto accompaniment<br />
is engaged. The harmony type selection is assigned in<br />
the Function menu. Use it to select the type of harmony, Duet,<br />
Close Harmony, Open Harmony, or Octave. See the Function<br />
section for more information.<br />
11
12<br />
PANEL CONTROLS<br />
MIN MAX<br />
MASTER VOLUME<br />
MIN MAX<br />
7<br />
– TEMPO + HARMONY LAYER LOWER<br />
8<br />
5<br />
6<br />
SINGLE<br />
FINGERED<br />
ACCOMP VOLUME SYNCHSTART START/STOP INTRO/ENDING FILL IN VARIATION<br />
ACCOMP<br />
5. LAYER - Pressing the LAYER button will put the keyboard in the<br />
layer, or dual, mode. Layer, or dual, refers to an additional voice<br />
that is tone mixed with the selected keyboard voice. The assigned<br />
layer voice will be heard with the original voice. To select a new<br />
layered instrument voice us the +Yes or -No buttons within 4<br />
seconds after the Layer button has been pressed.<br />
6. LOWER - With the LOWER feature engaged the keyboard operates<br />
in split mode. In split mode the keyboard is divided into two<br />
sections. In the right hand section the original or layered voice will<br />
sound, and in the left hand section a different voice can be<br />
assigned. To select a new Lower instrument voice use the +Yes<br />
or -No buttons within 4 seconds after the Lower button has been<br />
pressed.<br />
7. SYNC START - Synchronized Start mode sets the auto accompaniment<br />
into standby mode. When the SYNC START button is<br />
pressed the indicator lights above the tempo will flash to the<br />
Tempo of the selected rhythm style. The rhythm style will start<br />
as soon as you play in the auto accompaniment section of<br />
the keyboard. The auto accompaniment will start with the first<br />
recognized chord played in the auto accompaniment section of the<br />
keyboard, depending on which fingering mode is selected. Pressing<br />
the SYNC START button again will stop the auto accompaniment<br />
and put the keyboard back into standby mode.<br />
8. START/STOP - This button starts or stops the selected rhythm<br />
style. The auto accompaniment will start with the first recognized<br />
chord played in the auto accompaniment section of the keyboard,<br />
PIANO
PANEL CONTROLS<br />
SYNCHSTART<br />
– TEMPO + HARMONY LAYER LOWER<br />
10<br />
SINGLE<br />
FINGERED<br />
PIANO<br />
START/STOP INTRO/ENDING FILL IN VARIATION<br />
ACCOMP<br />
9<br />
11 12<br />
depending on the fingering mode selected.<br />
9. INTRO/ENDING - All of the 100 rhythm styles can be started or<br />
finished with a unique introduction or ending pattern. When<br />
selected, an introduction of the style will start followed by the main<br />
style pattern.<br />
With a rhythm or accompaniment pattern already engaged the accompaniment<br />
can be professionally completed with an ending<br />
pattern from the next measure by pressing the INTRO/ENDING<br />
button. If you press the fill-in button during the ending pattern it<br />
will return to the main accompaniment pattern.<br />
10. FILL IN - The fill-in provides the accompaniment with a short rhythm<br />
pattern of one or two measures for each style. Press the FILL IN<br />
button at any time while the accompaniment is playing to add a fillin.<br />
If you hold down the FILL IN button, the fill-in pattern will<br />
repeat until the button is released, then the main pattern will play<br />
from the beginning of the next measure.<br />
11. VARIATION - All of the 100 rhythm styles include a variation of that<br />
style that can be played simply by pressing the VARIATION<br />
button. Press the VARIATION button again to disengage and<br />
return to the main pattern.<br />
12. ACCOMP - Each rhythm style has a fully orchestrated auto accompaniment<br />
pattern. These accompaniments are dedicated to the<br />
selected rhythm style, and will create rhythm, bass and chord<br />
accompaniments. The ACCOMP button selects the auto accompaniment<br />
mode. With this function engaged, the keys to the left<br />
side of the split point are the auto accompaniment section of the<br />
keyboard, while the keys to the right are available for normal<br />
playing.<br />
13
14<br />
PANEL CONTROLS<br />
SINGLE<br />
FINGERED<br />
PIANO<br />
ACCOMP<br />
14<br />
15<br />
PIANO E.PIANO H A R P S. ORGAN<br />
GUITAR<br />
STRINGS<br />
USER 1<br />
TRUMPET FLUTE USER 2<br />
BOSSA NOVA ROCK POP BALLAD USER 1<br />
LOUNGE BLUES JAZZ GOSPEL USER 2<br />
13. A/B BUTTON - The five quick select voice and five quick select<br />
style buttons are each assigned to a line A and line B. Press the<br />
A/B button to alternate between the two selection lines. The<br />
indicator light will be lit when selection line B is active. Please<br />
see the quick select buttons below for more information.<br />
14. QUICK SELECT VOICE - There are ten instrument voices that can<br />
be selected quickly by pressing one of the five voice select<br />
buttons. These voices are assigned to line A and line B. Each of<br />
these selection lines consists of five voices. The voice name in<br />
the line A is printed above the voice select button and the voice<br />
name on line B is beneath the button. Press the A/B button to<br />
select the voice line of your choice. When the indicator light is lit<br />
the B line or bottom line is active. The selected voice name and<br />
its number will be shown on the display. Please see the Keyboard<br />
Voices section of this manual for more information.<br />
15. QUICK SELECT STYLE BUTTONS - There are ten Rhythm Styles<br />
that can be selected quickly by pressing one of the five Rhythm<br />
select buttons. These Rhythm Styles are assigned to line A and<br />
line B. Each of these selection lines consists of five rhythm styles.<br />
The Style name in line A is printed above the Style select button<br />
and the Rhythm style name on line B is beneath the button. Press<br />
the A/B button to select the Rhythm Style line of your choice.<br />
When the indicator light is lit the B line or bottom line is active.<br />
The selected rhythm name and its number will be shown on the<br />
display. Please see the Rhythm Styles section of this manual for<br />
more information.<br />
13<br />
A / B<br />
METRONOME
PANEL CONTROLS<br />
A / B<br />
METRONOME<br />
16<br />
17 18<br />
VOICE<br />
DEMO/SONG SONG FUNCTION PAGE<br />
PAGE<br />
USER REG<br />
19<br />
16. METRONOME - Press the METRONOME button to engage the<br />
metronome. If the auto accompaniment is playing the metronome<br />
sound will replace the percussive rhythm sound immediately. If the<br />
auto accompaniment is not engaged, press the METRONOME<br />
button to start the metronome, and again to stop it. Time signature<br />
and volume of the metronome can be adjusted. Please see the<br />
Rhythm section of this manual for more information.<br />
17. INSTRUMENT VOICE - There are 128 GM (General MIDI) instrument<br />
voices, plus ten Asian folk instrument voices available on this<br />
<strong>piano</strong>. You can instantly select an instrument voice by pressing one<br />
of the voice select buttons. Or press the VOICE button to engage the<br />
voice selection mode. While its indicator light is lit, you can use the<br />
number pad to select all 138 voices listed in the back of the<br />
manual.Please see the Voice section of this manual for more<br />
information.<br />
18. STYLE - Press the STYLE button to engage the style selection<br />
mode. While its indicator light is lit, use the number pads to select a<br />
style. There is a complete list of all 100 rhythm accompaniment<br />
styles listed in the back of the manual. Please see the Rhythm<br />
section of this manual for more information.<br />
19. DEMO/SONG - This is a dual function button. The first pressing<br />
engages demonstration song mode with a red indicator lighting. The<br />
second pressing engages the teaching mode with a green indicator<br />
lighting.<br />
The “music teacher” feature can be used as an aid to learn the 50<br />
songs built into this <strong>piano</strong>. Please see the Training section of this<br />
manual for more information.<br />
This <strong>piano</strong> has ten different demonstration songs. The demo mode<br />
will play back all ten demo songs or select the song individually.<br />
STYLE<br />
15
16<br />
PANEL CONTROLS<br />
VOICE<br />
SONG FUNCTION PAGE<br />
PAGE<br />
USER REG<br />
20<br />
21 22<br />
STYLE<br />
20. FUNCTION - The FUNCTION button is used to access the function<br />
menu. The function menu can be used to adjust or change the<br />
parameters of a number of settings. Reverb level, chorus level,<br />
touch, split point for voice, auto accompaniment split point, tuning,<br />
drum kit selection, the auto harmony type and local off are all set<br />
from the function menu. Please see the Function section of this<br />
manual for more information.<br />
21. PAGE - The PAGE buttons (up and down) are used to access the<br />
different menus in the Function feature. When the FUNCTION<br />
button has been pressed use the PAGE s and PAGE t to access<br />
the Function menu selections.<br />
22. USER REG - USER REG is used to store keyboard settings. Press<br />
the USER REG button to engage the registration memory mode,<br />
the indicator will light up. Press one of the numeric buttons 1-9,<br />
and the stored setting will be recalled instantly. Please see the<br />
Registration Memory section of the manual for more information.<br />
23. NUMERIC PAD - Use the +/YES, –/NO or the numeric pad to input<br />
numbers directly while using the voice, style or function settings.<br />
These buttons are also used to access or alter many of the function<br />
features or whereever numerical input is necessary.<br />
24. TRANSPOSE - The transpose feature can shift the pitch of the<br />
keyboard up or down in semitone intervals up to a maximum of 24<br />
semitones. Press one of the TRANSPOSE buttons and the current<br />
transpose value will appear on the display. Use the TRANS-<br />
POSE + or TRANSPOSE – buttons to set the transpose value<br />
range from –12, one octave lower, to 12, one octave higher. Press<br />
the + and – value buttons simultaneously to recall the default<br />
value of 0. After three seconds the display will return to the<br />
23<br />
1 2 3 +/YES<br />
4 5 6<br />
7 8 9 –/NO<br />
0
PANEL CONTROLS<br />
1<br />
2<br />
3<br />
4<br />
– TRANSPOSE + REVERB CHORUS LEFT RIGHT<br />
24<br />
EFFECT SONG<br />
25 26<br />
PLAY ALL LOAD SAVE UTILITY PLAY/STOP<br />
USER SONG ACCOMP MELODY 1 MELODY 2 REC PLAY/STOP CARD<br />
currently selected instrument voice. Transpose does not affect<br />
notes that are currently playing. Transpose does not affect the<br />
percussion.<br />
25. REVERB - The reverb effect is engaged automatically when the<br />
power is turned on. Reverb simulates the effect of playing in a<br />
big room or hall where the sound reverberates off the walls and<br />
ceiling. Press the REVERB button to turn off the reverb effect.<br />
You can switch the reverb feature on and off by pressing the<br />
REVERB button. The reverb setting does not affect the auto<br />
accompaniment. Reverb depth can be changed in the function<br />
menu “Reverb Level”. Please see the Function Section for<br />
more information.<br />
26. CHORUS - The Chorus effect adds depth and spaciousness to<br />
the selected keyboard voice. Press the CHORUS button to<br />
engage the chorus effect and the indicator will light up. Press<br />
the button again to turn off the chorus effect. The chorus setting<br />
does not affect the auto accompaniment. Chorus depth can be<br />
changed in the function menu “Chorus Level”. Please see the<br />
Function Section for more information.<br />
27. SONG LEFT , SONG RIGHT - These buttons are used in conjunction<br />
with the SONG button. It allows the player to play<br />
along with the prerecorded traditional songs contained within<br />
this <strong>piano</strong>. The LEFT button will play the right hand of the<br />
selected song, so the user can practice the Left Hand portion of<br />
the song. The RIGHT button will play the Left Hand of the<br />
selected song, so that the user can practice the Right Hand<br />
portion of the song.<br />
27<br />
17
18<br />
PANEL CONTROLS<br />
1<br />
2<br />
3<br />
4<br />
EFFECT SONG<br />
– TRANSPOSE + REVERB CHORUS LEFT RIGHT<br />
PLAY ALL LOAD SAVE UTILITY PLAY/STOP<br />
USER SONG ACCOMP MELODY 1 MELODY 2 REC PLAY/STOP CARD<br />
28 29 30<br />
When engaging the LEFT and RIGHT buttons simultaneously<br />
only the accompaniment (if available) will be heard as the user<br />
should play both the Left and Right portions of the selected song.<br />
Please see the Play Along Song section of this manual for more<br />
information.<br />
28. USER SONG - The USER SONG button accesses one of the four<br />
available song settings for recording or playback. Use the +/<br />
YES, –/NO buttons to select the song you wish, if there is recorded<br />
information on any of the three tracks their indicator lights<br />
will light up. Please see the Record section of this manual for<br />
more information.<br />
29. ACCOMP/PLAY ALL - This is a dual function button for Record<br />
and SD Card modes.<br />
In the Record mode, this button is used to select the auto accompaniment<br />
track of a song for recording or playback.<br />
In the SD Card mode, press this button to play all MIDI files<br />
stored in the SD Card.<br />
Please see the Record and SD Card sections of this manual for<br />
more information.<br />
30. MELODY 1/LOAD, MELODY 2/SAVE - These are dual function<br />
buttons for Record and SD Card modes. In Record mode, there<br />
are two tracks for recording melody, which are assigned by the<br />
MELODY 1 and MELODY 2 buttons.<br />
In the SD Card mode, MELODY 1/LOAD button is used to load<br />
MIDI file fromthe USB Drive; MELODY 2/SAVE button is used to<br />
save recorded song to SD Card in MIDI file format.<br />
Please see the Record and SD Card sections of this manual for<br />
more information.
PANEL CONTROLS<br />
1<br />
2<br />
3<br />
4<br />
EFFECT SONG<br />
– TRANSPOSE + REVERB CHORUS LEFT RIGHT<br />
PLAY ALL LOAD SAVE UTILITY PLAY/STOP<br />
USER SONG ACCOMP MELODY 1 MELODY 2 REC PLAY/STOP CARD<br />
31 32<br />
31. REC/UTILITY - This is a dual function button for Record and SD<br />
Card mode.<br />
This unit is able to record four songs, each with a 3-track<br />
sequencer. It will record all note events and the accompaniment<br />
patterns exactly as they are performed. This recorded information<br />
is nonvolatile and therefore will not be lost when the power is<br />
turned off. To Record press and hold down the RECORD button<br />
then press the track button(s) you want to record on. Recording<br />
begins as soon as you start to play on any section of the keyboard.<br />
Press the RECORD button again to stop recording.<br />
In the Card mode, it functions as utility access button which includes<br />
solo, mute and delete for a selected song in the SD Card.<br />
Please see the Record and SD Card sections of the manual for<br />
more information.<br />
32. PLAY/STOP - This is a dual function button for Record and SD<br />
Card features. In the Record mode, press the PLAY/STOP button<br />
to hear selected tracks that you have recorded on. Press the<br />
PLAY/STOP button again to stop the playback.<br />
In the SD Card mode, it functions as also play/stop switch for a<br />
selected song in the SD Card.<br />
Please see the Record and SD Card section of this manual for<br />
more information.<br />
33. SD CARD - This <strong>piano</strong> is equipped with a mass storage device<br />
using popular SD Card. The user can read and play MIDI files on<br />
the SD Card either in format 0 or format 1 and save the recorded<br />
music into the SD Card as the MIDI file in format 1. The user can<br />
also delete the MIDI files in the SD Card. Press the CARD button<br />
to engage the SD Card mode and the indicator will light up. Press<br />
the button again to exit this mode.<br />
Please see the Record and SD Card sections of this manual for<br />
more information.<br />
33<br />
19
20<br />
DEMO<br />
PLAYING THE DEMO SONGS - This <strong>piano</strong> has 13 different demonstration songs that are<br />
designed to showcase the different sampled voices that are available. The display will show<br />
the song number with a “d” prefix. When playing all the songs, “ALL” will appear on the<br />
display initially, and will change to the demo song number as it plays. After exiting the demonstration<br />
mode the display will revert to its initial data.<br />
The DEMO/SONG button is a dual function button used for both Demo and play along song<br />
with variation of indicator color.<br />
DEMO/SONG<br />
DEMO/SONG<br />
1 2 3 +/YES<br />
3 4 5 6<br />
7 8 9 –/NO<br />
1. PLAY ALL DEMO SONGS - Press the DEMO/SONG, the indicator<br />
lights up with red color. The first demo song will playback<br />
instantly. This unit has ten demo songs. All songs will play<br />
repeatedly until you press the DEMO/SONG button again to stop<br />
the demonstration and turns to the teaching song mode.<br />
ALL:Demo Song<br />
VOICE STYLE<br />
2. PLAY A SINGLE DEMO SONG - Use the +/YES or the -/NO buttons<br />
to change songs while the demo is playing, or enter a song<br />
number directly by using the numeric pad. Please note that two<br />
digits are required for selecting a song number, for example, to<br />
select song No. 9 enter “09”. The song will play repeatedly until<br />
you press the demo button again to stop.<br />
d-9:Demo Song<br />
VOICE STYLE<br />
There are 50 songs for the musical training course that can also be<br />
played back for demonstration. Please see the Training section of<br />
this manual for more information.
KEYBOARD VOICES<br />
VOICE SELECTION - There are 128 GM voices in 16 groups plus 10 Asian ethnic folk<br />
instrument voices. There is a complete list of all 138 voices in the back of the manual.<br />
VOICE A/B<br />
G.PIANO<br />
GUITAR<br />
VOICE<br />
1 2 3 +/YES<br />
3 4 5 6<br />
7 8 9 –/NO<br />
G.PIANO E.PIANO HARPSICHORD ORGAN USER 1<br />
GUITAR STRINGS TRUMPET FLUTE USER 2 A / B<br />
QUICK SELECT - There are ten voices that can be selected quickly by<br />
pressing one of the five voice select buttons. These voices are<br />
assigned to Instrument Line A and Instrument Line B. Each Line<br />
consists of five voices. The voice name in Line A is printed above<br />
the voice select button and the voice name in Line B is beneath<br />
the button.<br />
1. Press the A/B button to select a voice kit. Selection of the Instrument<br />
Lines will alternate when the A/B button is pressed<br />
repeatedly. The indicator will be lit when Line B is selected .<br />
2. Press the voice select button that corresponds to the desired voice<br />
in the Instrument Line you have selected. The voice name and its<br />
number will show on the display.<br />
VOICE<br />
SELECTING ONE OF THE 138 VOICES<br />
001:Grand Piano<br />
1. If the Instrument Voice Button is not already lit press the VOICE<br />
button to engage the voice selection mode, the indicator will turn<br />
on.<br />
2. Use the numeric pad or the +/YES, –/NO buttons to select a voice<br />
number.<br />
Please note, when using the number pads, you must enter three<br />
digits to select a voice number from 001-138. For example, to<br />
select voice No. 2 you must enter “002”. The voice name and its<br />
VOICE<br />
002:Bright Piano<br />
21
22<br />
KEYBOARD VOICES<br />
USER 1<br />
USER 2 A / B<br />
LAYER<br />
LOWER<br />
number will show on the display. Please refer to the back of the manual<br />
for a list of all available voices.<br />
USER DEFINED QUICK SELECTION BUTTON - You can assign a<br />
favorite voice to the voice quick select button in the follow manner.<br />
1. Press the voice USER button, USER 1 from Line A, or USER 2 from<br />
Line B to recall the current stored voice (User key LED On). The<br />
default user voices are USER 1= 012; Vibraphone, USER 2=092;<br />
Choir Pad.<br />
2. If you want to assign your desired voice to the USER button, press<br />
and hold down the User key for 2 or 3 seconds, the User key LED<br />
will blink to indicate store mode<br />
3. Select the desired voice by using the numeric pad or the +/YES, –/<br />
NO buttons. Please note: you cannot use Voice quick select<br />
buttons.<br />
4. Press the USER button again to store the voice. The indicator stays<br />
On. The currently selected voice will be assigned to this button to<br />
be available for quick selection.<br />
If another voice is selected while User Key is ON but the indicator<br />
does not blink for store mode, the new voice will become the active<br />
voice. When User mode exits, the User indicator turns Off.<br />
5. User Key assignments will be saved after Power Off.<br />
LAYER (DUAL) VOICE - Layer, or dual, refers to an additional voice that<br />
is tone mixed with the selected keyboard voice. The assigned<br />
layer voice will be heard with the original voice when the layer<br />
feature is engaged.<br />
1. Press the LAYER button, the currently assigned layer voice will<br />
show on the display, and the indicator will light up.<br />
2. Use the +/YES, –/NO buttons or the numeric pad to select the desired<br />
voice. The display will show the layer voice number and<br />
name,<br />
3. Press the LAYER button a second time within 3 seconds and the<br />
current layer volume level will show on the display. Use the +/<br />
YES, –/NO buttons to adjust the layer volume level. Otherwise, this<br />
procedure will be skipped.<br />
After three seconds the display will revert to the selected main voice.<br />
4. Press the LAYER button again to turn the feature off.<br />
LOWER VOICE - In the lower, or split, mode the keyboard is divided into<br />
two sections. To the right of the Split Point the currently selected<br />
main voice, or the layer voice will sound. The keys to the left of the
KEYBOARD VOICES<br />
FUNCTION<br />
Split Point can play a different instrument voice.<br />
2. Use the +/YES, –/NO buttons or the numeric pad to select the<br />
desired voice. The display will show the lower voice number and<br />
name,<br />
3. Press the SPLIT button a second time gain within 3 seconds and<br />
the current lower volume level will show on the display. Use the<br />
+/YES, –/NO buttons to adjust the lower volume level. Otherwise,<br />
this procedure will be skipped.<br />
After three seconds the display will revert to the selected main<br />
voice.<br />
4. Press the SPLIT button again to turn the feature off.<br />
ASSIGNING THE SPLIT POINT FOR VOICE - The keyboard is split into<br />
two sections at the split point. The default split point for voice is<br />
the C3 key. A different voice split point can be assigned in the<br />
Function menu “Split Point”. Please see the Function section of<br />
this manual for more information.<br />
23
24<br />
RHYTHM SECTION<br />
RHYTHM STYLE SELECTION - This <strong>piano</strong> offers 100 rhythm styles and a variation of each<br />
style to choose from. There is a complete list of all 100 styles in the back of the manual.<br />
STYLE A / B<br />
BOSSA NOVA1<br />
LOUNGE<br />
STYLE<br />
1 2 3 +/YES<br />
3 4 5 6<br />
7 8 9 –/NO<br />
BOSSA NOVA ROCK POP BALLAD USER 1<br />
LOUNGE BLUES JAZZ GOSPEL USER 2<br />
QUICK SELECT - There are ten styles that can be selected quickly<br />
by pressing one of the five style select buttons. These styles<br />
are assigned to Line A and Line B. Each Rhythm Style Line<br />
consists of five styles. The style name in Line A is printed<br />
above the style select button and the voice name in Line B is<br />
beneath the button.<br />
1. Press the A/B button to select a Line. Selection of the Lines will<br />
alternate when the A/B button is pressed repeatedly. The<br />
indicator will be lit when Line B is selected.<br />
2. Press the style quick select button that corresponds to the<br />
desired style in the Line you have selected. The style name<br />
and its number will show on the display.<br />
54:BossaNova<br />
SELECTING ONE OF THE 100 STYLES<br />
1. Press the STYLE button to engage the style selection mode, the<br />
indicator will light up.<br />
2. Use the numeric pad or the +/YES, –/NO buttons to select a<br />
style number while the indicator is lit.<br />
Please note, when using the number pads, you must enter two<br />
digits to select a style number from 00-99. For example, to<br />
select style No. 4 you must enter “04”. The style name and its<br />
number will be shown on the display. Please refer to the back<br />
of the manual for a list of all available styles.<br />
04:Dixie<br />
A / B<br />
METRONOME<br />
STYLE<br />
STYLE
RHYTHM SECTION<br />
USER 1<br />
USER 2<br />
STYLE<br />
- TEMPO +<br />
METRONOME<br />
USER DEFINED QUICK SELECTION BUTTON - You can assign a<br />
favorite rhythm style to the style quick select button in the following<br />
manner.<br />
1. Press the style USER button, USER 1 from Line A, or USER 2 from<br />
Line B to recall the current stored style (User key LED On). The<br />
default user style is USER 1= 82; Kids 1, USER 2=32; Folk 2).<br />
2. If you want to assign your desired style to USER button, press and<br />
hold down the User key for 2 or 3 seconds, the User key LED will<br />
blink to enter store mode.<br />
3. Select the desired style by using the numeric pad or the +/YES, –/<br />
NO buttons. Please note: you cannot use style quick select<br />
buttons.<br />
4. Press the USER button again to store the style. The indicator atays<br />
On. The currently selected style will be assigned to this button to<br />
be available for quick selection.<br />
If another style is selected while User Key is ON but the indicator<br />
does not blink for store mode, the new voice will become the<br />
active voice but not change the User Key assignment while User<br />
mode exits, the User indicator turns Off.<br />
5. User Key assignments will be saved after Power Off.<br />
ADJUSTING THE TEMPO - There is a four-beat indicator above the<br />
TEMPO buttons that indicates the tempo and the beat for the<br />
accompaniment playing. Each style has its own preset tempo.<br />
The tempo can be adjusted before or during rhythm style playback<br />
by pressing either of the –TEMPO+ buttons. When you change<br />
the style before you play, the tempo will be set to that default<br />
value. If you change style during play, the tempo will keep its<br />
current value, press the –/+ TEMPO buttons simultaneously to set<br />
the tempo to the new styles default value.<br />
25
26<br />
RHYTHM SECTION<br />
STARTING AND STOPPING THE RHYTHM STYLE - There are several ways to start and<br />
stop the rhythm style.<br />
START/STOP<br />
INTRO/ENDING<br />
SYNCH START<br />
STRAIGHT START - The START/STOP button starts the selected<br />
rhythm style immediately. Press the START/STOP button again<br />
to stop the accompaniment.<br />
STARTING WITH AN INTRODUCTION - All of the 100 styles can be<br />
started with an appropriate introduction. As soon as you press the<br />
INTRO/ENDING button, the rhythm of the introduction will start<br />
followed by the main pattern. Press the START/STOP button to<br />
stop the accompaniment or the INTRO/ENDING button again to<br />
stop with an ending pattern.<br />
Please note, if you want the selected rhythm style to be engaged<br />
again after the ending pattern has been completed, press the FILL<br />
IN button while the ending pattern is engaged.<br />
SYNCHRONIZED START - Synchronized Start engages the accompaniment<br />
in standby mode.<br />
Press the SYNC START button, the beat indicator dots above the<br />
TEMPO buttons will blink at the current tempo, showing that the<br />
synchronized start mode is ready. The rhythm style will start as<br />
soon as you play in the auto accompaniment section of the<br />
keyboard. You may add an introduction by pressing the INTRO/<br />
ENDING button after pressing the SYNC START button.<br />
Press the START/STOP or the SYNC START buttons to stop the<br />
accompaniment. If the SYNC START button is used, the synchronized<br />
start mode will be on standby. Use the INTRO/ENDING<br />
button to stop with an ending pattern.
RHYTHM SECTION<br />
VARIATION<br />
FILL IN<br />
FUNCTION<br />
METRONOME<br />
VARIATION - To select the a variation of the main patterns, press the<br />
VARIATION button. The indicator will light up. If you press the<br />
VARIATION button, then press the INTRO/ENDING button, the<br />
variation pattern will play after the introduction.<br />
FILL - IN - The fill feature will insert a short rhythmic pattern of one to two<br />
measures in length, depending on the rhythm style selected and<br />
the variation. Holding down the FILL IN button will extend the fill<br />
indefinitely.<br />
ASSIGNING THE SPLIT POINT FOR THE AUTO ACCOMPANIMENT -<br />
The keyboard is split into two sections at the split point. The<br />
default split point for auto accompaniment section is the G1<br />
key. A different split point for the auto accompaniment can be<br />
assigned in the Function menu “Auto A.Split”. Please see the<br />
Function section of this manual for more information.<br />
METRONOME -<br />
If the rhythm accompaniment is not engaged, press the METRO-<br />
NOME button to start the metronome, and press the button again<br />
to stop it.<br />
If the Rhythm accompaniment is playing the metronome sound<br />
will replace the percussive rhythm sound immediately.<br />
1. Press the METRONOME button to start the metronome. Its indicator<br />
will light up and the “Metronome” menu will appear on the<br />
display..<br />
Metronome 3/4<br />
2. Use the +/YES or the –/NO to choose the time signature to<br />
choose the meter 2/4, 3/4, 4/4, 5/4, 6/4, 6/8 or 12/8 within 3<br />
seconds after the metronome has been engaged .<br />
3. Use the ACCOMP VOLUME slider to adjust the metronome volume<br />
and use the TEMPO +/- buttons to change the tempo of the<br />
metronome.<br />
27
28<br />
AUTO ACCOMPANIMENT<br />
AUTO ACCOMPANIMENT (AUTO BASS CHORD) - The rhythm styles have their own<br />
auto accompaniment. These auto accompaniment patterns create fully orchestrated rhythm,<br />
bass and chord progressions based on the chords that you play with your left hand. The<br />
selected rhythm style determines the characteristics of the auto accompaniment. The auto<br />
accompaniment section of the keyboard is assigned by the split point. The keys on the left<br />
of the split point are reserved for the auto accompaniment. The keys to the right are available<br />
for normal playing.<br />
SINGLE<br />
FINGERED<br />
PIANO<br />
ACCOMP<br />
AUTO BASS CHORD FINGERING - This <strong>piano</strong> has three auto accompaniment<br />
fingering modes, single, fingered, and <strong>piano</strong>.<br />
1. Press the ACCOMP button until the indicator light until the Fingering<br />
mode that you desire is selected.<br />
2. Press the START/STOP or the SYNC START buttons to start the<br />
rhythm style. Press the INTRO/ENDING button to start with an<br />
introduction.<br />
3. Press the START/STOP or the SYNC START buttons to stop the<br />
accompaniment, or press the INTRO/ENDING button to stop with<br />
an ending.<br />
SINGLE (INTELLIGENT) MODE - Single fingering mode makes it<br />
simple to produce four types of orchestrated accompaniment<br />
chords using a minimum of fingers, (one, two, or three fingers at<br />
the most), while playing in the auto accompaniment section of the<br />
keyboard. In this mode, keys in the auto accompaniment section<br />
of the keyboard are used to produce major, seventh, minor, and<br />
minor-seventh chords. The auto accompaniment will start with the<br />
percussive rhythm as soon as a recognized chord is played. The<br />
accompaniment produced is perfectly matched to the selected<br />
rhythm style.<br />
Major Chord: Press any key in the auto accompaniment section of<br />
the keyboard. The key you press determines the root note of the<br />
major chord.<br />
Minor Chord: Press the root key and two keys to its left in the auto<br />
accompaniment section of the keyboard simultaneously.<br />
Seventh Chord: Press the root key and one key to its left (7th key)<br />
in the auto accompaniment section of the keyboard simultaneously.<br />
Minor-Seventh Chord: Press the root key and both the first and<br />
second keys to its left in the auto accompaniment section of the<br />
keyboard simultaneously.
AUTO ACCOMPANIMENT<br />
SINGLE<br />
FINGERED<br />
PIANO<br />
ACCOMP<br />
AUTO BASS CHORD FINGERING continued<br />
FINGERED MODE - The fingered mode is ideal if you already know how<br />
to play chords on the keyboard. It allows you to play the chords in<br />
the auto accompaniment section of the keyboard that produce the<br />
selected auto accompaniment pattern.<br />
Please note, if a chord played cannot be recognized (fingered<br />
beyond the table), the previous chord will keep playing. An unrecognized<br />
chord cannot start a bass chord in the straight start mode,<br />
and cannot start the auto accompaniment in the synchronized start<br />
mode. The “Fingering Guide” table below lists all of the 31 playable<br />
chords of this mode.<br />
FINGERING GUIDE<br />
Chord Mark Fingering<br />
Major M 1-3-5<br />
Major sixth M6 1-3-5-6<br />
Major seventh M7 1-3-(5)-7<br />
Major seventh sharp eleventh M7 #11 1-(2)-3-#4-(5)-7<br />
Major add ninth M 9 1-2-3-5<br />
Major seventh ninth M7 9 1-2-3-(5)-7<br />
Major sixth add ninth M6 9 1-2-3-(5)-6<br />
Augmented Aug 1-3-#5<br />
Minor m 1-b3-5<br />
Minor sixth m6 1-b3-5-6<br />
Minor seventh m7 1-b3-(5)-b7<br />
Minor seventh flatten fifth m7b5 1-b3-b5-b7<br />
Minor add ninth m 9 1-2-b3-5<br />
Minor seventh add ninth m7 9 1-2-b3-(5)-b7<br />
Minor seventh add eleventh m7 11 1-(2)-b3-4-5-(b7)<br />
Minor major seventh mM7 1-b3-(5)-7<br />
Minor major seventh add ninth mM7 9 1-2-b3-(5)-7<br />
Diminished Dim 1-b3-b5<br />
Diminished seventh Dim7 1-b3-b5-6<br />
Seventh 7 1-3-(5)-b7<br />
Seventh suspend fourth 7sus4 1-4-5-b7<br />
Seventh add ninth 7 9 1-2-3-(5)-b7<br />
Seventh sharp eleventh 7 #11 1-(2)-3#4-(5)-b7<br />
Seventh thirteenth 7 13 1-3-(5)-6-b7<br />
Seventh flatted fifth 7 b5 1-3-b5-b7<br />
Seventh flatted ninth 7 b9 1-b2-3-(5)-b7<br />
Seventh flatted thirteenth 7 b13 1-3-5-b6-b7<br />
Seventh sharp ninth 7 #9 1-#2-3-(5)-b7<br />
Major seventh augmented M7aug 1-3-#5-7<br />
Seventh augmented 7aug 1-3-#5-b7<br />
Suspended fourth Sus4 1-4-5<br />
Please note, the notes listed in parentheses can be omitted.<br />
The listed chord fingerings are all in root note position, other inversions can be used with the exception of:<br />
1. The M6 chords are only recognized in root note position. All other inversions are interpreted as m7.<br />
2. The 6 9 chords are only recognized in root note position. All other inversions are interpreted as minor<br />
chords.<br />
3. The m6 chords are only recognized in root note position. All other inversions are interpreted as m7b5.<br />
4. With aug and dim7 chords the lowest note played is assumed to be the root.<br />
5. With 7#11 chords the lowest note played is assumed to be the root or b7.<br />
29
30<br />
AUTO ACCOMPANIMENT<br />
SINGLE<br />
FINGERED<br />
PIANO<br />
ACCOMP<br />
START/<br />
STOP<br />
HARMONY<br />
FUNCTION<br />
METRONOME<br />
AUTO BASS CHORD FINGERING continued<br />
PIANO CHORD MODE - When the Piano fingering chord mode is<br />
engaged you may enter chords anywhere on the keyboard,<br />
and the auto accompaniment will make complete styled<br />
arrangements. You are not limited to the auto accompaniment<br />
section or the range of the split point. In this regard<br />
there is no keyboard split point function for this Piano<br />
Chord Mode.<br />
MANUAL BASS CHORD - When engaged in the single or fingered<br />
mode, you may play individual keys in the auto<br />
accompaniment section of the keyboard. The voice on this<br />
section of the keyboard will be a layered bass and chord<br />
voice determined by the current style. This is a split voice<br />
mode, with the right hand playing the main voice.<br />
AUTO HARMONY - With the harmony feature engaged, a single<br />
note on the right-hand section of the keyboard will sound<br />
with additional auto harmony notes. The note played in the<br />
right-hand section of the keyboard determines the root key<br />
of the harmony. If more than one note is played only the<br />
highest note will add harmony.<br />
Please note, auto harmony is only available when the<br />
auto accompaniment is engaged.<br />
Press the HARMONY button to turn the feature on and off.<br />
There are four harmony types that can be selected, duet,<br />
close harmony, open harmony, and octave. The harmony<br />
type selection is assigned in the Function menu. Use the<br />
“Harmony Type” menu to select the type of harmony.<br />
Please see the Function section for more information.<br />
METRONOME -<br />
If the auto accompaniment is playing the metronome sound will<br />
replace the percussive rhythm sound immediately. If the auto<br />
accompaniment is not engaged, press the METRONOME button<br />
to start the metronome, and again to stop it.<br />
1. Press the METRONOME button to start the metronome. Its indicator<br />
will light up and the “Metronome” menu will appear on the<br />
display..<br />
Metronome 3/4<br />
2. Use the +/YES or the –/NO to choose the meter 2/4, 3/4, 4/4, 5/4,<br />
6/4, 6/8 or 12/8 within 3 seconds after the metronome has been<br />
engaged .
SD CARD<br />
This <strong>piano</strong> is equipped with a mass storage device using popular USB Flash memory<br />
drive.<br />
The User can read and play MIDI files in the memory either in format 0 or format 1 and<br />
save the recorded music into the USB flash memory drive as the MIDI file in format 1. User<br />
can also delete the MIDI files in the memory.<br />
Note: Directory architecture in the USB flash drive cannot be supported, you can only<br />
operate the files under the root directory in the USB memory. The Max number of files<br />
supported is 128 and the Max size of a MIDI file cannot be larger than 128Kbytes.<br />
Insert Memory Card - Insert SD card into the slot of the card reader, then poke the card<br />
into slot with the index finger until hear a click sound which means the card is located at the<br />
right place.<br />
Take Out The Memory Card - Poke the card in the slot with the index finger, the card will<br />
pop out automatically. Then you can take out the card in a safe condition.<br />
Note: Don’t take out the card or turn off the power switch when the card is involving a<br />
reading or saving process to avoid any damage<br />
Enter the Card<br />
Mode<br />
CARD<br />
1. Press the SD card button to engage the memory card operation<br />
mode and the indicator is lit. The main page of card mode is:<br />
SD CARD<br />
Press the SD card button again to exit the card mode and return to<br />
the normal <strong>piano</strong> mode, the indicator turns off.<br />
Note: You can not enter the card mode directly when record or play<br />
along song mode is engaged.<br />
2. The record function buttons are dual function buttons. Please<br />
follow the description above the buttons in the card mode.<br />
PLAY ALL LOAD SAVE UTILITY PLAY / STOP<br />
31
Save the Recorded<br />
Song<br />
into the Card<br />
32<br />
SD CARD<br />
SAVE<br />
3. If no SD card is inserted, or the SD Card is not inserted properly, or<br />
the card has been damaged, you will be unable to proceed to the various<br />
functions. The screen displays “No SD Card!”. After about 3<br />
seconds, it returns to normal <strong>piano</strong> mode, the card indicator turns off.<br />
1. Press the SAVE button, the indicator lights up. If there is no unsaved<br />
song, the display will show “No new song”. After about 3<br />
seconds, it will exit the saving operation and return to main page.<br />
No new song<br />
2. If an unsaved song does exist, one of the song indicators will blink<br />
requesting the song to be saved to the card. The display will prompt<br />
“Save it to card?”<br />
Save it to card?<br />
3. If you don’t want to save this song, press -/NO button. If there is<br />
more than one unsaved song, the next song indicator will blink and the<br />
display will prompt “Save it to card?” again. Keep on pressing -/NO<br />
button to cancel the saving operation for each unsaved song.<br />
4. If you want to save a song, press +/YES button. The file name of<br />
the song to be saved to the SD Card will appear in the display. This<br />
file name is automatically generated.<br />
When the saving starts, the completion percentage of the saving will<br />
be shown in the display.<br />
Song 003 88%<br />
5. After you finish saving this song, OK will appear in the<br />
display for about 3 seconds. If there is another unsaved<br />
song, the procedure will repeat. After all songs have been<br />
completed/saved, the <strong>piano</strong> will automatically exit the<br />
saving operation and return to the main page. The saving<br />
indicator turns off.
SD CARD<br />
6. If the card is full, “Card is full!” will appear in the display for 3<br />
seconds. Then, it will exit the saving operation and turn back to the<br />
main page and the saving indicator turns off.<br />
Card is full!<br />
7.Press the button “0” button to exit the saving operation and return to<br />
the main page. The save indicator turns off.<br />
Note: although the recorded songs have been saved to the SD Card,<br />
they are still kept in internal memory of the <strong>piano</strong>. You will not be<br />
asked to save them to the SD Card. If you change them in record<br />
mode, you will then be asked to save them into the SD Card.<br />
33
34<br />
SD CARD<br />
Play All MIDI<br />
Files on the<br />
Card<br />
PLAY ALL<br />
This feature plays all MIDI files in the card one by one.<br />
1. Press the PLAY ALL button and its indicator is lit.<br />
Before playing back, the file in the card will be loaded into the <strong>piano</strong>.<br />
Because the file loaded shares the same memory of recorded song in the<br />
<strong>piano</strong>, if you have your song recorded, this loading operation will erase it.<br />
When songs recorded but unsaved to card exist, the display will remind<br />
you “Save your song?” for safety.<br />
Save your song?<br />
2. If you want to save it, press the +/YES button and the <strong>piano</strong> will turn to<br />
the save page mentioned above automatically. When the saving process<br />
is finished, the <strong>piano</strong> returns to the normal settings page. If you don’t<br />
need to save, press the -/NO button and the loading process will<br />
continue. If there is no unsaved song, the loading process goes on<br />
automatically.<br />
3. After the step above is finished or skipped, the first file name appears<br />
in the display. The display will show 8 letters of the file name. If the file<br />
name consists of more than 8 letters, the display presents the first 6<br />
letters and the 7th letter appears as “^” to indicate that the rest of the<br />
letters are eliminated. The 8th letter is a number. It refers to the file number<br />
relating to the first 8 letters. For example, “Dreaming Melody” is displayed<br />
as “Dreami^1”, “Dreaming song” is displayed as “Dreami^2”.<br />
Dreami~1<br />
Note: If there is no MIDI file in the card, “No music file” will appear in the<br />
display for about 3 seconds. Then it returns to the main page.<br />
No MIDI file<br />
4. When loading starts, the completion percentage of loading will be<br />
shown in the display.<br />
Dreami~1 88%
SD CARD<br />
PLAY / STOP<br />
5. The file will automatically play after being loaded. The PLAY/<br />
STOP indicator lights up. The percentage of played parts of the file<br />
will appear in the display.<br />
6. After a file playback is finished, steps 2-3 mentioned above will<br />
be automatically carried on. While the file is playing you can press<br />
the +/YES or -/NO button to select other files.<br />
Note: If the channel number of the MIDI file is more than 16, which<br />
exceeds the capability of the <strong>piano</strong>, the file can not be loaded. “Too<br />
many Channels” will appear on the display. The nest file will be<br />
loaded and played automatically.<br />
Too many chnls!<br />
Note: The Maximum size of an individual file is 128K, If the size is<br />
larger than 128K, “Too large file” will appear on the display. The<br />
nest file will be loaded and played automatically.<br />
Too large file!<br />
6. Press the PLAY/STOP or press Play All button again to stop all<br />
playing. The indicator turns off and returns to the main page. Or,<br />
when all files in the SD Card are played, it will automatically stop<br />
and return to the main page.<br />
The solo, mute, save operation is available only after Play All mode<br />
is exited.<br />
Note: Lyrics display feature is not supported.<br />
35
36<br />
SD CARD<br />
Load and Play<br />
a File<br />
LOAD<br />
You should load the file into the <strong>piano</strong> at first to play single file in card,<br />
or to enable solo, mute feature.<br />
1. Press the LOAD button, the button indicator lights up.<br />
The first file name appears in the display.<br />
The display can show the file name with 8 letters maximum. If the file<br />
name consists of more than 8 letters, the display presents the first 6<br />
letters and the 7th letter appears as “^” to indicate that the rest letters<br />
are eliminated. The 8th letter is a number. It refers to file number<br />
which has the same first 8 letters and the file name is more than 8<br />
letters.<br />
Dreami~1<br />
If there is no MIDI file in the card, “No music file” will appear in the<br />
display for about 3 seconds. Then it returns to the main page.<br />
No music file<br />
2.Use +/YES or -/NO button to selcet file you desire.<br />
3. Press the LOAD button again to confirm your selection.<br />
Because the file loaded shares the same built-in memory asrecorded<br />
songs in the <strong>piano</strong>, if you have your song recorded, this loading<br />
operation will erase it. When songs recorded but not saved to the card<br />
really exist, the display will remind you “Save your song?” for safety.<br />
Save your song?<br />
If you want to save it, press the +/YES button and the <strong>piano</strong> returns to<br />
the save page mentioned above automatically while the LOAD indicator<br />
turns off. When the saving function is finished, it’ll go back to the<br />
loading page. If you don’t need to save, press the -/NO button and the<br />
loading goes on. If there is no unsaved song detected, this operation<br />
will be skipped.<br />
4. When loading starts, the percentage of completed loading will be<br />
shown in the display.<br />
Dreami~1 88%
SD CARD<br />
PLAY / STOP<br />
Note: The Maximum size of an individual file is 128K, If the size is<br />
larger than 128K, “Too large file” will appear on the display. Then, it’ll<br />
return to the main page.<br />
Too large file<br />
Note: If the channel number of the MIDI file is more than 16, which<br />
exceeds the capability of the <strong>piano</strong>, the file can not be loaded. “Too<br />
many Channels” will appear on the display. Then, it’ll turn to the main<br />
page.<br />
Too many channels<br />
5. After loading 100% completed, “OK” appears on the display then it<br />
turns to the main page. LOAD indicator turns off.<br />
6. Press the PLAY/STOP button to play the file. The PLAY/STOP<br />
indicator lights up. The percentage of played parts of the file will<br />
appear in the display. Press the PLAY/STOP button again to stop<br />
playing, the indicator turns off.<br />
Note: If press the PLAY/STOP button while no file has been loaded,<br />
“No file loaded” will appear on the display.<br />
No file loaded<br />
7. You can play the <strong>piano</strong> keyboard while a file is playing. You can<br />
also choose a voice while playing the keyboard. If your playing<br />
overlaps a voice of the playback file, you may mute the first channel<br />
as described in the next chapter of the manual, and play your own<br />
melody to replace that in the file.<br />
37
38<br />
SD CARD<br />
Solo a Channel<br />
UTILITY<br />
PLAY / STOP<br />
Note: You can’t play with layer or split mode. If the layer or split<br />
mode has been engaged when enter into the card operation mode,<br />
they will automatically be disabled.<br />
Note: Lyrics display feature is not supported.<br />
The MIDI file may contain several channels; each channel delivers a<br />
musical instrument sound simultaneously with other channels. If you<br />
want, you can choose a channel to Solo. This can also used as the<br />
preparation for muting a channel – determining which channel to be<br />
muted in the mute mode.<br />
1. Press the UTILITY button after loading a file, the indicator lights on.<br />
There are three utilities that can be selected. They are Solo, Mute<br />
and Delete. Use +/YES button or -/NO button to select Solo.<br />
Note: If there is no files loaded, “No file loaded” will appear on the<br />
display. The <strong>piano</strong> will returns to the main page.<br />
2. Press the UTILITY button again to confirm your<br />
selection. The first channel number will appear on the display. Use +/<br />
YES button or -/NO button to select a channel to solo.<br />
Note: If the file contains less than 16 channels, the display shows<br />
only the active channel numbers.<br />
3. Press the PLAY/STOP button to play the solo channel<br />
selected with its indicator lighting up. Press the PLAY/STOP button<br />
again to stop playing, the indicator turns off. The playing will auto-<br />
matically stop after all contents in this channel have been played.<br />
Then it returns to the Solo page and you may continue to select<br />
channels.<br />
Solo<br />
Solo Channel 2<br />
4. Press button 0 in the number pad area to exit the utility mode and<br />
return to the main page.
SD CARD<br />
Mute a<br />
Channel<br />
UTILITY<br />
PLAY / STOP<br />
The MIDI file may contain several channels; each channel delivers a<br />
musical instrument sound simultaneously with other channels. If you<br />
want, you can mute a channel and play by yourself on the keyboard.<br />
1. Press the UTILITY button after loading a file, the indicator lights on.<br />
There are three utilities that can be selected. Use +/YES button or -/<br />
NO button to select Mute.<br />
Mute<br />
2. Press the UTILITY button again to confirm your<br />
selection. The first channel number will appear on the display. Use +/<br />
YES button or -/NO button to select a channel to mute.<br />
Note: If the file contains less than 16 channels, the display shows only<br />
the active channel numbers.<br />
Mute Channel 2<br />
Note: If there is no file loaded, “No file loaded” will appear on the<br />
display. Then it returns to the main page.<br />
3. Press the PLAY/STOP button to play all channels except the mute<br />
channel selected with its indicator lighting up. Press the PLAY/STOP<br />
button again to stop playing, the indicator turns off. The playing will<br />
automatically stop after all contents in this channel are played. Then<br />
the <strong>piano</strong> returns to the Solo page and you may continue to select<br />
channels.<br />
4. You may perform on the keyboard with a music file playing as<br />
accompaniment. Normally, the voice in your playing is the same as the<br />
muted voice; all indicators of the voice quick select buttons will beoff.<br />
You may choose your own voice using voice quick select buttons; press<br />
the same quick select button to recover the original voice of the mute<br />
channel.<br />
5. Press button 0 in the number pad area to exit the utility mode and<br />
return to the main page.<br />
39
40<br />
SD CARD<br />
Delete File This operation is performed while in the SD Card main page.<br />
UTILITY<br />
1. Press the UTILITY button, the indicator lights on. Use +/YES button<br />
or -/NO button to select Delete.<br />
2. Press the UTILITY button again to confirm your<br />
selection.<br />
3. The first file name will appear on the display. Use +/YES button or -<br />
/NO button to select a file to delete.<br />
Note: If there is no MIDI file in the card, “No music file” will appear in<br />
the display for about 3 seconds. Then it returns to the main page.<br />
4. Press the UTILITY button again to enter the file selected.<br />
5. The display will remind you “Delete your song?” for safety.<br />
Press the +/YES button to carry on the deleting or press the -/NO<br />
button to ignore the delete then return to the main page.<br />
6. When the delete is finished, “OK” will appear on the display then<br />
return to the main page.<br />
Delete<br />
Del Song012<br />
No MIDI file<br />
Are you sure?<br />
OK!<br />
7. Press button 0 in the number pad area to exit the utility mode and<br />
return to the main page.
FUNCTION<br />
The Function mode is used to set up or to adjust various parameters related to the operation<br />
of this keyboard. With the FUNCTION button engaged you may access the menu for<br />
the Equalization, Reverb type & level, Chorus type & level, Touch sensitivity, Lower Split<br />
point for voice, Split point for auto accompaniment, tuning, the Drum kit selection, Harmony<br />
type selection and local off feature switch.<br />
FUNCTION<br />
PAGE<br />
VOICE<br />
SONG FUNCTION PAGE<br />
PAGE<br />
USER REG<br />
PAGE<br />
+ / YES<br />
0<br />
- / NO<br />
Equalization<br />
USING THE FUNCTION MENU<br />
STYLE<br />
1 2 3 +/YES<br />
4 5 6<br />
7 8 9 –/NO<br />
1. Press the FUNCTION button. The first menu item that can be<br />
manipulated will appear on the display.<br />
2. Press the PAGE or the PAGE buttons until the menu you<br />
wish to access appears on the display screen.<br />
3. Press the +/YES button to show the current parameter for your<br />
selected function.<br />
4. Use the number pad or the +/YES, –/NO buttons to set a new<br />
parameter.<br />
Note: Pressing the +/YES and the –/NO buttons simultaneously<br />
will recall the default setting.<br />
5. To exit the setup mode press any control button except the +/YES,<br />
-/NO or the FUNCTION button.<br />
0<br />
41
42<br />
FUNCTION<br />
DRUM KIT SELECTION (KEYBOARD PERCUSSION) - When keyboard<br />
percussion has been engaged, the entire keyboard will play the<br />
percussion voices from the selected Drum kit. There are ten drum<br />
kits, based on the Standard Kit that can be assigned. Kit 10 is a<br />
sound effects kit. Please see the “Drum List” at the back of the<br />
manual for a complete listing.<br />
Drum Kit<br />
1. Press the FUNCTION button, then the +/YES button to confirm.<br />
2. Press the PAGE or the PAGE buttons until the “Drum Kit” menu<br />
appears.<br />
3. Press the +/YES button to enter the Keyboard Percussion mode.<br />
4. Use the +/YES, –/NO buttons to select a drum kit 01 to 10.<br />
KYBD PERC.01<br />
Note: Pressing the -/NO button when KYBD PERC.01 is selected will<br />
return the <strong>piano</strong> to regular Voice mode, and display the last selected<br />
voice. Pressing the -/NO button when KYBD PERC.10 is selected<br />
will return the <strong>piano</strong> to regular Voice mode, and display “Percussion<br />
OFF” until another kit is selected.<br />
5. To exit the setup mode press any control button except the +/YES, -/<br />
NO or the FUNCTION button. If a kit is selected, the display will<br />
show “Percussion ON”. Use the +/YES, –/NO buttons to select a<br />
drum kit 01 to 10.<br />
6. To quickly exit the keyboard percussion mode, press any one of the<br />
quick select voice key.<br />
REVERB LEVEL SETTING - Reverb simulates the effect of playing in a<br />
big room or hall where the sound reverberates off the walls and<br />
ceiling. The reverb effect is engaged automatically when the power<br />
is turned on. You can switch the reverb feature on and off by pressing<br />
the REVERB button. Select the level of reverb from the Function<br />
menu.<br />
Reverb Level<br />
1. Press the FUNCTION button.<br />
2. Press the PAGE or the PAGE buttons until the “Reverb Level”<br />
menu appears.<br />
3. Press the +/YES button and the current reverb level will be shown.<br />
4. Use the +/YES button to increase the reverb level or the –/NO buttons<br />
to decrease the level. The number pad can also be used to directly<br />
enter a value ranged from 01-127. Press the +/YES, –/NO
FUNCTION<br />
CHORUS<br />
buttons simultaneously to recover the default setting.<br />
5. To exit the setup mode press any control button except the +/YES, -/<br />
NO or the FUNCTION button.<br />
CHORUS LEVEL SETTING - The Chorus effect enriches your selected<br />
instrument voice by adding depth and texture.<br />
Press the CHORUS button to engage the chorus effect, the indicator<br />
will light up. Adjust the level of chorus in the Function menu.<br />
Chorus Level<br />
1. Press the FUNCTION button.<br />
2. Press the PAGE or the PAGE buttons until the “Chorus Level”<br />
menu appears.<br />
3. Press the +/YES button to confirm your selection and the current<br />
Chorus level will be shown.<br />
4. Use the +/YES to increase the chorus level or the –/NO buttons to<br />
decrease the level. The number pad can also be used to directly<br />
enter a value ranged from 01-127. Press the +/YES, –/NO buttons<br />
simultaneously to recover the default setting of 08.<br />
5. To exit the setup mode press any control button except the +/YES, -/<br />
NO or the FUNCTION button.<br />
TOUCH RESPONSE SETTING - The <strong>piano</strong> offers four types of keyboard<br />
touch sensitivity settings, soft, normal, hard, and fixed. These are<br />
also known as velocity settings and are designed to suit your style<br />
of playing. The normal setting is selected automatically when the<br />
<strong>piano</strong> is turned on. The touch response can be changed with the<br />
function feature.<br />
Soft is the most sensitive keyboard response which permits maximum<br />
sound levels with a light touch.<br />
Normal is an intermediate response suitable for most styles of music.<br />
Normal is the default setting.<br />
Hard is a less sensitive keyboard response which requires a heavier<br />
touch to obtain maximum sound levels.<br />
Fixed does not offer any touch sensitivity. Each key plays at full<br />
volume no matter how hard the <strong>piano</strong> key is hit.<br />
It is commonly used on Harpsichord and Organ voices.<br />
Touch<br />
1. Press the FUNCTION button.<br />
2. Press the PAGE or the PAGE buttons until the “Touch” menu<br />
appears.<br />
3. Press the +/YES button to confirm your selection. The current touch<br />
response setting will be shown.<br />
4. Use the +/YES, –/NO buttons to select a touch response.<br />
43
44<br />
FUNCTION<br />
LOWER<br />
SINGLE<br />
FINGERED<br />
PIANO<br />
ACCOMP<br />
5. To exit the setup mode press any control button except the +/YES, -/<br />
NO or the FUNCTION button.<br />
CHANGING THE SPLIT POINT FOR LOWER VOICE - When the lower<br />
mode is engaged the keyboard is divided into two parts at the split<br />
point. In the right hand section the original or Upper voice will<br />
sound. In the left hand section a new instrument voice can be<br />
assigned, the lower voice. The split point for the Lower section<br />
can be changed in the Function feature.<br />
Split Point<br />
1. Press the FUNCTION button.<br />
2. Press the PAGE or the PAGE buttons until the “Split Point”<br />
menu appears.<br />
3. Press the +/YES button to confirm your selection and the current<br />
voice split point will be shown.<br />
4. Use the +/YES button to shift the split point up the keyboard, to the<br />
right, and the –/NO button to shift the split point down the<br />
keyboard, to the left. The number pad can also be used to enter<br />
the split point directly (by key number) from G2–C7. Press the +/<br />
YES, –/NO buttons simultaneously to recover the default setting of<br />
C3.<br />
5. To exit the setup mode press any control button except the +/YES, -/<br />
NO or the FUNCTION button.<br />
CHANGING THE SPLIT POINT FOR AUTO ACCOMPANIMENT - The<br />
split point that divides the keyboard can also be changed in the<br />
function menu.<br />
Auto A.Split<br />
1. Press the FUNCTION button.<br />
2. Press the PAGE or the PAGE buttons until the “Auto A.Split”<br />
menu appears.<br />
3. Press the +/YES button to confirm your selection and the current<br />
auto accompaniment split point will be shown.<br />
4. Use the +/YES button to shift the split point up the keyboard, to the<br />
right, and the –/NO button to shift the split point down.
FUNCTION<br />
HARMONY<br />
AUTO HARMONY TYPE SELECTING - When the HARMONY button is<br />
engaged, a single note on the right-hand section of the keyboard<br />
will sound with additional auto harmony notes, when the auto<br />
accompaniment is engaged. There are four types of harmony that<br />
can be selected.<br />
Duet adds a harmonizing note sounding below the single right hand<br />
note that you supply when the chord accompaniment is playing.<br />
Close harmony adds two harmonizing notes sounding below the<br />
single right hand melody note that you supply, when the chord accompaniment<br />
is playing.<br />
Open harmony<br />
Octave add a note one octave below the note you play in the right<br />
hand section of the keyboard when the chord accompaniment is<br />
playing.<br />
1. Press the FUNCTION button, then the +/YES button to confirm.<br />
2. Press the PAGE or the PAGE buttons until the “Harmony Type”<br />
menu appears.<br />
3. Press the +/YES button to confirm your selection. The current harmony<br />
type will be shown.<br />
4. Use the +/YES or –/NO buttons to select a harmony type.<br />
5. To exit the setup mode press any control button except the +/YES,<br />
-/NO or the FUNCTION button.<br />
Harmony Type<br />
MASTER TUNE - The pitch of this <strong>piano</strong> is very accurate and stable, it is<br />
automatically set to standard A440 pitch when the <strong>piano</strong> is turned<br />
on. The tuning feature makes it possible to tune the pitch of the<br />
instrument in fine intervals. If necessary, you can alter the <strong>piano</strong><br />
pitch. Tuning can be accomplished over –50 to +50 semitone<br />
steps, or cents.<br />
Master Tune<br />
1. Press the FUNCTION button.<br />
2. Press the PAGE s or the PAGE t buttons until the “Master<br />
Tune” menu appears.<br />
3. Press the +/YES button the tuning value will be shown.<br />
4. Use the +/YES button to increase the value or the –/NO<br />
buttons to decrease the value. Press the +/YES, –/NO<br />
buttons simultaneously to recover the default setting of<br />
00.<br />
5. To exit the setup mode press any control button except the<br />
+/YES, -/NO or the FUNCTION button.<br />
45
46<br />
FUNCTION<br />
EQUALIZATIONE - The Equalization function will adjust the global “tone”<br />
of the internal sound output of the <strong>piano</strong>.<br />
Equalization<br />
1. Press the FUNCTION button.<br />
2. Press the PAGE s or the PAGE t buttons until the “Equalization”<br />
menu appears.<br />
3. Press the +/YES button the current EQ type will be shown.<br />
4. Use the +/YES or the –/NO buttons to select EQ type you desire. The<br />
available EQ types are listed below:<br />
1. Piano 2. Bright 3. Bright Middle 4. Middle boost<br />
5. Bass Middle 6. Bass Boost 7. Flat 8. Classical<br />
9. Jazz 10.Pop 11. Rock<br />
5. To exit the setup mode press any control button except the +/YES, -/<br />
NO or the FUNCTION button.<br />
REVERB TYPE - There are 10 reverb types available to choose from.<br />
Reverb Type<br />
1. Press the FUNCTION button.<br />
2. Press the PAGE s or the PAGE t buttons until the “Reverb Type”<br />
menu appears.<br />
3. Press the +/YES button the current reverb type will be shown.<br />
4. Press the +/YES or the –/NO buttons to select type listed below<br />
1. Small Hall 2. large Hall 3 . Plate reverb 4. Church<br />
5. Cathedral 6. Gated Reverb 7. Echo 8. 3/4 Echo<br />
9. 4/4 Echo 10. Triplet Echo<br />
5. To exit the setup mode press any control button except the +/YES, -/<br />
NO or the FUNCTION button.<br />
CHORUS TYPE - There are 8 Chorus types available to choose from.<br />
Chorus Type<br />
1. Press the FUNCTION button.<br />
2. Press the PAGE s or the PAGE t buttons until the “Chorus Type”<br />
menu appears.<br />
3. Press the +/YES button the current chorus type will be shown.<br />
4. Press the +/YES or the –/NO buttons to select type listed below:<br />
1. Chorus Deep 2. Resonant Chorus 3 . Flange 4. Flange Deep<br />
5. Phaser 6. Tremolo 7. Tremolo Medium 8. Tremolo Fast<br />
5. To exit the setup mode press any control button except the +/YES, -/<br />
NO or the FUNCTION button.
FUNCTION<br />
VOCAL GRADING - After performance of the play-along song, you can<br />
hear vocal grading. You can also disable this feature.<br />
Vocal Grade<br />
1. Press the FUNCTION button.<br />
2. Press the PAGE s or the PAGE t buttons until the “Vocal Grade”<br />
menu appears.<br />
3. Press the +/YES button the current status will be shown.<br />
4. Press the +/YES button to set Vocal grading ON, or the –/NO buttons<br />
to set it Off<br />
5. To exit the setup mode press any control button except the +/YES, -/<br />
NO or the FUNCTION button.<br />
LOCAL - Normally, playing on the keyboard generates sound while it<br />
sends MIDI messages via the MIDI connector or USB. This mode is<br />
called Local On. If you desire, you could mute the <strong>piano</strong> but simply<br />
send out the MIDI messages. This mode is called Local Off.<br />
Local<br />
1. Press the FUNCTION button.<br />
2. Press the PAGE s or the PAGE t buttons until the “Local” menu<br />
appears.<br />
3. Press the +/YES button the current status will be shown.<br />
4. Press the +/YES button to set Local ON, or the –/NO buttons to set it<br />
Off<br />
5. To exit the setup mode press any control button except the +/YES, -/<br />
NO or the FUNCTION button.<br />
FACTORY SETTING - This function will reset the <strong>piano</strong> with factory default<br />
setting..<br />
Reset<br />
1. Press the FUNCTION button.<br />
2. Press the PAGE s or the PAGE t buttons until the “Reset” menu<br />
appears.<br />
3. Press the +/YES button to recover the factory setting.<br />
4. To exit the setup mode press any control button except the +/YES, -/<br />
NO or the FUNCTION button.<br />
47
48<br />
RECORD<br />
+/YES<br />
6<br />
–/NO<br />
This <strong>piano</strong> is equipped with a real time recorder, able to store four songs, each with a 3track<br />
sequencer. It will record all note events and the accompaniment as they are<br />
performed. This recorded information is nonvolatile and therefore will not be lost when<br />
the power is turned off. All the tracks can playback separately or together as a complete<br />
song.<br />
MELODY 1 MELODY2<br />
ACCOMP<br />
REC<br />
1<br />
2<br />
3<br />
4<br />
USER SONG<br />
METRONOME<br />
PLAY ALL LOAD SAVE UTILITY PLAY/STOP<br />
USER SONG ACCOMP MELODY 1 MELODY 2 REC PLAY/STOP<br />
RECORDING -<br />
1. Prepare - Prepare to record by setting the voice, style, tempo and<br />
reverb level and other parameters as desired.<br />
These settings can be stored into a registration memory for easy<br />
recall, please see the registration memory section for more<br />
information.<br />
2. Select a Song - Press the USER SONG button, and use the +/<br />
YES, –/NO buttons to select a song, the display will show the song<br />
number selected. This is where the recorded information will be<br />
stored.<br />
1:User Song<br />
3. Select a track -<br />
Melody will record all notes.<br />
There are two tracks available for recording the melody, these are<br />
assigned by pressing the MELODY 1 or the MELODY 2 button.<br />
Auto Accompaniment will record all the auto accompaniment<br />
events just as they are played.<br />
The ACCOMP track button will select the accompaniment track.<br />
Press and hold down the REC button, then press the track button<br />
that you want to record in. The corresponding track indicator will<br />
blink and immediately erase the existing recording in this track. The<br />
four dots of the beat indicator will blink with the current tempo, to<br />
show that the recorder is on standby.<br />
If you already have a recorded track(s) in the selected song, that<br />
indicator will also be lit and the recorded music will play, as a<br />
reference for you while you record the new track. If you do not wish<br />
for previously recorded tracks to play while you are recording,<br />
press the corresponding track button to turn the indicator light off.<br />
4. Metronome - Press the METRONOME button to enable the metronome<br />
as a reference when recording only melody track. The metronome<br />
sound will not be recorded.<br />
Note: If you use the metronome when recording the accompaniment<br />
track, the metronome will play in place of the drum part of the<br />
auto accompaniment.
RECORD<br />
MELODY 1 MELODY2<br />
ACCOMP<br />
ACCOMP MELODY 1<br />
REC PLAY/STOP<br />
RECORDING (continued)<br />
4. Record - Your performance can be recorded in the following ways:<br />
Record Melody Track Only<br />
If the MELODY 1 or MELODY 2 buttons are selected the recording<br />
will begin as soon as you play the keyboard.<br />
Please Note: It is suggested to turn off the fingering mode when<br />
recording on a melody track alone. When the fingering mode is<br />
set to Fingered or Single, the auto accompaniment section of the<br />
keyboard will not be recorded, although the notes are sounding.<br />
Record Auto Accompaniment Track Only<br />
With the Auto Accompaniment ACCOMP engaged recording will<br />
start as soon as a chord is played on the auto accompaniment<br />
section of the keyboard.<br />
Please note, notes played on the Melody section of the keyboard<br />
will not be recorded in the auto accompaniment track. If the auto<br />
accompaniment is off, only the percussive rhythm will be recorded<br />
in the ACCOMP track.<br />
An unrecognized chord in the fingered mode cannot start the<br />
recording.<br />
Record the Auto Accompaniment and a Melody Track<br />
If you want to record a melody and the accompaniment at the same<br />
time, Press a MELODY track button, then the ACCOMP track<br />
button and both indicators will blink in the standby mode. Recording<br />
begins as soon as you start to play on any section of the<br />
keyboard.<br />
Please Note: the contents in a track will be erased as soon you<br />
start to record on the selected track.<br />
It will be replaced by the new data that the user is recording.<br />
5. Stop Recording - Press the START/STOP button, the PLAY/STOP<br />
button or the REC button to stop recording.<br />
Or when the accompaniment track is being recorded, press the<br />
INTRO/ENDING button to stop the recording with an ending<br />
pattern in the accompaniment track.<br />
Please Note: When the record memory is full, recording will stop<br />
automatically and “End” will appear on the display screen.<br />
PLAYBACK - To listen to the recorded passage:<br />
49
50<br />
RECORD<br />
+ / YES<br />
0<br />
- / NO<br />
MELODY 1 MELODY2<br />
ACCOMP<br />
PLAY/STOP<br />
PLAY/STOP<br />
USER SONG<br />
1<br />
2<br />
3<br />
4<br />
USER SONG<br />
1. Press the USER SONG button and select the song you want to play<br />
back, using the +/YES, –/NO buttons. The display will show the<br />
song number.<br />
1:User Song<br />
VOICE STYLE<br />
2. After you have selected your desired User Song, the LED indicators<br />
of those recorded channel tracks will be engaged.<br />
If you do not wish to hear a specific track, press the corresponding<br />
track button to turn that track off.<br />
Its LED indicator will turn off.<br />
3. Press the PLAY/STOP button to hear the recorded track(s).<br />
The dots of the beat indicator will flash.<br />
You can change the tempo by pressing the +TEMPO– buttons.<br />
You may also play on the keyboard while the recording is playing<br />
back.<br />
4. Press the PLAY/STOP button again to stop the playback.<br />
Playback will stop automatically when the recording reaches its<br />
end.<br />
5. Press the USER SONG button again to exit the Record Mode, the<br />
display screen will revert to the current voice selected.<br />
Note: The melody track can record layer or lower performance. But<br />
cannot record layer and lower at the same time. In the record mode,<br />
when layer or lower mode is triggered, then press another mode button,<br />
the mode will be toggled to new one. If both layer and lower mode are<br />
engaged before entering record, when enter the record mode, only<br />
layer mode remains and the lower will be disabled automatically.
REGISTRATION MEMORY<br />
Registration Memory can recall particular settings of style, voice, chord and other parameters<br />
or features you have engaged. This <strong>piano</strong> has nine registration memories to hold your<br />
favorite settings so that they can be recalled quickly by pressing a button.<br />
The unit is equipped with a backup battery and your registration memories will not be lost<br />
when the power is turned off.<br />
Please Note: The Registration Memory is recalled by using the numeric pad buttons.<br />
DIGITAL/REG<br />
1 2 3 +/YES<br />
3 4 5 6<br />
7 8 9 –/NO<br />
DIGITAL/REG<br />
1 2 3 +/YES<br />
3 4 5 6<br />
7 8 9 –/NO<br />
SAVE YOUR SETTINGS IN THE REGISTRATION MEMORY<br />
1. Set the voice, rhythm, tempo, accompaniment, reverb effect and<br />
any other parameters that you wish to save.<br />
2. Hold down the REG button.<br />
VOICE<br />
b-1:Store<br />
3. Press one of the number pads 1-9. The display will show the<br />
current registration memory number with a “b-” prefix. Your<br />
panel setting will be saved into that registration memory button<br />
instantly.<br />
RECALL CONTENTS IN THE REGISTRATION MEMORY<br />
1. Press and release the DIGITAL/REG button to engage the registration<br />
memory mode, the indicator will light up.<br />
2. Press one of the number pads 1-9 buttons, the stored setting will<br />
be recalled instantly and the display will show the memory<br />
number with a “b-” prefix. The relevant parameters will be set<br />
and the display will recover to the voice that has just been<br />
recalled.<br />
VOICE<br />
b-1:RegisterBank<br />
STYLE<br />
STYLE<br />
51
52<br />
PLAY ALONG SONGS<br />
Press the DEMO/SONG button twice to access the play along song function.<br />
There are 50 songs built into the <strong>piano</strong> for your musical enjoyment.<br />
You can change the song by pressing the +/YES , –/NO buttons or use the number pads to<br />
input a song number directly.<br />
Press the DEMO/SONG button again to stop the song demonstration.<br />
DEMO/SONG SONG<br />
START/STOP<br />
LEFT<br />
START/STOP<br />
DEMO/SONG<br />
+ / YES<br />
0<br />
- / NO<br />
RIGHT<br />
LEFT<br />
RIGHT<br />
DEMO/SONG<br />
FUNCTION PAGE<br />
PAGE<br />
USER REG<br />
USING THE SONG FEATURE<br />
1. Engage the Song mode - Press the DEMO/SONG button twice<br />
until green indicator lights up. The first song number will appear on<br />
the display.<br />
Use the +/YES, –/NO buttons or the number pads to select a song.<br />
The song number will appear on the display.<br />
001:Mary Lamb<br />
2. Listen to the demonstration - Press the START/STOP button to<br />
listen to the selected song. The chord playing from the auto<br />
accompaniment and the tempo will be shown on the display.<br />
Right hand play along - Press the RIGHT button. Then press the<br />
START/STOP button, after the metronome sound count in, the<br />
auto accompaniment will playback, and you can play the right<br />
hand melody notes with the rhythm accompaniment track.<br />
While playing, press the METRONOME button if you want to<br />
replace the drum part of the auto-accompaniment by the<br />
metronome.<br />
If you want to play slower or faster than the preset tempo, press<br />
the TEMPO + or TEMPO - button to adjust the tempo. Press<br />
TEMPO+ and TEMPO- button simultaneously to return to the
PLAY ALONG SONGS<br />
START/STOP<br />
LEFT<br />
START/STOP<br />
DEMO/SONG<br />
LEFT<br />
RIGHT<br />
default tempo for the selected song.<br />
Left hand play along - Press the LEFT button. Then press the<br />
START/STOP button, after the metronome sound count in the melody<br />
will playback with the drum rhythm of the accompaniment track, you<br />
can play the left hand accompaniment pattern to match this melody.<br />
You may use METRONOME, TEMPO button as described above.<br />
Right and Left hand play along- Press the RIGHT and LEFT buttons<br />
simultaneously, then press the START/STOP button, after the metronome<br />
sound, you can play the entire section with both hands with the<br />
percussive rhythm or metronome track.<br />
You may use METRONOME, TEMPO button as described above.<br />
3. Check you progress - You will hear a vocal grading as soon as you<br />
finish the performance. The grades are “Try Again”, “Good”, “Very<br />
good” and “Excellent”. You can also disable the vocal grading system<br />
in the Function mode.<br />
The same song passage will continue until you press the START/<br />
STOP button.<br />
4. Stop the Song Function - Press the DEMO/SONG button again to<br />
exit the Play Along Song Mode.<br />
53
54<br />
iPOD DOCK<br />
The iPod docking station is located on the right hand side of the <strong>piano</strong> underneath the<br />
keyboard.<br />
1. Pull out the iPod docking station from under the keyboard.<br />
2. Turn the Piano’s Master Volume to mid level to ensure that the initial iPod volume will not<br />
damage the Piano’s sound delivery system.<br />
3. Place your iPod onto the docking station carefully. The bottom of the iPod needs to interface<br />
with the compatible connector on the docking station.<br />
iPod Volume<br />
The volume control to the right of the iPod docking cradle can be used to easily adjust the<br />
iPod’s volume to match your playing volume level, while you may use the master volume<br />
control for overall volume of the <strong>piano</strong>.<br />
The Piano’s EQ controls will not affect the iPod sound output. Therefore please use the<br />
iPod’s EQ to optimize the iPod’s sound and tone.<br />
IPod Charging<br />
Your iPod will be charging while it is connected to your <strong>piano</strong>’s iPod docking station.
MIDI<br />
MIDI stands for <strong>Music</strong>al Instrument Digital Interface. This is a world wide standard communication<br />
interface that enables electronic musical instruments and computers (of all brands)<br />
to communicate with each other so that instructions and other data can pass between them.<br />
This exchange of information makes it possible to create a system of MIDI instruments and<br />
devices that offers far greater versatility and control than is available with isolated<br />
instruments. Whether you interface with computers, sequencers, expanders or other keyboards<br />
your musical horizons will be greatly enhanced.<br />
MIDI<br />
OUT IN<br />
MIDI CONNECTION - The MIDI terminals are located on the left side<br />
panel of the <strong>piano</strong>.<br />
1. MIDI In: This terminal receives MIDI data from an external MIDI<br />
device.<br />
2. MIDI Out: This terminal transmits data from this instrument to other<br />
MIDI devices. The transmitted data includes the note and touch<br />
velocity produced while playing on the keyboard, as well as voice<br />
changes, wheel operation, and recorded playback for the melody<br />
tracks. Demo songs and auto accompaniment are not transmitted.<br />
USB - The USB connector allows you to connect the <strong>piano</strong> directly to<br />
your computer. It can be connected without driver installation<br />
under the Windows XP, Windows Vista & MAC OSX environment.<br />
The <strong>piano</strong> will be recognized as a USB Audio device to receive<br />
and transmit the same MIDI messages described above.<br />
For more information regarding transmitted MIDI data please<br />
see the next page and or the MIDI implementation chart.<br />
55
56<br />
MIDI<br />
MIDI CHANNELS - The MIDI system in this unit has 16 channels<br />
numbered from 1-16. Each of the channels is responsible for a<br />
voice. When the instrument receives from an external device, the<br />
active channel is determined by the control message. The transmission<br />
channels on this keyboard are fixed as follows:<br />
Channel 1: Master voice<br />
Channel 2: Layer voice<br />
Channel 3: Split voice<br />
Channel 4: Bass in manual bass chord mode<br />
Channel 7: Chord in manual bass chord mode<br />
Channel 10: Percussion sound<br />
Please see the MIDI Implementation Chart for more detail.<br />
For further MIDI setup options please see your local Suzuki <strong>Music</strong><br />
Store.<br />
Note: When a USB cable is connected from the <strong>piano</strong> to to a<br />
computer, all MIDI messages will receive/transmit via USB.
MIDI IMPLEMENTATION CHART<br />
Function Transmitted Recognized Remark<br />
Basic Channel 1 CH 1 – 16 CH<br />
Channel changed 1 – 16 CH 1 – 16 CH<br />
Default mode X 3<br />
Note number 11 – 118 0 – 127<br />
Velocity Note On<br />
9N,V=1–127 9N,V=0–127<br />
Note Off<br />
X<br />
Yes<br />
Pitch Bender X Yes<br />
Control Change<br />
1 X Yes Modulation<br />
5 X Yes Portamento value<br />
7 X Yes Volume<br />
10 X Yes Pan<br />
11 X Yes Expression<br />
64, Yes Yes Sustain, ,<br />
66 Yes Yes Sostenuto<br />
67 Yes Yes Soft pedal<br />
65 X Yes Portamento yes/no<br />
80 Yes X Reverb program<br />
81 Yes X chorus program<br />
91 Yes Yes Reverb send level<br />
92 Yes Yes chorus send level<br />
98 X Yes NRPNL<br />
99 X Yes NRPNH<br />
100 X X RPNL<br />
101 X X RPNH<br />
121 Yes Yes Reset all controllers<br />
123 Yes Yes All notes off<br />
Program change 0 – 138 * 0 – 127<br />
System exclusive X X<br />
Sys. Common: Song select X X<br />
Song position X X<br />
System: Clock X X<br />
Real time: Commands X X<br />
Mode 1: OMNI ON, POLY Mode 2: OMNI ON, MONO<br />
Mode 3: OMNI OFF, POLY Mode 4: OMNI OFF, MONO<br />
* Including some special voices.<br />
57
58<br />
VOICE LIST<br />
No. Name Display<br />
PIANO<br />
001 Acoustic Grand Piano Grand Piano<br />
002 Bright Acoustic Piano Bright Piano<br />
003 Electric Grand Piano El.G.Piano<br />
004 Honky-Tonk Piano Honky-Tonk<br />
005 Electric Piano 1 Elec.Piano1<br />
006 Electric Piano 2 Elec.Piano2<br />
007 Harpsichord Harpsichord<br />
008 Clavichord Clavichord<br />
CHROMATIC PERCUSSION<br />
009 Celesta Celesta<br />
010 Glockenspiel Glockenspiel<br />
011 <strong>Music</strong> box <strong>Music</strong> Box<br />
012 Vibraphone Vibraphone<br />
013 Marimba Marimba<br />
014 Xylophone Xylophone<br />
015 Tubular Bells TubularBells<br />
016 Dulcimer Dulcimer<br />
ORGAN<br />
017 Drawbar Organ Draw Organ<br />
018 Percussive Organ Percus Organ<br />
019 Rock Organ Rock Organ<br />
020 Church Organ ChurchOrgan<br />
021 Reed Organ Reed Organ<br />
022 Accordion Accordion<br />
023 Harmonica Harmonica<br />
024 Tango Accordion Tango Accordn<br />
GUITAR<br />
025 Acoustic Nylon Guitar Nylon Guitar<br />
026 Acoustic Steel Guitar Steel Guitar<br />
027 Electric Jazz Guitar Jazz Guitar<br />
028 Electric Clean Guitar Clean Guitar<br />
029 Electic Muted Guitar Mute Guitar<br />
030 Overdriven Guitar Overdrive<br />
031 Distortion Guitar Dist Guitar<br />
032 Guitar Harmonics GtrHarmonics<br />
BASS<br />
033 Acoustic Bass AcousticBass<br />
034 Electric Bass (finger) Finger Bass<br />
035 Electric Bass (pick) Pick Bass<br />
036 Fretless Bass FretlessBass<br />
037 Slap Bass 1 SlapBass1<br />
038 Slap Bass 2 SlapBass2<br />
039 Synth Bass 1 Synth Bass1<br />
040 Synth Bass 2 Synth Bass2<br />
No. Name Display<br />
STRINGS<br />
041 Violin Violin<br />
042 Viola Viola<br />
043 Cello Cello<br />
044 Contrabass ContraBass<br />
045 Tremolo Strings TremStrings<br />
046 Pizzicato Strings PizzStrings<br />
047 Orchestral Harp OrchHarp<br />
048 Timpani Timpani<br />
ENSEMBLE<br />
049 String Ensemble 1 StringEnsbl1<br />
050 String Ensemble 2 StringEnsbl2<br />
051 Synth Strings 1 SynthString1<br />
052 Synth Strings 2 SynthString2<br />
053 Choir Aahs ChoirAahs<br />
054 Voice Oohs VoiceOohs<br />
055 Synth Voice Synth Voice<br />
056 Orchestra Hit OrchHit<br />
BRASS<br />
057 Trumpet Trumpet<br />
058 Trombone Trombone<br />
059 Tuba Tuba<br />
060 Muted Trumpet MutedTrumpet<br />
061 French Horn FrenchHorn<br />
062 Brass Section BrassSection<br />
063 Synth Brass 1 SynthBrass1<br />
064 Synth Brass 2 SynthBrass2<br />
REED<br />
065 Soprano Sax SopranoSax<br />
066 Alto Sax Alto Sax<br />
067 Tenor Sax Tenor Sax<br />
068 Baritone Sax Baritone Sax<br />
069 Oboe Oboe<br />
070 English Horn English Horn<br />
071 Bassoon Bassoon<br />
072 Clarinet Clarinet<br />
PIPE<br />
073 Piccolo Piccolo<br />
074 Flute Flute<br />
075 Recorder Recorder<br />
076 Pan Flute Pan Flute<br />
077 Bottle Blow Bottle<br />
078 Shakuhachi Shakuhachi<br />
079 Whistle Whistle<br />
080 Ocarina Ocarina
VOICE LIST<br />
No. Name Display<br />
SYNTH LEAD<br />
081 Lead 1 (square) Square Lead<br />
082 Lead 2 (sawtooth) SawtoothLead<br />
083 Lead 3 (caliope lead) CaliopeLead<br />
084 Lead 4 (chiff lead) Chiff Lead<br />
085 Lead 5 (charang) Charang Lead<br />
086 Lead 6 (voice) Voice Lead<br />
087 Lead 7 (fifths) Fifth Lead<br />
088 Lead 8 (bass + lead) Bass +Lead<br />
SYNTH PAD<br />
089 Pad 1 (new age) New Age Pad<br />
090 Pad 2 (warm) Warm Pad<br />
091 Pad 3 (polysynth) PolySynthPad<br />
092 Pad 4 (choir) Choir Pad<br />
093 Pad 5 (bowed) Bowed Pad<br />
094 Pad 6 (metallic) Metallic Pad<br />
095 Pad 7 (halo) Halo Pad<br />
096 Pad 8 (sweep) Sweep Pad<br />
SYNTH EFFECT<br />
097 FX 1 (rain) Rain<br />
098 FX 2 (soundtrack) Sound Track<br />
099 FX 3 (crystal) Crystal<br />
100 FX 4 (atmosphere) Atmosphere<br />
101 FX 5 (brightness) Brightness<br />
102 FX 6 (goblins) Goblins<br />
103 FX 7 (echoes) Echoes<br />
104 FX 8 (sci-fi) Sci-Fi<br />
ETHNIC<br />
105 Sitar Sitar<br />
106 Banjo Banjo<br />
107 Shamisen Shamisen<br />
108 Koto Koto<br />
109 Kalimba Kalimba<br />
110 Bagpipe Bagpipe<br />
111 Fiddle Fiddle<br />
112 Shanai Shanai<br />
PERCUSSIVE<br />
113 Tinkle Bell Tinkle Bell<br />
114 Agogo Agogo<br />
115 Steel Drums Steel Drums<br />
116 Woodblock WoodBlock<br />
117 Taiko Drum Taiko Drum<br />
118 Melodic Tom MelodicTom<br />
119 Synth Drum Synth Drum<br />
120 Reverse Cymbal ReversCymbal<br />
No. Name Display<br />
SOUND EFFECT<br />
121 Guitar Fret Noise Fret Noise<br />
122 Breath Noise Breath Noise<br />
123 Seashore Seashore<br />
124 Bird Tweet Bird Tweet<br />
125 Telephone Ring Telephone<br />
126 Helicopter Helicopter<br />
127 Applause Applause<br />
128 Gunshot Gunshot<br />
Please note: For voices from 001 - 128<br />
in the table, the “No.” is the displayed<br />
voice number. The MIDI<br />
program number for any voice<br />
listed is one less than the display<br />
number. For example voice 001<br />
Acoustic Grand Piano MIDI program<br />
number is 000, voice 002<br />
Bright Acoustic Piano MIDI program<br />
number is 001, and so forth.<br />
59
60<br />
VOICE LIST<br />
More ethnic Asian Instruments have been added to the voice list as shown below.<br />
ASIAN FOLK INSTRUMENTS<br />
No. Name Display Prog. Change Bank<br />
129 Yangqin Yangqin 15 1<br />
130 Sanxian Pipa 106 1<br />
131 Zheng Zheng 107 1<br />
132 Erhu Erhuvib 110 1<br />
133 Banhu Banhu 0 1<br />
134 Suona Suona 1 1<br />
135 Sheng Sheng 2 1<br />
136 Dizi Dizi 3 1<br />
137 Erhu + Yangqin ErhuYangqin2 7 1<br />
138 Dizi + Zheng DiziZheng2 11 1<br />
Please note: When the touch sensitivity is in the “Soft,” “Normal,” or “Hard,” mode,<br />
voice No. 137 will sound as Erhu when a key is struck softly, and as Yangqin<br />
when the key is struck hard.<br />
If the touch response is fixed, voice No. 137 will always sound as Yangqin.<br />
Voice No. 138 will sound as Zheng when a playing keys below C4, and as<br />
Dizi when playing key C4 and above.
STYLE LIST<br />
No. Name<br />
Swing<br />
00 Swing 1<br />
01 Swingin'Organ<br />
02 Swing Trio<br />
03 Slow Swing<br />
04 Dixie<br />
05 Jazz<br />
06 Lounge<br />
07. Shuffle Blues<br />
08. Blues<br />
R&B<br />
09 Gospel 1<br />
10 Gospel 2<br />
11 Reggae 1<br />
12 Reggae 2<br />
13 Motown<br />
14 Shuffle<br />
15 R&B 1<br />
16 R&B 2<br />
17 R&B Shuf<br />
POP<br />
18 Pop 1<br />
19 Pop 2<br />
20 Pop 3<br />
21 8 Beat Pop 1<br />
22 8 Beat Pop 2<br />
23 8 Beat Pop 3<br />
24 Pop16<br />
25 Pop Acoustic<br />
26 EasyPop<br />
27 Funky Pop<br />
28 Disco Pop<br />
29 Slow Groove<br />
30 Florida<br />
31 Folk 1<br />
32 Folk 2<br />
33 Funky<br />
DISCO<br />
34 Disco<br />
No.<br />
Name<br />
35 Disco Dance 1<br />
36 Disco Dance 2<br />
37 Disco Shuffle<br />
38 Disco Groove<br />
39 House<br />
40 Dance 1<br />
41 Dance Pop 1<br />
42 Dance Pop 2<br />
43 80’s Dance<br />
44 Dance 2<br />
45 Techno<br />
46 Rap<br />
ROCK<br />
47 Rock1<br />
48 Rock2<br />
49 Slow Rock<br />
50 Rock n Roll 1<br />
51 Rock n Roll 2<br />
52 Surf Rock<br />
53 Jerry<br />
BOSSA<br />
54 Bossa Nova<br />
55 Bossa Nova 2<br />
56 Pop Bossa 1<br />
57 Pop Bossa 2<br />
58 Salsa<br />
59 Tango<br />
60 Merenque<br />
LATIN<br />
61 Rumba<br />
62 Beguine<br />
63 Samba<br />
64 Chacha<br />
65 Latin 1<br />
66 Latin 2<br />
OLDIES<br />
67 Hawaiian<br />
68 Hula<br />
69 Boogie<br />
No.<br />
Name<br />
70 Fox Trot<br />
71 Ragtime<br />
72 Waltz 1<br />
73 Waltz 2<br />
74 Classic 1<br />
75 Classic 2<br />
BALLAD<br />
76 Ballad<br />
77 50's Ballad<br />
78 Power Ballad<br />
79 Jazz Ballad<br />
80 Bolero<br />
81 Slow 16<br />
ACOUSTIC<br />
82 Kids 1<br />
83 Kids 2<br />
84 March0 1<br />
85 March0 2<br />
86 March0 3<br />
87 Polka 1<br />
88 Polka 2<br />
89 MexPolka<br />
90 NewAge<br />
ROCK<br />
91 Country<br />
92 Country Train<br />
93 Bluegrass<br />
94 SlowBlus<br />
BIG BAND<br />
95 Latin Big Band<br />
96 Brodway1<br />
97 Brodway2<br />
98 Big band<br />
99 Mambo Band<br />
61
62<br />
DRUM KIT LIST-1<br />
No.-Key<br />
27-E b 1<br />
28-E1<br />
29-F1<br />
30-F#1<br />
31-G1<br />
32-G#1<br />
33-A1<br />
34-B b 1<br />
35-B1<br />
36-C2<br />
37-C#2<br />
38-D2<br />
39-E b 2<br />
40-E2<br />
41-F2<br />
42-F#2<br />
43-G2<br />
44-G#2<br />
45-A2<br />
46-B b 2<br />
47-B2<br />
48-C3<br />
49-C#3<br />
50-D3<br />
51-E b 3<br />
52-E3<br />
53-F3<br />
54-F#3<br />
55-G3<br />
56-G#3<br />
57-A3<br />
58-B b 3<br />
59-B3<br />
60-C4<br />
61-C#4<br />
62-D4<br />
63-E b 4<br />
64-E4<br />
65-F4<br />
66-F#4<br />
67-G4<br />
68-G#4<br />
69-A4<br />
70-B b 4<br />
71-B4<br />
72-C5<br />
73-C#5<br />
74-D5<br />
75-E b 5<br />
76-E5<br />
77-F5<br />
78-F#5<br />
79-G5<br />
80-G#5<br />
81-A5<br />
82-B b 5<br />
83-B5<br />
84-C6<br />
85-C#6<br />
86-D6<br />
87-E b 6<br />
Standard (0)<br />
P-1: Standard<br />
High Q<br />
Slap<br />
Scratch Push<br />
Scratch Pull<br />
Stick<br />
Square Click<br />
Metronome Click<br />
Metronome Bell<br />
Kick Drum 2<br />
Kick Drum 1<br />
Side Stick<br />
Snare Drum 2<br />
Hand Clap<br />
Snare Drum 1<br />
Low Floor Tom 2<br />
Close Hi-hat<br />
Low Floor Tom 1<br />
Pedal Hi-hat<br />
Low Tom<br />
Open Hi-hat<br />
Low-mid Tom<br />
Hi-mid Tom<br />
Crash Cymbal 1<br />
RHigh Tom<br />
Ride Cymbal 1<br />
Chinese Cymbal<br />
Ride Bell<br />
Tambourine<br />
Splash Cymbal<br />
Cowbell<br />
Crash Cymbal 2<br />
Vibra Slap<br />
Ride Cymbal 2<br />
Hi Bongo<br />
Low Bongo<br />
Mute Conga<br />
Hi Conga<br />
Low Conga<br />
High Timbale<br />
Low Timbale<br />
High Agogo<br />
Low Agogo<br />
Cabasa<br />
Maracas<br />
Short Whistle<br />
Long Whistle<br />
Short Guiro<br />
Long Guiro<br />
Claves<br />
Hi Wood Block<br />
Low Wood Block<br />
Mute Cuica<br />
Open Cuica<br />
Mute Triangle<br />
Open Triangle<br />
Cabasa<br />
Shaker<br />
Belltree<br />
Castanets<br />
Mute Surdo<br />
Open Surdo<br />
Room (8)<br />
Power (16)<br />
P-2: Room<br />
P-3: Power<br />
High Q<br />
High Q<br />
Slap<br />
Slap<br />
Scratch Push Scratch Push<br />
Scratch Pull<br />
Scratch Pull<br />
Stick<br />
Stick<br />
Square Click<br />
Square Click<br />
Metronome Click Metronome Click<br />
Metronome Bell Metronome Bell<br />
Kick Drum 2<br />
Kick Drum 2<br />
Kick Drum 1<br />
Power Kick Drum<br />
Side Stick<br />
Side Stick<br />
Snare Drum 2 Power Snare Drum 2<br />
Hand Clap<br />
Hand Clap<br />
Snare Drum 1 Power Snare Drum 1<br />
Room Low Floor Tom 2 Low Floor Tom 2<br />
Close Hi-hat<br />
Close Hi-hat<br />
Room Low Floor Tom 1 Low Floor Tom 1<br />
Pedal Hi-hat<br />
Pedal Hi-hat<br />
Room Low Tom Low Tom<br />
Open Hi-hat<br />
Open Hi-hat<br />
Room Low-mid Tom Low-mid Tom<br />
Hi-mid Tom<br />
Hi-mid Tom<br />
Crash Cymbal 1 Crash Cymbal 1<br />
R High Tom<br />
High Tom<br />
Ride Cymbal 1 Ride Cymbal 1<br />
Chinese Cymbal Chinese Cymbal<br />
Ride Bell<br />
Ride Bell<br />
Tambourine<br />
Tambourine<br />
Splash Cymbal Splash Cymbal<br />
Cowbell<br />
Cowbell<br />
Crash Cymbal 2 Crash Cymbal 2<br />
Vibra Slap<br />
Vibra Slap<br />
Ride Cymbal 2 Ride Cymbal 2<br />
Hi Bongo<br />
Hi Bongo<br />
Low Bongo<br />
Low Bongo<br />
Mute Conga<br />
Mute Conga<br />
Hi Conga<br />
Hi Conga<br />
Low Conga<br />
Low Conga<br />
High Timbale<br />
High Timbale<br />
Low Timbale<br />
Low Timbale<br />
High Agogo<br />
High Agogo<br />
Low Agogo<br />
Low Agogo<br />
Cabasa<br />
Cabasa<br />
Maracas<br />
Maracas<br />
Short Whistle<br />
Short Whistle<br />
Long Whistle<br />
Long Whistle<br />
Short Guiro<br />
Short Guiro<br />
Long Guiro<br />
Long Guiro<br />
Claves<br />
Claves<br />
Hi Wood Block Hi Wood Block<br />
Low Wood Block Low Wood Block<br />
Mute Cuica<br />
Mute Cuica<br />
Open Cuica<br />
Open Cuica<br />
Mute Triangle Mute Triangle<br />
Open Triangle Open Triangle<br />
Cabasa<br />
Cabasa<br />
Shaker<br />
Shaker<br />
Belltree<br />
Belltree<br />
Castanets<br />
Castanets<br />
Mute Surdo<br />
Mute Surdo<br />
Open Surdo<br />
Open Surdo<br />
Electronic (24)<br />
P-4: Electronic<br />
High Q<br />
Slap<br />
Scratch Push<br />
Scratch Pull<br />
Stick<br />
Square Click<br />
Metronome Click<br />
Metronome Bell<br />
Kick Drum 2<br />
Elec Kick Drum<br />
Side Stick<br />
Elec Snare Drum 2<br />
Hand Clap<br />
Power Snare Drum 1<br />
Elec Low Floor Tom 2<br />
Close Hi-hat<br />
Elec Low Floor Tom 1<br />
Pedal Hi-hat<br />
Elec Low Tom<br />
Open Hi-hat<br />
Elec Low-mid Tom<br />
Elec Hi-mid Tom<br />
Crash Cymbal 1<br />
Elec High Tom<br />
Ride Cymbal 1<br />
Reverse Cymbal<br />
Ride Bell<br />
Tambourine<br />
Splash Cymbal<br />
Cowbell<br />
Crash Cymbal 2<br />
Vibra Slap<br />
Ride Cymbal 2<br />
Hi Bongo<br />
Low Bongo<br />
Mute Conga<br />
Hi Conga<br />
Low Conga<br />
High Timbale<br />
Low Timbale<br />
High Agogo<br />
Low Agogo<br />
Cabasa<br />
Maracas<br />
Short Whistle<br />
Long Whistle<br />
Short Guiro<br />
Long Guiro<br />
Claves<br />
Hi Wood Block<br />
Low Wood Block<br />
Mute Cuica<br />
Open Cuica<br />
Mute Triangle<br />
Open Triangle<br />
Cabasa<br />
Shaker<br />
Belltree<br />
Castanets<br />
Mute Surdo<br />
Open Surdo<br />
TR-808 (25)<br />
P-5: TR-808<br />
High Q<br />
Slap<br />
Scratch Push<br />
Scratch Pull<br />
Stick<br />
Square Click<br />
Metronome Click<br />
Metronome Bell<br />
Kick Drum 2<br />
Synth Kick Drum 1<br />
Synth Side Stick<br />
Synth Snare Drum<br />
Hand Clap<br />
Snare Drum 1<br />
Synth Low Floor Tom 2<br />
Synth Close Hi-hat<br />
Synth Low Floor Tom 1<br />
Synth Pedal Hi-hat<br />
Synth Low Tom<br />
Synth Open Hi-hat<br />
Synth Low-mid Tom<br />
Synth Hi-mid Tom<br />
Synth Crash Cymbal 1<br />
Synth High Tom<br />
Ride Cymbal 1<br />
Chinese Cymbal<br />
Ride Bell<br />
Tambourine<br />
Splash Cymbal<br />
Cowbell<br />
Crash Cymbal 2<br />
Vibra Slap<br />
Ride Cymbal 2<br />
Hi Bongo<br />
Low Bongo<br />
Mute Conga<br />
Hi Conga<br />
Low Conga<br />
High Timbale<br />
Low Timbale<br />
High Agogo<br />
Low Agogo<br />
Cabasa<br />
Maracas<br />
Short Whistle<br />
Long Whistle<br />
Short Guiro<br />
Long Guiro<br />
Claves<br />
Hi Wood Block<br />
Low Wood Block<br />
Mute Cuica<br />
Open Cuica<br />
Mute Triangle<br />
Open Triangle<br />
Cabasa<br />
Shaker<br />
Belltree<br />
Castanets<br />
Mute Surdo<br />
Open Surdo
DRUM KIT LIST-2<br />
No.-Key<br />
27-E b 1<br />
28-E1<br />
29-F1<br />
30-F#1<br />
31-G1<br />
32-G#1<br />
33-A1<br />
34-B b 1<br />
35-B1<br />
36-C2<br />
37-C#2<br />
38-D2<br />
39-E b 2<br />
40-E2<br />
41-F2<br />
42-F#2<br />
43-G2<br />
44-G#2<br />
45-A2<br />
46-B b 2<br />
47-B2<br />
48-C3<br />
49-C#3<br />
50-D3<br />
51-E b 3<br />
52-E3<br />
53-F3<br />
54-F#3<br />
55-G3<br />
56-G#3<br />
57-A3<br />
58-B b 3<br />
59-B3<br />
60-C4<br />
61-C#4<br />
62-D4<br />
63-E b 4<br />
64-E4<br />
65-F4<br />
66-F#4<br />
67-G4<br />
68-G#4<br />
69-A4<br />
70-B b 4<br />
71-B4<br />
72-C5<br />
73-C#5<br />
74-D5<br />
75-E b 5<br />
76-E5<br />
77-F5<br />
78-F#5<br />
79-G5<br />
80-G#5<br />
81-A5<br />
82-B b 5<br />
83-B5<br />
84-C6<br />
85-C#6<br />
86-D6<br />
87-E b 6<br />
88-E6<br />
89-F6<br />
90-F#6<br />
91-G6<br />
92-G#6<br />
93-A6<br />
94-B b 6<br />
95-B6<br />
96-C7<br />
Jazz (32)<br />
P-6: Jazz<br />
High Q<br />
Slap<br />
Scratch Push<br />
Scratch Pull<br />
Stick<br />
Square Click<br />
Metronome Click<br />
Metronome Bell<br />
Jazz Bass Drum<br />
70 Bass Drum 1<br />
Side Stick<br />
Snare Drum 2<br />
Hand Clap<br />
Snare Drum 1<br />
Low Floor Tom 2<br />
Close Hi-hat<br />
Low Floor Tom 1<br />
Pedal Hi-hat<br />
Low Tom<br />
Open Hi-hat<br />
Low-mid Tom<br />
Hi-mid Tom<br />
Crash Cymbal 1<br />
High Tom<br />
Ride Cymbal 1<br />
Chinese Cymbal<br />
Ride Bell<br />
Tambourine<br />
Splash Cymbal<br />
Cowbell<br />
Crash Cymbal 2<br />
Vibra Slap<br />
Ride Cymbal 2<br />
Hi Bongo<br />
Low Bongo<br />
Mute Conga<br />
Hi Conga<br />
Low Conga<br />
High Timbale<br />
Low Timbale<br />
High Agogo<br />
Low Agogo<br />
Cabasa<br />
Maracas<br />
Short Whistle<br />
Long Whistle<br />
Short Guiro<br />
Long Guiro<br />
Claves<br />
Hi Wood Block<br />
Low Wood Block<br />
Mute Cuica<br />
Open Cuica<br />
Mute Triangle<br />
Open Triangle<br />
Cabasa<br />
Shaker<br />
Belltree<br />
Castanets<br />
Mute Surdo<br />
Open Surdo<br />
Brush (40)<br />
P-7: Brush<br />
High Q<br />
Slap<br />
Scratch Push<br />
Scratch Pull<br />
Stick<br />
Square Click<br />
Metronome Click<br />
Metronome Bell<br />
Jazz Bass Drum<br />
70 Bass Drum<br />
Side Stick<br />
Brush Tap<br />
Brush Slap<br />
Brush Swirl<br />
Low Floor Tom 2<br />
Close Hi-hat<br />
Low Floor Tom 1<br />
Pedal Hi-hat<br />
Low Tom<br />
Open Hi-hat<br />
Low-mid Tom<br />
Hi-mid Tom<br />
Crash Cymbal 1<br />
High Tom<br />
Ride Cymbal 1<br />
Chinese Cymbal<br />
Ride Bell<br />
Tambourine<br />
Splash Cymbal<br />
Cowbell<br />
Crash Cymbal 2<br />
Vibra Slap<br />
Ride Cymbal 2<br />
Hi Bongo<br />
Low Bongo<br />
Mute Conga<br />
Hi Conga<br />
Low Conga<br />
High Timbale<br />
Low Timbale<br />
High Agogo<br />
Low Agogo<br />
Cabasa<br />
Maracas<br />
Short Whistle<br />
Long Whistle<br />
Short Guiro<br />
Long Guiro<br />
Claves<br />
Hi Wood Block<br />
Low Wood Block<br />
Mute Cuica<br />
Open Cuica<br />
Mute Triangle<br />
Open Triangle<br />
Cabasa<br />
Shaker<br />
Belltree<br />
Castanets<br />
Mute Surdo<br />
Open Surdo<br />
Orchestra (48)<br />
P-8: Orchestra<br />
Close Hi-hat<br />
Pedal Hi-hat<br />
Open Hi-ha<br />
Ride Cymbal<br />
Stick<br />
Square Click<br />
Metronome Click<br />
Metronome Bell<br />
Orche Bass Drum 2<br />
Orche Bass Drum 1<br />
Side Stick<br />
Orche Snare Drum 2<br />
Casstanets<br />
Orche Snare Drum 1<br />
Timpani F<br />
Timpani F#<br />
Timpani G<br />
Timpani G#<br />
Timpani A<br />
Timpani A#<br />
Timpani B<br />
Timpani C<br />
Timpani C#<br />
Timpani D<br />
Timpani D#<br />
Timpani E<br />
Timpani F<br />
Tambourine<br />
Splash Cymbal<br />
Cowbell<br />
Orche Crash Cymbal<br />
Vibra Slap<br />
Orche Cymbal<br />
Hi Bongo<br />
Low Bongo<br />
Mute Conga<br />
Hi Conga<br />
Low Conga<br />
High Timbale<br />
Low Timbale<br />
High Agogo<br />
Low Agogo<br />
Cabasa<br />
Maracas<br />
Short Whistle<br />
Long Whistle<br />
Short Guiro<br />
Long Guiro<br />
Claves<br />
Hi Wood Block<br />
Low Wood Block<br />
Mute Cuica<br />
Open Cuica<br />
Mute Triangle<br />
Open Triangle<br />
Cabasa<br />
Shaker<br />
Belltree<br />
Castanets<br />
Mute Surdo<br />
Open Surdo<br />
Chinese (58)<br />
P-9: Chinese<br />
High Q<br />
Slap<br />
Scratch Push<br />
Scratch Pull<br />
Stick<br />
Square Click<br />
Metronome Click<br />
Metronome Bell<br />
Jazz Bass Drum<br />
70 Bass Drum 1<br />
Side Stick<br />
Snare Drum 2<br />
Hand Clap<br />
Snare Drum 1<br />
Low Floor Tom 2<br />
Close Hi-hat<br />
Low Floor Tom 1<br />
Pedal Hi-hat<br />
Low Tom<br />
Open Hi-hat<br />
Low-mid Tom<br />
Hi-mid Tom<br />
Crash Cymbal 1<br />
High Tom<br />
Ride Cymbal 1<br />
Chinese Cymbal<br />
Ride Bell<br />
Tambourine<br />
Splash Cymbal<br />
Cowbell<br />
Crash Cymbal 2<br />
Vibra Slap<br />
Ride Cymbal 2<br />
Hi Bongo<br />
Low Bongo<br />
Mute Conga<br />
Hi Conga<br />
Low Conga<br />
High Timbale<br />
Low Timbale<br />
High Agogo<br />
Low Agogo<br />
Cabasa<br />
Maracas<br />
Short Whistle<br />
Long Whistle<br />
Short Guiro<br />
Long Guiro<br />
Claves<br />
Hi Wood Block<br />
Low Wood Block<br />
Mute Cuica<br />
Open Cuica<br />
Mute Triangle<br />
Open Triangle<br />
Chi<br />
Da<br />
Gong<br />
Xiao cha 1<br />
Dagu<br />
Xiao cha mute 1<br />
Hey<br />
Pai gu Low<br />
Xiao cha 2<br />
Pai gu Mid<br />
Xiao cha mute 2<br />
Pai gu Hi<br />
Jing Luo mute<br />
Jing Luo<br />
Xiao Luo<br />
Effects (56)<br />
P-10: SFX<br />
High-Q<br />
Slap<br />
Scratch Push<br />
Scratch Pull<br />
Stick<br />
Square Click<br />
Metronome Click<br />
Metronome Bell<br />
Gtr. Cut Noise1 (down)<br />
Gtr. Cut Noise2 (up)<br />
Bass Slap<br />
Bass Pick<br />
Key Click<br />
Laughing<br />
Screaming<br />
Punch<br />
Heart Beat<br />
Footstep 1<br />
Footstep 2<br />
Applause<br />
Door Creaking<br />
Door Closing<br />
Scratch<br />
Wind Chime<br />
Car Engine Starting<br />
Car stop<br />
Car Pass<br />
Car Crash<br />
Siren<br />
Train<br />
Jet Plane<br />
Helicopter<br />
Starship<br />
Gun Shot<br />
Machingun<br />
Laser Gun<br />
Explosion<br />
Dog<br />
Horse Gallop<br />
Birds<br />
Rain<br />
Thunder<br />
Wind<br />
Sea Shore<br />
Stream<br />
Bubble<br />
63
64<br />
DRUM KIT LIST<br />
Please Note: For the drum kit lists on the previous two pages, in<br />
the first title row, the number in the bracket, after the kit<br />
name, is the MIDI program number. The Drum kits name<br />
and number that are shown on the LCD display are listed in<br />
the second title row.<br />
The “No.” refers to MIDI note number, and “Key” refers to the<br />
key on the keyboard.<br />
Keys from A1 to D2 sound as timpani, except for in Kit 10, the<br />
effects kit.<br />
Keys from E6 to C7 sound the same as the D#1 to B2 keys,<br />
except for Kit 9, the Chinese kit.<br />
A list of the sounds of E6 to C7 for Kit 9, Chinese kit are listed<br />
below.<br />
KIT 9 COMPLEMENT<br />
No. - Key Sound<br />
88-E5 Drum + Hey!<br />
89-F5 Low Pai Gu<br />
90-F#5 Small Cymbal<br />
91-G5 Mid Pai Gu<br />
92-G#5 Mute Small Cymbal<br />
93-A5 High Pai Gu<br />
94-Bb5 Mute Jing Gong<br />
95-B5 Jing Gong<br />
96-C6 Small Gong
PEDALS<br />
PIANO PEDALS<br />
1 2<br />
3<br />
1. SOFT PEDAL - When the left pedal is engaged the <strong>piano</strong> volume is reduced<br />
and the timbre slightly altered on the notes that are played.<br />
2. FUNCTION PEDAL - This center pedal can be used to trigger various events,<br />
such as start/stop and Fill In. Pedal functions are assigned in the<br />
setup menu, “Pedal Assign”. Please see the Setup section of this<br />
manual for more information.<br />
3. SUSTAIN PEDAL - When the right pedal is engaged the <strong>piano</strong> keys will<br />
continue to sustain as they are played. Thereby the <strong>piano</strong> note will decay<br />
gradually) as if you were continuing to hold down the <strong>piano</strong> keys.<br />
65
66<br />
SPECIFICATIONS<br />
KEYBOARD<br />
88-note, Graded hammer-action keyboard<br />
MAX. POLYPHONY WITH SOUND EFFECTS: 64<br />
VOICES<br />
138 Voices<br />
(Including ten Asian folk instrument voices)<br />
5 quick select voice buttons + A/B select<br />
VOICE MODE<br />
Layer (dual) voice<br />
Lower (split) voice<br />
VOICE EFFECTS<br />
Reverb<br />
Chorus<br />
NUMERIC PAD: 12<br />
DISPLAY: 16-Character LCD<br />
REGISTRATION MEMORY: 9<br />
DEMONSTRATION: 13 songs,<br />
RECORDING: Four songs, 3 track recording<br />
OVERALL CONTROL<br />
Transpose<br />
Tempo<br />
Main Volume Control: Min-Max<br />
Accomp Volume Control: Min-Max<br />
Setup<br />
AUTO BASS CHORD MODE<br />
Single<br />
Fingered<br />
Piano<br />
Off<br />
AUTO ACCOMPANIMENT STYLE<br />
100 Auto accompaniment styles<br />
5 quick select style buttons + A/B select<br />
ACCOMPANIMENT CONTROL<br />
Sync start<br />
Start/Stop<br />
Introduction<br />
Ending<br />
Fill-In<br />
Variation<br />
Metronome<br />
Auto harmony (four types)<br />
PLAY ALONG SONGS<br />
50 songs<br />
Right hand, left hand or both hands performance<br />
Vocal grading<br />
FUNCTION<br />
Equalization<br />
Reverb Type & level<br />
Chorus Type & level<br />
Touch Sensitivity<br />
Split point for voice<br />
Split point for auto accompaniment<br />
Master Tune<br />
Drum kit selection<br />
Harmony type selection<br />
Local Off<br />
Vocal Grading<br />
Factory setting<br />
EXTERNAL MEMORY<br />
SD Card<br />
CONNECTIONS<br />
iPod Docking Station<br />
Headphone x 2<br />
Line Out<br />
Line In<br />
Power In<br />
MIDI In/Out<br />
USB<br />
Microphone In<br />
PEDALS<br />
Sustain Pedal<br />
Sustenuto Pedal<br />
Soft Pedal<br />
AMPLIFIER: 60W x 2<br />
DIMENSIONS<br />
1406mm x 717mm x 900mm
GDP-<strong>8820</strong> DIGITAL PIANO<br />
OWNER’S MANUAL
