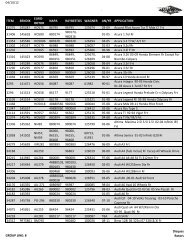
Front axle nut torque - Torque Specification Guide
Front axle nut torque - Torque Specification Guide
Front axle nut torque - Torque Specification Guide

Create successful ePaper yourself
Turn your PDF publications into a flip-book with our unique Google optimized e-Paper software.
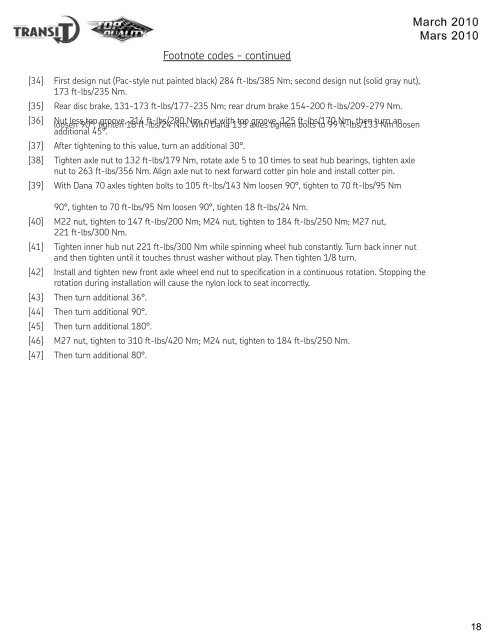
Footnote codes - continued<br />
[34] First design <strong>nut</strong> (Pac-style <strong>nut</strong> painted black) 284 ft-lbs/385 Nm; second design <strong>nut</strong> (solid gray <strong>nut</strong>),<br />
173 ft-lbs/235 Nm.<br />
[35] Rear disc brake, 131-173 ft-lbs/177-235 Nm; rear drum brake 154-200 ft-lbs/209-279 Nm.<br />
[36] Nut<br />
loosen<br />
less<br />
90°,<br />
top<br />
tighten<br />
groove,<br />
18<br />
214<br />
ft-lbs/24<br />
ft-lbs/290<br />
Nm.<br />
Nm;<br />
With<br />
<strong>nut</strong><br />
Dana<br />
with<br />
135<br />
top<br />
<strong>axle</strong>s<br />
groove,<br />
tighten<br />
125 ft-lbs/170<br />
bolts to 99<br />
Nm,<br />
ft-lbs/133<br />
then turn<br />
Nm<br />
an<br />
loosen<br />
additional 45°.<br />
[37] After tightening to this value, turn an additional 30°.<br />
[38] Tighten <strong>axle</strong> <strong>nut</strong> to 132 ft-lbs/179 Nm, rotate <strong>axle</strong> 5 to 10 times to seat hub bearings, tighten <strong>axle</strong><br />
<strong>nut</strong> to 263 ft-lbs/356 Nm. Align <strong>axle</strong> <strong>nut</strong> to next forward cotter pin hole and install cotter pin.<br />
[39] With Dana 70 <strong>axle</strong>s tighten bolts to 105 ft-lbs/143 Nm loosen 90°, tighten to 70 ft-lbs/95 Nm<br />
90°, tighten to 70 ft-lbs/95 Nm loosen 90°, tighten 18 ft-lbs/24 Nm.<br />
[40] M22 <strong>nut</strong>, tighten to 147 ft-lbs/200 Nm; M24 <strong>nut</strong>, tighten to 184 ft-lbs/250 Nm; M27 <strong>nut</strong>,<br />
221 ft-lbs/300 Nm.<br />
[41] Tighten inner hub <strong>nut</strong> 221 ft-lbs/300 Nm while spinning wheel hub constantly. Turn back inner <strong>nut</strong><br />
and then tighten until it touches thrust washer without play. Then tighten 1/8 turn.<br />
[42] Install and tighten new front <strong>axle</strong> wheel end <strong>nut</strong> to specification in a continuous rotation. Stopping the<br />
rotation during installation will cause the nylon lock to seat incorrectly.<br />
[43] Then turn additional 36°.<br />
[44] Then turn additional 90°.<br />
[45] Then turn additional 180°.<br />
[46] M27 <strong>nut</strong>, tighten to 310 ft-lbs/420 Nm; M24 <strong>nut</strong>, tighten to 184 ft-lbs/250 Nm.<br />
[47] Then turn additional 80°.<br />
18