OM, HUSQVARNA, YTH20K46, 2011-02, 532441748, NAen ...
OM, HUSQVARNA, YTH20K46, 2011-02, 532441748, NAen ...
OM, HUSQVARNA, YTH20K46, 2011-02, 532441748, NAen ...

You also want an ePaper? Increase the reach of your titles
YUMPU automatically turns print PDFs into web optimized ePapers that Google loves.
SERVICE AND ADJUSTMENTS<br />
TO REPLACE MOWER BLADE DRIVE BELT<br />
(See Fig. 30)<br />
The mower blade drive belt may be replaced without tools.<br />
Park the tractor on level surface. Engage parking brake.<br />
BELT REMOVAL -<br />
• Remove mower from tractor (See “TO REMOVE<br />
MOW ER” in this section of manual).<br />
• Work belt off both mandrel pulleys and idler pulleys.<br />
• Pull belt away from mower.<br />
BELT INSTALLATION -<br />
• Work belt around both mandrel pulleys and idler pulleys.<br />
• Make sure belt is in all pulley grooves and in side all<br />
belt guides.<br />
• Install mower (See "To Install Mower" in this section<br />
of manual).<br />
MANDREL<br />
PULLEY<br />
IDLER<br />
PUL LEYS<br />
Fig. 30<br />
MANDREL<br />
PULLEY<br />
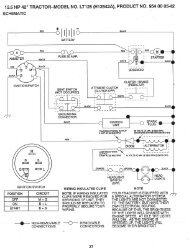
TO CHECK BRAKE<br />
If tractor requires more than five (5) feet to stop at highest<br />
speed in high est gear on a level, dry concrete or paved<br />
surface, then brake must be serviced.<br />
You may also check brake by:<br />
• Park tractor on a level, dry concrete or paved surface,<br />
depress brake pedal all the way down and engage<br />
parking brake.<br />
• Disengage transmission by placing freewheel control<br />
in “transmission disengaged” position. Pull freewheel<br />
control out and into the slot and release so it is held in<br />
the disengaged position.<br />
The rear wheels must lock and skid when you try to manually<br />
push the tractor forward. If the rear wheels rotate,<br />
then the brake needs to be serviced. Contact a qualified<br />
service center.<br />
21<br />
TO REPLACE MOTION DRIVE BELT<br />
(See Fig. 31)<br />
Park the tractor on level surface. En gage parking brake.<br />
For as sis tance, there is a belt installation guide decal on<br />
bottom side of left footrest.<br />
BELT REMOVAL -<br />
1. Remove mower (See “TO REMOVE MOWER” section<br />
in this manual).<br />
NOTE: Observe entire motion drive belt and position of all<br />
belt guides and keepers.<br />
2. Remove belt from stationary idler (A) and clutching<br />
idler (B).<br />
3. Remove belt from centerspan idler (C).<br />
4. Pull belt slack toward rear of trac tor. Remove belt<br />
up wards from trans axle input pulley (D).<br />
5. Remove belt downward from engine pulley (E).<br />
6. Slide belt toward rear of tractor, off the steering plate<br />
(F) and remove from tractor.<br />
BELT INSTALLATION -<br />
1. Install new belt from tractor rear to front, over the steering<br />
plate (F) and above clutch brake pedal shaft (G).<br />
2. Pull belt toward front of tractor and roll belt onto engine<br />
pulley (E).<br />
3. Pull belt toward rear of tractor. Carefully work belt down<br />
around transaxle input pulley (D). Be sure belt is inside<br />
the belt keeper.<br />
4. Install belt on centerspan idler (C).<br />
5. Install belt through stationary idler (A) and clutch ing<br />
idler (B).<br />
6. Make sure belt is in all pulley grooves and in side all<br />
belt guides and keep ers.<br />
7. Install mower (See “TO INSTALL MOWER” section in<br />
this manual).<br />
D<br />
A<br />
B<br />
C<br />
Fig. 31<br />
<strong>02</strong>952<br />
E<br />
F<br />
G